Page 1 of 27
NAVIGATION SYSTEM
WITH ENTUNE
QUICK REFERENCE GUIDE
CUSTOMER EXPERIENCE CENTER
1- 8 0 0 - 3 31- 4 3 31
00505-NAV13-AVAPrinted in U.S.A. 10/1212-TCS-05911
2013
AVALON
Page 2 of 27

1
TABLE OF CONTENTS
OVERVIEW 2
Limitations of the Quick Reference Guide 2
Basic Operation 2
CONNECT A BLUETOOTH PHONE 3
CALLING BY VOICE RECOGNITION 4
Dial by Number 4
Dial by Name 5
DESTINATION INPUT 6
By Address 6
Note on Voice Recognition 8
Tips for Using Voice Recognition 8
By Address - Voice Recognition 8
DESTINATION INPUT - POINT OF INTEREST (POI) 10
Point of Interest by Name 10
Point of Interest by Category 11
Point of Interest by Category - Voice Recognition 12
SET HOME 13
ADDITIONAL NAVIGATION FEATURES 15
Operation of Emergency Screen 15
Search Area 15
Route Preferences 15
3 Routes 15
Screen Configurations 15
Beep Setting 16
Voice Volume 16
Language 16
System Time 16
Auto Screen Change 16
Estimated Distance and Time 16
NAVTRAFFIC 17
Show Navtraffic Information 17
Automatically Avoid Traffic 18
Traffic Incident Warning 18
Show Free Flowing Traffic 19
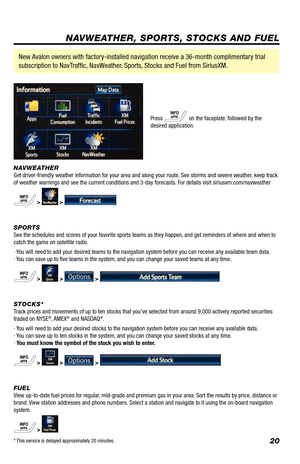
NAVWEATHER, SPORTS, STOCKS AND FUEL 20
ENTUNE™ - INTRODUCTION 21
What is Entune? 21
Entune 21
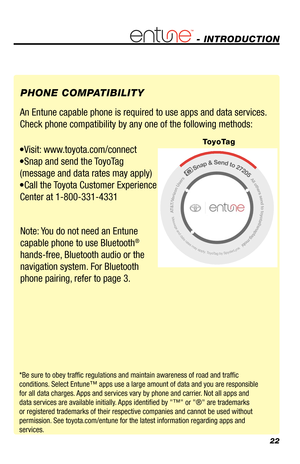
Phone Compatibility 22
ENTUNE - HOW TO GET STARTED 23
Basic Overview 23
ENTUNE - NEW CUSTOMER REGISTRATION 24
Account Creation 24
Downloading Entune App to Your Phone 24
Launch App 24
Connect Phone 24
Accessing Entune Apps 24
Page 3 of 27
. The Quick
Reference Guide is")
2
The Quick Reference Guide is designed to provide information on the basic operation and
key features of the navigation system and Entune
™ (apps and data services). The Quick
Reference Guide is not intended as a substitute for the Navigation Owner’s Manual. We strongly
encourage you to review the Navigation Owner’s Manual, the quick reference guide and visit
www.toyota.com/entune so you will have a better understanding of all your v\
ehicles features and
controls.
OVERVIEW
ZOOM IN/ZOOM OUT Icons
Touch to magnify or reduce the map
scale.
MAP/VOICE Button
Repeat the last voice guidance prompt,
cancel the map scrolling feature, or
display the current position.
DESTINATION Button
Input the destination by one of several
methods.
SETUP Button
Adjust preferences for general settings,
voice, navigation, vehicle maintenance,
phone, bluetooth and audio. INFO/APPS Button
Access apps, fuel consumption, traffic,
fuel prices, sports, stocks, weather and
map data.
CURRENT VEHICLE POSITION Mark
Indicates the current position of the
vehicle and its directional heading.
NORTH-UP OR COMPASS MODE Icon
Touch to change the map display between
North-up or Head-up perspectives.1
2
3
4
5
6
7
23
5476
1
LIMITATIONS OF THE QUICK REFERENCE GUIDE
BASIC OPERATION
Page 4 of 27
3
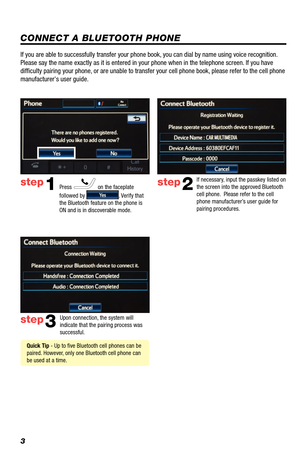
CONNECT A BLUETOOTH PHONE
Press on the faceplate
followed by
. Verify that
the Bluetooth feature on the phone is
ON and is in discoverable mode.
step2
step3
step1
If necessary, input the passkey listed on
the screen into the approved Bluetooth
cell phone. Please refer to the cell
phone manufacturer’s user guide for
pairing procedures.
Upon connection, the system will
indicate that the pairing process was
successful.
Quick Tip - Up to five Bluetooth cell phones can be
paired. However, only one Bluetooth cell phone can
be used at a time.
If you are able to successfully transfer your phone book, you can dial by name using voice recognition.
Please say the name exactly as it is entered in your phone when in the t\
elephone screen. If you have
difficulty pairing your phone, or are unable to transfer your cell phone book, please refer to the cell phone
manufacturer's user guide.
Page 5 of 27
4
CALLING BY VOICE RECOGNITION
After the beep say, “Dial .”
Say the phone number digits
individually, without pausing (e.g. “Dial
Three, one, zero, four…”).step2
step3
Press on the steering wheel. After
the beep say, “Use the Phone.”step1
After the beep, say “Dial” or press
on the steering wheel. Call is active when is
indicated. To end call, press
on the screen or
on the steering
wheel.
step4
Quick Tip - It is recommended that you reduce
background noise prior to using the Voice
Recognition system. Conversation, high fan speed,
wind noise (open windows), etc., may prevent the
voice recognition system from understanding your
commands.
Quick Tip - If you know your next command, you
can press
at any time to interrupt the prompt.
Speak your command after the beep.
Some Bluetooth® equipped cell
phones may or may not show battery or signal strength
on the display. DIAL BY NUMBER
Quick Tip - You can skip Step 1 and say Dial
commands immediately from the Shortcut Menu.
Page 6 of 27
5
CALLING BY VOICE RECOGNITION
DIAL BY NAMEPress
on the steering wheel. After
the beep say, “Use the Phone.”step1
Quick Tip - If you know your next command, you
can press
at any time to interrupt the prompt.
Speak your command after the beep. After the beep say, “Call .”
Please say the name exactly as it is
entered in your phone.
step2
step3
After the beep, say “Dial” or press
on the steering wheel. step4Call is active when is
indicated. To end call, press
on the screen or
on the steering
wheel.
If you are able to successfully transfer your phone book, you can dial by name using voice recognition.
Please say the name exactly as it is entered in your phone when in the t\
elephone screen. If you have
difficulty pairing your phone, or are unable to transfer your cell phone book, please refer to the cell phone
manufacturer's user guide.
Quick Tip - You can skip Step 1 and say Dial
commands immediately from the Shortcut Menu.
Page 7 of 27
6
DESTINATION INPUT
BY ADDRESS
Press
on the faceplate
followed by
. Touch
and move to
step 4. To change State/Province, touch
and move to step 3.
Input the city name.
Touch the desired city name. Input the street name and touch
.
Select the desired State/Province.
step1step2
step3step4
step5step6
Quick Tip - Enter the street name without prefixes
such as North or the letter N. The system will display
the base street name without prefixes or suffixes on
the next screen.
Page 8 of 27
7
DESTINATION INPUT
BY ADDRESSTouch
. Input the house number and touch
.
Touch the desired street name.
Touch
followed by
.
step7step8
step9step10
Select the desired Route
Preferences and touch to
confirm selection. See page 15 for
route selection.
step11
Touch to start route
guidance. step12


.step2
step3
Press on t")


