2013 TOYOTA AURIS TOURING SPORTS tire type
[x] Cancel search: tire typePage 15 of 616
15Pictorial index
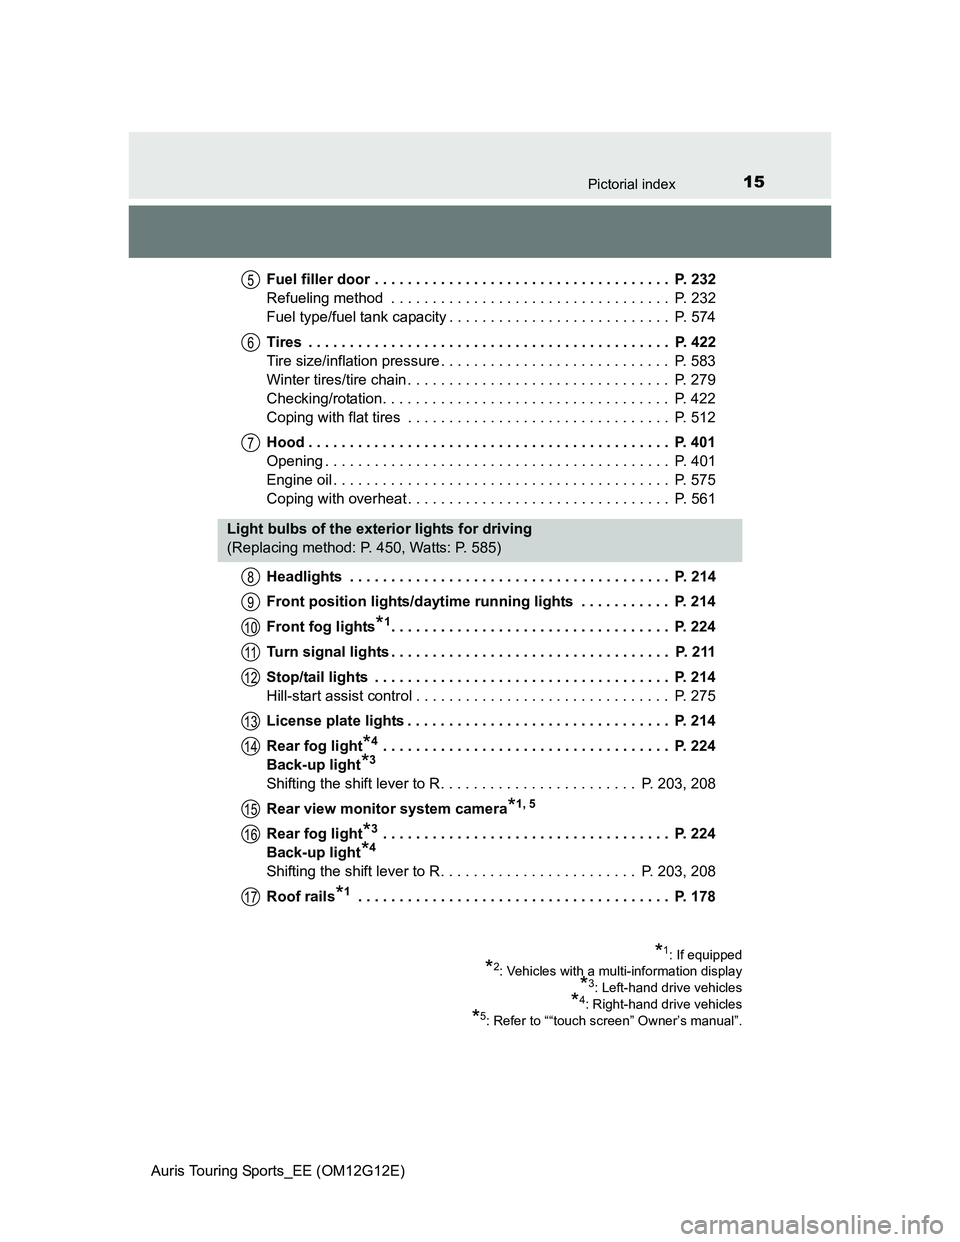
Auris Touring Sports_EE (OM12G12E)Fuel filler door . . . . . . . . . . . . . . . . . . . . . . . . . . . . . . . . . . . . P. 232
Refueling method . . . . . . . . . . . . . . . . . . . . . . . . . . . . . . . . . . P. 232
Fuel type/fuel tank capacity . . . . . . . . . . . . . . . . . . . . . . . . . . . P. 574
Tires . . . . . . . . . . . . . . . . . . . . . . . . . . . . . . . . . . . . . . . . . . . . P. 422
Tire size/inflation pressure . . . . . . . . . . . . . . . . . . . . . . . . . . . . P. 583
Winter tires/tire chain . . . . . . . . . . . . . . . . . . . . . . . . . . . . . . . . P. 279
Checking/rotation. . . . . . . . . . . . . . . . . . . . . . . . . . . . . . . . . . . P. 422
Coping with flat tires . . . . . . . . . . . . . . . . . . . . . . . . . . . . . . . . P. 512
Hood . . . . . . . . . . . . . . . . . . . . . . . . . . . . . . . . . . . . . . . . . . . . P. 401
Opening . . . . . . . . . . . . . . . . . . . . . . . . . . . . . . . . . . . . . . . . . . P. 401
Engine oil . . . . . . . . . . . . . . . . . . . . . . . . . . . . . . . . . . . . . . . . . P. 575
Coping with overheat . . . . . . . . . . . . . . . . . . . . . . . . . . . . . . . . P. 561
Headlights . . . . . . . . . . . . . . . . . . . . . . . . . . . . . . . . . . . . . . . P. 214
Front position lights/daytime running lights . . . . . . . . . . . P. 214
Front fog lights
*1. . . . . . . . . . . . . . . . . . . . . . . . . . . . . . . . . . P. 224
Turn signal lights . . . . . . . . . . . . . . . . . . . . . . . . . . . . . . . . . . P. 211
Stop/tail lights . . . . . . . . . . . . . . . . . . . . . . . . . . . . . . . . . . . . P. 214
Hill-start assist control . . . . . . . . . . . . . . . . . . . . . . . . . . . . . . . P. 275
License plate lights . . . . . . . . . . . . . . . . . . . . . . . . . . . . . . . . P. 214
Rear fog light
*4 . . . . . . . . . . . . . . . . . . . . . . . . . . . . . . . . . . . P. 224
Back-up light
*3
Shifting the shift lever to R. . . . . . . . . . . . . . . . . . . . . . . . P. 203, 208
Rear view monitor system camera
*1, 5
Rear fog light*3 . . . . . . . . . . . . . . . . . . . . . . . . . . . . . . . . . . . P. 224
Back-up light
*4
Shifting the shift lever to R. . . . . . . . . . . . . . . . . . . . . . . . P. 203, 208
Roof rails
*1 . . . . . . . . . . . . . . . . . . . . . . . . . . . . . . . . . . . . . . P. 178
5
6
7
Light bulbs of the exterior lights for driving
(Replacing method: P. 450, Watts: P. 585)
*1: If equipped
*2: Vehicles with a multi-information display
*3: Left-hand drive vehicles
*4: Right-hand drive vehicles
*5: Refer to ““touch screen” Owner’s manual”.
8
9
10
11
12
13
14
15
16
17
Page 281 of 616
2814-6. Driving tips
Auris Touring Sports_EE (OM12G12E)
4
Driving
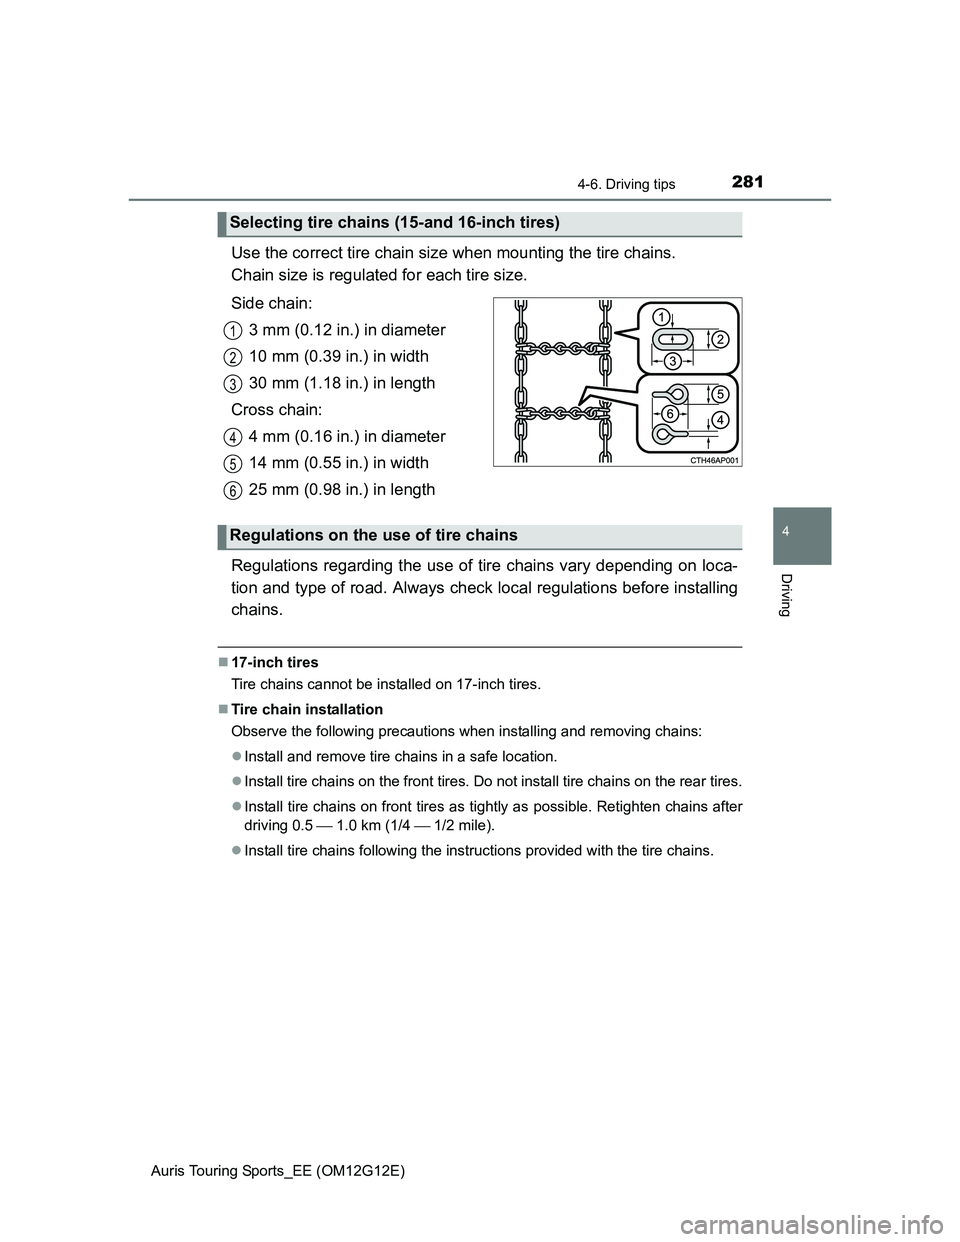
Use the correct tire chain size when mounting the tire chains.
Chain size is regulated for each tire size.
Side chain:
3 mm (0.12 in.) in diameter
10 mm (0.39 in.) in width
30 mm (1.18 in.) in length
Cross chain:
4 mm (0.16 in.) in diameter
14 mm (0.55 in.) in width
25 mm (0.98 in.) in length
Regulations regarding the use of tire chains vary depending on loca-
tion and type of road. Always check local regulations before installing
chains.
17-inch tires
Tire chains cannot be installed on 17-inch tires.
Tire chain installation
Observe the following precautions when installing and removing chains:
Install and remove tire chains in a safe location.
Install tire chains on the front tires. Do not install tire chains on the rear tires.
Install tire chains on front tires as tightly as possible. Retighten chains after
driving 0.5 1.0 km (1/4 1/2 mile).
Install tire chains following the instructions provided with the tire chains.
Selecting tire chains (15-and 16-inch tires)
1
2
3
4
5
6
Regulations on the use of tire chains
Page 426 of 616
4266-3. Do-it-yourself maintenance
Auris Touring Sports_EE (OM12G12E)
When replacing wheels, care should be taken to ensure that they are
equivalent to those removed in load capacity, diameter, rim width and
inset
*.
Replacement wheels are available at any authorized Toyota dealer or
repairer, or another duly qualified and equipped professional.
*: Conventionally referred to as “offset”.
Toyota does not recommend using the following:
Wheels of different sizes or types
Used wheels
Bent wheels that have been straightened
Use only Toyota wheel nuts and wrenches designed for use with
your aluminum wheels.
When rotating, repairing or changing your tires, check that the
wheel nuts are still tight after driving 1600 km (1000 miles).
Be careful not to damage the aluminum wheels when using tire
chains.
Use only Toyota genuine balance weights or equivalent and a plas-
tic or rubber hammer when balancing your wheels.
Wheels
If a wheel is bent, cracked or heavily corroded, it should be
replaced. Otherwise, the tire may separate from the wheel or
cause a loss of handling control.
Wheel selection
Aluminum wheel precautions (if equipped)
Page 528 of 616
5287-2. Steps to take in an emergency
Auris Touring Sports_EE (OM12G12E)
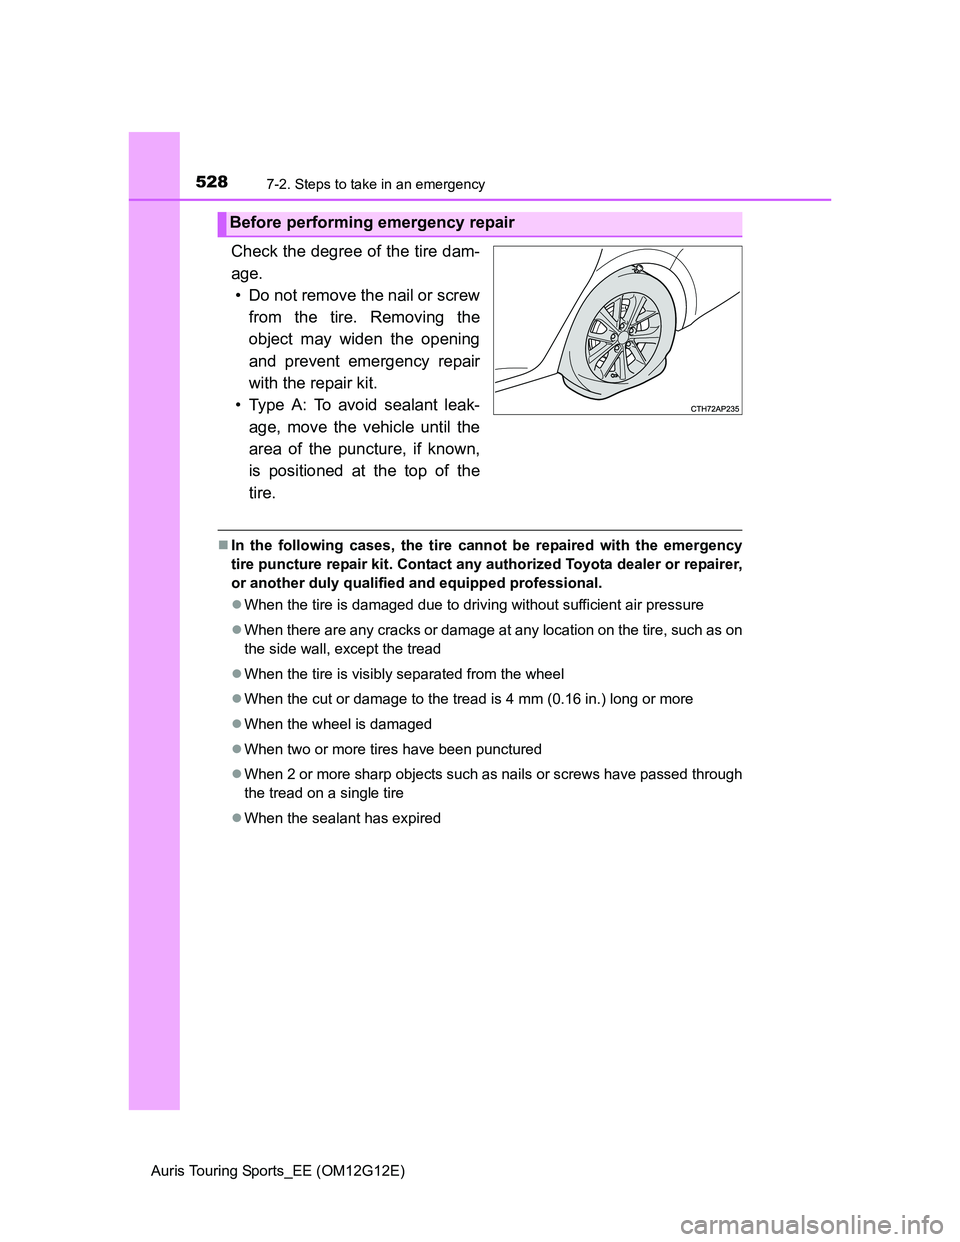
Check the degree of the tire dam-
age.
• Do not remove the nail or screw
from the tire. Removing the
object may widen the opening
and prevent emergency repair
with the repair kit.
• Type A: To avoid sealant leak-
age, move the vehicle until the
area of the puncture, if known,
is positioned at the top of the
tire.
In the following cases, the tire cannot be repaired with the emergency
tire puncture repair kit. Contact any authorized Toyota dealer or repairer,
or another duly qualified and equipped professional.
When the tire is damaged due to driving without sufficient air pressure
When there are any cracks or damage at any location on the tire, such as on
the side wall, except the tread
When the tire is visibly separated from the wheel
When the cut or damage to the tread is 4 mm (0.16 in.) long or more
When the wheel is damaged
When two or more tires have been punctured
When 2 or more sharp objects such as nails or screws have passed through
the tread on a single tire
When the sealant has expired
Before performing emergency repair
Page 529 of 616
5297-2. Steps to take in an emergency
Auris Touring Sports_EE (OM12G12E)
7
When trouble arises
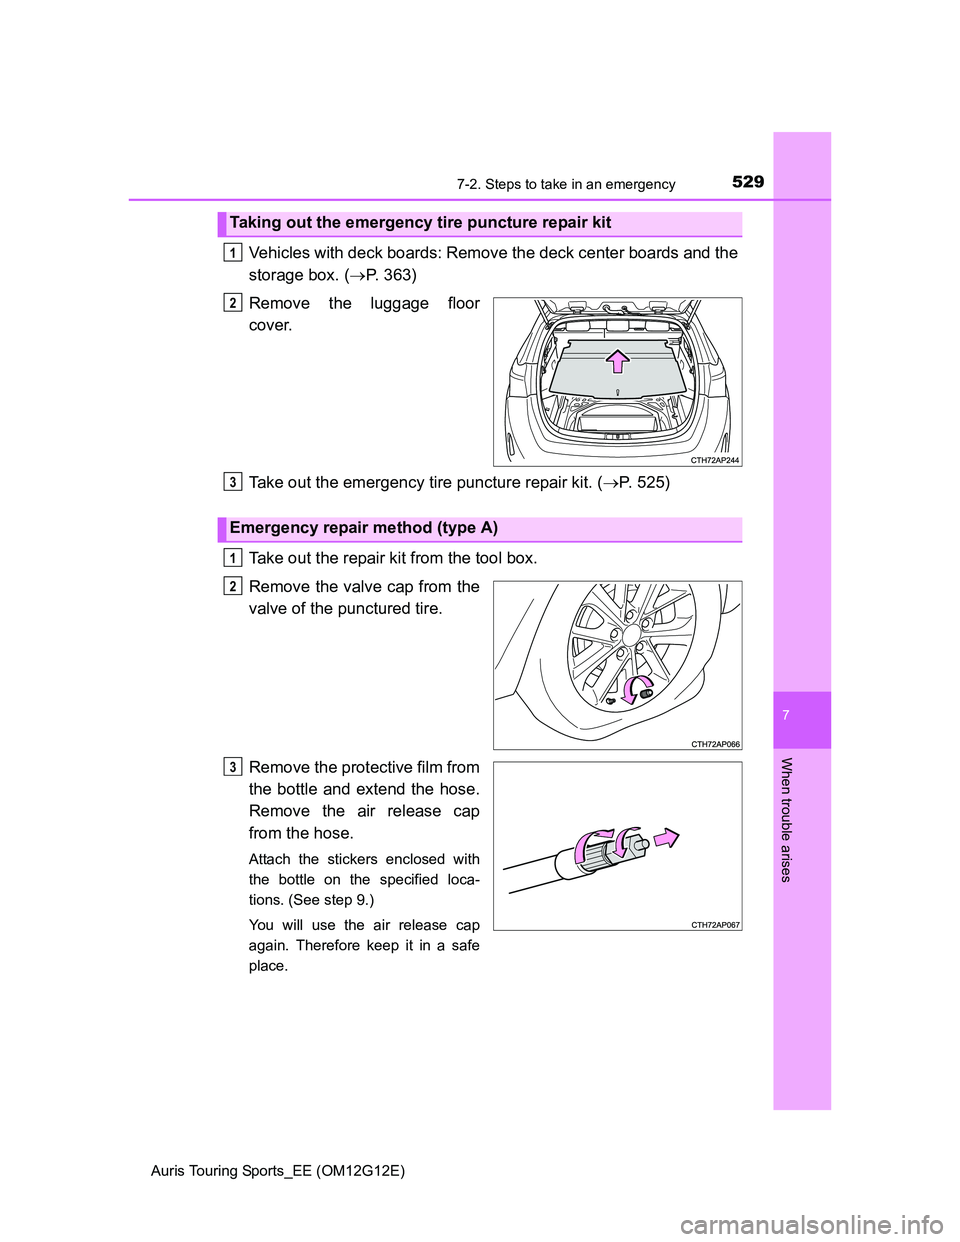
Vehicles with deck boards: Remove the deck center boards and the
storage box. (P. 363)
Remove the luggage floor
cover.
Take out the emergency tire puncture repair kit. (P. 525)
Take out the repair kit from the tool box.
Remove the valve cap from the
valve of the punctured tire.
Remove the protective film from
the bottle and extend the hose.
Remove the air release cap
from the hose.
Attach the stickers enclosed with
the bottle on the specified loca-
tions. (See step 9.)
You will use the air release cap
again. Therefore keep it in a safe
place.
Taking out the emergency tire puncture repair kit
1
2
Emergency repair method (type A)
3
1
2
3
Page 536 of 616
5367-2. Steps to take in an emergency
Auris Touring Sports_EE (OM12G12E)
Taking precautions to avoid sudden braking, sudden acceleration
and sharp turns, drive carefully at under 80 km/h (50 mph) to the
nearest authorized Toyota dealer or repairer, or another duly quali-
fied and equipped professional for tire repair or replacement.
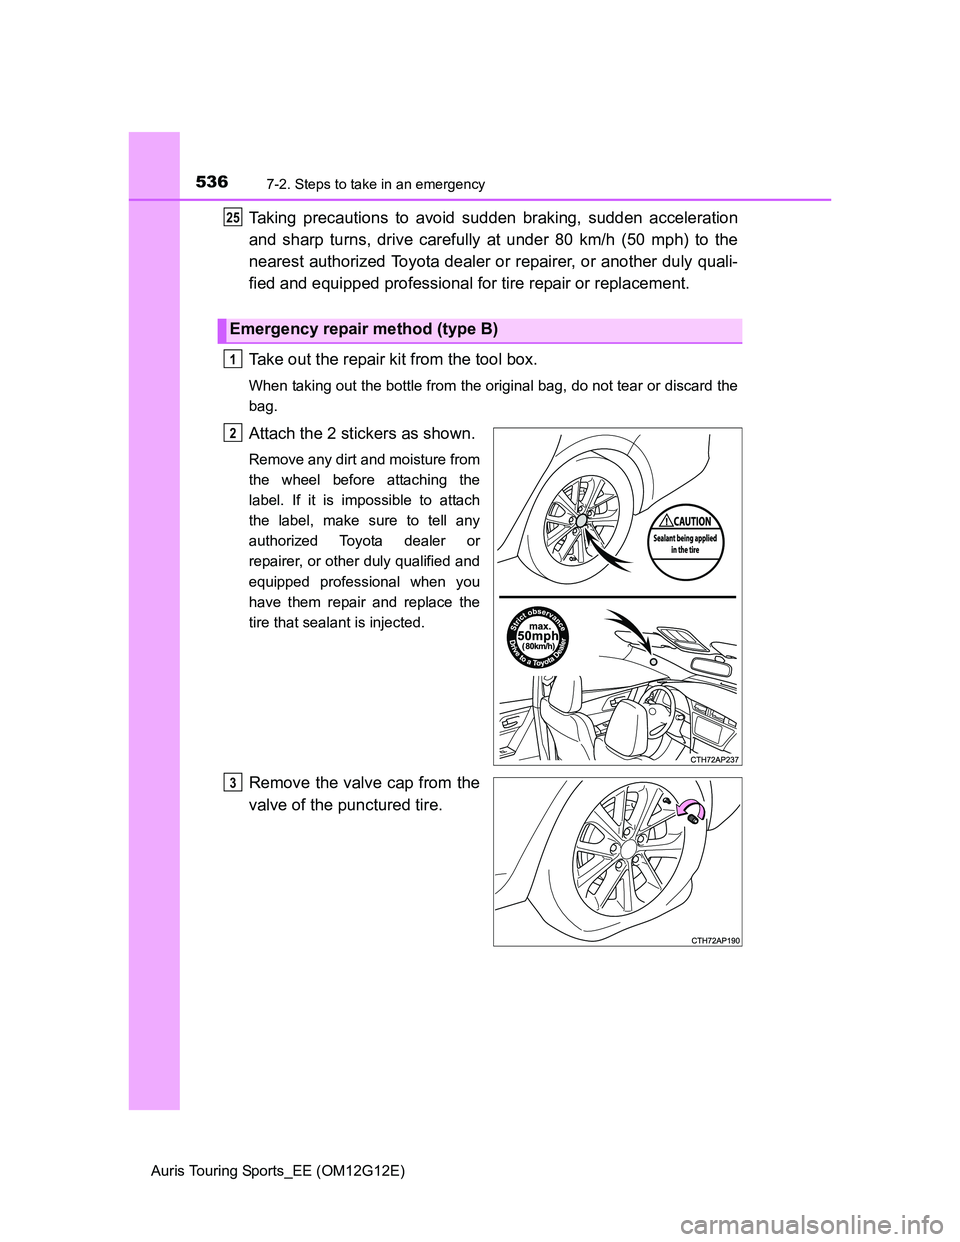
Take out the repair kit from the tool box.
When taking out the bottle from the original bag, do not tear or discard the
bag.
Attach the 2 stickers as shown.
Remove any dirt and moisture from
the wheel before attaching the
label. If it is impossible to attach
the label, make sure to tell any
authorized Toyota dealer or
repairer, or other duly qualified and
equipped professional when you
have them repair and replace the
tire that sealant is injected.
Remove the valve cap from the
valve of the punctured tire.
Emergency repair method (type B)
25
1
2
3
Page 544 of 616
5447-2. Steps to take in an emergency
Auris Touring Sports_EE (OM12G12E)Note for checking the emergency tire puncture repair kit
Check the sealant expiry date occasionally.
The expiry date is shown on the bottle. Do not use sealant whose expiry date
has already passed. Otherwise, repairs conducted using the emergency tire
puncture repair kit may not be performed properly.
Emergency tire puncture repair kit
The sealant stored in the emergency tire puncture repair kit can be used
only once to temporarily repair a single tire. If the sealant has been used
and needs to be replaced, purchase a new bottle at any authorized Toyota
dealer or repairer, or another duly qualified and equipped professional. The
compressor is reusable.
The sealant can be used when the outside temperature is from -30°C
(-22°F) to 60°C (140°F).
The repair kit is exclusively designed for size and type of tires originally
installed on your vehicle. Do not use it for tires that a different size than the
original ones, or for any other purposes.
The sealant has a limited lifespan. The expiry date is marked on the bottle.
The bottle of sealant should be replaced with a new bottle before the expiry
date. Contact any authorized Toyota dealer or repairer, or another duly qual-
ified and equipped professional for replacement.
If the sealant gets on your clothes, it may stain.
If the sealant adheres to a wheel or the surface of the vehicle body, the stain
may not be removable if it is not cleaned at once. Immediately wipe away
the sealant with a wet cloth.
During operation of the repair kit, a loud operation noise is produced. This
does not indicate a malfunction.
Do not use to check or to adjust the tire pressure.
Page 547 of 616
5477-2. Steps to take in an emergency
Auris Touring Sports_EE (OM12G12E)
7
When trouble arises
NOTICE
When performing an emergency repair
A tire should only be repaired with the emergency tire puncture repair kit if
the damage is caused by a sharp object such as nail or screw passing
through the tire tread.
Do not remove the sharp object from the tire. Removing the object may
widen the opening and disenable emergency repair with the repair kit.
The repair kit is not waterproof. Make sure that the repair kit is not
exposed to water, such as when it is being used in the rain.
Do not put the repair kit directly onto dusty ground such as sand at the
side of the road. If the repair kit vacuums up dust etc., a malfunction may
occur.
Type B: Do not turn the bottle upside down when using it, as doing so may
cause damage to the compressor.
Precautions for the emergency tire puncture repair kit
The repair kit power source should be 12 V DC suitable for vehicle use. Do
not connect the repair kit to any other source.
If gasoline splatters on the repair kit, the repair kit may deteriorate. Take
care not to allow gasoline to contact it.
Place the repair kit in a storage to prevent it from being exposed to dirt or
water.
Store the repair kit in the tool tray under the luggage floor cover out of
reach of children.
Do not disassemble or modify the repair kit. Do not subject parts such as
the air pressure indicator to impacts. This may cause a malfunction.