Page 516 of 616
5167-2. Steps to take in an emergency
Auris Touring Sports_EE (OM12G12E)
Loosen the center fastener that
secures the spare tire.
Chock the tires.3
CAUTION
When storing the spare tire
Be careful not to catch fingers or other body parts between the spare tire
and the body of the vehicle.
Replacing a flat tire
1
Flat tireWheel chock positions
FrontLeft-hand sideBehind the rear right-hand side tire
Right-hand sideBehind the rear left-hand side tire
RearLeft-hand sideIn front of the front right-hand side tire
Right-hand sideIn front of the front left-hand side tire
Page 518 of 616
5187-2. Steps to take in an emergency
Auris Touring Sports_EE (OM12G12E)
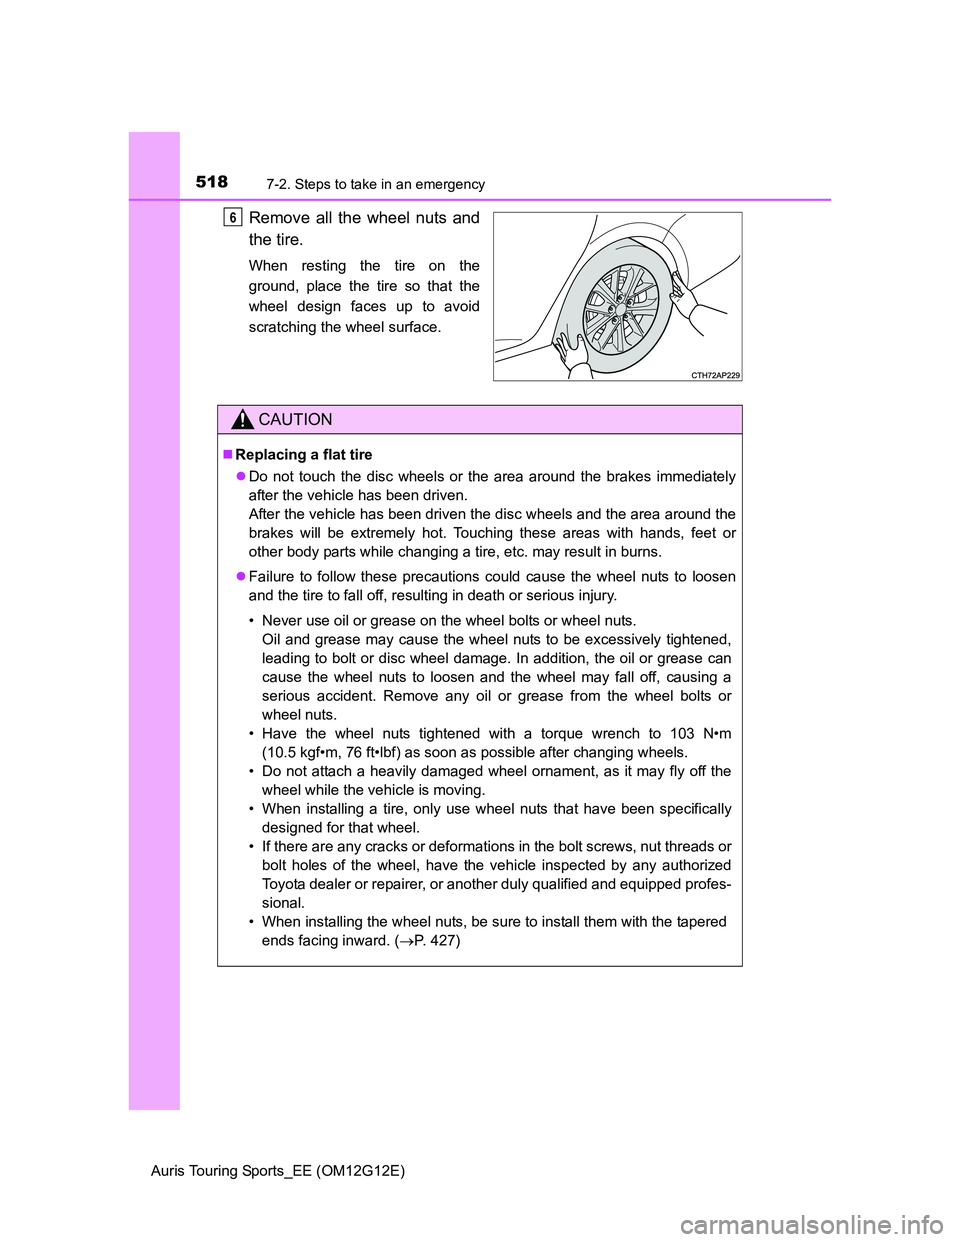
Remove all the wheel nuts and
the tire.
When resting the tire on the
ground, place the tire so that the
wheel design faces up to avoid
scratching the wheel surface.
6
CAUTION
Replacing a flat tire
Do not touch the disc wheels or the area around the brakes immediately
after the vehicle has been driven.
After the vehicle has been driven the disc wheels and the area around the
brakes will be extremely hot. Touching these areas with hands, feet or
other body parts while changing a tire, etc. may result in burns.
Failure to follow these precautions could cause the wheel nuts to loosen
and the tire to fall off, resulting in death or serious injury.
• Never use oil or grease on the wheel bolts or wheel nuts.
Oil and grease may cause the wheel nuts to be excessively tightened,
leading to bolt or disc wheel damage. In addition, the oil or grease can
cause the wheel nuts to loosen and the wheel may fall off, causing a
serious accident. Remove any oil or grease from the wheel bolts or
wheel nuts.
• Have the wheel nuts tightened with a torque wrench to 103 N•m
(10.5 kgf•m, 76 ft•lbf) as soon as possible after changing wheels.
• Do not attach a heavily damaged wheel ornament, as it may fly off the
wheel while the vehicle is moving.
• When installing a tire, only use wheel nuts that have been specifically
designed for that wheel.
• If there are any cracks or deformations in the bolt screws, nut threads or
bolt holes of the wheel, have the vehicle inspected by any authorized
Toyota dealer or repairer, or another duly qualified and equipped profes-
sional.
• When installing the wheel nuts, be sure to install them with the tapered
ends facing inward. (P. 427)
Page 520 of 616
5207-2. Steps to take in an emergency
Auris Touring Sports_EE (OM12G12E)
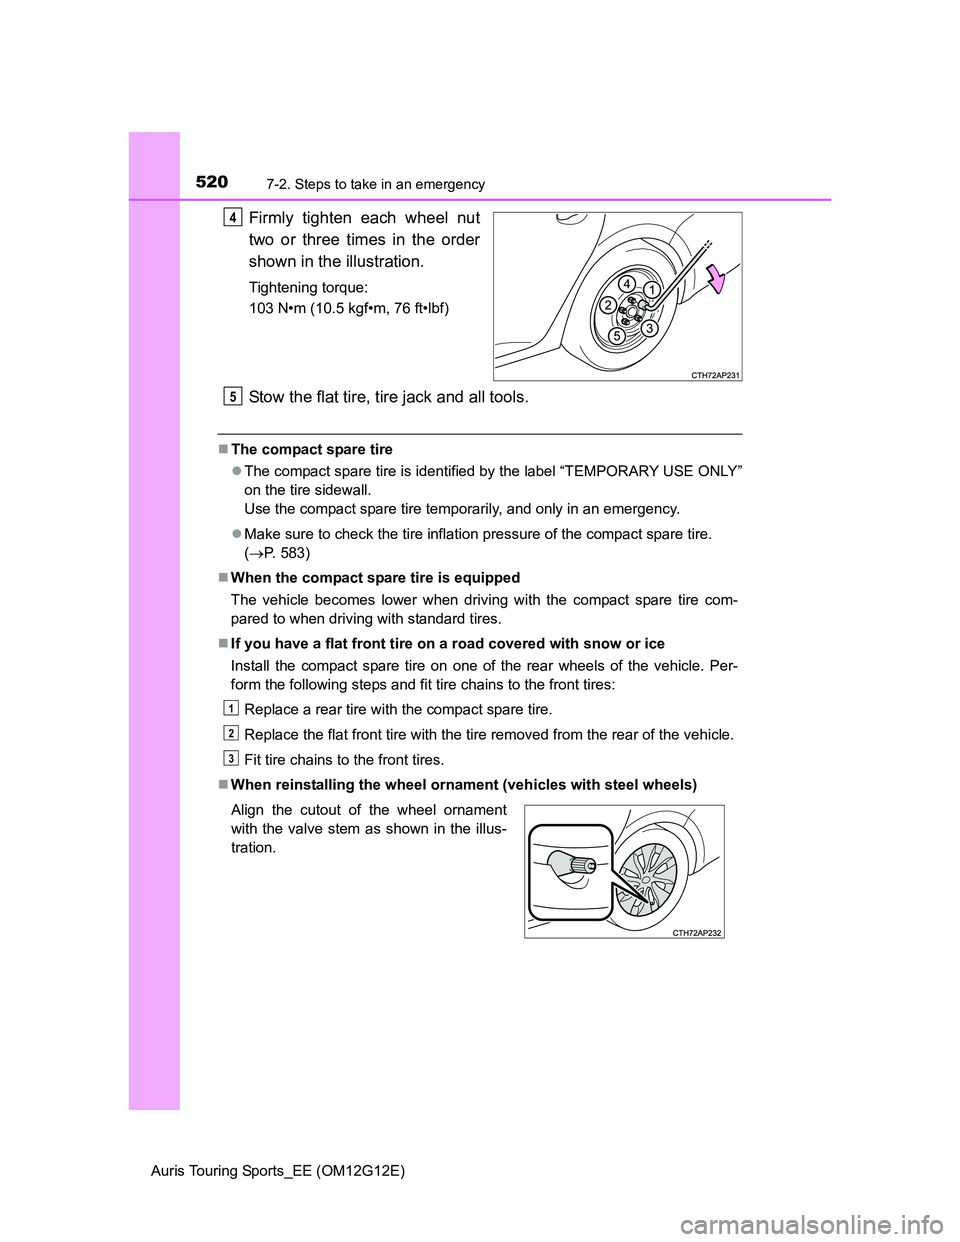
Firmly tighten each wheel nut
two or three times in the order
shown in the illustration.
Tightening torque:
103 N•m (10.5 kgf•m, 76 ft•lbf)
Stow the flat tire, tire jack and all tools.
The compact spare tire
The compact spare tire is identified by the label “TEMPORARY USE ONLY”
on the tire sidewall.
Use the compact spare tire temporarily, and only in an emergency.
Make sure to check the tire inflation pressure of the compact spare tire.
(P. 583)
When the compact spare tire is equipped
The vehicle becomes lower when driving with the compact spare tire com-
pared to when driving with standard tires.
If you have a flat front tire on a road covered with snow or ice
Install the compact spare tire on one of the rear wheels of the vehicle. Per-
form the following steps and fit tire chains to the front tires:
Replace a rear tire with the compact spare tire.
Replace the flat front tire with the tire removed from the rear of the vehicle.
Fit tire chains to the front tires.
When reinstalling the wheel ornament (vehicles with steel wheels)
4
Align the cutout of the wheel ornament
with the valve stem as shown in the illus-
tration.
5
1
2
3
Page 524 of 616
5247-2. Steps to take in an emergency
Auris Touring Sports_EE (OM12G12E)
Before repairing the tire
Stop the vehicle in a safe place on a hard, flat surface.
Set the parking brake.
Shift the shift lever to P (Multidrive) or N (manual transmission).
Stop the engine.
Turn on the emergency flashers. (P. 468)
If you have a flat tire (vehicles with an
emergency tire puncture repair kit)
A puncture caused by a nail or screw passing through the tire tread can
be repaired temporarily using the emergency tire puncture repair kit.
(The kit contains a bottle of sealant. The sealant can be used only once
to temporarily repair one tire without removing the nail or screw from
the tire.) Depending on the damage, this kit cannot be used to repair the
tire. (P. 528)
After temporarily repairing the tire with the kit, have the tire repaired or
replaced by any authorized Toyota dealer or repairer, or another duly
qualified and equipped professional. Repairs conducted using the
emergency tire puncture repair kit are only a temporary measure. Have
the tire repaired and replaced as soon as possible.
Page 532 of 616
5327-2. Steps to take in an emergency
Auris Touring Sports_EE (OM12G12E)
Connect the bottle to the com-
pressor.
As shown in the illustration, insert
the bottle vertically into the com-
pressor to connect making sure
that the claw on the bottle's neck is
hooked onto the cutout of the com-
pressor case.
Check the specified tire inflation pressure.
Tire inflation pressure is specified on the label as shown. (P. 583)
Start the vehicle’s engine.
To inject the sealant and inflate
the tire, turn the compressor
switch on.
10
11
Left-hand drive vehiclesRight-hand drive vehicles
12
13
Page 533 of 616
5337-2. Steps to take in an emergency
Auris Touring Sports_EE (OM12G12E)
7
When trouble arises
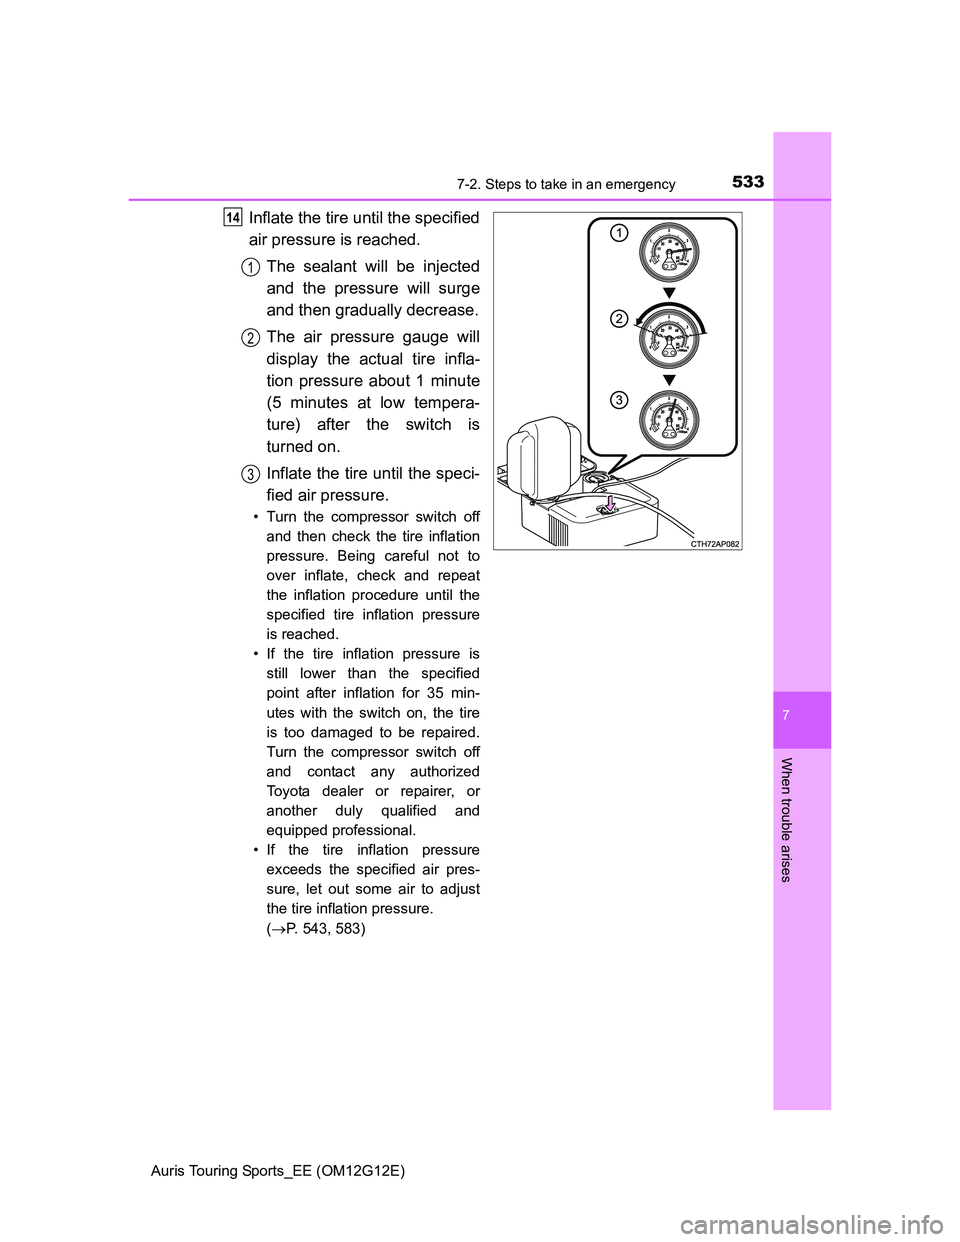
Inflate the tire until the specified
air pressure is reached.
The sealant will be injected
and the pressure will surge
and then gradually decrease.
The air pressure gauge will
display the actual tire infla-
tion pressure about 1 minute
(5 minutes at low tempera-
ture) after the switch is
turned on.
Inflate the tire until the speci-
fied air pressure.
• Turn the compressor switch off
and then check the tire inflation
pressure. Being careful not to
over inflate, check and repeat
the inflation procedure until the
specified tire inflation pressure
is reached.
• If the tire inflation pressure is
still lower than the specified
point after inflation for 35 min-
utes with the switch on, the tire
is too damaged to be repaired.
Turn the compressor switch off
and contact any authorized
Toyota dealer or repairer, or
another duly qualified and
equipped professional.
• If the tire inflation pressure
exceeds the specified air pres-
sure, let out some air to adjust
the tire inflation pressure.
(P. 543, 583)
14
1
2
3
Page 534 of 616
5347-2. Steps to take in an emergency
Auris Touring Sports_EE (OM12G12E)
With the compressor switch off, disconnect the hose from the valve
on the tire and then pull out the power plug from the power outlet
socket.
Some sealant may leak when the hose is removed.
Install the valve cap onto the valve of the emergency repaired tire.
Attach the air release cap to the
end of the hose.
If the air release cap is not
attached, the sealant may leak and
the vehicle may get dirty.
Temporarily store the bottle in the luggage compartment while it is
connected to the compressor.
To spread the liquid sealant evenly within the tire, immediately drive
safely for about 5 km (3 miles) below 80 km/h (50 mph).
After driving for about 5 km (3
miles), stop your vehicle in a
safe place on a hard, flat sur-
face and remove the air release
cap from the hose before
reconnecting the repair kit.
15
16
17
18
19
20
Page 535 of 616
5357-2. Steps to take in an emergency
Auris Touring Sports_EE (OM12G12E)
7
When trouble arises
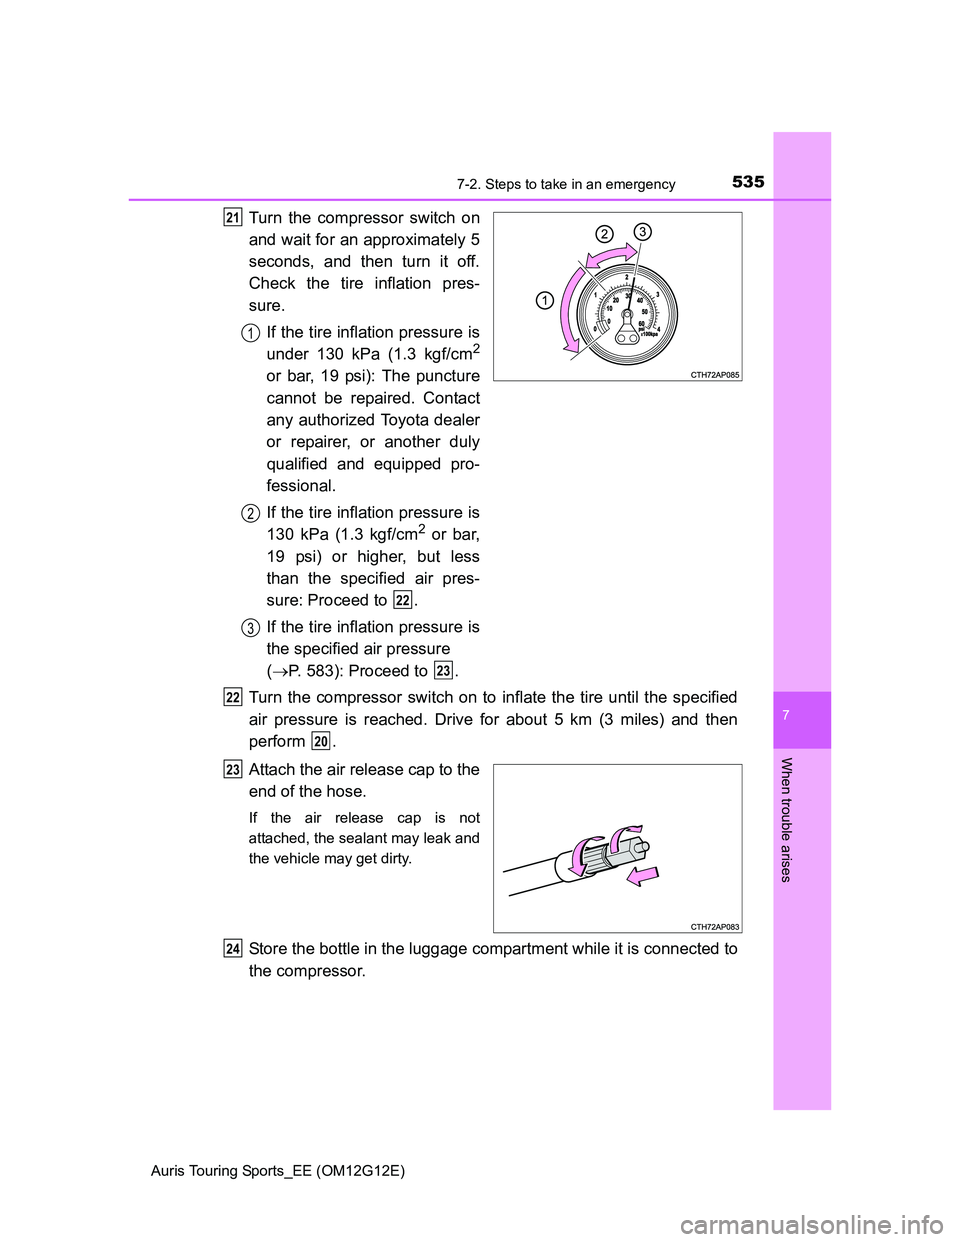
Turn the compressor switch on
and wait for an approximately 5
seconds, and then turn it off.
Check the tire inflation pres-
sure.
If the tire inflation pressure is
under 130 kPa (1.3 kgf/cm
2
or bar, 19 psi): The puncture
cannot be repaired. Contact
any authorized Toyota dealer
or repairer, or another duly
qualified and equipped pro-
fessional.
If the tire inflation pressure is
130 kPa (1.3 kgf/cm
2 or bar,
19 psi) or higher, but less
than the specified air pres-
sure: Proceed to .
If the tire inflation pressure is
the specified air pressure
(P. 583): Proceed to .
Turn the compressor switch on to inflate the tire until the specified
air pressure is reached. Drive for about 5 km (3 miles) and then
perform .
Attach the air release cap to the
end of the hose.
If the air release cap is not
attached, the sealant may leak and
the vehicle may get dirty.
Store the bottle in the luggage compartment while it is connected to
the compressor.
21
1
2
22
3
23
22
20
23
24