2013 TOYOTA AURIS HYBRID check
[x] Cancel search: checkPage 5 of 768

5
1
8 7
6
5
4
3
2
UK_AURIS/AURIS_HV_EE (OM12F76E)6-1. Maintenance and care
Cleaning and protecting
the vehicle exterior ..........486
Cleaning and protecting
the vehicle interior ...........490
6-2. Maintenance
Maintenance
requirements....................493
6-3. Do-it-yourself
maintenance
Do-it-yourself service
precautions ......................496
Hood ..................................500
Positioning a floor jack .......502
Engine compartment..........504
12-volt battery ....................526
Tires ...................................531
Tire inflation pressure ........534
Wheels ...............................536
Air conditioning filter ..........538
Wireless remote control/
electronic key battery.......540
Checking and replacing
fuses ................................543
Light bulbs .........................5677-1. Essential information
Emergency flashers .......... 584
If your vehicle has to
be stopped in an
emergency ...................... 585
7-2. Steps to take in an
emergency
If your vehicle needs to
be towed ......................... 587
If you think something is
wrong .............................. 595
Fuel pump shut off
system............................. 596
If a warning light turns
on or a warning buzzer
sounds ............................ 597
If a warning message is
displayed ......................... 612
If you have a flat tire
(vehicles with a
spare tire) ........................ 640
If you have a flat tire
(vehicles with an
emergency tire
puncture repair kit) .......... 653
If the engine will not
start ................................. 678
If the hybrid system will
not start ........................... 680
If the shift lever cannot
be shifted from P
(vehicles with a
Multidrive) ....................... 682
If the shift lever cannot
be shifted (vehicles with
a multi-mode manual
transmission)................... 683
6Maintenance and care7When trouble arises
Page 9 of 768
9
UK_AURIS/AURIS_HV_EE (OM12F76E)The installation of an RF-transmitter system in your vehicle could affect elec-
tronic systems such as:
Multiport fuel injection system/sequential multiport fuel injection system
Cruise control system (if equipped)
Anti-lock brake system
SRS airbag system
Seat belt pretensioner system
Be sure to check with any authorized Toyota dealer or repairer, or another
duly qualified and equipped professional for precautionary measures or spe-
cial instructions regarding installation of an RF-transmitter system.
Further information regarding frequency bands, power levels, antenna posi-
tions and installation provisions for the installation of RF-transmitters, is avail-
able on request at any authorized Toyota dealer or repairer, or another duly
qualified and equipped professional.
Hybrid model: High voltage parts and cables on the hybrid vehicles emit
approximately the same amount of electromagnetic waves as the conven-
tional gasoline powered vehicles or home electronic appliances despite of
their electromagnetic shielding.
Hybrid model: Unwanted noise may occur in the reception of the RF-transmit-
ter.
The SRS airbag and seat belt pretensioner devices in your Toyota contain
explosive chemicals. If the vehicle is scrapped with the airbags and seat belt
pretensioners left as they are, this may cause an accident such as fire. Be
sure to have the systems of the SRS airbag and seat belt pretensioner
removed and disposed of by a qualified service shop or by any authorized
Toyota dealer or repairer, or another duly qualified and equipped professional,
before you scrap your vehicle.
Installation of an RF-transmitter system
Scrapping of your Toyota
Your vehicle contains batteries and/or accumulators. Do not discard them
into the environment but cooperate with separate collection (Directive 2006/
66/EC).
Page 15 of 768

15Pictorial index
UK_AURIS/AURIS_HV_EE (OM12F76E)Windshield wipers . . . . . . . . . . . . . . . . . . . . . . . . . . . . . . . . . P. 322
Precautions against winter season . . . . . . . . . . . . . . . . . . . . . P. 380
Precautions against car wash . . . . . . . . . . . . . . . . . . . . . . . . . P. 488
Fuel filler door . . . . . . . . . . . . . . . . . . . . . . . . . . . . . . . . . . . . P. 328
Refueling method . . . . . . . . . . . . . . . . . . . . . . . . . . . . . . . . . . P. 328
Fuel type/fuel tank capacity . . . . . . . . . . . . . . . . . . . . . . . . . . . P. 719
Tires . . . . . . . . . . . . . . . . . . . . . . . . . . . . . . . . . . . . . . . . . . . . P. 531
Tire size/inflation pressure . . . . . . . . . . . . . . . . . . . . . . . . . . . . P. 730
Winter tires/tire chain . . . . . . . . . . . . . . . . . . . . . . . . . . . . . . . . P. 380
Checking/rotation. . . . . . . . . . . . . . . . . . . . . . . . . . . . . . . . . . . P. 531
Coping with flat tires . . . . . . . . . . . . . . . . . . . . . . . . . . . . . . . . P. 640
Hood . . . . . . . . . . . . . . . . . . . . . . . . . . . . . . . . . . . . . . . . . . . . P. 500
Opening . . . . . . . . . . . . . . . . . . . . . . . . . . . . . . . . . . . . . . . . . . P. 500
Engine oil . . . . . . . . . . . . . . . . . . . . . . . . . . . . . . . . . . . . . . . . . P. 721
Coping with overheat . . . . . . . . . . . . . . . . . . . . . . . . . . . . . . . . P. 700
Headlights . . . . . . . . . . . . . . . . . . . . . . . . . . . . . . . . . . . . . . . P. 308
Front position lights/daytime running lights . . . . . . . . . . . P. 308
Front fog lights
*1. . . . . . . . . . . . . . . . . . . . . . . . . . . . . . . . . . P. 320
Turn signal lights . . . . . . . . . . . . . . . . . . . . . . . . . . . . . . . . . . P. 305
Stop/tail lights . . . . . . . . . . . . . . . . . . . . . . . . . . . . . . . . . . . . P. 308
Hill-start assist control
*1 . . . . . . . . . . . . . . . . . . . . . . . . . . . . . P. 374
License plate lights . . . . . . . . . . . . . . . . . . . . . . . . . . . . . . . . P. 308
Rear fog light
*4 . . . . . . . . . . . . . . . . . . . . . . . . . . . . . . . . . . . P. 320
Back-up light
*3
Shifting the shift lever to R. . . . . . . . . . . . . . . . P. 284, 289, 294, 297
Rear view monitor system camera
*1, 5
Rear fog light*3 . . . . . . . . . . . . . . . . . . . . . . . . . . . . . . . . . . . P. 320
Back-up light
*4
Shifting the shift lever to R. . . . . . . . . . . . . . . . P. 284, 289, 294, 297
4
5
6
7
Light bulbs of the exterior lights for driving
(Replacing method: P. 567, Watts: P. 734)
*1: If equipped
*2: Vehicles with a multi-information display
*3: Left-hand drive vehicles
*4: Right-hand drive vehicles
*5: Refer to ““touch screen” Owner’s manual”.
8
9
10
11
12
13
14
15
16
Page 39 of 768

391-1. For safe use
1
For safety and security
UK_AURIS/AURIS_HV_EE (OM12F76E)
CAUTION
Observe the following precautions.
Failure to do so may cause the driver’s floor mat to slip, possibly interfering
with the pedals while driving. An unexpectedly high speed may result or it may
become difficult to stop the vehicle, leading to an accident, or leading to death
or a serious injury.
When installing the driver’s floor mat
Do not use floor mats designed for other models or different model year
vehicles, even if they are Toyota Genuine floor mats.
Only use floor mats designed for the driver’s seat.
Always install the floor mat securely using the retaining hooks (clips) pro-
vided.
Do not use two or more floor mats on top of each other.
Do not place the floor mat bottom-side up or upside-down.
Before driving
Check that the floor mat is securely
fixed in the correct place with all the
provided retaining hooks (clips). Be
especially careful to perform this check
after cleaning the floor.
Except hybrid model: With the engine
stopped and the shift lever in P (Multid-
rive) or N (multi-mode manual and man-
ual transmissions), fully depress each
pedal to the floor to make sure it does
not interfere with the floor mat.
Hybrid model: With the hybrid system
stopped and the shift position in P, fully
depress each pedal to the floor to make
sure it does not interfere with the floor
mat.
Page 45 of 768
451-1. For safe use
1
For safety and security
UK_AURIS/AURIS_HV_EE (OM12F76E)
CAUTION
People suffering illness
Obtain medical advice and wear the seat belt in the proper way. (P. 42)
When children are in the vehicle
Do not allow children to play with the seat belt. If the seat belt becomes
twisted around a child’s neck, it may lead to choking or other serious injuries
that could result in death.
If this occurs and the buckle cannot be unfastened, scissors should be used
to cut the belt.
Seat belt pretensioners (front seats)
If the pretensioner has activated, the SRS warning light will come on. In that
case, the seat belt cannot be used again and must be replaced at any
authorized Toyota dealer or repairer, or another duly qualified and equipped
professional.
Adjustable shoulder anchor (front seats)
Always make sure the shoulder belt is positioned across the center of your
shoulder. The belt should be kept away from your neck, but not falling off
your shoulder. Failure to do so could reduce the amount of protection in an
accident and cause death or serious injuries in the event of a sudden stop,
sudden swerve or accident. (P. 43)
Seat belt damage and wear
Do not damage the seat belts by allowing the belt, plate, or buckle to be
jammed in the door.
Inspect the seat belt system periodically. Check for cuts, fraying, and loose
parts. Do not use a damaged seat belt until it is replaced. Damaged seat
belts cannot protect an occupant from death or serious injury.
Ensure that the belt and plate are locked and the belt is not twisted.
If the seat belt does not function correctly, immediately contact any autho-
rized Toyota dealer or repairer, or another duly qualified and equipped pro-
fessional.
Replace the seat assembly, including the belts, if your vehicle has been
involved in a serious accident, even if there is no obvious damage.
Do not attempt to install, remove, modify, disassemble or dispose of the
seat belts. Have any necessary repairs carried out by any authorized
Toyota dealer or repairer, or another duly qualified and equipped profes-
sional. Inappropriate handling may lead to incorrect operation.
Page 62 of 768
621-1. For safe use
UK_AURIS/AURIS_HV_EE (OM12F76E)
Key of letters inserted in the above table:
U: Suitable for “universal” category child restraint system approved
for the use in this mass group.
UF: Suitable for forward-facing “universal” category child restraint
system approved for the use in this mass group.
L1: Suitable for “TOYOTA G 0
+, BABY SAFE PLUS with SEAT BELT
FIXATION, BASE PLATFORM” (0 to 13 kg [0 to 28 lb.]) approved
for the use in this mass group.
L2: Suitable for “TOYOTA KIDFIX” (15 to 36 kg [34 to 79 lb.])
approved for the use in this mass group.
X: Not suitable seat position for children in this mass group.
*1: Adjust the front seatback to the most upright position. Move the front seat
cushion to the fully rearward.
Remove the head restraint if it interferes with your child restraint system.
Vehicles with a vertical height adjustment lever: Adjust the seat cushion to
the highest position.
Follow these procedures
• For installing a baby seat with support base
If the baby seat interferes with the seatback when latching the baby seat
into the support base, adjust the seatback rearward until there is no
interference.
• For installing a forward-facing child seat
If the seat belt shoulder anchor is ahead of the child seat belt guide,
move the seat cushion forward.
• For installing a junior seat
If the child in your child restraint system is in a very upright position,
adjust the seatback to the most comfortable position.
If the seat belt shoulder anchor is ahead of the child seat belt guide,
move the seat cushion forward.
*2: Remove the head restraint if it interferes with your child restraint system.
The child restraint system mentioned in the table may not be available
outside of the EU area.
Other child restraint system which is different from the system men-
tioned in the table can be used, but the suitability of the systems must
be carefully checked with the child restraint system manufacturer con-
cerned and the seller of those seats.
Page 64 of 768
641-1. For safe use
UK_AURIS/AURIS_HV_EE (OM12F76E)
(1) For the child restraint system which do not carry the ISO/XX size
class identification (A to G), for the applicable mass group, the
car manufacturer shall indicate the vehicle specific ISOFIX child
restraint system(s) recommended for each position.
Key of letters inserted in the above table:
IUF: Suitable for ISOFIX forward-facing child restraint systems of uni-
versal category approved for use in this mass group.
IL1: Toyota recommend to use “TOYOTA MINI” approved for the use
in this mass group.
IL2: Toyota recommend to use “TOYOTA MIDI” approved for the use
in this mass group.
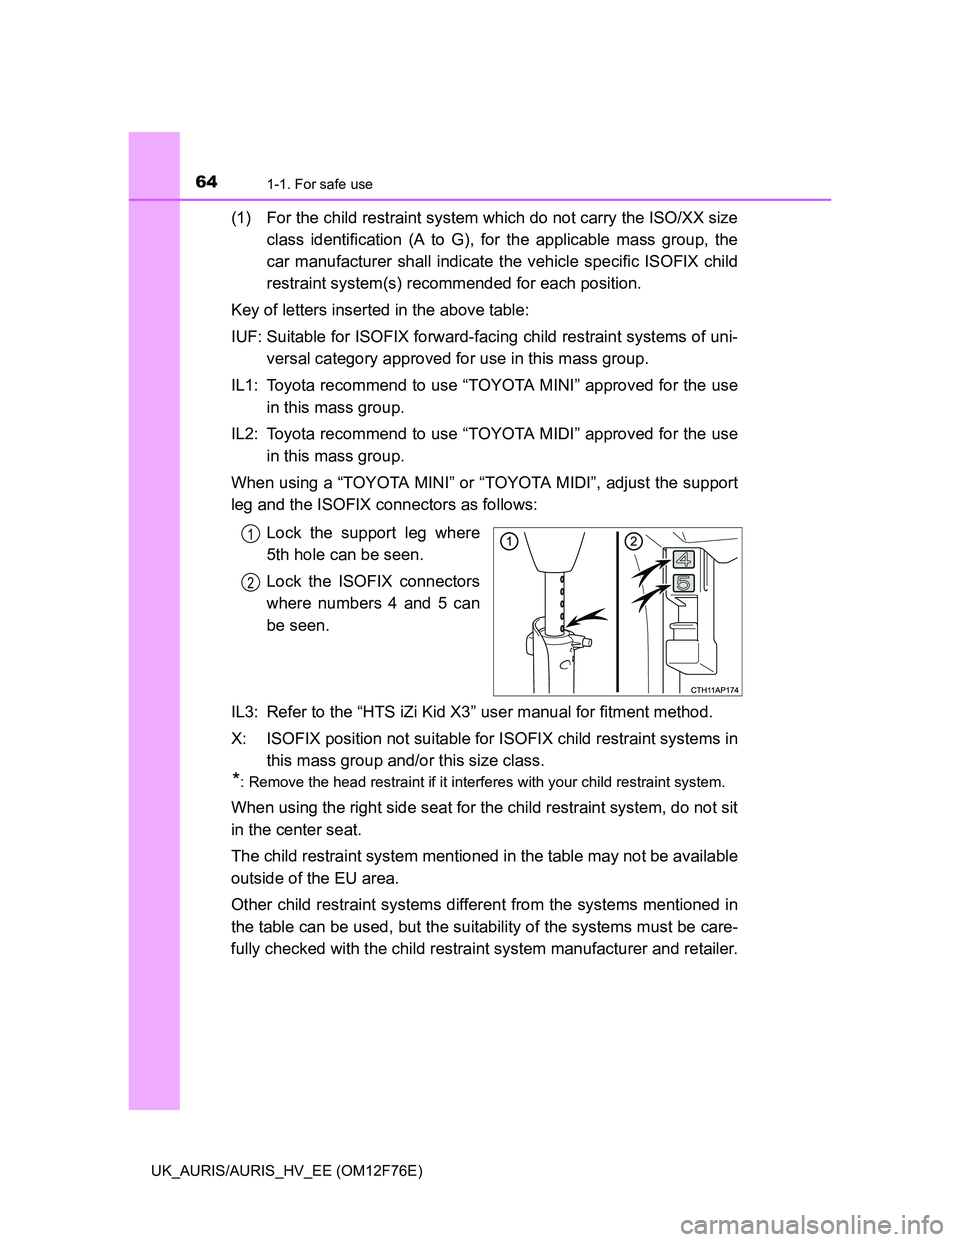
When using a “TOYOTA MINI” or “TOYOTA MIDI”, adjust the support
leg and the ISOFIX connectors as follows:
Lock the support leg where
5th hole can be seen.
Lock the ISOFIX connectors
where numbers 4 and 5 can
be seen.
IL3: Refer to the “HTS iZi Kid X3” user manual for fitment method.
X: ISOFIX position not suitable for ISOFIX child restraint systems in
this mass group and/or this size class.
*: Remove the head restraint if it interferes with your child restraint system.
When using the right side seat for the child restraint system, do not sit
in the center seat.
The child restraint system mentioned in the table may not be available
outside of the EU area.
Other child restraint systems different from the systems mentioned in
the table can be used, but the suitability of the systems must be care-
fully checked with the child restraint system manufacturer and retailer.
1
2
Page 71 of 768
711-1. For safe use
1
For safety and security
UK_AURIS/AURIS_HV_EE (OM12F76E)
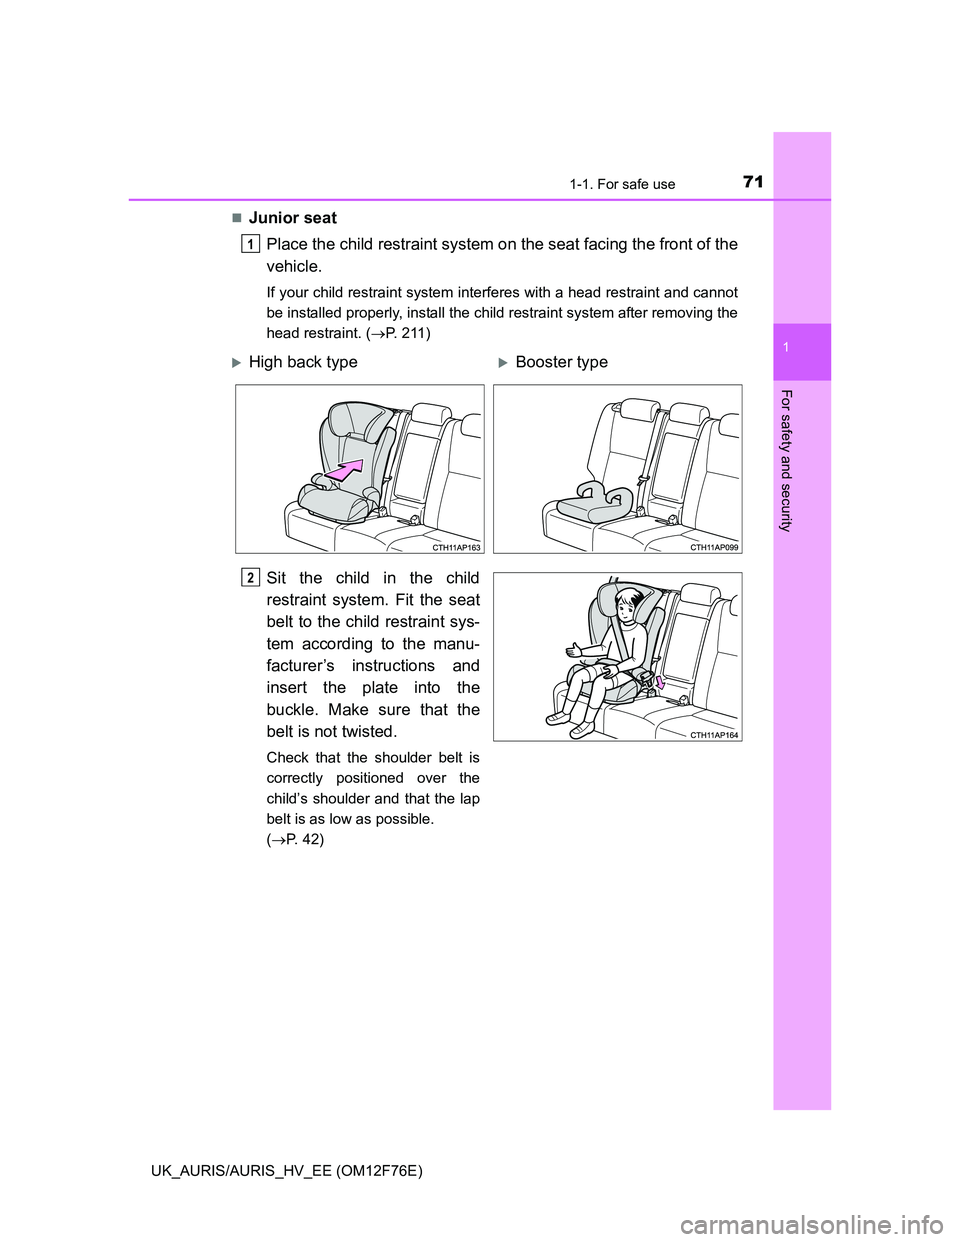
Junior seat
Place the child restraint system on the seat facing the front of the
vehicle.
If your child restraint system interferes with a head restraint and cannot
be installed properly, install the child restraint system after removing the
head restraint. (P. 211)
Sit the child in the child
restraint system. Fit the seat
belt to the child restraint sys-
tem according to the manu-
facturer’s instructions and
insert the plate into the
buckle. Make sure that the
belt is not twisted.
Check that the shoulder belt is
correctly positioned over the
child’s shoulder and that the lap
belt is as low as possible.
(P. 42)
1
High back typeBooster type
2