2013 SUZUKI ERTIGA battery
[x] Cancel search: batteryPage 60 of 207

Downloaded from www.Manualslib.com manuals search engine 2-45BEFORE DRIVING
60MK0-14E
Brightness Control
68LM227
When the ignition switch is turned to the
“ON” position, the pointer lights come on.
Your vehicle has a system to automatically
dim the brightness of the instrument panel
lights when the position lights or headlights
are on.
When the position lights and/or headlights
are ON, you can control the meter illumina-
tion intensity.
To increase the brightness of the instru-
ment panel lights, turn the brightness con-
trol knob (1) clockwise.
To reduce the brightness of the instrument
panel lights, turn the brightness control
knob (1) counterclockwise.
60MH025
NOTE:
If you do not turn the brightness control
knob within about 10 seconds of activat-
ing the brightness control display, the
brightness control display will be can-
celed automatically.
When you reconnect the battery, the
brightness of the instrument panel lights
will be reinitialized. Readjust the bright-
ness according to your preference.
(1)
EXAMPLE
WARNING
If you attempt to adjust the display
while driving, you could lose control
of the vehicle.
Do not attempt to adjust the display
while driving.EXAMPLE
(Brightest)
(Initial setting)
(Dimmest)
Page 62 of 207

Downloaded from www.Manualslib.com manuals search engine 2-47BEFORE DRIVING
60MK0-14E
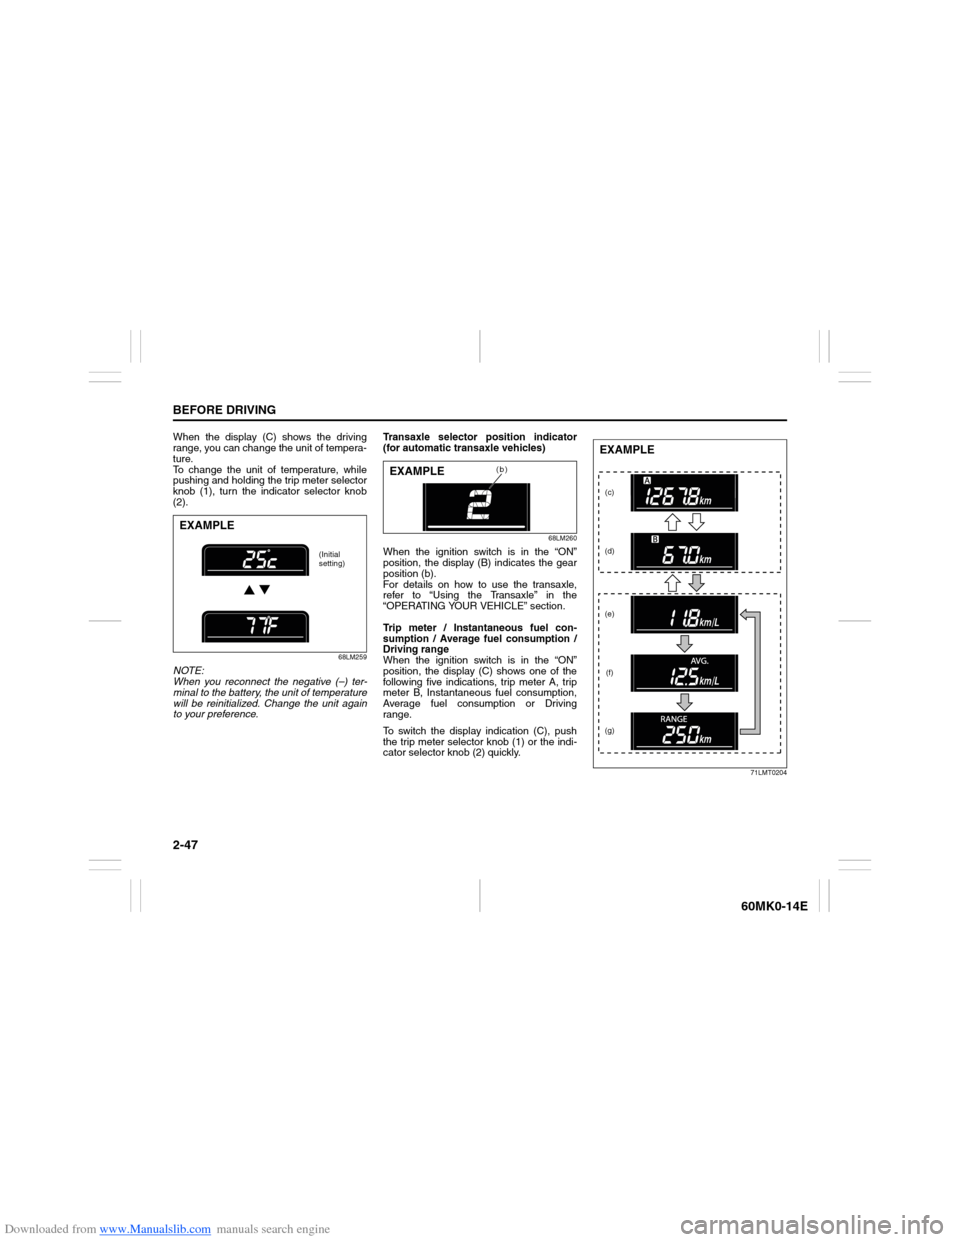
When the display (C) shows the driving
range, you can change the unit of tempera-
ture.
To change the unit of temperature, while
pushing and holding the trip meter selector
knob (1), turn the indicator selector knob
(2).
68LM259
NOTE:
When you reconnect the negative (–) ter-
minal to the battery, the unit of temperature
will be reinitialized. Change the unit again
to your preference.Transaxle selector position indicator
(for automatic transaxle vehicles)
68LM260
When the ignition switch is in the “ON”
position, the display (B) indicates the gear
position (b).
For details on how to use the transaxle,
refer to “Using the Transaxle” in the
“OPERATING YOUR VEHICLE” section.
Trip meter / Instantaneous fuel con-
sumption / Average fuel consumption /
Driving range
When the ignition switch is in the “ON”
position, the display (C) shows one of the
following five indications, trip meter A, trip
meter B, Instantaneous fuel consumption,
Average fuel consumption or Driving
range.
To switch the display indication (C), push
the trip meter selector knob (1) or the indi-
cator selector knob (2) quickly.
71LMT0204
EXAMPLE
(Initial
setting)
(b)
EXAMPLE
(c)
(d)
(e)
(f)
(g)EXAMPLE
Page 64 of 207

Downloaded from www.Manualslib.com manuals search engine 2-49BEFORE DRIVING
60MK0-14E
Average fuel consumption
If you selected average fuel consumption
the last time you drove the vehicle, the dis-
play shows the last value of average fuel
consumption from previous driving when
the ignition switch is turned to the “ON”
position. Unless you reset the value of
average fuel consumption, the display indi-
cates the value of average fuel consump-
tion which includes average fuel
consumption during previous driving.
To reset the average fuel consumption to
zero, push and hold the indicator selector
knob (2) for a while when the display
shows the average fuel consumption.
NOTE:
When you reset the indication or reconnect
the negative (–) terminal to the battery, the
value of average fuel consumption will be
shown after driving for a while.To change the unit of average fuel con-
sumption, while pushing and holding the
trip meter selector knob (1), turn the indi-
cator selector knob (2).
68LM262
NOTE:
When you change the units that average
fuel consumption is displayed in, the
instantaneous fuel consumption units
will be changed automatically.
When you reconnect the negative (–) ter-
minal to the battery, the unit of the aver-
age fuel consumption will be reinitialized.
Change the unit again to your prefer-
ence.Driving range
If you selected driving range the last time
you drove the vehicle, the display indicates
“---” for a few seconds and then indicates
the current driving range when the ignition
switch is turned to the “ON” position.
The driving range shown in the display is
the approximate distance you can drive
until the fuel gauge indicates “E”, based on
current driving conditions.
When the low fuel warning light comes on,
the display “---” will appear.
If the low fuel warning light comes on, fill
the fuel tank immediately regardless of the
value of driving range shown in the display.
As the driving range after refueling is cal-
culated based on the most recent driving
condition, the value is different each time
you refuel.
NOTE:
If you refuel when the ignition switch is in
the “ON” position, the driving range may
not indicate the correct value.
When you reconnect the negative (–) ter-
minal to the battery, the value of driving
range will be shown after driving for a
while.EXAMPLE
(Initial
setting)
Page 65 of 207

Downloaded from www.Manualslib.com manuals search engine 2-50
BEFORE DRIVING
60MK0-14E
Odometer
When the ignition switch is in the “ON”
position, the display (D) shows the odome-
ter.
The odometer records the total distance
the vehicle has been driven.
Clock
When the ignition switch is in the “ON”
position, the display (E) shows the time.To change the time indication:
1) Push the trip meter selector knob (1)
and the indicator selector knob (2)
together.
2) To change the hour indication, turn the
indicator selector knob (2) left or right
repeatedly when the hour indication
blinks. To change the hour indication
quickly, turn and hold the indicator
selector knob (2). To set the hour indi-
cation, push the indicator selector knob
(2) and the minute indication will blink.
3) To change the minute indication, turn
the indicator selector knob (2) left or
right repeatedly when the minute indi-
cation blinks. To change the minute
indication quickly, turn and hold the
indicator selector knob (2). To set the
minute indication, push the indicator
selector knob (2).
NOTE:
When you reconnect the negative (–) ter-
minal to the battery, the clock indication will
be reinitialized. Change the indication
again to your preference.
Lighting Control Lever
65D611
NOTICE
Keep track of your odometer reading
and check the maintenance schedule
regularly for required services.
Increased wear or damage to certain
parts can result from failure to per-
form required services at the proper
mileage intervals.
WARNING
If you attempt to adjust the display
while driving, you could lose control
of the vehicle.
Do not attempt to adjust the display
while driving.
WARNING
To avoid possible injury, do not oper-
ate controls by reaching through the
steering wheel.
Page 75 of 207

Downloaded from www.Manualslib.com manuals search engine 3-2
OPERATING YOUR VEHICLE
60MK0-14E
4) Make sure the hood is fully closed and
latched.
5) Check the headlights, turn signal lights,
brake lights and horn for proper opera-
tion.
6) Adjust the seat and head restraint (if
equipped).
7) Check the brake pedal and the parking
brake lever.
8) Adjust the mirrors.
9) Make sure that you and all passengers
have properly fastened your seat belts.
10)Make sure that all warning lights come
on as the key is turned to the “ON” posi-
tion.
11)Check all gauges.
12)Make sure that the BRAKE SYSTEM
WARNING light turns off when the
parking brake is released.
Once a week, or each time you fill your fuel
tank, perform the following under-hood
checks:
1) Engine oil level
2) Coolant level
3) Brake fluid level
4) Battery solution level
5) Windshield washer fluid level
6) Hood latch operation
Pull the hood release handle inside the
vehicle. Make sure that you cannot
open the hood all the way without
releasing the secondary latch. Be sure
to close the hood securely after check-
ing for proper latch operation. See theitem “All latches, hinges and locks” of
“CHASSIS AND BODY” in the “Periodic
Maintenance Schedule” in the
“INSPECTION AND MAINTENANCE”
section for lubrication schedule.
Once a month, or each time you fill your
fuel tank, check the tire pressure using a
tire pressure gauge. Also check the tire
pressure of the spare tire.
Engine Oil ConsumptionIt is normal for the engine to consume
some engine oil during normal vehicle
operation.
The amount of engine oil consumed
depends on the viscosity of the oil, the
quality of the oil and the conditions the
vehicle is driven under.
More oil is consumed during high-speed
driving and when there is frequent acceler-
ation and deceleration. Under high loads,
your engine also will consume more oil.
A new engine also consumes more oil,
since its pistons, piston rings and cylinder
walls have not yet become conditioned.
New engines reach the normal level of oil
consumption only after approximately 5000
km (3000 miles) driving.
Oil consumption:
Max. 1.0 L per 1000 km
(1 Qt. per 600 miles)
When judging the amount of oil consump-
tion, note that the oil may become diluted
and make it difficult to accurately judge the
true oil level.
As an example, if a vehicle is used for
repeated short trips, and consumes a nor-
mal amount of oil, the dipstick may not
show any drop in the oil level at all, even
after 1000 km (600 miles) or more of driv-
ing. This is because the oil is gradually
becoming diluted with fuel or moisture,
WARNING
Make sure the hood is fully closed
and latched before driving. If it is not,
it can fly up unexpectedly during
driving, obstructing your view and
resulting in an accident.
Page 78 of 207

Downloaded from www.Manualslib.com manuals search engine 3-5OPERATING YOUR VEHICLE
60MK0-14E
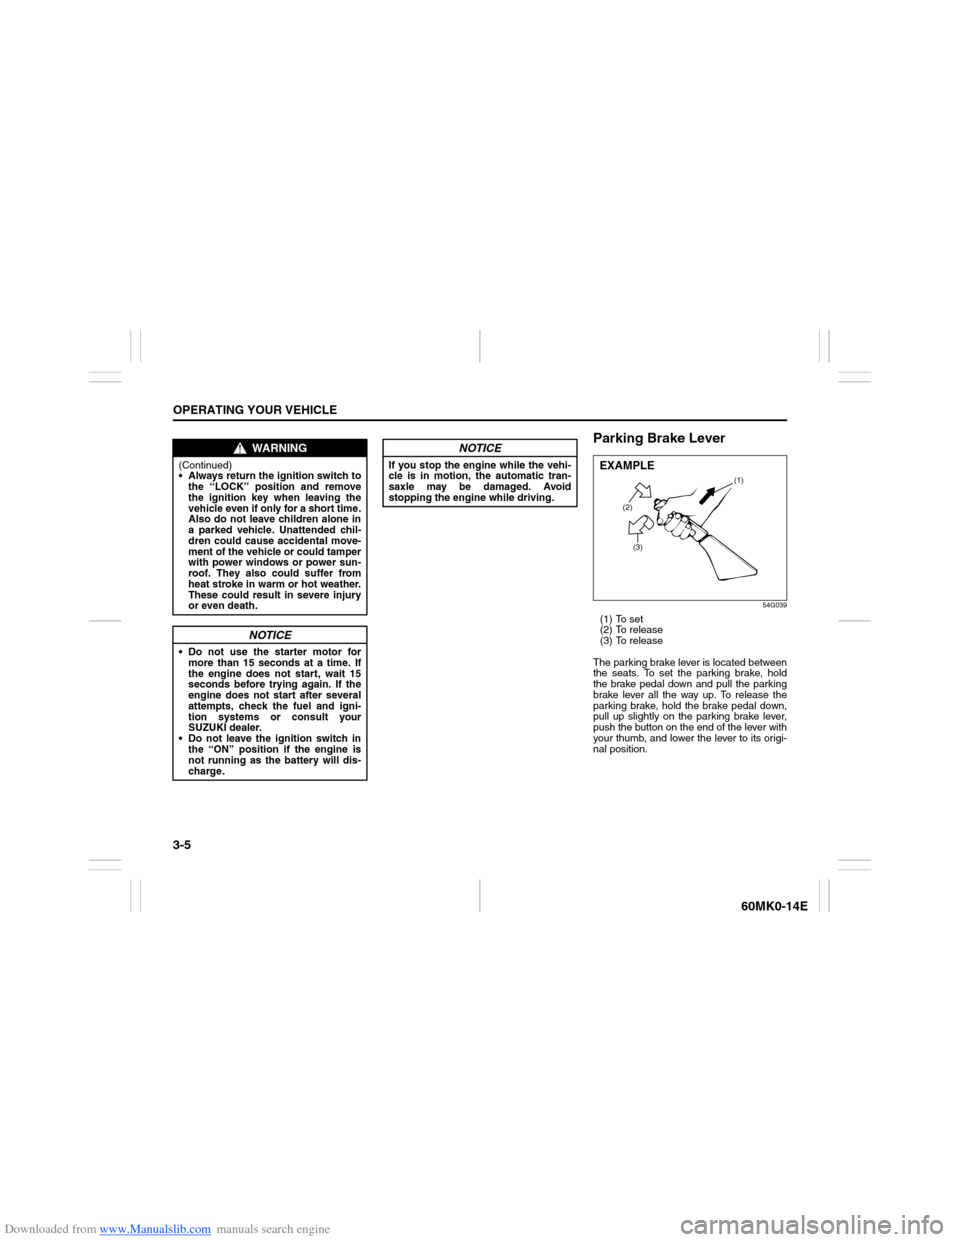
Parking Brake Lever
54G039
(1) To set
(2) To release
(3) To release
The parking brake lever is located between
the seats. To set the parking brake, hold
the brake pedal down and pull the parking
brake lever all the way up. To release the
parking brake, hold the brake pedal down,
pull up slightly on the parking brake lever,
push the button on the end of the lever with
your thumb, and lower the lever to its origi-
nal position.
WARNING
(Continued)
Always return the ignition switch to
the “LOCK” position and remove
the ignition key when leaving the
vehicle even if only for a short time.
Also do not leave children alone in
a parked vehicle. Unattended chil-
dren could cause accidental move-
ment of the vehicle or could tamper
with power windows or power sun-
roof. They also could suffer from
heat stroke in warm or hot weather.
These could result in severe injury
or even death.
NOTICE
Do not use the starter motor for
more than 15 seconds at a time. If
the engine does not start, wait 15
seconds before trying again. If the
engine does not start after several
attempts, check the fuel and igni-
tion systems or consult your
SUZUKI dealer.
Do not leave the ignition switch in
the “ON” position if the engine is
not running as the battery will dis-
charge.
NOTICE
If you stop the engine while the vehi-
cle is in motion, the automatic tran-
saxle may be damaged. Avoid
stopping the engine while driving.
(2)
(3)(1)
EXAMPLE
Page 85 of 207

Downloaded from www.Manualslib.com manuals search engine 3-12
OPERATING YOUR VEHICLE
60MK0-14E
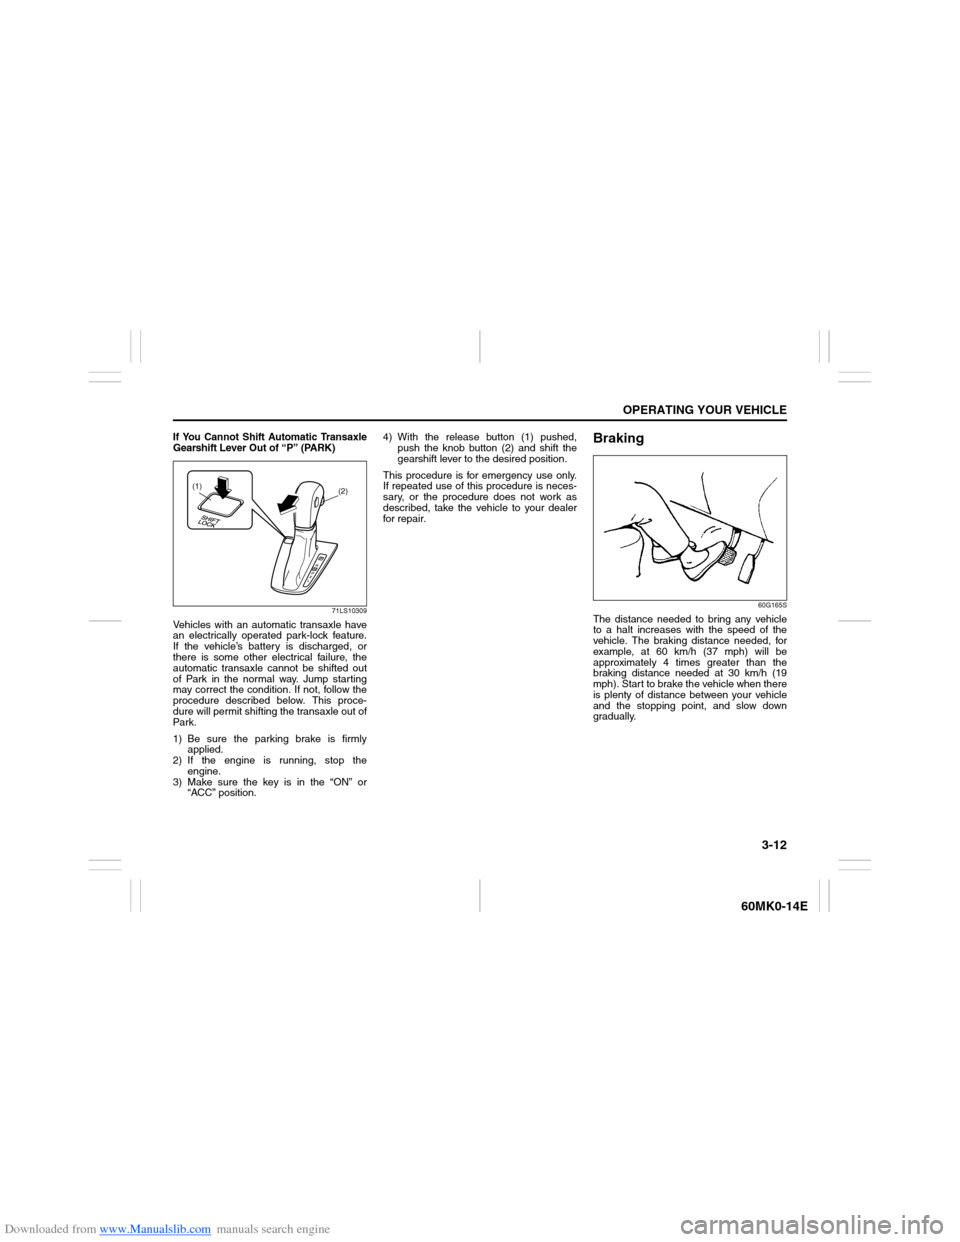
If You Cannot Shift Automatic Transaxle
Gearshift Lever Out of “P” (PARK)
71LS10309
Vehicles with an automatic transaxle have
an electrically operated park-lock feature.
If the vehicle’s battery is discharged, or
there is some other electrical failure, the
automatic transaxle cannot be shifted out
of Park in the normal way. Jump starting
may correct the condition. If not, follow the
procedure described below. This proce-
dure will permit shifting the transaxle out of
Par k.
1) Be sure the parking brake is firmly
applied.
2) If the engine is running, stop the
engine.
3) Make sure the key is in the “ON” or
“ACC” position.4) With the release button (1) pushed,
push the knob button (2) and shift the
gearshift lever to the desired position.
This procedure is for emergency use only.
If repeated use of this procedure is neces-
sary, or the procedure does not work as
described, take the vehicle to your dealer
for repair.
Braking
60G165S
The distance needed to bring any vehicle
to a halt increases with the speed of the
vehicle. The braking distance needed, for
example, at 60 km/h (37 mph) will be
approximately 4 times greater than the
braking distance needed at 30 km/h (19
mph). Start to brake the vehicle when there
is plenty of distance between your vehicle
and the stopping point, and slow down
gradually.
(2)
(1)
Page 124 of 207

Downloaded from www.Manualslib.com manuals search engine 5-29OTHER CONTROLS AND EQUIPMENT
60MK0-14E
iPod
® connection
Make sure to detach the iPod
® after
pressing the engine switch to change
the ignition mode to LOCK. The iPod
®
may not be shut down when it is being
connected and may result in battery
depletion.
Please do not connect iPod
® accesso-
ries such as an iPod
® remote control or
headphones while connecting the
iPod
® with the unit. The unit may not
operate correctly.