2013 SUBARU TRIBECA ignition
[x] Cancel search: ignitionPage 255 of 420

7-10Starting and operating/Remote engine start system (dealer option)
transmitter within a few seconds immedi-
ately following remote engine start shut-down. &Pre-heating or pre-cooling
the interior of the vehicle
Before exiting the vehicle, set the tem-
perature controls to the desired setting
and operation. After the system starts the
vehicle, the heater or air-conditioning will
activate and heat or cool the interior to
your setting. & Service mode
In service mode, the remote start function
is temporarily disabled to prevent the
system from unexpectedly starting the
engine while being serviced. ! To engage the service mode
Turn the ignition switch to the “ON ”
position, depress and hold the brake pedal
then, press and release the “
”button on
the remote engine start transmitter three
times. The system will pause for 1 second
and then flash the parking lights and honk
the horn three times indicating that the
system is in service mode. When attempt-
ing to activate the remote start system
while in service mode, the parking lights
will flash and the horn will honk two times
and will not start. !
To disengage the service mode
Turn the ignition switch to the “ON ”
position, depress and hold the brake
pedal, then press and release the “
”
button on the remote engine start trans-
mitter three times. The system will pause
for 1 second and flash the parking lights
one time indicating that the system has
exited service mode. NOTE
When taking your vehicle in for service,
it is recommended that you inform the
service personnel that your vehicle is
equipped with a remote engine startsystem. & Remote engine start trans-
mitter programming and pro-
grammable feature option
New transmitters can be programmed to
the remote engine start system in the
event that remote engine start transmitters
are lost, stolen or damaged. The remote
engine start system also has one pro-
grammable feature that can be adjusted
for user preference.
The remote engine start system can be
programmed to either make an audible
horn chirp upon remote start activation or
not. Remote engine start transmitter pro-
gramming and feature programming can be adjusted using the following procedure.
1. Open the driver
’s door (the driver ’s
door must remain opened throughout the
entire process).
2. Insert the key into the vehicle ’s ignition
switch and turn to the “ON ”position.
3. Locate the small black programming
button behind the fuse box cover, on the
driver ’s side left under the dashboard
panel.
4. Press and hold the black programming
button for 10 to 15 seconds. The horn will
honk and the parking lights will flash three
times to indicate that the system has
entered programming mode. At this point
you can perform either action (step 5 or
step 6).
5. To program a remote transmitter:
press and release the “
”button on each
transmitter. The horn will honk and the
parking lights will flash one time to indicate
a successful transmitter learn each timethe “
”button is pressed. You can
program up to eight transmitters.
6. To toggle the Horn Confirmation chirps
ON/OFF: press and release the brake to
toggle the feature. The horn will chirp and
the parking lights will flash one time to
indicate Confirmation Horn Chirps are“ OFF ”. The horn will honk and the parking
lights will flash 2 times to indicate Con-
firmation Horn Chirps are “ON ”. Depres-
Page 256 of 420

sing the brake pedal repeatedly will toggle
the feature ON or OFF each time.
7. To exit the remote transmitter and
feature programming mode, turn the igni-
tion switch to the“LOCK ”position, remove
the key from the ignition switch and test
operation of the remote transmitter(s) and
horn confirmation feature. & System maintenance
! Changing the batteries
CAUTION
. Do not let dust, oil or water get on
or in the remote engine start
transmitter when replacing the
battery.
. Be careful not to damage the
printed circuit board in the re-
mote engine start transmitter
when replacing the battery.
. Be careful not to allow children to
touch the battery and any re-
moved parts; children could
swallow them.
. There is a danger of explosion if
an incorrect replacement battery
is used. Replace only with the
same or equivalent type of bat-
tery. .
Batteries should not be exposed
to excessive heat such as sun-
shine, fire or the like.
The two 3-volt lithium batteries (modelCR-1220 ) supplied in your remote engine
start transmitter should last approximately
three years, depending on usage. When
the batteries begin to weaken, you will
notice a decrease in range (distance from
the vehicle that your remote engine start
system operates). Follow the instructions
below to change the remote controlbatteries.1. Carefully pry the remote engine start
transmitter halves apart using a small flat-
head screwdriver.
Starting and operating/Remote engine start system (dealer option)7-11
– CONTINUED –
Page 258 of 420
“R ” position or vice versa until
the vehicle has completely
stopped. Such shifting may
cause damage to the transmis-sion.
. When parking the vehicle, first
securely apply the parking brake
and then place the select lever inthe “P ” position. Avoid parking
for a long time with the select
lever in any other position as
doing so could result in a dead
battery.
NOTE . When the engine coolant tempera-
ture is still low, the automatic transmis-
sion will upshift to higher engine
speeds than when the coolant tempera-
ture is sufficiently high in order to
shorten the warm-up time and improve
driveability. The gearshift timing will
automatically shift to the normal timing
after the engine has warmed up.. Immediately after ATF (automatic
transmission fluid) is replaced, you
may feel that the automatic transmis-
sion operation is somewhat unusual.
This results from invalidation of data
which the on-board computer has
collected and stored in memory to allow the transmission to shift at the
most appropriate times for the current
condition of your vehicle. Optimized
shifting will be restored as the vehicle
continues to be driven for a while.
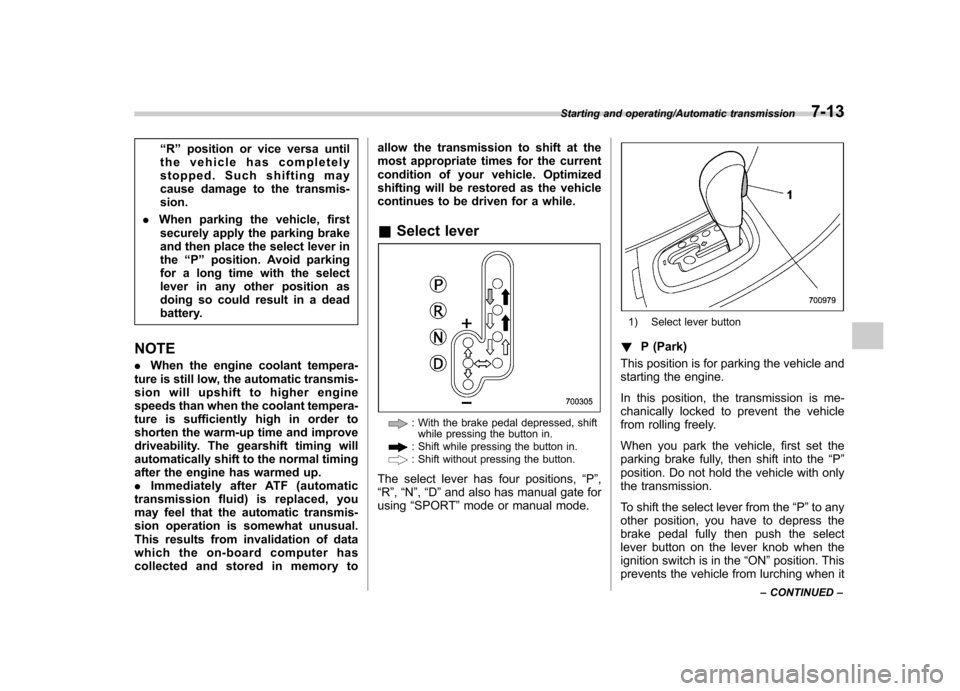
& Select lever
: With the brake pedal depressed, shift
while pressing the button in.
: Shift while pressing the button in.: Shift without pressing the button.
The select lever has four positions, “P ”,
“ R ”, “N ”, “D ”and also has manual gate for
using “SPORT ”mode or manual mode.
1) Select lever button
! P (Park)
This position is for parking the vehicle and
starting the engine.
In this position, the transmission is me-
chanically locked to prevent the vehicle
from rolling freely.
When you park the vehicle, first set the
parking brake fully, then shift into the “P ”
position. Do not hold the vehicle with only
the transmission.
To shift the select lever from the “P ”to any
other position, you have to depress the
brake pedal fully then push the select
lever button on the lever knob when the
ignition switch is in the “ON ”position. This
prevents the vehicle from lurching when it
Starting and operating/Automatic transmission7-13
– CONTINUED –
Page 259 of 420
7-14Starting and operating/Automatic transmission
is started.
If the select lever does not move from the “P ” position with the brake pedal de-
pressed, the select lever button pushed
in, and the ignition switch in the ON
position, refer to “Shift lock function ”F 7-
14. ! R (Reverse)
This position is for backing the vehicle.
To shift from the “N ” to “R ”position, stop
the vehicle completely then move the
lever to the “R ” position while pushing
the select lever button. ! N (Neutral)
This position is for restarting a stalled engine.
In this position the wheels and transmis-
sion are not locked. In this position, the
transmission is neutral; the vehicle will roll
freely, even on the slightest incline unless
the parking brake or foot brake is applied.
Avoid coasting with the transmission neutral.
During coasting, there is no engine brak-
ing effect.
NOTE
When the ignition switch has been
turned to the “LOCK ”position, move-
ment of the select lever from the “N ” position to the
“R ” position is possible
for a limited time period by depressing
the brake pedal and then becomes
impossible. If the select lever becomes
impossible to be moved after a limited
time period, turn the ignition switch tothe “ON ”position. You will then be able
to move the select lever to the “P ”
position.
WARNING
Do not drive the vehicle with the
select lever in the “N ” (Neutral)
position. Engine braking has no
effect in this condition and the risk
of an accident is consequently in-creased.
! D (Drive)
This position is for normal driving.
The transmission automatically shifts into
a suitable gear from 1st to 5th according to
the vehicle speed and the acceleration
you require.
When more acceleration is required in this
position, depress the accelerator pedal
fully to the floor and hold that position. The
transmission will automatically downshift
to 4th, 3rd, 2nd or 1st gear. When you
release the pedal, the transmission will return to the original gear position.
To use the SPORT mode, move the lever
from this position into the manual gate.
To use the manual mode, move the lever
from this position into the manual gate
then move it toward the
“+ ” end or “� ”end.
! While climbing a grade
When driving up a hill, undesired upshift to
4th or 5th gear is prevented from taking
place when the accelerator is released.
This minimizes the chance of subsequent
downshifting to a lower gear when accel-
erating again. This prevents repeated
upshifting and downshifting resulting in a
smoother operation of the vehicle.
NOTE
The transmission may downshift to 2nd
or 1st gear, depending on the way the
accelerator pedal is depressed to ac-
celerate the vehicle again. & Shift lock function
The shift lock function helps prevent the
improper operation of the select lever. . The select lever cannot be operated
unless the ignition switch is turned to the “ ON ”position and the brake pedal is
depressed. . The select lever cannot be moved from
Page 260 of 420

the“P ” position to any other position
before the brake pedal is depressed.
Depress the brake pedal first, and then
operate the select lever. . Only the “P ”position allows you to turn
the key from the “Acc ”position to the
“ LOCK ”position and remove the key from
the ignition key cylinder.. If the ignition switch is turned to the
“ LOCK ”position while the select lever is in
the “N ”position, the select lever may not
be moved to the “P ”position after a period
of time. Therefore, move the select lever
to the “P ” position with the brake pedal
depressed soon after the ignition switch is
turned to the “LOCK ”position.
! Shift lock release
If the select lever cannot be operated, turn
the ignition switch back to the “ON ”
position then move the select lever to the“ P ” position with the select lever button
pressed and brake pedal depressed.
If the select lever does not move after
performing the above procedure, perform
the following steps. . When the select lever cannot be
shifted from “P ” to “N ”:
Refer to “Shift lock release using the shift
lock release button ”F 7-15. .
When the select lever cannot be
shifted from “N ” to “R ” or “P ”:
Within 60 seconds after placing the igni-
tion switch in the “Acc ”position, move the
select lever to the “R ”or “P ”position with
the select lever button pressed and brake
pedal depressed.
If you must perform the above procedure,
the shift lock system (or the vehicle control
system) may be malfunctioning. Contact a
SUBARU dealer for an inspection as soon
as possible.
If the select lever does not move after
performing the above procedure, refer to“ Shift lock release using the shift lock
release button ”F 7-15.
! Shift lock release using the shift
lock release button
Perform the following procedure to release
the shift lock.
1. Apply the parking brake and stop the engine.
2. Remove the cover by prying on the
edge with a flat-head screwdriver. NOTE
To prevent damage to the cover, wrap
the tip of the flat-head screwdriver with
vinyl tape or a cloth before removing
the cover.
Starting and operating/Automatic transmission7-15
– CONTINUED –
Page 266 of 420
constant brake pedal pressure.
Do not pump the brake pedal
since doing so may defeat the
operation of the ABS system.
The ABS system prevents the lock-up of
wheels which may occur during sudden
braking or braking on slippery road sur-
faces. This helps prevent the loss of
steering control and directional stability
caused by wheel lock-up.
When the ABS system is operating, you
may hear a chattering noise or feel a slight
vibration in the brake pedal. This is normal
when the ABS operates.
The ABS system will not operate when the
vehicle speed is below approximately 6
mph (10 km/h). & ABS system self-check
You may feel a slight shock in the brake
pedal and hear the operating sound of
ABS from the engine compartment just
after the vehicle is started. This is caused
by an automatic functional test of the ABS
system being carried out and does not
indicate any abnormal condition. &
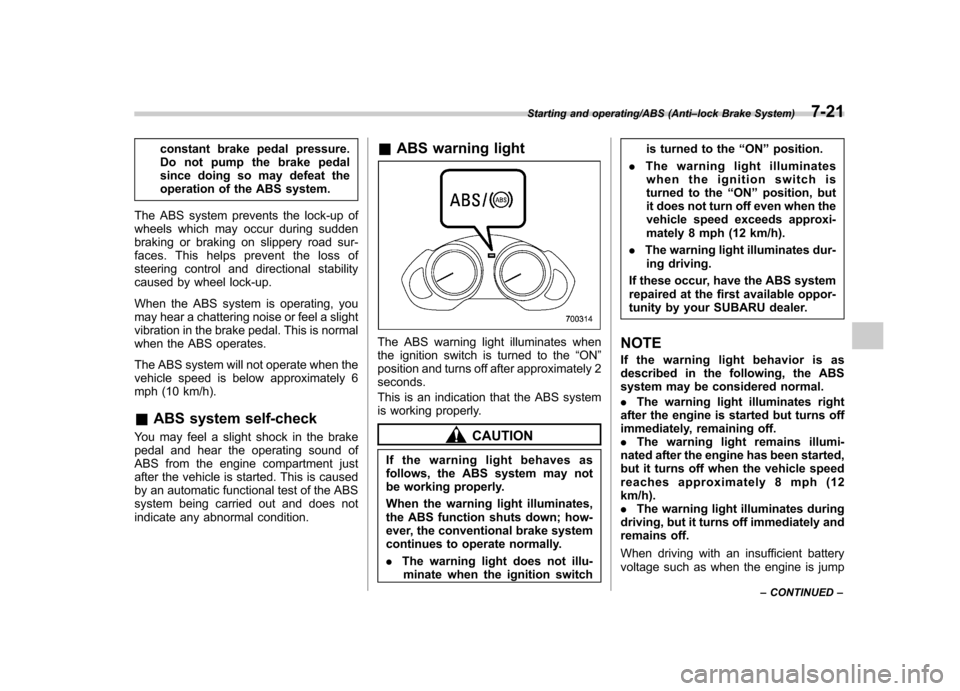
ABS warning light
The ABS warning light illuminates when
the ignition switch is turned to the “ON ”
position and turns off after approximately 2seconds.
This is an indication that the ABS system
is working properly.
CAUTION
If the warning light behaves as
follows, the ABS system may not
be working properly.
When the warning light illuminates,
the ABS function shuts down; how-
ever, the conventional brake system
continues to operate normally. . The warning light does not illu-
minate when the ignition switch is turned to the
“ON ”position.
. The warning light illuminates
when the ignition switch is
turned to the “ON ”position, but
it does not turn off even when the
vehicle speed exceeds approxi-
mately 8 mph (12 km/h).
. The warning light illuminates dur-
ing driving.
If these occur, have the ABS system
repaired at the first available oppor-
tunity by your SUBARU dealer.
NOTE
If the warning light behavior is as
described in the following, the ABS
system may be considered normal. . The warning light illuminates right
after the engine is started but turns off
immediately, remaining off. . The warning light remains illumi-
nated after the engine has been started,
but it turns off when the vehicle speed
reaches approximately 8 mph (12km/h).. The warning light illuminates during
driving, but it turns off immediately and
remains off.
When driving with an insufficient battery
voltage such as when the engine is jump
Starting and operating/ABS (Anti –lock Brake System)7-21
– CONTINUED –
Page 271 of 420
7-26Starting and operating/Vehicle Dynamics Control system
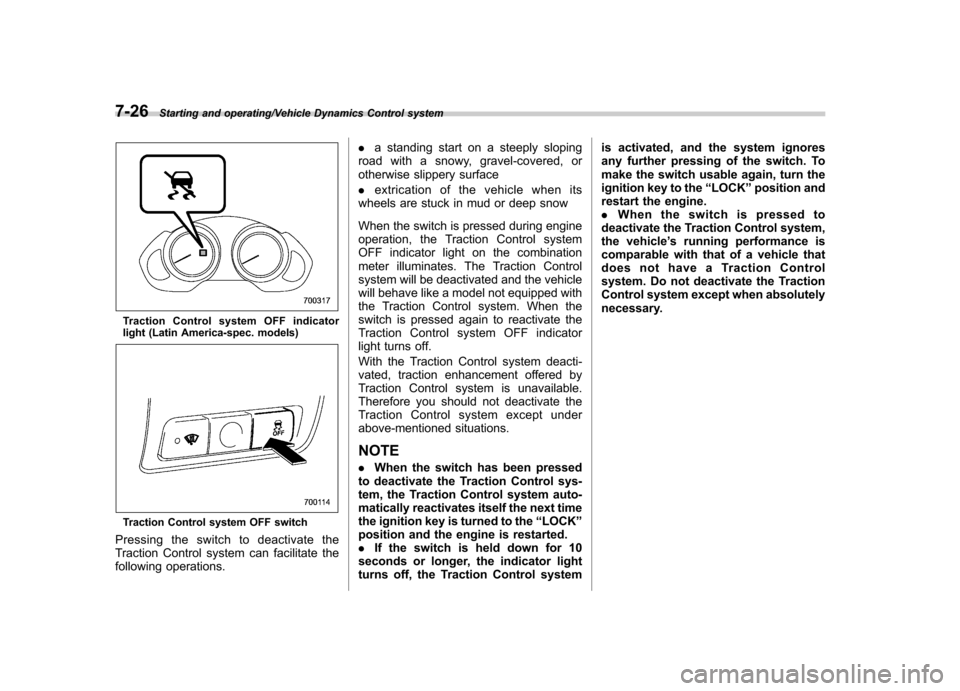
Traction Control system OFF indicator
light (Latin America-spec. models)
Traction Control system OFF switch
Pressingtheswitchtodeactivatethe
Traction Control system can facilitate the
following operations. .
a standing start on a steeply sloping
road with a snowy, gravel-covered, or
otherwise slippery surface . extrication of the vehicle when its
wheels are stuck in mud or deep snow
When the switch is pressed during engine
operation, the Traction Control system
OFF indicator light on the combination
meter illuminates. The Traction Control
system will be deactivated and the vehicle
will behave like a model not equipped with
the Traction Control system. When the
switch is pressed again to reactivate the
Traction Control system OFF indicator
light turns off.
With the Traction Control system deacti-
vated, traction enhancement offered by
Traction Control system is unavailable.
Therefore you should not deactivate the
Traction Control system except under
above-mentioned situations.
NOTE . When the switch has been pressed
to deactivate the Traction Control sys-
tem, the Traction Control system auto-
matically reactivates itself the next time
the ignition key is turned to the “LOCK ”
position and the engine is restarted.. If the switch is held down for 10
seconds or longer, the indicator light
turns off, the Traction Control system is activated, and the system ignores
any further pressing of the switch. To
make the switch usable again, turn the
ignition key to the
“LOCK ”position and
restart the engine.. Whentheswitchispressedto
deactivate the Traction Control system,
the vehicle ’s running performance is
comparable with that of a vehicle that
does not have a Traction Control
system. Do not deactivate the Traction
Control system except when absolutely
necessary.
Page 274 of 420
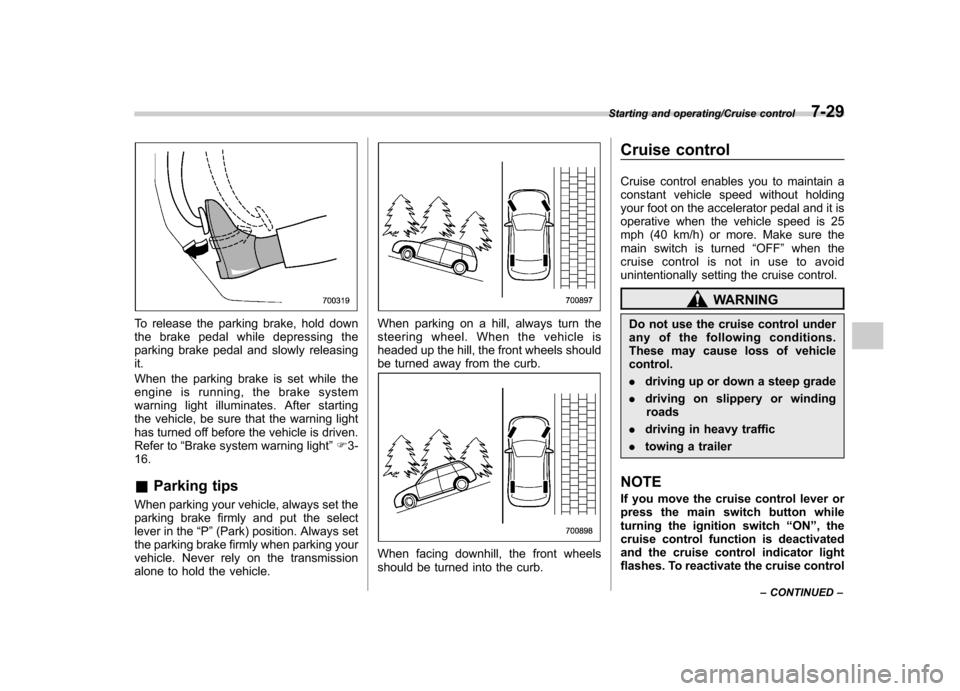
To release the parking brake, hold down
the brake pedal while depressing the
parking brake pedal and slowly releasingit.
When the parking brake is set while the
engine is running, the brake system
warning light illuminates. After starting
the vehicle, be sure that the warning light
has turned off before the vehicle is driven.
Refer to“Brake system warning light ”F 3-
16.
& Parking tips
When parking your vehicle, always set the
parking brake firmly and put the select
lever in the “P ”(Park) position. Always set
the parking brake firmly when parking your
vehicle. Never rely on the transmission
alone to hold the vehicle.When parking on a hill, always turn the
steering wheel. When the vehicle is
headed up the hill, the front wheels should
be turned away from the curb.
When facing downhill, the front wheels
should be turned into the curb. Cruise control
Cruise control enables you to maintain a
constant vehicle speed without holding
your foot on the accelerator pedal and it is
operative when the vehicle speed is 25
mph (40 km/h) or more. Make sure the
main switch is turned
“OFF ”when the
cruise control is not in use to avoid
unintentionally setting the cruise control.
WARNING
Do not use the cruise control under
any of the following conditions.
These may cause loss of vehiclecontrol. . driving up or down a steep grade
. driving on slippery or winding
roads
. driving in heavy traffic
. towing a trailer
NOTE
If you move the cruise control lever or
press the main switch button while
turning the ignition switch “ON ”, the
cruise control function is deactivated
and the cruise control indicator light
flashes. To reactivate the cruise control
Starting and operating/Cruise control7-29
– CONTINUED –