Page 14 of 36
11
Getting
Started Instrument
Panel Gauges
Personalize Controls
While
Operating Safety / In Case
of Emergency Additional
Information
11
Getting Started
Instrument Panel
Gauges
Personalize
Controls
While Operating
Safety / In Case of Emergency
Additional Information
Personalize
Power Moonroof (if equipped)
With the moonroof in the fully closed position,
press the switch
2 to tilt the rear of the
moonroof up. Press and hold the switch
1
to lower the moonroof. Press the switch
4 to
fully open the moonroof. Press the switch
3
to close the moonroof. To stop the moonroof
in a midway position while opening or closing,
momentarily press the switch to the
4 side
or
3 side.
1
2
3
4
Page 16 of 36

13
Getting
Started Instrument
Panel Gauges
Personalize Controls
While
Operating Safety / In Case
of Emergency Additional
Information
13
Getting Started
Instrument Panel
Gauges
Personalize
Controls
While Operating
Safety / In Case of Emergency
Additional Information
Controls
Windshield Wipers
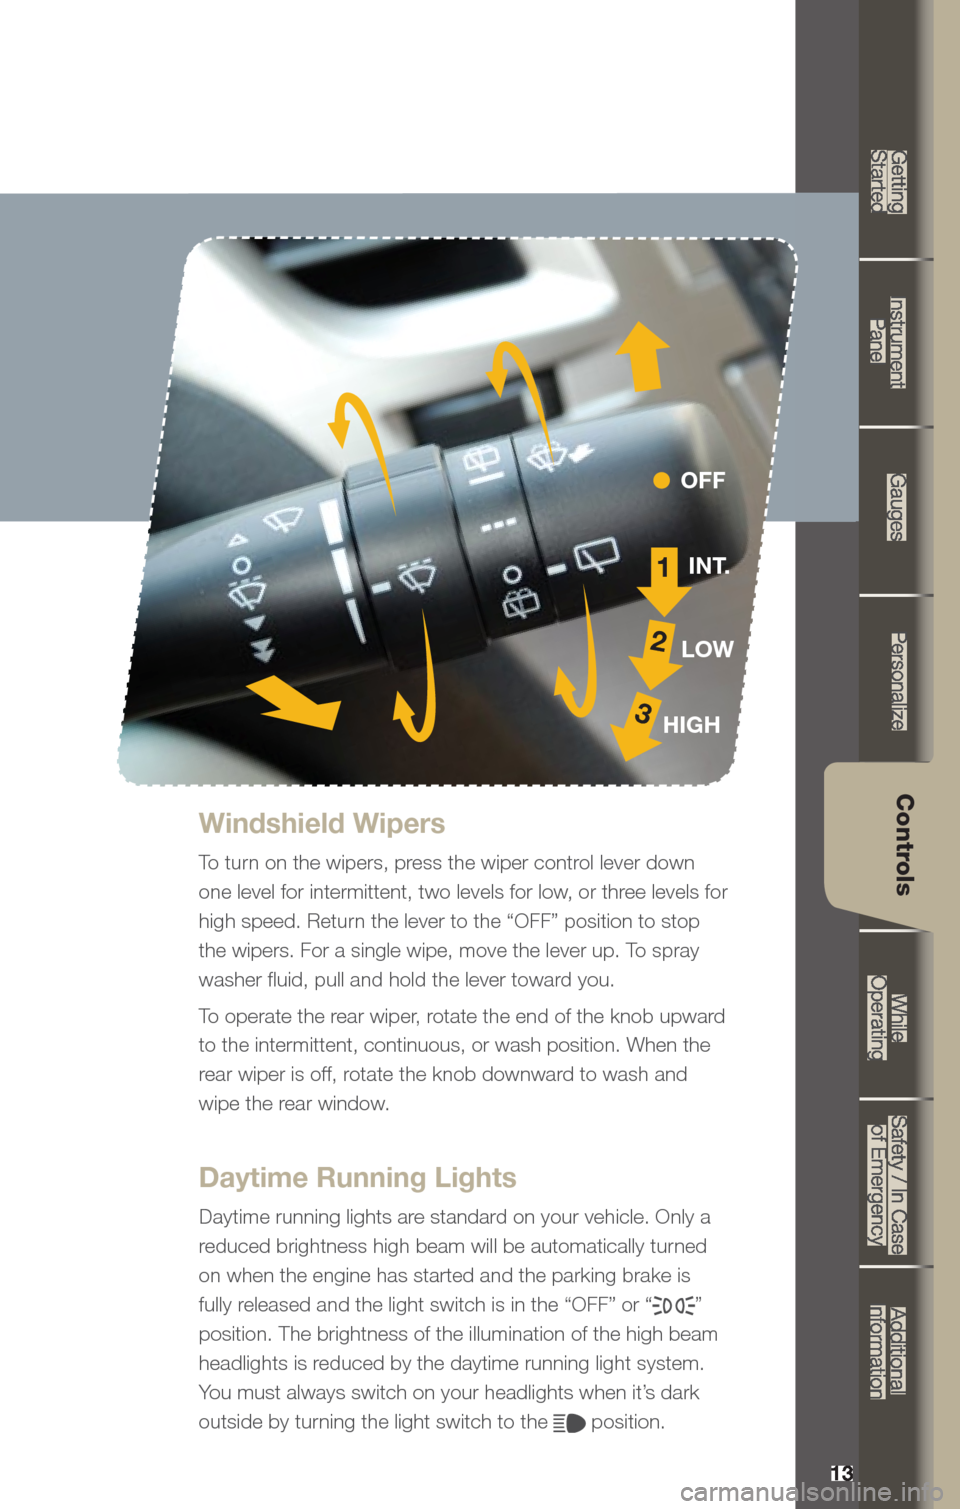
To turn on the wipers, press the wiper control lever down
one level for intermittent, two levels for low, or three levels for
high speed. Return the lever to the “OFF” position to stop
the wipers. For a single wipe, move the lever up. To spray
washer fluid, pull and hold the lever toward you.
To operate the rear wiper, rotate the end of the knob upward
to the intermittent, continuous, or wash position. When the
rear wiper is off, rotate the knob downward to wash and
wipe the rear window.
Daytime Running Lights
Daytime running lights are standard on your vehicle. Only a
reduced brightness high beam will be automatically turned
on when the engine has started and the parking brake is
fully released and the light switch is in the “OFF” or “
”
position. The brightness of the illumination of the high beam
headlights is reduced by the daytime running light system.
You must always switch on your headlights when it’s dark
outside by turning the light switch to the
position.
1
2
3
INT.
LOW
HIGH OFF
Page 22 of 36

19
Getting
Started Instrument
Panel Gauges
Personalize Controls
While
Operating Safety / In Case
of Emergency Additional
Information
19
Getting Started
Instrument Panel
Gauges
Personalize
Controls
While Operating
Safety / In Case of Emergency
Additional Information
Controls
CD Player functions
8. Load
Insert a disc into the slot. The CD
will automatically be drawn in and
will begin play at the first track.
9. Play CD
Press the “CD/AUX” button
and playback will begin.
10. Repeat / Random
Press the “RPT/RDM” button
once to repeat the current
track; press twice to repeat the
current folder.
Press and hold the “RPT/RDM”
button to randomize tracks on
a CD.
11. Eject
Press the button to eject the disc.
12. Forward / Reverse
Rotate the “TUNE/TRACK/CH”
knob clockwise to skip to the
beginning of the next track; rotate
the knob counter-clockwise to
skip to the beginning of the
current track. Rotate the knob
counter-clockwise again to go to
the previous selection.
13. Fast Forward / Fast Reverse
Press and hold the right arrow
of the “SEEK” button for more
than one second to fast forward.
Release the button to stop. To fast
reverse, press and hold the left
arrow for more than one second
and release the button to stop. 14.
Scan
Press the “SCAN” button to begin
previewing the first 10 seconds
of each track on the disc. Normal
playback will resume after all
tracks have been scanned. Press
the “SCAN” button again to stop
scanning and listen to the track
being previewed.
MP3/WMA Formatted CD
Player Functions
15. Folder Selection
Press the up arrow of the
“FOLDER” button to select the
next folder. Press the down
arrow to go back to the first
music file. Quickly press the
down arrow again to go back
to the previous folder.
16. Page Scroll
Press the “TEXT” button to select
title display. Press and hold again
to scroll through the title, 8
characters at a time. Up to a
maximum of 64 characters.
17. Display
Press and hold the “TEXT” button
during playback to change the
display to show the play time,
disc title, artist name and track
title. If the disc is formatted with
MP3/WMAs, press the “TEXT”
button to change the display to
show play time, folder name
and file name.
Page 24 of 36

21
Getting
Started Instrument
Panel Gauges
Personalize Controls
While
Operating Safety / In Case
of Emergency Additional
Information
21
Getting Started
Instrument Panel
Gauges
Personalize
Controls
While Operating
Safety / In Case of Emergency
Additional Information
Controls
CD Player functions
8. Load
Insert a disc into the slot. The CD
will automatically be drawn in and
will begin play at the first track.
9. Play CD
Press the “CD/AUX” button and
playback will begin.
10. Repeat / Random
Press the “RPT” button once to
repeat the current folder; press
twice to repeat the current track.
Press the “RDM” button once to
randomize tracks on a CD; press
twice to randomize all tracks in
a folder.
11. Eject
Press the button to eject the disc.
12. Forward / Reverse
Press the right arrow of the
“SEEK” button to skip to the
beginning of the next track.
Press the left arrow to skip to the
beginning of the current track;
press again to go to the previous
selection.
13. Fast Forward / Fast Reverse
Press and hold the right arrow
of the “SEEK” button for more
than one second to fast forward.
Release the button to stop. To fast
reverse, press and hold the left
arrow for more than one second
and release the button to stop. 14.
Scan
Press the “SCAN/A.S” button
to begin previewing the first 10
seconds of each track on the
disc. Normal playback will
resume after all tracks have
been scanned. Press the
“SCAN/A.S” button again to
stop scanning and listen to the
track being previewed.
MP3/WMA Formatted CD
Player Functions
15. Folder Selection
Rotate the “SCROLL/TUNE”
knob clockwise to select the
next folder. Rotate the knob
counter-clockwise to go to the
previous folder.
HD Radio® Functions
16. HD Radio® Selection
Press the “HD/TEXT” button while
listening to FM radio (will not
work in AM broadcast). The next
channel of the station that is being
received will play.
Yo u can change the HD Radio
®
settings by going into the
settings menu.