2013 SUBARU FORESTER steering
[x] Cancel search: steeringPage 335 of 436
10-4Appearance care
Corrosion protection
Your SUBARU has been designed and
built to resist corrosion. Special materials
and protective finishes have been used on
most parts of the vehicle to help maintain
fine appearance, strength, and reliableoperation. &Most common causes of corrosion
The most common causes of corrosion are:
1. The accumulation of moisture retain-
ing dirt and debris in body panel sections,
cavities, and other areas.
2. Damage to paint and other protective
coatings caused by gravel and stone
chips or minor accidents.
Corrosion is accelerated on the vehicle when:
1. It is exposed to road salt or dust
control chemicals, or used in coastal
areas where there is more salt in the air,
or in areas where there is considerable
industrial pollution.
2. It is driven in areas of high humidity,
especially when temperatures range just
above freezing.
3. Dampness in certain parts of the
vehicle remains for a long time, even though other parts of the vehicle may be
dry.
4. High temperatures will cause corro-
sion to parts of the vehicle which cannot
dry quickly due to lack of proper ventila-tion.
& To help prevent corrosion
Wash the vehicle regularly to prevent
corrosion of the body and suspension
components. Also, wash the vehicle
promptly after driving on any of the
following surfaces. . Roads that have been salted to prevent
them from freezing in winter. Mud, sand, or gravel
. Coastal roads
After the winter has ended, it is recom-
mended that the underbody be given a
very thorough washing.
Before the beginning of winter, check the
condition of underbody components, such
as the exhaust system, fuel and brake
lines, brake cables, suspension, steering
system, floor pan, and fenders. If any of
them are found to be rusted, they should
be given an appropriate rust prevention
treatment or should be replaced. Contact
your SUBARU dealer to perform this kind
of maintenance and treatment if you need assistance.
Repair chips and scratches in the paint as
soon as you find them.
Check the interior of the vehicle for water
and dirt accumulation under the floor mats
because that could cause corrosion.
Occasionally check under the mats to
make sure the area is dry.
Keep your garage dry. Do not park your
vehicle in a damp, poorly ventilated
garage. In such a garage, corrosion can
be caused by dampness. If you wash the
vehicle in the garage or put the vehicle
into the garage when wet or covered with
snow, that can cause dampness.
If your vehicle is operated in cold weather
and/or in areas where road salts and other
corrosive materials are used, the door
hinges and locks, and hood latch should
be inspected and lubricated periodically.
Page 338 of 436

Maintenance schedule....................................... 11-3
Maintenance precautions ................................... 11-3
Before checking or servicing in the engine compartment .................................................... 11-4
When checking or servicing in the engine compartment (non-turbo models) ...................... 11-4
When checking or servicing in the engine compartment while the engine is running .......... 11-5
Engine hood ....................................................... 11-5
Engine compartment overview .......................... 11-7
Non-turbo models .............................................. 11-7
Turbo models ..................................................... 11-8
Engine oil ............................................................ 11-9
Checking the oil level ......................................... 11-9
Changing the oil and oil filter ............................ 11-11
Recommended grade and viscosity .................. 11-13
Synthetic oil ..................................................... 11-13
Cooling system ................................................ 11-13
Cooling fan, hose and connections ................... 11-14
Engine coolant ................................................. 11-14
Air cleaner element .......................................... 11-15
Replacing the air cleaner element ..................... 11-15
Spark plugs ...................................................... 11-17
Drive belts ........................................................ 11-18
Turbo models ................................................... 11-18
Non-turbo models ............................................ 11-18
Manual transmission oil .................................. 11-19
Checking the oil level ....................................... 11-19
Recommended grade and viscosity .................. 11-19Automatic transmission fluid
.......................... 11-20
Checking the fluid level .................................... 11-20
Recommended fluid ......................................... 11-21
Front differential gear oil (AT models) ........... 11-21
Checking the oil level ...................................... 11-21
Recommended grade and viscosity .................. 11-22
Rear differential gear oil .................................. 11-22
Recommended grade and viscosity .................. 11-22
Power steering fluid ........................................ 11-22
Checking the fluid level .................................... 11-22
Recommended fluid ......................................... 11-23
Brake fluid ........................................................ 11-23
Checking the fluid level .................................... 11-23
Recommended brake fluid ............................... 11-24
Clutch fluid (MT models) ................................. 11-24
Checking the fluid level .................................... 11-24
Recommended clutch fluid ............................... 11-25
Brake booster .................................................. 11-25
Brake pedal ...................................................... 11-26
Checking the brake pedal free play .................. 11-26
Checking the brake pedal reserve distance....... 11-26
Clutch pedal (MT models) ............................... 11-27
Checking the clutch function ............................ 11-27
Checking the clutch pedal free play .................. 11-27
Hill start assist system (MT models) .............. 11-27
Replacement of brake pad and lining ............ 11-28
Breaking-in of new brake pads and linings ....... 11-28
Parking brake stroke ....................................... 11-29
Maintenance and service
11
Page 344 of 436
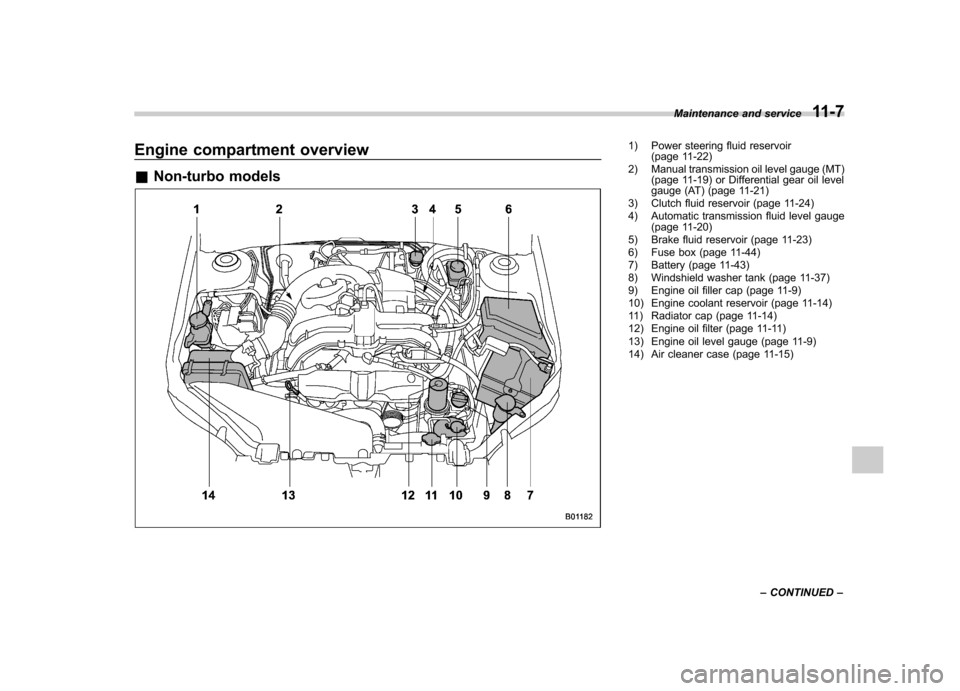
Engine compartment overview &Non-turbo models1) Power steering fluid reservoir
(page 11-22)
2) Manual transmission oil level gauge (MT) (page 11-19) or Differential gear oil level
gauge (AT) (page 11-21)
3) Clutch fluid reservoir (page 11-24)
4) Automatic transmission fluid level gauge (page 11-20)
5) Brake fluid reservoir (page 11-23)
6) Fuse box (page 11-44)
7) Battery (page 11-43)
8) Windshield washer tank (page 11-37)
9) Engine oil filler cap (page 11-9)
10) Engine coolant reservoir (page 11-14)
11) Radiator cap (page 11-14)
12) Engine oil filter (page 11-11)
13) Engine oil level gauge (page 11-9)
14) Air cleaner case (page 11-15) Maintenance and service
11-7
– CONTINUED –
Page 345 of 436
11-8Maintenance and service
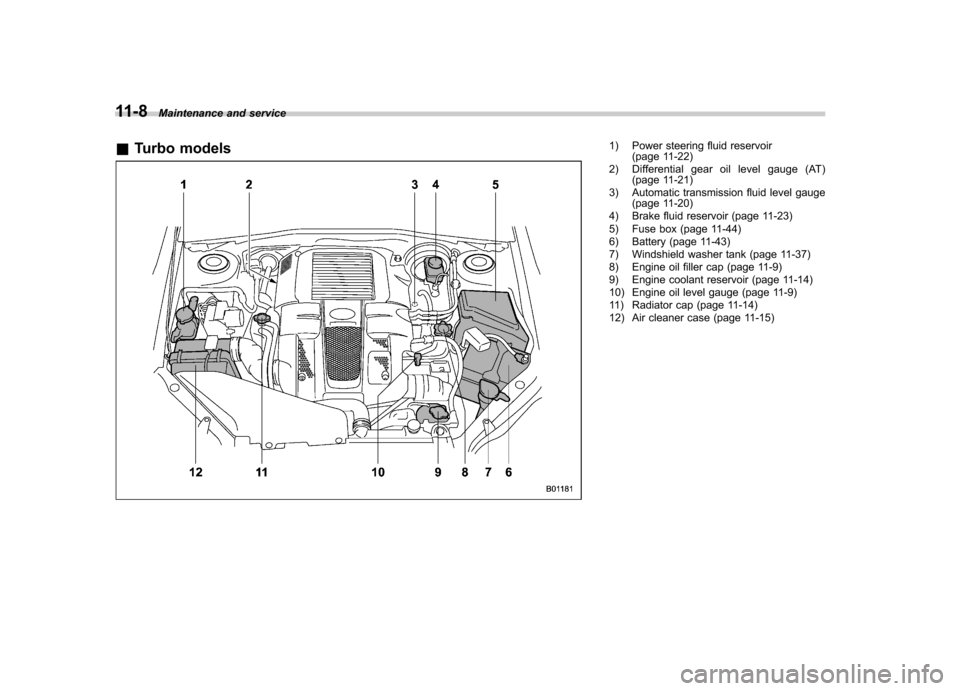
& Turbo models
1) Power steering fluid reservoir
(page 11-22)
2) Differential gear oil level gauge (AT) (page 11-21)
3) Automatic transmission fluid level gauge (page 11-20)
4) Brake fluid reservoir (page 11-23)
5) Fuse box (page 11-44)
6) Battery (page 11-43)
7) Windshield washer tank (page 11-37)
8) Engine oil filler cap (page 11-9)
9) Engine coolant reservoir (page 11-14)
10) Engine oil level gauge (page 11-9)
11) Radiator cap (page 11-14)
12) Air cleaner case (page 11-15)
Page 355 of 436
11-18Maintenance and service
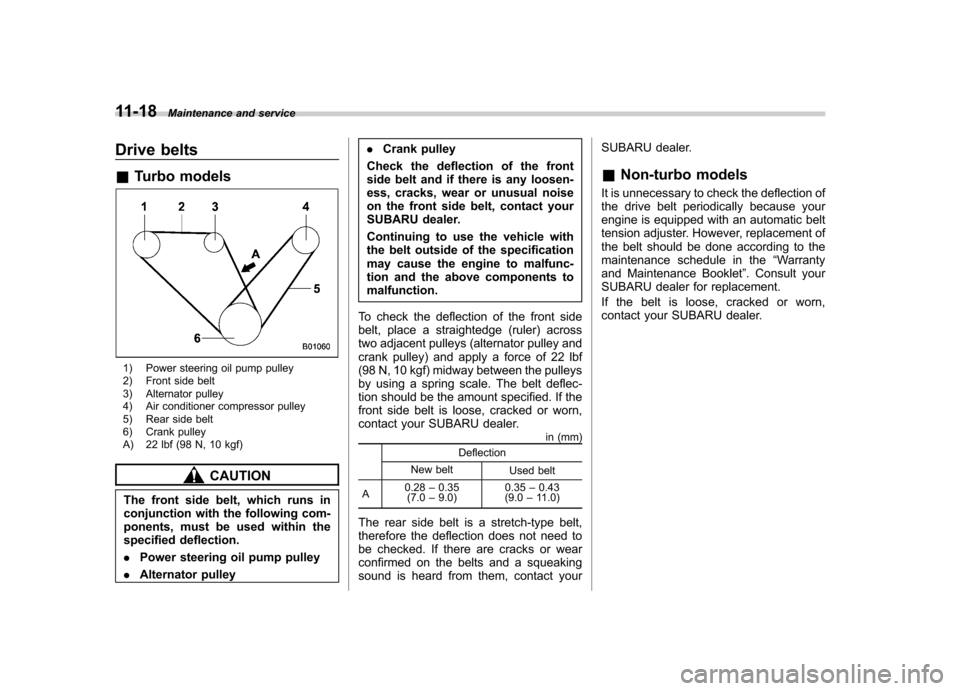
Drive belts &Turbo models
1) Power steering oil pump pulley
2) Front side belt
3) Alternator pulley
4) Air conditioner compressor pulley
5) Rear side belt
6) Crank pulley
A) 22 lbf (98 N, 10 kgf)
CAUTION
The front side belt, which runs in
conjunction with the following com-
ponents, must be used within the
specified deflection. . Power steering oil pump pulley
. Alternator pulley .
Crank pulley
Check the deflection of the front
side belt and if there is any loosen-
ess, cracks, wear or unusual noise
on the front side belt, contact your
SUBARU dealer.
Continuing to use the vehicle with
the belt outside of the specification
may cause the engine to malfunc-
tion and the above components tomalfunction.
To check the deflection of the front side
belt, place a straightedge (ruler) across
two adjacent pulleys (alternator pulley and
crank pulley) and apply a force of 22 lbf
(98 N, 10 kgf) midway between the pulleys
by using a spring scale. The belt deflec-
tion should be the amount specified. If the
front side belt is loose, cracked or worn,
contact your SUBARU dealer. in (mm)
Deflection
New belt Used belt
A 0.28
–0.35
(7.0 –9.0) 0.35
–0.43
(9.0 –11.0)
The rear side belt is a stretch-type belt,
therefore the deflection does not need to
be checked. If there are cracks or wear
confirmed on the belts and a squeaking
sound is heard from them, contact your SUBARU dealer. &
Non-turbo models
It is unnecessary to check the deflection of
the drive belt periodically because your
engine is equipped with an automatic belt
tension adjuster. However, replacement of
the belt should be done according to the
maintenance schedule in the “Warranty
and Maintenance Booklet ”. Consult your
SUBARU dealer for replacement.
If the belt is loose, cracked or worn,
contact your SUBARU dealer.
Page 359 of 436
11-22Maintenance and service
&Recommended grade and viscosity
Each oil manufacturer has its own base
oils and additives. Never use different
brands together. For details, refer to“ Manual transmission, front differential
and rear differential gear oil ”F 12-8. Rear differential gear oil
There is no rear differential gear oil level
gauge. To check the rear differential gear
oil level, consult your SUBARU dealer forinspection. &
Recommended grade and viscosity
Each oil manufacturer has its own base
oils and additives. Never use different
brands together. For details, refer to“ Manual transmission, front differential
and rear differential gear oil ”F 12-8. Power steering fluid &
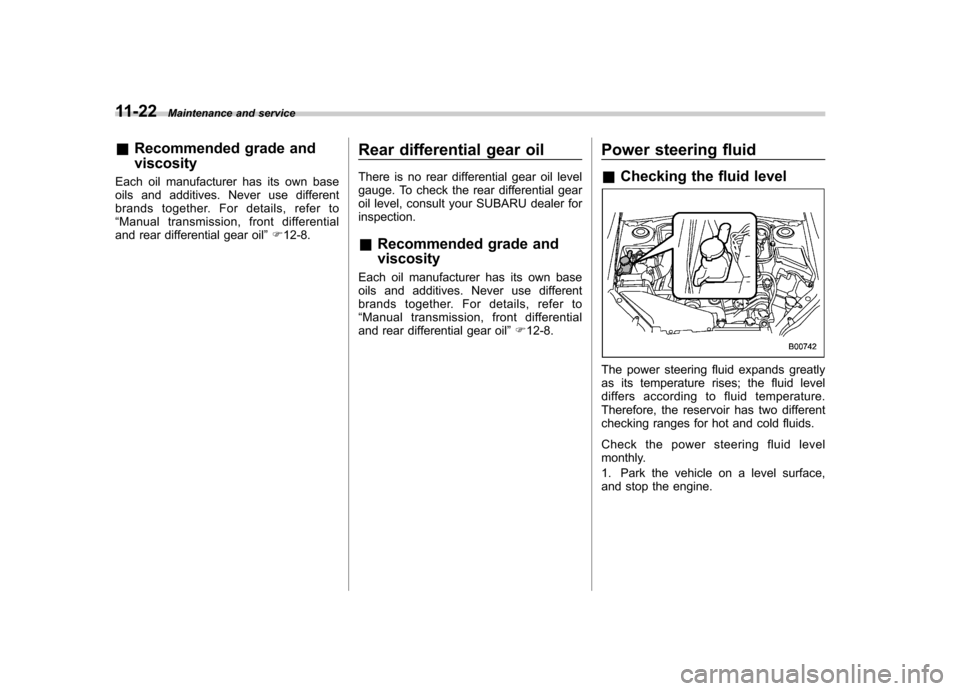
Checking the fluid level
The power steering fluid expands greatly
as its temperature rises; the fluid level
differs according to fluid temperature.
Therefore, the reservoir has two different
checking ranges for hot and cold fluids.
Check the power steering fluid level
monthly.
1. Park the vehicle on a level surface,
and stop the engine.
Page 360 of 436
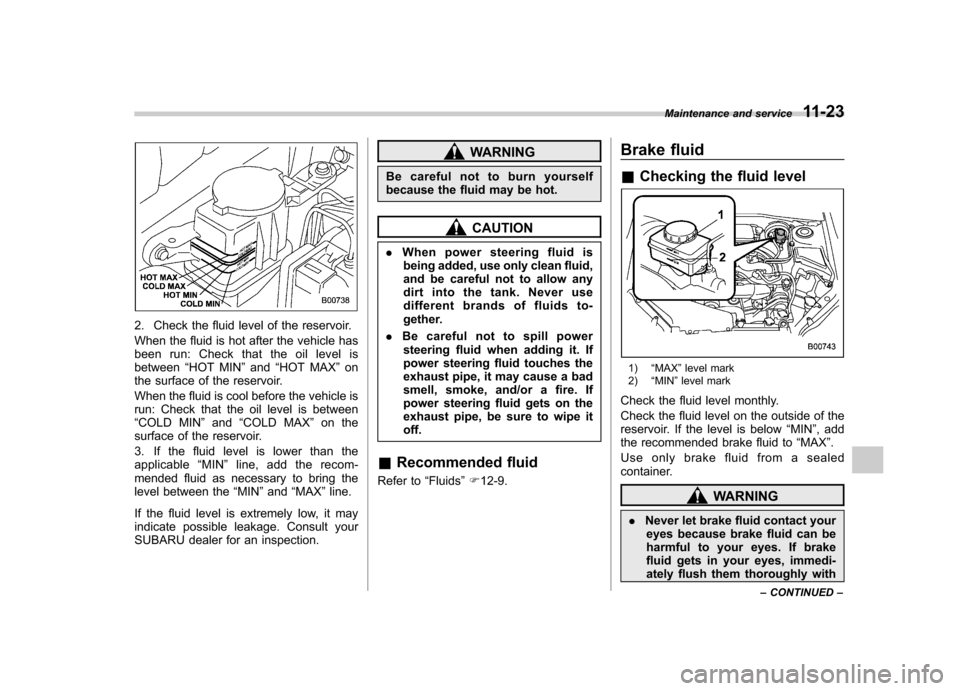
2. Check the fluid level of the reservoir.
When the fluid is hot after the vehicle has
been run: Check that the oil level isbetween“HOT MIN ”and “HOT MAX ”on
the surface of the reservoir.
When the fluid is cool before the vehicle is
run: Check that the oil level is between“ COLD MIN ”and “COLD MAX ”on the
surface of the reservoir.
3. If the fluid level is lower than the
applicable “MIN ”line, add the recom-
mended fluid as necessary to bring the
level between the “MIN ”and “MAX ”line.
If the fluid level is extremely low, it may
indicate possible leakage. Consult your
SUBARU dealer for an inspection.
WARNING
Be careful not to burn yourself
because the fluid may be hot.
CAUTION
. When power steering fluid is
being added, use only clean fluid,
and be careful not to allow any
dirt into the tank. Never use
different brands of fluids to-
gether.
. Be careful not to spill power
steering fluid when adding it. If
power steering fluid touches the
exhaust pipe, it may cause a bad
smell, smoke, and/or a fire. If
power steering fluid gets on the
exhaust pipe, be sure to wipe itoff.
& Recommended fluid
Refer to “Fluids ”F 12-9. Brake fluid &
Checking the fluid level
1) “MAX ”level mark
2) “MIN ”level mark
Check the fluid level monthly.
Check the fluid level on the outside of the
reservoir. If the level is below “MIN ”, add
the recommended brake fluid to “MAX ”.
Use only brake fluid from a sealed
container.
WARNING
. Never let brake fluid contact your
eyes because brake fluid can be
harmful to your eyes. If brake
fluid gets in your eyes, immedi-
ately flush them thoroughly with Maintenance and service
11-23
– CONTINUED –
Page 369 of 436
11-32Maintenance and service
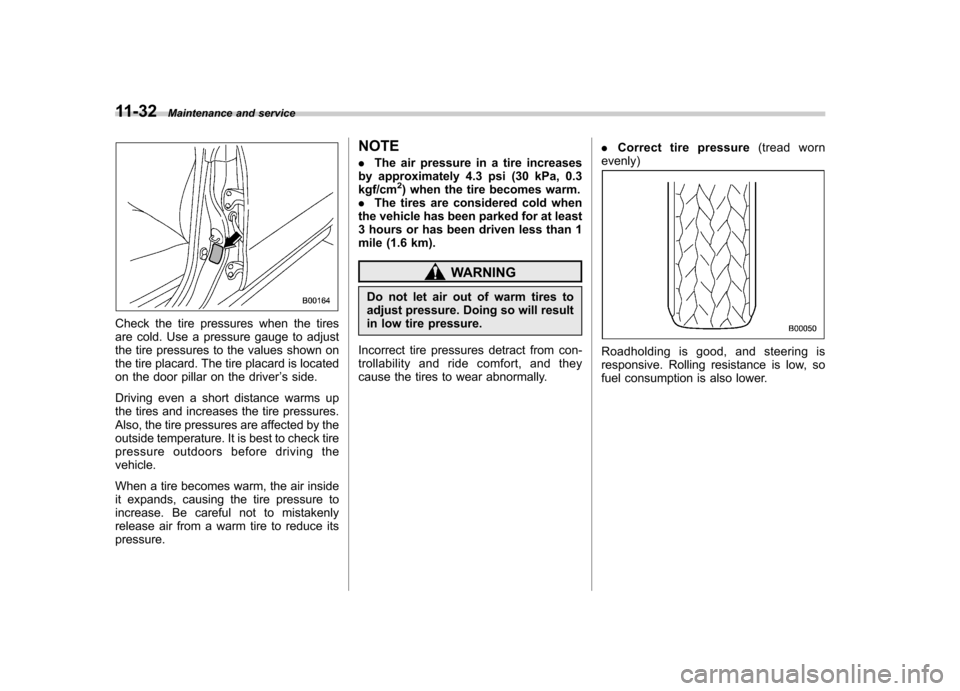
Check the tire pressures when the tires
are cold. Use a pressure gauge to adjust
the tire pressures to the values shown on
the tire placard. The tire placard is located
on the door pillar on the driver ’s side.
Driving even a short distance warms up
the tires and increases the tire pressures.
Also, the tire pressures are affected by the
outside temperature. It is best to check tire
pressure outdoors before driving thevehicle.
When a tire becomes warm, the air inside
it expands, causing the tire pressure to
increase. Be careful not to mistakenly
release air from a warm tire to reduce itspressure. NOTE .
The air pressure in a tire increases
by approximately 4.3 psi (30 kPa, 0.3 kgf/cm
2) when the tire becomes warm.
. The tires are considered cold when
the vehicle has been parked for at least
3 hours or has been driven less than 1
mile (1.6 km).
WARNING
Do not let air out of warm tires to
adjust pressure. Doing so will result
in low tire pressure.
Incorrect tire pressures detract from con-
trollability and ride comfort, and they
cause the tires to wear abnormally. .
Correct tire pressure (tread worn
evenly)
Roadholding is good, and steering is
responsive. Rolling resistance is low, so
fuel consumption is also lower.