2013 SUBARU FORESTER stop start
[x] Cancel search: stop startPage 131 of 436

3-20Instruments and controls
km/h). .The warning light illuminates during
driving, but it turns off immediately and
remains off.
When driving with an insufficient battery
voltage such as when the engine is jump
started, the ABS warning light may illumi-
nate. This is due to the low battery voltage
and does not indicate a malfunction.
When the battery becomes fully charged,
the light will turn off. & Brake system
warning light
WARNING
. Driving with the brake system
warning light on is dangerous.
This indicates your brake system
may not be working properly. If
the light remains illuminated,
have the brakes inspected by a
SUBARU dealer immediately.
. If at all in doubt about whether
the brakes are operating prop-
erly, do not drive the vehicle.
Have your vehicle towed to the
nearest SUBARU dealer for re-
pair.
This light has the following functions. !
Parking brake warning
The light illuminates with the parking
brake applied while the ignition switch is
in the “ON ”position. It turns off when the
parking brake is fully released. ! Brake fluid level warning
This light illuminates when the brake fluid
level has dropped to near the “MIN ”level
of the brake fluid reservoir with the ignition
switch in the “ON ”position and with the
parking brake fully released.
If the brake system warning light should
illuminate while driving (with the parking
brake fully released and with the ignition
switch positioned in “ON ”), it could be an
indication of leaking of brake fluid or worn
brake pads. If this occurs, immediately
stop the vehicle at the nearest safe place
and check the brake fluid level. If the fluid
level is below the “MIN ”mark in the
reservoir, do not drive the vehicle. Have
the vehicle towed to the nearest SUBARU
dealer for repair. ! Electronic Brake Force Distribution
(EBD) system warning
The EBD system may be malfunctioning if
the brake system warning light and ABS
warning light illuminate simultaneously
during driving.
Even if the EBD system fails, the conven- tional braking system will still function.
However, the rear wheels will be more
prone to locking when the brakes are
applied harder than usual and the vehi-cle
’s motion may therefore become some-
what harder to control.
If the brake system warning light and ABS
warning light illuminate simultaneously,
take the following steps.
1. Stop the vehicle in the nearest safe,
flat place.
2. Shut down the engine, apply the
parking brake and then restart it.
3. Release the parking brake. If both
warning lights turn off, the EBD system
may be malfunctioning. Drive carefully to
the nearest SUBARU dealer and have the
system inspected.
4. If both warning lights illuminate again
and stay illuminated after the engine has
been restarted, shut down the engine
again, apply the parking brake, and check
the brake fluid level.
5. If the brake fluid level is not below the “ MIN ”mark, the EBD system may be
malfunctioning. Drive carefully to the
nearest SUBARU dealer and have the
system inspected.
6. If the brake fluid level is below the “ MIN ”mark, DO NOT drive the vehicle.
Instead, have the vehicle towed to the
nearest SUBARU dealer for repair.
Page 147 of 436

3-36Instruments and controls
mittently at intervals corresponding to the
vehicle speed (longer when the vehicle
speed is low; shorter when the vehicle
speed is high).
When you subsequently shift the trans-
mission into reverse, the rear wiper will
automatically switch to continuous opera-
tion. When the transmission is shifted to a
position other than reverse, the rear wiper
will return to intermittent operation. !Washer
To wash the rear window while the rear
wiper is operating, turn the knob upward tothe “
”position. The washer fluid sprays
until you release the knob.
To wash the rear window when the rear
wiper is not in use, turn the knob down-
ward to the “
”position. The washer fluid
sprays, and 2 seconds later the rear wiper
operates. Releasing the knob stops the
washer fluid spray, and 3 seconds later
the rear wiper stops. Mirrors
Always check that the inside and outside
mirrors are properly adjusted before you
start driving. &
Inside mirror
The inside mirror has a day and night
position. Pull the tab at the bottom of the
mirror toward you for the night position.
Push it away for the day position. The
night position reduces glare from head-
lights of vehicles behind you. &
Auto-dimming mirror/com-
pass (if equipped)
1) Auto dimming indicator
2) Left (mirror) button
3) Photosensor
4) Right (compass) button
5) Compass display
The auto-dimming mirror has an anti-glare
feature which automatically reduces glare
coming from headlights of vehicles behind
you. It also contains a built-in compass. . By pressing and releasing the left
button, the automatic dimming function is
toggled on or off. When the automatic
dimming function is on, the auto dimming
indicator light (green) located on the left
button will illuminate. . By pressing and releasing the right
Page 186 of 436

FM/AM radio operation &FM/AM selection
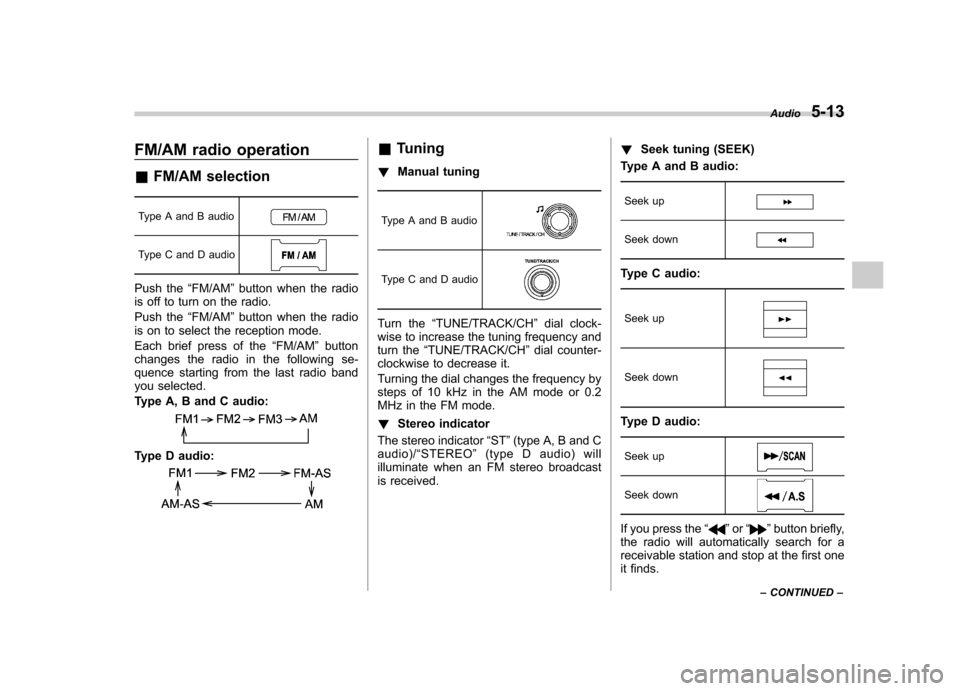
Type A and B audio
Type C and D audio
Push the “FM/AM ”button when the radio
is off to turn on the radio.
Push the “FM/AM ”button when the radio
is on to select the reception mode.
Each brief press of the “FM/AM ”button
changes the radio in the following se-
quence starting from the last radio band
you selected.
Type A, B and C audio:
Type D audio:
& Tuning
! Manual tuning
Type A and B audio
Type C and D audio
Turn the “TUNE/TRACK/CH ”dial clock-
wise to increase the tuning frequency and
turn the “TUNE/TRACK/CH ”dial counter-
clockwise to decrease it.
Turning the dial changes the frequency by
steps of 10 kHz in the AM mode or 0.2
MHz in the FM mode. ! Stereo indicator
The stereo indicator “ST ”(type A, B and C
audio)/ “STEREO ”(type D audio) will
illuminate when an FM stereo broadcast
is received. !
Seek tuning (SEEK)
Type A and B audio:
Seek up
Seek down
Type C audio:
Seek up
Seek down
Type D audio:Seek up
Seek down
If you press the “”or “”button briefly,
the radio will automatically search for a
receivable station and stop at the first one
it finds. Audio
5-13
– CONTINUED –
Page 197 of 436

5-24Audio
!Loading all the magazine (full disc
loading mode)
1. If you continue to press the
button for more than 1.5 seconds, the
player will produce beep sound and will
enter the full disc loading mode.
2. When the disc number indicator
flashes and “ALL LOAD ”indicator illumi-
nates, insert a disc within 15 seconds. If a
disc is successfully loaded during this
period, the disc number indicator will stop
blinking and will steadily light.
3. When the loading of a disc is com-
plete, the next disc number indicator will
blink. Then repeat step 2.
4. When the magazine is filled with discs
by repeating steps 2 and 3, the player will
start playback of the discs, beginning with
the one inserted first.
If you fail to insert any disc during each 15
seconds interval, the full disc loading
mode will be canceled, and the player will
start playback of the disc inserted first. & How to play back a CD
! When there is no CD inserted
Properly insert a CD. Refer to “How to
insert a CD (type A, C and D) ”F 5-23 /
“ How to insert a CD(s) (type B) ”F 5-23.
When a CD is loaded, the player will start
playback of the CD, beginning with the first track. !
When CD is in the player (type A)
When thebutton is pressed, the
player will start playback. ! When there are CDs loaded (type B)
Press a desired one of the disc select
buttons (from
to) the disc
number indicator of which steadily lights
up. The player will then start playback of
the selected CD, beginning with the firsttrack.
If a disc that the player cannot read has
been loaded, the player will display themessage “CHECK DISC ”.
! When CD is in the player (type C
and D)
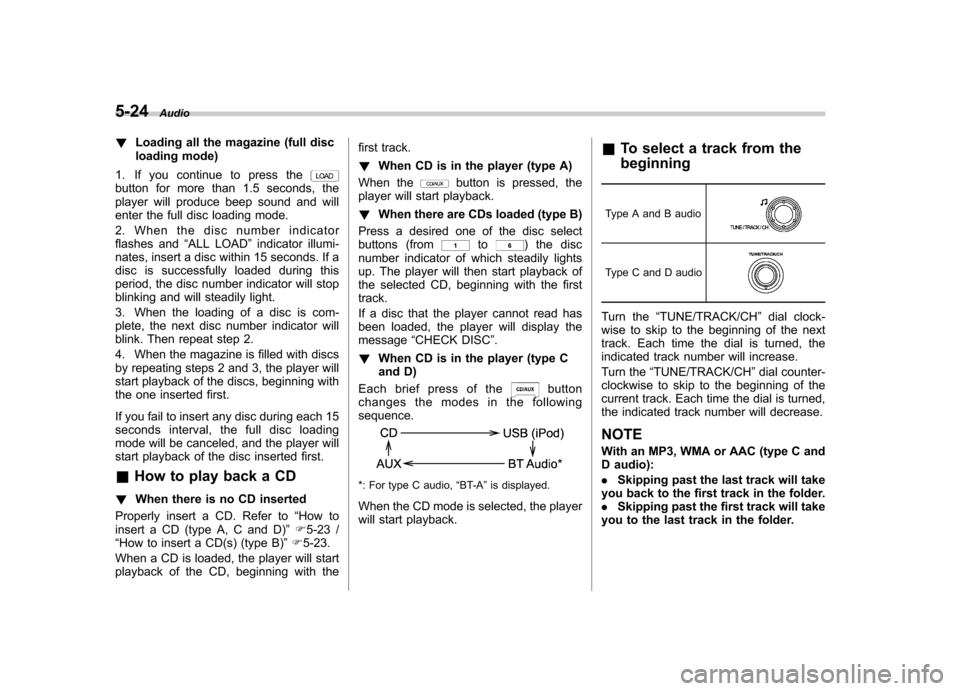
Each brief press of the
button
changes the modes in the following sequence.
*: For type C audio, “BT-A ”is displayed.
When the CD mode is selected, the player
will start playback. &
To select a track from the beginning
Type A and B audio
Type C and D audio
Turn the “TUNE/TRACK/CH ”dial clock-
wise to skip to the beginning of the next
track. Each time the dial is turned, the
indicated track number will increase.
Turn the “TUNE/TRACK/CH ”dial counter-
clockwise to skip to the beginning of the
current track. Each time the dial is turned,
the indicated track number will decrease.
NOTE
With an MP3, WMA or AAC (type C and
D audio): . Skipping past the last track will take
you back to the first track in the folder. . Skipping past the first track will take
you to the last track in the folder.
Page 198 of 436

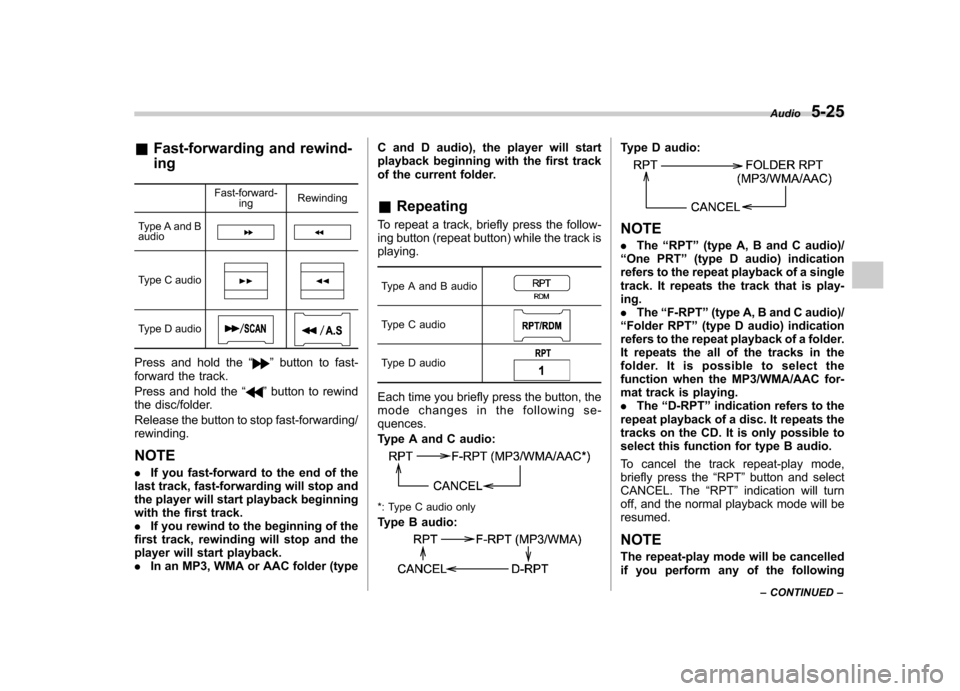
&Fast-forwarding and rewind- ing
Fast-forward-ing Rewinding
Type A and B audio
Type C audio
Type D audio
Press and hold the “”button to fast-
forward the track.
Press and hold the “
”button to rewind
the disc/folder.
Release the button to stop fast-forwarding/ rewinding.
NOTE . If you fast-forward to the end of the
last track, fast-forwarding will stop and
the player will start playback beginning
with the first track.. If you rewind to the beginning of the
first track, rewinding will stop and the
player will start playback.. In an MP3, WMA or AAC folder (type C and D audio), the player will start
playback beginning with the first track
of the current folder. &
Repeating
To repeat a track, briefly press the follow-
ing button (repeat button) while the track isplaying.
Type A and B audio
Type C audio
Type D audio
Each time you briefly press the button, the
mode changes in the following se-quences.
Type A and C audio:
*: Type C audio only
Type B audio:
Type D audio:
NOTE . The “RPT ”(type A, B and C audio)/
“ One PRT ”(type D audio) indication
refers to the repeat playback of a single
track. It repeats the track that is play-ing.. The “F-RPT ”(type A, B and C audio)/
“ Folder RPT ”(type D audio) indication
refers to the repeat playback of a folder.
It repeats the all of the tracks in the
folder. It is possible to select the
function when the MP3/WMA/AAC for-
mat track is playing.. The “D-RPT ”indication refers to the
repeat playback of a disc. It repeats the
tracks on the CD. It is only possible to
select this function for type B audio.
To cancel the track repeat-play mode,
briefly press the “RPT ”button and select
CANCEL. The “RPT ”indication will turn
off, and the normal playback mode will beresumed.
NOTE
The repeat-play mode will be cancelled
if you perform any of the following Audio
5-25
– CONTINUED –
Page 228 of 436

!Deleting registered cell phone from
the list
1. Select the “DELETE ”menu.
2. Select a cell phone to be deleted by
performing either of the following proce-dures. –Operate the “TUNE/TRACK/CH ”
dial. – Press the talk switch
and say
the voice tag.
3. Select the “CONFIRM ”menu. “DE-
LETED ”is displayed, the data is deleted
and the mode changes to the “PHONE
SETUP ”mode.
! System setup
After selecting the “SYSTEM SETUP ”
menu, perform the following procedures.
You can select the following menus only
by operating the “TUNE/TRACK/CH ”dial.
! Setting guidance volume
To set the guidance volume, perform the
following procedure.
1. Select the “GUIDANCE VOL ”/“ GUI-
DANCE VOLUME ”menu.
2. Set the guidance volume by operating the “TUNE/TRACK/CH ”dial. !
Initializing the registered data
To initialize the registered data, perform
the following procedure.
1. Select the “INITIALIZE ”menu.
2. Select the “CONFIRM ”menu. First
“ PLEASE WAIT ”, then “INITIALIZED ”is
displayed. The registered data is initia-
lized and the mode changes to the lastmode. ! Selecting language
To select the language, perform the
following procedure.
1. Select the “SEL LANGUAGE ”/“ SE-
LECT LANGUAGE ”menu.
2. Select the desired language by oper-
ating the “TUNE/TRACK/CH ”dial. Screensaver (type D audio)
If the following operations are not per-
formed for more than 30 seconds while
the audio is ON, the screensaver will bedisplayed. .
Operate any button or dial
. Shift the shift lever/select lever to the
“ R ”position
. A cell phone registered in the Hands-
free system is called
If one of the following operations is
performed, the screensaver turns off and
the operation screen will be displayed. . A cell phone registered in the Hands-
free system is called. The update for satellite radio starts.
. The update for satellite radio stops.
If one of the following operations is
performed, the screensaver turns off.
However, the operation screen will not
be displayed. . Operate any button or any dial in a
condition other than the following condi- tions
–Pressing the
button while a
mode other than the CD mode is selected – Pressing the volume control buttons
of the audio control buttons Audio
5-55
– CONTINUED –
Page 252 of 436

Fuel...................................................................... 7-2
Fuel requirements ............................................... 7-2
Fuel filler lid and cap ........................................... 7-3
State emission testing (U.S. only) ...................... 7-6
Preparing to drive ............................................... 7-7
Starting the engine .............................................. 7-7
MT models .......................................................... 7-7
AT models ........................................................... 7-8
Stopping the engine ............................................ 7-9
Remote engine start system (dealer option) ..... 7-9
Starting your vehicle .......................................... 7-10
Remote start safety features ............................... 7-10
Entering the vehicle while it is running via remote start ................................................................. 7-10
Entering the vehicle following remote engine start shutdown ......................................................... 7-10
Pre-heating or pre-cooling the interior of the vehicle ............................................................. 7-11
Service mode ..................................................... 7-11
Remote transmitter programming and programmable feature option ............................ 7-11
System maintenance .......................................... 7-12
Manual transmission .......................................... 7-13
Shifting speeds .................................................. 7-14
Driving tips ........................................................ 7-14
Automatic transmission ..................................... 7-15
Select lever ........................................................ 7-16
Shift lock function .............................................. 7-17
Selection of manual mode .................................. 7-19
Driving tips ........................................................ 7-20 SPORT mode
..................................................... 7-20
Power steering ................................................... 7-21
Braking ............................................................... 7-22
Braking tips ....................................................... 7-22
Brake system .................................................... 7-22
Disc brake pad wear warning indicators ............. 7-23
ABS (Anti-lock Brake System) .......................... 7-23
ABS system self-check ...................................... 7-23
ABS warning light .............................................. 7-23
Electronic Brake Force Distribution (EBD) system ............................................................. 7-24
Steps to take if EBD system malfunctions ..... ..... 7-24
Vehicle Dynamics Control system .................... 7-25
Vehicle Dynamics Control system monitor..... ..... 7-26
Vehicle Dynamics Control OFF switch ................ 7-27
Tire pressure monitoring system (TPMS) (U.S.-spec. models). ........................................ 7-27
Parking your vehicle ......................................... 7-29
Parking brake .................................................... 7-29
Parking tips ....................................................... 7-29
Hill start assist system (MT models) ................ 7-31
Hill start assist warning light .............................. 7-32
Cruise control .................................................... 7-32
To set cruise control .......................................... 7-32
To temporarily cancel the cruise control ............. 7-33
To turn off the cruise control .............................. 7-34
To change the cruising speed .. .......................... 7-34
Cruise control indicator light .............................. 7-35
Cruise control set indicator light ........................ 7-35
Starting and operating
7
Page 255 of 436

7-4Starting and operating
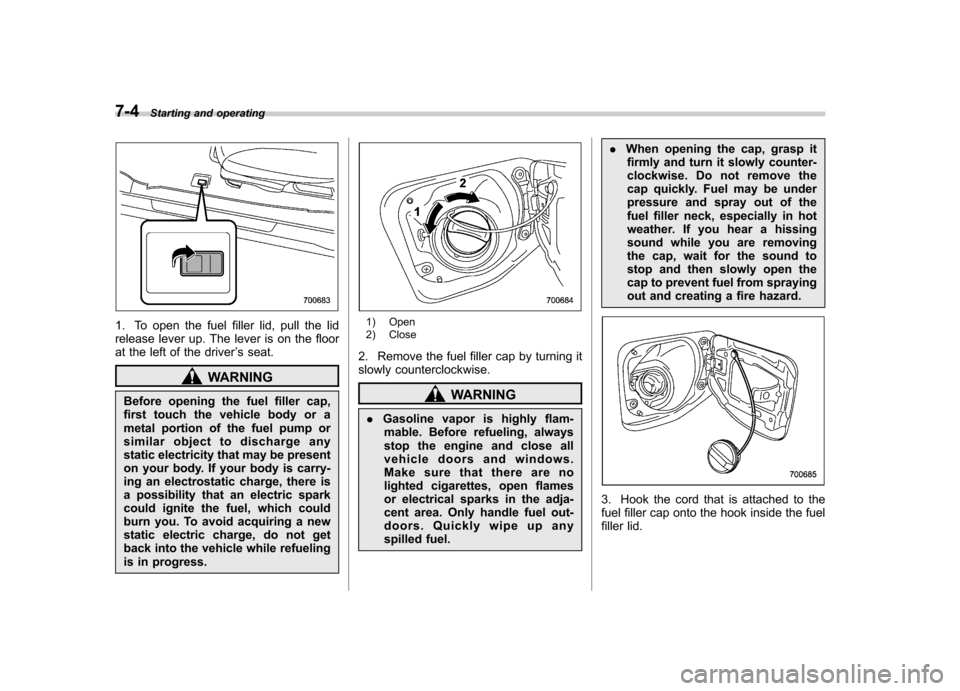
1. To open the fuel filler lid, pull the lid
release lever up. The lever is on the floor
at the left of the driver ’s seat.
WARNING
Before opening the fuel filler cap,
first touch the vehicle body or a
metal portion of the fuel pump or
similar object to discharge any
static electricity that may be present
on your body. If your body is carry-
ing an electrostatic charge, there is
a possibility that an electric spark
could ignite the fuel, which could
burn you. To avoid acquiring a new
static electric charge, do not get
back into the vehicle while refueling
is in progress.
1) Open
2) Close
2. Remove the fuel filler cap by turning it
slowly counterclockwise.
WARNING
. Gasoline vapor is highly flam-
mable. Before refueling, always
stop the engine and close all
vehicle doors and windows.
Make sure that there are no
lighted cigarettes, open flames
or electrical sparks in the adja-
cent area. Only handle fuel out-
doors. Quickly wipe up any
spilled fuel. .
When opening the cap, grasp it
firmly and turn it slowly counter-
clockwise. Do not remove the
cap quickly. Fuel may be under
pressure and spray out of the
fuel filler neck, especially in hot
weather. If you hear a hissing
sound while you are removing
the cap, wait for the sound to
stop and then slowly open the
cap to prevent fuel from spraying
out and creating a fire hazard.
3. Hook the cord that is attached to the
fuel filler cap onto the hook inside the fuel
filler lid.