2013 SUBARU FORESTER clock
[x] Cancel search: clockPage 188 of 436
Type C audio:Seek up
Seek down
In the PTY selection mode, when the
preferred PTY group has been selected,
pressing the “SEEK ”button “
”or “”
seeks within that PTY group.
The control function returns to the normal
mode after approximately 10 seconds. ! Seek in PTY (Program type) group
(type D audio)
In the PTY selection mode, when the
preferred PTY group has been selected,
turning the “TUNE/TRACK/CH ”dial seeks
within that PTY group. Turning the dial
clockwise seeks up. Turning the dial
counterclockwise seeks down.
The control function returns to the normal
mode after approximately 10 seconds. &
HD Radio
TMTechnology (Di-
gital AM and FM Radio) (type
D audio)
HD Radio Technology is fueling the digital
radio revolution in the United States and
around the world.
The digital technology enables broadcas-
ters to offer new and unique FM content
via HD2 / HD3 channels, crystal-clear
sound and data services on both AM
and FM bands - all free, with no subscrip-
tion fee.
HD Radio Technology manufactured un-
der license from iBiquity Digital Corpora-
tion. U.S. and Foreign Patents. HD Radio
®
and the HD, HD Radio, and “Arc ”logos
are proprietary trademarks of iBiquity
Digital Corp. For more information, visit www.hdradio.com.
Press the
button while receiving the
FM radio (except analog broadcast). The
next channel of the station that is being
received will be received. ! Mode selection
Turn the “TUNE/TRACK/CH ”dial and
select the HD Radio ON mode (hybrid
mode) or OFF mode (analog mode). ! iTunes
®tagging
To tag the received song, press and hold the
button for more than 1.5
seconds. Connect the iPod®to store the
tagged song to the iPod®. When the iPod®
is connected to iTunes®, you can pur-
chase the tagged songs from the Apple®
iTunes Music Store.
For the models of iPod®that support
iTunes®tagging, refer to the following
website: www.hdradio.com/tagging.php? id=itunes. ! HD Radio indicators
Each indicator illuminates under the fol-
lowing conditions. . The
indicator illuminates while the
digital broadcast is received during the HD
Radio ON mode. . The “TA G ”indicator illuminates while
you can operate the iTunes
®tagging.
Audio
5-15
– CONTINUED –
Page 193 of 436
5-20Audio
&Band selection
Type A and B audio
Type C audio
Type D audio
Push the “SAT ”button when the radio is
off to turn on the radio.
Push the “SAT ”button when the radio is
on to select SAT1, SAT2 or SAT3 recep-
tion mode.
& Channel and category selec- tion
! Channel selection
Type A and B audio
Type C and D audio
Turn the “TUNE/TRACK/CH ”dial clock- wise to select the next channel and turn the
“TUNE/TRACK/CH ”dial counterclock-
wise to select the previous channel. ! Skip channel selection
When in the SAT mode, perform the
following procedures to change to the
channel selection mode.
Type A and B audio: Press and hold the
following button.
Channel up by 10 steps
Channel down by 10 steps
Type C audio: Press and hold the
following button.
Channel up by 10 steps
Channel down by 10 steps
Type D audio: Press the following button
briefly.
Channel up by 10 steps
Channel down by 10 steps
! Category selection
! Type A, B and C audio
Type A and B audio
Type C audio
To activate the category search mode,
press the “PTY/CAT ”button. To deactivate
the category search mode, press the“ PTY/CAT ”button again.
When in the category search mode, press
the following button to change the cate-
gory up or down.
Page 197 of 436
5-24Audio
!Loading all the magazine (full disc
loading mode)
1. If you continue to press the
button for more than 1.5 seconds, the
player will produce beep sound and will
enter the full disc loading mode.
2. When the disc number indicator
flashes and “ALL LOAD ”indicator illumi-
nates, insert a disc within 15 seconds. If a
disc is successfully loaded during this
period, the disc number indicator will stop
blinking and will steadily light.
3. When the loading of a disc is com-
plete, the next disc number indicator will
blink. Then repeat step 2.
4. When the magazine is filled with discs
by repeating steps 2 and 3, the player will
start playback of the discs, beginning with
the one inserted first.
If you fail to insert any disc during each 15
seconds interval, the full disc loading
mode will be canceled, and the player will
start playback of the disc inserted first. & How to play back a CD
! When there is no CD inserted
Properly insert a CD. Refer to “How to
insert a CD (type A, C and D) ”F 5-23 /
“ How to insert a CD(s) (type B) ”F 5-23.
When a CD is loaded, the player will start
playback of the CD, beginning with the first track. !
When CD is in the player (type A)
When thebutton is pressed, the
player will start playback. ! When there are CDs loaded (type B)
Press a desired one of the disc select
buttons (from
to) the disc
number indicator of which steadily lights
up. The player will then start playback of
the selected CD, beginning with the firsttrack.
If a disc that the player cannot read has
been loaded, the player will display themessage “CHECK DISC ”.
! When CD is in the player (type C
and D)
Each brief press of the
button
changes the modes in the following sequence.
*: For type C audio, “BT-A ”is displayed.
When the CD mode is selected, the player
will start playback. &
To select a track from the beginning
Type A and B audio
Type C and D audio
Turn the “TUNE/TRACK/CH ”dial clock-
wise to skip to the beginning of the next
track. Each time the dial is turned, the
indicated track number will increase.
Turn the “TUNE/TRACK/CH ”dial counter-
clockwise to skip to the beginning of the
current track. Each time the dial is turned,
the indicated track number will decrease.
NOTE
With an MP3, WMA or AAC (type C and
D audio): . Skipping past the last track will take
you back to the first track in the folder. . Skipping past the first track will take
you to the last track in the folder.
Page 209 of 436

5-36Audio
to the shuffle playback on the entire iPod
®. It randomly repeats all of the
tracks on the iPod®.
. When an iPod®is connected, the
tracks are played back at random by
the shuffle function of the iPod
®. There-
fore, iPod®operation may be different
depending on the model of the con-
nected iPod
®.
. When an audiobook or a podcast is
playing, the mode does not change
even if you press the “RDM ”button.
To cancel the random playback mode,
press the “RDM ”button and select CAN-
CEL. The “RDM ”indication will turn off
and the normal playback mode will re-sume. & SCAN (only when connecting
USB storage device) (type Caudio)
Scan is operated in the same way as for a
CD. For details, refer to “Scan (type A, B
and C audio) ”F 5-27.
NOTE
When an iPod
®is connected, you
cannot select the SCAN mode. &
Selecting category (only
when connecting iPod
®)
When the
button is pressed briefly,
the iPod®menu is displayed.
Each time you turn the “TUNE/TRACK/
CH ”dial clockwise, the displayed category
changes in the following sequence. Each
time you turn the dial counterclockwise,
the displayed category changes in the
opposite sequence.
To select the category, press the dial. To
close the iPod®menu, press and hold thebutton. To return to the previous
screen, briefly press thebutton.
& Display selection
Refer to “Display selection (type A, B and
C audio) ”F 5-27. !
Page scroll
Refer to “Page (track/folder title) scroll ”
F 5-27.
& Folder selection (only when
connecting USB storage de- vice)
Refer to “Folder selection ”F 5-28.
NOTE
When an iPod
®is connected, you
cannot select a folder. & Setting the playing speed
(only when the audiobook is
playing) (type D audio)
Each time you briefly press
(the
“ RPT ”button) while the audiobook is
playing, the playing speed changes in
the following sequence.
& When the following mes-
sages are displayed
If one of the following messages is
displayed while connecting the USB sto-
rage device/iPod
®, determine the cause
Page 234 of 436
Storage compartment
CAUTION
. Always keep the storage com-
partment closed while driving to
reduce the risk of injury in the
event of a sudden stop or anaccident.
. Do not store spray cans, contain-
ers with flammable or corrosive
liquids or any other dangerous
items in the storage compart-ment. &
Glove box
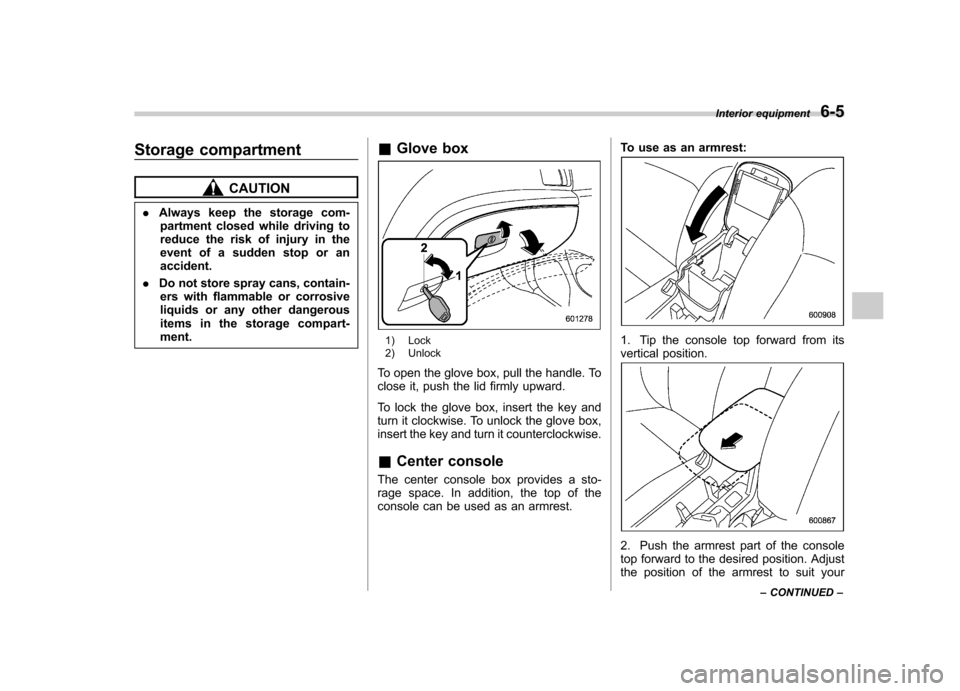
1) Lock
2) Unlock
To open the glove box, pull the handle. To
close it, push the lid firmly upward.
To lock the glove box, insert the key and
turn it clockwise. To unlock the glove box,
insert the key and turn it counterclockwise. & Center console
The center console box provides a sto-
rage space. In addition, the top of the
console can be used as an armrest. To use as an armrest:1. Tip the console top forward from its
vertical position.
2. Push the armrest part of the console
top forward to the desired position. Adjust
the position of the armrest to suit yourInterior equipment
6-5
– CONTINUED –
Page 255 of 436
7-4Starting and operating
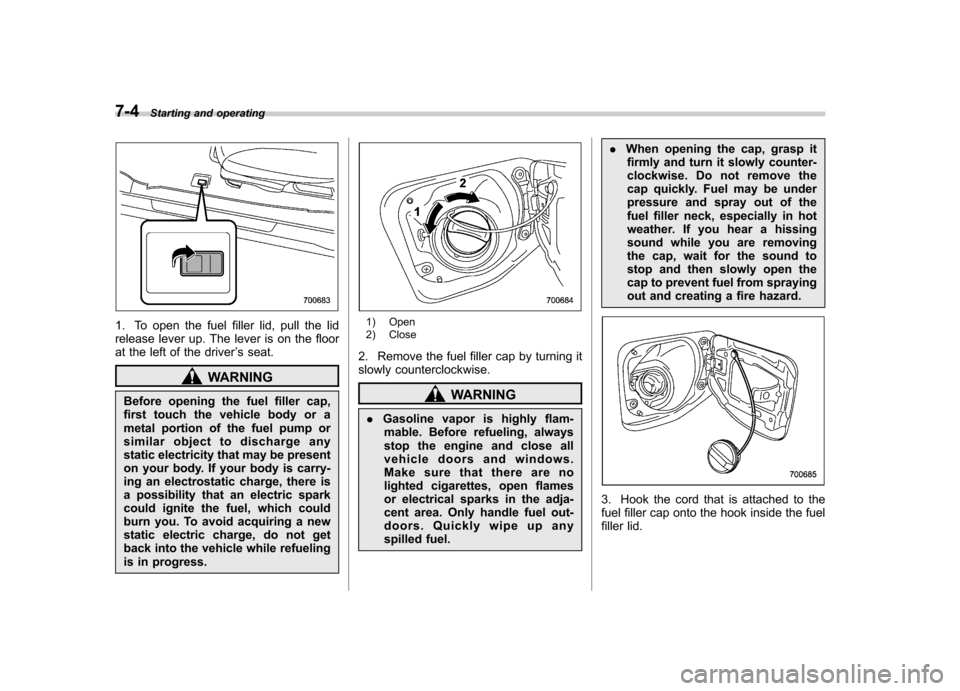
1. To open the fuel filler lid, pull the lid
release lever up. The lever is on the floor
at the left of the driver ’s seat.
WARNING
Before opening the fuel filler cap,
first touch the vehicle body or a
metal portion of the fuel pump or
similar object to discharge any
static electricity that may be present
on your body. If your body is carry-
ing an electrostatic charge, there is
a possibility that an electric spark
could ignite the fuel, which could
burn you. To avoid acquiring a new
static electric charge, do not get
back into the vehicle while refueling
is in progress.
1) Open
2) Close
2. Remove the fuel filler cap by turning it
slowly counterclockwise.
WARNING
. Gasoline vapor is highly flam-
mable. Before refueling, always
stop the engine and close all
vehicle doors and windows.
Make sure that there are no
lighted cigarettes, open flames
or electrical sparks in the adja-
cent area. Only handle fuel out-
doors. Quickly wipe up any
spilled fuel. .
When opening the cap, grasp it
firmly and turn it slowly counter-
clockwise. Do not remove the
cap quickly. Fuel may be under
pressure and spray out of the
fuel filler neck, especially in hot
weather. If you hear a hissing
sound while you are removing
the cap, wait for the sound to
stop and then slowly open the
cap to prevent fuel from spraying
out and creating a fire hazard.
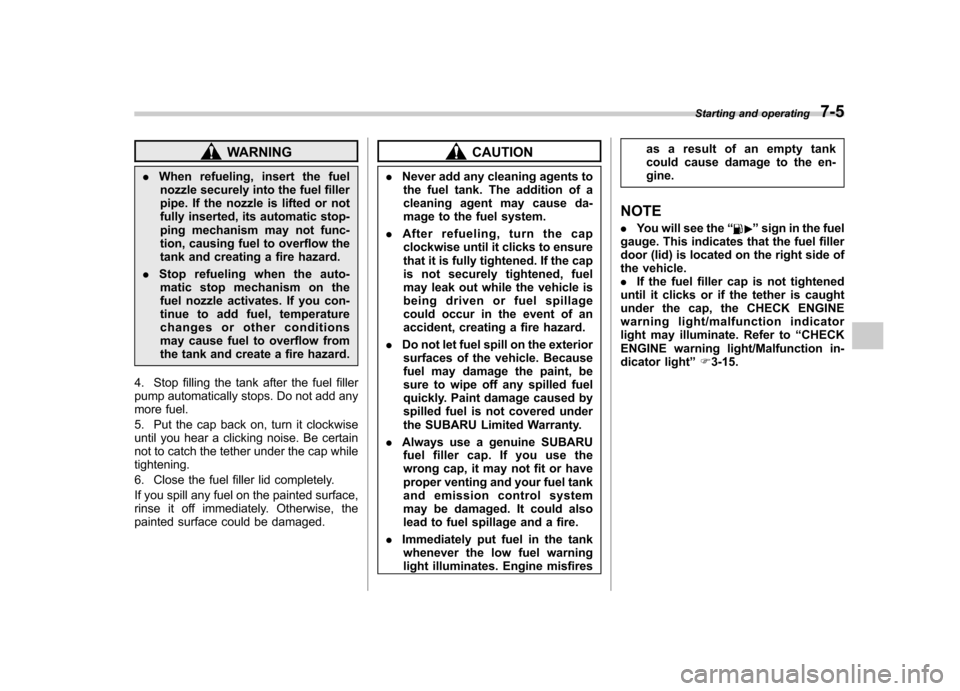
3. Hook the cord that is attached to the
fuel filler cap onto the hook inside the fuel
filler lid.
Page 256 of 436
WARNING
. When refueling, insert the fuel
nozzle securely into the fuel filler
pipe. If the nozzle is lifted or not
fully inserted, its automatic stop-
ping mechanism may not func-
tion, causing fuel to overflow the
tank and creating a fire hazard.
. Stop refueling when the auto-
matic stop mechanism on the
fuel nozzle activates. If you con-
tinue to add fuel, temperature
changes or other conditions
may cause fuel to overflow from
the tank and create a fire hazard.
4. Stop filling the tank after the fuel filler
pump automatically stops. Do not add any
more fuel.
5. Put the cap back on, turn it clockwise
until you hear a clicking noise. Be certain
not to catch the tether under the cap whiletightening.
6. Close the fuel filler lid completely.
If you spill any fuel on the painted surface,
rinse it off immediately. Otherwise, the
painted surface could be damaged.CAUTION
. Never add any cleaning agents to
the fuel tank. The addition of a
cleaning agent may cause da-
mage to the fuel system.
. After refueling, turn the cap
clockwise until it clicks to ensure
that it is fully tightened. If the cap
is not securely tightened, fuel
may leak out while the vehicle is
being driven or fuel spillage
could occur in the event of an
accident, creating a fire hazard.
. Do not let fuel spill on the exterior
surfaces of the vehicle. Because
fuel may damage the paint, be
sure to wipe off any spilled fuel
quickly. Paint damage caused by
spilled fuel is not covered under
the SUBARU Limited Warranty.
. Always use a genuine SUBARU
fuel filler cap. If you use the
wrong cap, it may not fit or have
proper venting and your fuel tank
and emission control system
may be damaged. It could also
lead to fuel spillage and a fire.
. Immediately put fuel in the tank
whenever the low fuel warning
light illuminates. Engine misfires as a result of an empty tank
could cause damage to the en-gine.
NOTE . You will see the “
”sign in the fuel
gauge. This indicates that the fuel filler
door (lid) is located on the right side of
the vehicle.. If the fuel filler cap is not tightened
until it clicks or if the tether is caught
under the cap, the CHECK ENGINE
warning light/malfunction indicator
light may illuminate. Refer to “CHECK
ENGINE warning light/Malfunction in-
dicator light ”F 3-15.
Starting and operating
7-5
Page 320 of 436
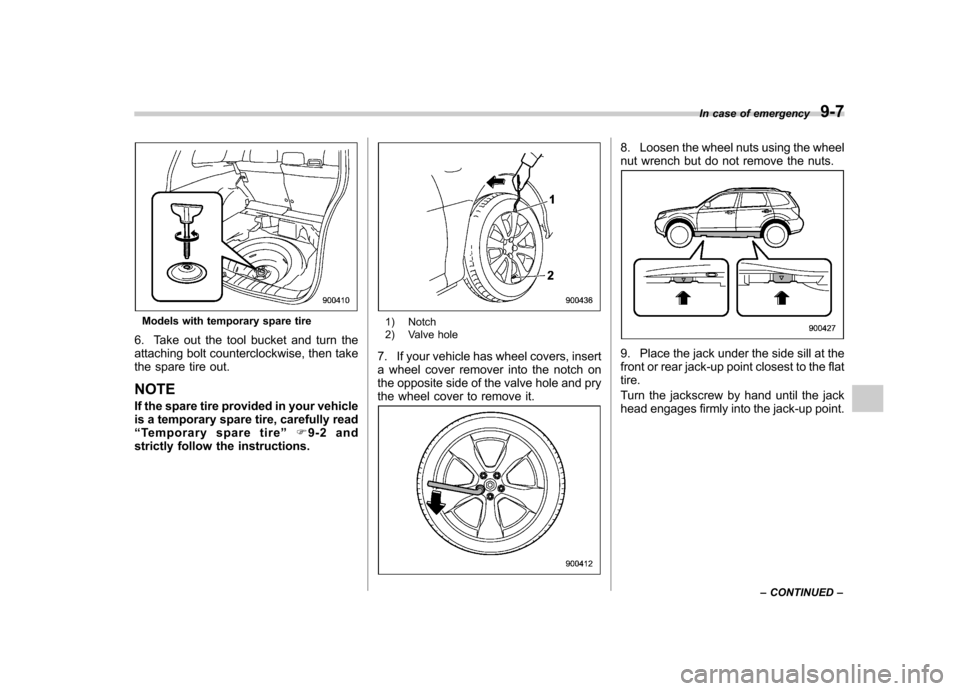
Models with temporary spare tire
6. Take out the tool bucket and turn the
attaching bolt counterclockwise, then take
the spare tire out. NOTE
If the spare tire provided in your vehicle
is a temporary spare tire, carefully read“ Temporary spare tire ”F9-2 and
strictly follow the instructions.1) Notch
2) Valve hole
7. If your vehicle has wheel covers, insert
a wheel cover remover into the notch on
the opposite side of the valve hole and pry
the wheel cover to remove it.
8. Loosen the wheel nuts using the wheel
nut wrench but do not remove the nuts.
9. Place the jack under the side sill at the
front or rear jack-up point closest to the flattire.
Turn the jackscrew by hand until the jack
head engages firmly into the jack-up point. In case of emergency
9-7
– CONTINUED –