2013 SUBARU FORESTER child lock
[x] Cancel search: child lockPage 48 of 436

child from injury in a collision,
because the child will be caught
between the passenger and objects
inside the vehicle.
Additionally, holding a child in your
lap or arms in the front seat exposes
that child to another serious danger.
Since the SRS airbag deploys with
considerable speed and force, the
child could be injured or even killed.
WARNING
Children should be properly re-
strained at all times. Never allow a
child to stand up, or to kneel on any
seat. Unrestrained children will be
thrown forward during sudden stop or in an accident and can be injured
seriously.
Additionally, children standing up or
kneeling on or in front of the front
seat are exposed another serious
danger. Since the SRS airbag de-
ploys with considerable speed and
force, the child could be injured or
even killed.
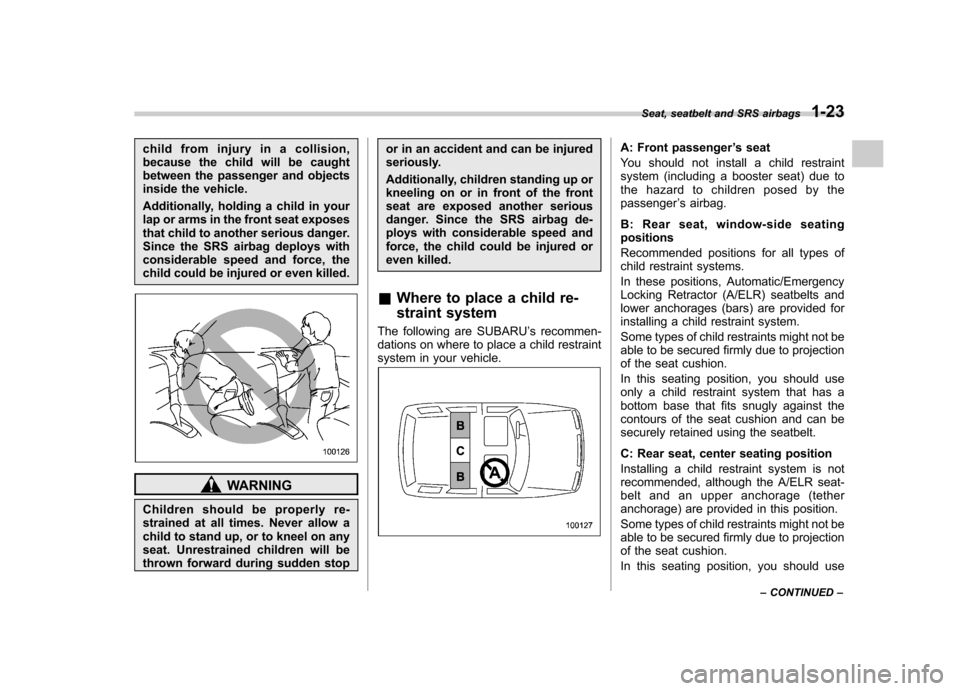
& Where to place a child re-
straint system
The following are SUBARU ’s recommen-
dations on where to place a child restraint
system in your vehicle.
A: Front passenger ’s seat
You should not install a child restraint
system (including a booster seat) due to
the hazard to children posed by thepassenger ’s airbag.
B: Rear seat, window-side seatingpositions
Recommended positions for all types of
child restraint systems.
In these positions, Automatic/Emergency
Locking Retractor (A/ELR) seatbelts and
lower anchorages (bars) are provided for
installing a child restraint system.
Some types of child restraints might not be
able to be secured firmly due to projection
of the seat cushion.
In this seating position, you should use
only a child restraint system that has a
bottom base that fits snugly against the
contours of the seat cushion and can be
securely retained using the seatbelt.
C: Rear seat, center seating position
Installing a child restraint system is not
recommended, although the A/ELR seat-
belt and an upper anchorage (tether
anchorage) are provided in this position.
Some types of child restraints might not be
able to be secured firmly due to projection
of the seat cushion.
In this seating position, you should use Seat, seatbelt and SRS airbags
1-23
– CONTINUED –
Page 50 of 436

&Installing child restraint sys-
tems with A/ELR seatbelt
WARNING
. Child restraint systems and seat-
belts can become hot in a vehicle
that has been closed up in sunny
weather; they could burn a small
child. Check the child restraint
system before you place a child
in it.
. Do not leave an unsecured child
restraint system in your vehicle.
Unsecured child restraint sys-
tems can be thrown around in-
side of the vehicle in a sudden
stop, turn or accident; they can
strike and injure vehicle occu-
pants as well as result in serious
injuries or death to the child.
CAUTION
When you install a child restraint
system, follow the manufacturer ’s
instructions supplied with it. After
installing the child restraint system,
check to ensure that it is held
securely in position. If it is not held
tight and secure, the danger of your child suffering personal injury in the
event of an accident may be in-creased.
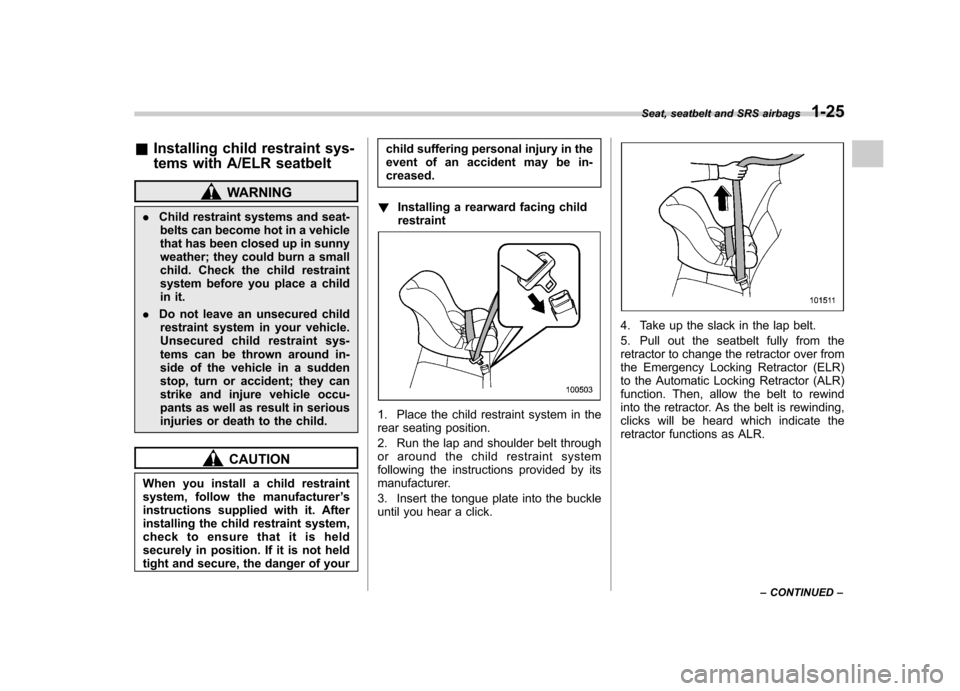
! Installing a rearward facing childrestraint
1. Place the child restraint system in the
rear seating position.
2. Run the lap and shoulder belt through
or around the child restraint system
following the instructions provided by its
manufacturer.
3. Insert the tongue plate into the buckle
until you hear a click.
4. Take up the slack in the lap belt.
5. Pull out the seatbelt fully from the
retractor to change the retractor over from
the Emergency Locking Retractor (ELR)
to the Automatic Locking Retractor (ALR)
function. Then, allow the belt to rewind
into the retractor. As the belt is rewinding,
clicks will be heard which indicate the
retractor functions as ALR. Seat, seatbelt and SRS airbags
1-25
– CONTINUED –
Page 52 of 436

4. Take up the slack in the lap belt.
5. Pull out the seatbelt fully from the
retractor to change the retractor over from
the Emergency Locking Retractor (ELR)
to the Automatic Locking Retractor (ALR)
function. Then, allow the belt to rewind
into the retractor. As the belt is rewinding,
clicks will be heard which indicate the
retractor functions as ALR.6. Before having a child sit in the child
restraint system, move it back and forth
and right and left to check if it is firmly
secured. Sometimes a child restraint can
be more firmly secured by pushing it down
into the seat cushion and then tightening
the seatbelt.
7. Pull at the shoulder portion of the belt
to confirm that it cannot be pulled out (ALR
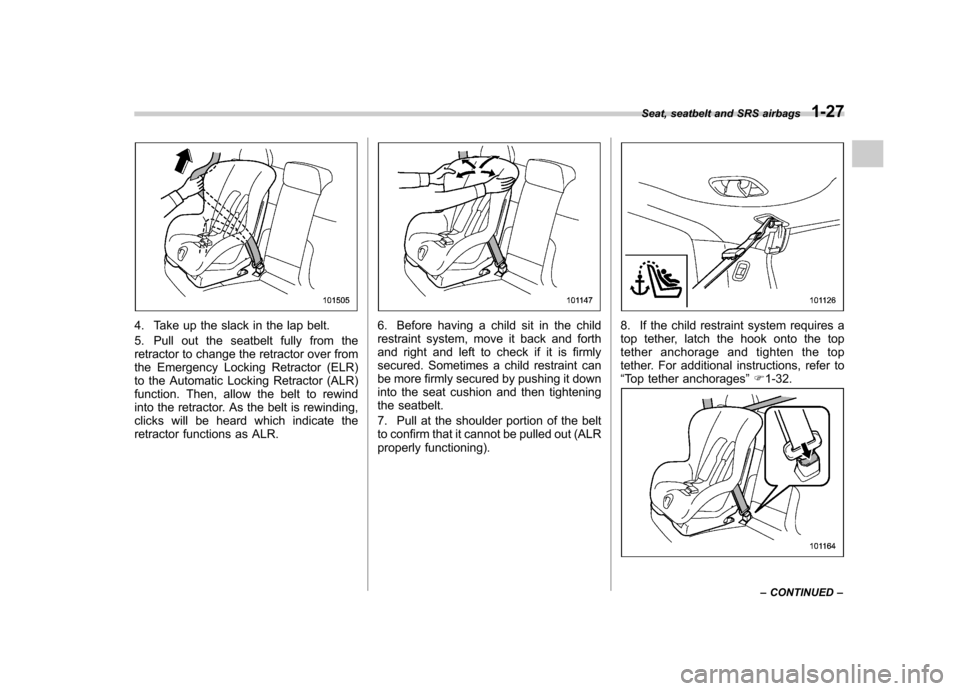
properly functioning).8. If the child restraint system requires a
top tether, latch the hook onto the top
tether anchorage and tighten the top
tether. For additional instructions, refer to“Top tether anchorages ”F 1-32.
Seat, seatbelt and SRS airbags 1-27
– CONTINUED –
Page 64 of 436

WARNING
Do not attach accessories to the
windshield, or fit an extra-wide mir-
ror over the rear view mirror. If the
SRS airbag deploys, those objects
could become projectiles that could
seriously injure vehicle occupants.
! Driver ’s SRS frontal airbag
The driver ’s SRS frontal airbag uses a
dual stage inflator. The inflator operates in
different ways depending on the severity
of impact.
Have the system inspected by your
SUBARU dealer immediately if the SRS
airbag system warning light illuminates. NOTE
The driver
’s SRS side airbag, SRS
curtain airbag and seatbelt preten-
sioner are not controlled by the
SUBARU advanced frontal airbag sys-tem. ! Front passenger ’s SRS frontal air-
bag
The front passenger ’s SRS frontal airbag
uses a dual stage inflator. The inflator
operates in different ways depending on
the severity of impact.
The total load on the seat is monitored by
the occupant detection system ’s weight
sensor located under the seat.
The system has another sensor that
monitors the tension of the front passen-
ger seatbelt. Using the total seat load and
seatbelt tension data from the sensors,
the occupant detection system determines
whether the front passenger ’s SRS frontal
airbag should or should not be inflated.
The occupant detection system may not
inflate the front passenger ’s SRS frontal
airbag even when the driver ’s SRS frontal
airbag deploys. This is normal.
Observe the following precautions. Failure
to do so may prevent the SUBARU
advanced frontal airbag system from
functioning correctly or cause the system
to fail. .
Do not apply any strong impact to the
front passenger ’s seat such as by kicking.
. Do not spill liquid on the front passen-
ger ’s seat. If liquid is spilled, wipe it off
immediately. . Do not remove or disassemble the front
passenger ’s seat.
. Do not install any accessory (such as
an audio amplifier) other than a genuine
SUBARU accessory under the front pas-senger ’s seat.
. Do not place anything (shoes, umbrel-
la, etc.) under the front passenger ’s seat.
. The front passenger ’s seat must not be
used with the head restraint removed. . Do not leave any article including a
child restraint system on the front passen- ger ’s seat or the seatbelt tongue and
buckle engaged when you leave yourvehicle. . Do not place a magnet near the
seatbelt buckle and the seatbelt retractor.. Do not use front seats with their back-
ward-forward position and seatback not
being locked into place securely. If any of
them are not locked securely, adjust them
again. For the adjustment procedure of
the manual seats, refer to “Manual seat ”
F 1-3.
If the seatbelt buckle switch and/or frontpassenger ’s occupant detection system
Seat, seatbelt and SRS airbags
1-39
– CONTINUED –
Page 66 of 436

!If the front passenger ’s frontal air-
bag ON indicator illuminates and the
OFF indicator turns off even when
an infant or a small child is in a child
restraint system (including boosterseat)
Turn the ignition switch to the “LOCK ”
position if the front passenger ’s frontal
airbag ON indicator illuminates and the
OFF indicator turns off even when an
infant or a small child is in a child restraint
system (including booster seat). Remove
the child restraint system from the seat. By
referring to the child restraint manufac-turer ’s recommendations as well as the
child restraint system installation proce-
dures in “Child restraint systems ”F 1-22,
correctly install the child restraint system.
Turn the ignition switch to the “ON ”
position and make sure that the frontpassenger ’s frontal airbag ON indicator
turns off and the OFF indicator illuminates.
If the ON indicator still remains illuminated
while the OFF indicator turns off, take the
following actions. . Ensure that no article is placed on the
seat other than the child restraint system
and the child occupant. . Ensure that there is no article left in the
seatback pocket.. Ensure that the backward-forward po- sition and seatback of front passenger
’s
seat are locked into place securely by
moving the seat back and forth.
If the ON indicator still remains illuminated
while the OFF indicator turns off after
taking relevant corrective actions de-
scribed above, relocate the child restraint
system to the rear seat and immediately
contact your SUBARU dealer for aninspection. NOTE
When a child who has outgrown a child
restraint system or a small adult is
seated in the front passenger ’s seat,
the SUBARU advanced frontal airbag
system may or may not activate the
front passenger ’s SRS frontal airbag
depending on the occupant ’s seating
posture. If the front passenger ’s SRS
frontal airbag is activated (the ON
indicator remains illuminated while
the OFF indicator turns off), take the
following actions. . Ensure that no article is placed on
the seat other than the occupant. . Ensure that there is no article left in
the seatback pocket.
If the ON indicator still remains illumi-
nates while the OFF indicator turns off
despite the fact that the actions noted above have been taken, seat the child/
small adult in the rear seat and im-
mediately contact your SUBARU dealer
for an inspection. Even if the system
has passed the dealer inspection, it is
recommended that on subsequent trips
the child/small adult always take the
rear seat.
Children who have outgrown a child
restraint system should always wear the
seatbelt irrespective of whether the airbag
is deactivated or activated. !
Conditions in which front passen- ger’s SRS frontal airbag is activated
The front passenger ’s SRS frontal airbag
will be activated for deployment upon
impact when any of the following condi-
tions are met regarding the front passen- ger ’s seat.
. When the seat is occupied by an adult.
. When a heavy article is placed on the
seat.
When the front passenger ’s seat is occu-
pied by an adult, observe the following
precautions. Failure to do so may lessen
the load on the front passenger ’s seat,
deactivating the front passenger ’s SRS
frontal airbag despite the fact that the seat
is occupied by an adult. . Do not allow the rear seat occupant toSeat, seatbelt and SRS airbags
1-41
– CONTINUED –
Page 86 of 436

Keys..................................................................... 2-2
Key number plate and security ID plate ................ 2-2
Immobilizer .......................................................... 2-3
Security indicator light ........................................ 2-3
Key replacement ................................................. 2-3
Door locks ........................................................... 2-4
Locking and unlocking from the outside .. ............ 2-4
Locking and unlocking from the inside ................ 2-5
Battery drainage prevention function ................... 2-5
Power door locking switches ............................. 2-6
Key lock-in prevention function ........................... 2-7
Remote keyless entry system ............................ 2-7
Locking the doors ............................................... 2-8
Unlocking the doors ............................................ 2-9
Unlocking the rear gate ....................................... 2-9
Illuminated entry ................................................. 2-9
Vehicle finder function ......................................... 2-9
Sounding a panic alarm ...................................... 2-10
Selecting turn signal lights operation .................. 2-10
Selecting audible signal operation ...................... 2-10
Replacing the battery ......................................... 2-10
Replacing lost transmitters ................................. 2-11 Alarm system
..................................................... 2-14
System operation ............................................... 2-14
Activating and deactivating the alarm system ..... 2-15
If you have accidentally triggered the alarm system ............................................................ 2-15
Arming the system ............................................ 2-15
Disarming the system ........................................ 2-17
Valet mode ........................................................ 2-17
Passive arming .................................................. 2-17
Tripped sensor identification .............................. 2-18
Shock sensors (dealer option).. .......................... 2-19
Child safety locks .............................................. 2-19
Windows ............................................................. 2-20
Power window operation by driver ..................... 2-20
Power window operation by passengers ............. 2-22
Initialization of power window (type A) ............... 2-23
Rear gate ............................................................ 2-23
Moonroof (if equipped) ...................................... 2-24
To open the moonroof ....................................... 2-25
To close the moonroof ....................................... 2-25
Anti-entrapment function .................................... 2-25
Sun shade ......................................................... 2-26 Keys and doors
2
Page 90 of 436

1) Rotate the lock lever rearward.
2) Close the door.
To lock the door from the outside without
the key, rotate the lock lever rearward and
then close the door.
To lock the door from the outside using the
power door locking switch, push the front
side of the switch ( “LOCK ”side) and then
close the door. In this case, all closed
doors and the rear gate are locked at the
same time.
Always make sure that all doors and the
rear gate are locked before leaving yourvehicle. NOTE
Make sure that you do not leave the key
inside the vehicle when locking the doors from the outside without the key.
& Locking and unlocking from
the inside
1) Lock
2) Unlock
To lock the door from the inside, rotate the
lock lever rearward. To unlock the door
from the inside, rotate the lock leverforward.
The red mark on the lock lever appears
when the door is unlocked.
Pull the inside door handle to open an
unlocked door.
Always make sure that all doors and the
rear gate are closed before starting todrive.
WARNING
Keep all doors locked when you
drive, especially when small chil-
dren are in your vehicle.
Along with the proper use of seat-
belts and child restraints, locking
the doors reduces the chance of
being thrown out of the vehicle in anaccident.
It also helps prevent passengers
from falling out if a door is acciden-
tally opened, and intruders from
unexpectedly opening doors and
entering your vehicle.
& Battery drainage prevention function
If a door or the rear gate is not completely
closed, the interior lights will remain
illuminated as a result. However, several
lights are automatically turned off by the
battery drainage prevention function to
prevent the battery from discharging. The
following interior lights are affected by thisfunction. Keys and doors
2-5
– CONTINUED –
Page 95 of 436

2-10Keys and doors
&Sounding a panic alarm
A“PANIC ”button is located on the back of
the transmitter.
To activate the alarm, press the “PANIC ”
button once.
The horn will sound and the turn signal
lights will flash.
To deactivate the panic alarm, press any
button on the remote transmitter. Unless a
button on the remote is pressed, the alarm
will be deactivated after approximately 30seconds. & Selecting turn signal lights operation
When the remote keyless entry system is
used, the turn signal lights flash. However,
the turn signal lights flashing operational/ non-operational setting can be changed
by your SUBARU dealer. Contact your
SUBARU dealer for details.
& Selecting audible signal op- eration
Using an electronic chirp, the system will
give you an audible signal when the doors
lock and unlock. If desired, you may turn
the audible signal off.
Do the following to deactivate the audible
signal. You can also use the same steps
to restore the function.
1. Sit in the driver ’s seat and shut all
doors and the rear gate.
2. Hold down the UNLOCK side of the
power door locking switch.
3. While holding down the “UNLOCK ”
side of the power door locking switch, pull
the key out and re-insert it into the ignition
switch at least 6 times within 10 seconds
after step 2.
4. Open and close the driver ’s door once
within 10 seconds after step 3.
5. The turn signal lights flash 3 times to
indicate completion of the setting.
You may have the above settings done by
your SUBARU dealer. Contact your
SUBARU dealer for details. &
Replacing the battery
CAUTION
. Do not let dust, oil or water get on
or in the transmitter when repla-
cing the battery.
. Be careful not to damage the
printed circuit board in the trans-
mitter when replacing the battery.
. Be careful not to allow children to
touch the battery and any re-
moved parts; children could
swallow them.
. There is a danger of explosion if
an incorrect replacement battery
is used. Replace only with the
same or equivalent type of bat-
tery.
. Batteries should not be exposed
to excessive heat such as sun-
shine, fire or the like.
When the transmitter battery begins to get
weak, transmitter range will begin to
decrease. Replace the battery as soon
as possible.