2013 SUBARU FORESTER check oil
[x] Cancel search: check oilPage 295 of 436

8-8Driving tips
.Frequent driving of an AWD model
under hard-driving conditions such as
rough roads or off roads will necessitate
more frequent replacement of engine oil,
brake fluid and transmission oil than that
specified in the maintenance schedule
described in the “Warranty and Mainte-
nance Booklet ”.
Remember that damage done to your
SUBARU while operating it off-road and
not using common sense precautions
such as those listed above is not eligible
for warranty coverage. Winter driving
&
Operation during cold weather
Carry some emergency equipment, such
as a window scraper, a bag of sand,
flares, a small shovel and jumper cables.
Check the battery and cables. Cold
temperatures reduce battery capacity.
The battery must be in good condition to
provide enough power for cold winterstarts.
It normally takes longer to start the engine
in very cold weather conditions. Use an
engine oil of a suitable grade and viscosity
for cold weather. Heavy summer oil will
cause harder starting.
Keep the door locks from freezing by squirting them with deicer or glycerin.
Forcing a frozen door open may damage
or separate the rubber weather strips
around the door. If the door is frozen,
use hot water to melt the ice, and after-
wards thoroughly wipe the water away.
Use a windshield washer fluid that con-
tains an antifreeze solution. Do not use
engine antifreeze or other substitutes
because they may damage the paint of
the vehicle.
SUBARU Windshield Washer Fluid con-
tains 58.5% methyl alcohol and 41.5%
surfactant, by volume. Its freezing tem-
perature varies according to how much it
is diluted, as indicated in the followingtable.
Washer Fluid Con- centration Freezing Temperature
30% 10.4 8F( �12 8C)
50% �48F( �20 8C)
100% �
49 8F( �45 8C)
In order to prevent freezing of washer
fluid, check the freezing temperatures in
the table above when adjusting the fluid
concentration to the outside temperature.
If you fill the washer tank with a fluid with a
different concentration from the one used
Page 321 of 436
9-8In case of emergency
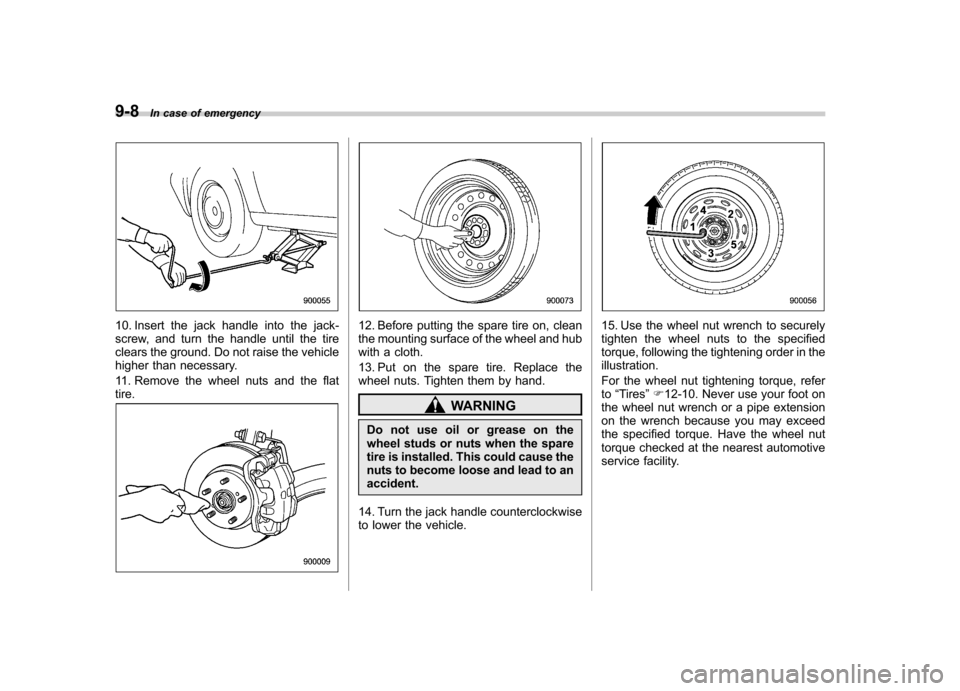
10. Insert the jack handle into the jack-
screw, and turn the handle until the tire
clears the ground. Do not raise the vehicle
higher than necessary.
11. Remove the wheel nuts and the flat tire.12. Before putting the spare tire on, clean
the mounting surface of the wheel and hub
with a cloth.
13. Put on the spare tire. Replace the
wheel nuts. Tighten them by hand.
WARNING
Do not use oil or grease on the
wheel studs or nuts when the spare
tire is installed. This could cause the
nuts to become loose and lead to anaccident.
14. Turn the jack handle counterclockwise
to lower the vehicle.
15. Use the wheel nut wrench to securely
tighten the wheel nuts to the specified
torque, following the tightening order in theillustration.
For the wheel nut tightening torque, refer to “Tires ”F 12-10. Never use your foot on
the wheel nut wrench or a pipe extension
on the wrench because you may exceed
the specified torque. Have the wheel nut
torque checked at the nearest automotive
service facility.
Page 326 of 436
Engine overheating
WARNING
Never attempt to remove the radia-
tor cap until the engine has been
shut off and has fully cooled down.
When the engine is hot, the coolant
is under pressure. Removing the
cap while the engine is still hot
could release a spray of boiling hot
coolant, which could burn you very
seriously.
If the engine overheats, safely pull off the
road and stop the vehicle in a safe place. & If steam is coming from the
engine compartment
Turn off the engine and get everyone
away from the vehicle until it cools down. & If no steam is coming from
the engine compartment
NOTE
For details about how to check the
coolant level or how to add coolant,
refer to “Engine coolant ”F 11-14.
1. Keep the engine running at idlingspeed. 2. Open the hood to ventilate the engine
compartment. Refer to
“Engine hood ”
F 11-5.
Confirm that the cooling fan is turning. If
the fan is not turning, immediately turn off
the engine and contact your SUBARU
dealer for repair.
3. After the engine coolant temperature
has dropped, turn off the engine.
If any of the following conditions occur,
turn off the engine. .The temperature gauge stays in the
overheated zone (if equipped). Referto “Temperature gauge (models with
type A combination meter) ”F 3-11.
. The coolant temperature high warn-
ing light remains illuminated (if
equipped). Refer to “Coolant tempera-
ture low indicator light/Coolant tem-
perature high warning light ”F 3-16.
4. After the engine has fully cooled down,
check the coolant level in the reservoir.
If the coolant level is below the “LOW ”
mark, add coolant up to the “FULL ”mark.
5. If there is no coolant in the reservoir,
add coolant to the reservoir. Then remove
the radiator cap (non-turbo models) or the
coolant filler tank cap (turbo models) and
fill the radiator with coolant.
If you have to remove a hot radiator cap/
coolant filler tank cap, first wrap a thick cloth around the cap, then turn the cap
counterclockwise slowly without pressing
down until it stops. Release the pressure
from the cooling system. After the pres-
sure has been fully released, remove the
cap by pressing it down and turningcounterclockwise.
In case of emergency
9-13
Page 338 of 436

Maintenance schedule....................................... 11-3
Maintenance precautions ................................... 11-3
Before checking or servicing in the engine compartment .................................................... 11-4
When checking or servicing in the engine compartment (non-turbo models) ...................... 11-4
When checking or servicing in the engine compartment while the engine is running .......... 11-5
Engine hood ....................................................... 11-5
Engine compartment overview .......................... 11-7
Non-turbo models .............................................. 11-7
Turbo models ..................................................... 11-8
Engine oil ............................................................ 11-9
Checking the oil level ......................................... 11-9
Changing the oil and oil filter ............................ 11-11
Recommended grade and viscosity .................. 11-13
Synthetic oil ..................................................... 11-13
Cooling system ................................................ 11-13
Cooling fan, hose and connections ................... 11-14
Engine coolant ................................................. 11-14
Air cleaner element .......................................... 11-15
Replacing the air cleaner element ..................... 11-15
Spark plugs ...................................................... 11-17
Drive belts ........................................................ 11-18
Turbo models ................................................... 11-18
Non-turbo models ............................................ 11-18
Manual transmission oil .................................. 11-19
Checking the oil level ....................................... 11-19
Recommended grade and viscosity .................. 11-19Automatic transmission fluid
.......................... 11-20
Checking the fluid level .................................... 11-20
Recommended fluid ......................................... 11-21
Front differential gear oil (AT models) ........... 11-21
Checking the oil level ...................................... 11-21
Recommended grade and viscosity .................. 11-22
Rear differential gear oil .................................. 11-22
Recommended grade and viscosity .................. 11-22
Power steering fluid ........................................ 11-22
Checking the fluid level .................................... 11-22
Recommended fluid ......................................... 11-23
Brake fluid ........................................................ 11-23
Checking the fluid level .................................... 11-23
Recommended brake fluid ............................... 11-24
Clutch fluid (MT models) ................................. 11-24
Checking the fluid level .................................... 11-24
Recommended clutch fluid ............................... 11-25
Brake booster .................................................. 11-25
Brake pedal ...................................................... 11-26
Checking the brake pedal free play .................. 11-26
Checking the brake pedal reserve distance....... 11-26
Clutch pedal (MT models) ............................... 11-27
Checking the clutch function ............................ 11-27
Checking the clutch pedal free play .................. 11-27
Hill start assist system (MT models) .............. 11-27
Replacement of brake pad and lining ............ 11-28
Breaking-in of new brake pads and linings ....... 11-28
Parking brake stroke ....................................... 11-29
Maintenance and service
11
Page 341 of 436
11-4Maintenance and service
guard against getting oil or fluids
in your eyes. If something does
get in your eyes, thoroughly
wash them out with clean water.
. Do not tamper with the wiring of
the SRS airbag system or seat-
belt pretensioner system, or at-
tempt to take its connectors
apart, as that may activate the
system or it can render it inop-
erative. NEVER use a circuit
tester for this wiring. If your
SRS airbag or seatbelt preten-
sioner needs service, consult
your nearest SUBARU dealer. &
Before checking or servicing
in the engine compartment
WARNING
. Always stop the engine and apply
the parking brake firmly to pre-
vent the vehicle from moving.
. Always let the engine cool down.
Engine parts become very hot
when the engine is running and
remain hot for some time after
the engine is stopped.
. Do not spill engine oil, engine
coolant, brake fluid or any other
fluid on hot engine components.
This may cause a fire.
. Always remove the key from the
ignition switch. When the ignition
switch is in the “ON ”position,
thecoolingfanmayoperate
suddenly even when the engine
is stopped.
. Before performing any servicing
on a vehicle equipped with a
remote engine start system (a
dealer option) temporarily place
that system in the service mode
to prevent it from unexpectedly
starting the engine. &
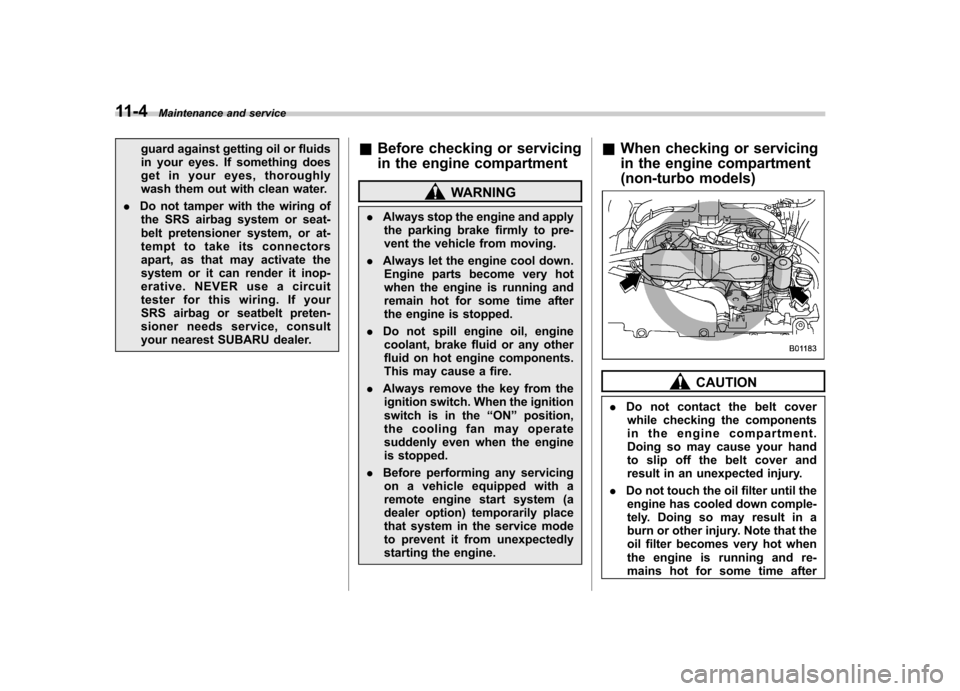
When checking or servicing
in the engine compartment
(non-turbo models)
CAUTION
. Do not contact the belt cover
while checking the components
in the engine compartment.
Doing so may cause your hand
to slip off the belt cover and
result in an unexpected injury.
. Do not touch the oil filter until the
engine has cooled down comple-
tely. Doing so may result in a
burn or other injury. Note that the
oil filter becomes very hot when
the engine is running and re-
mains hot for some time after
Page 346 of 436
Engine oil NOTE .The engine oil consumption rate is
not stabilized, and therefore cannot be
determined until the vehicle has tra-
veled at least several thousand miles
(kilometers). Even after break-in, when
the vehicle is used under severe driv-
ing conditions such as those men-
tionedintheWarrantyandMainte-
nance Booklet, engine oil is consumed
or deteriorated more quickly than un-
der normal driving conditions. If you
drive your vehicle under these severe
conditions, you should check the oil
level at least at every second fuel fill-up
time, and change the oil more fre-
quently. Please refer to the Warranty
and Maintenance Booklet for more de-tails.. If the oil consumption rate seems
abnormally high after the break-in
period, for example more than 1 quart
per 1,200 miles (1 liter per 2,000 kilo-
meters), contact your SUBARU dealer. &
Checking the oil level
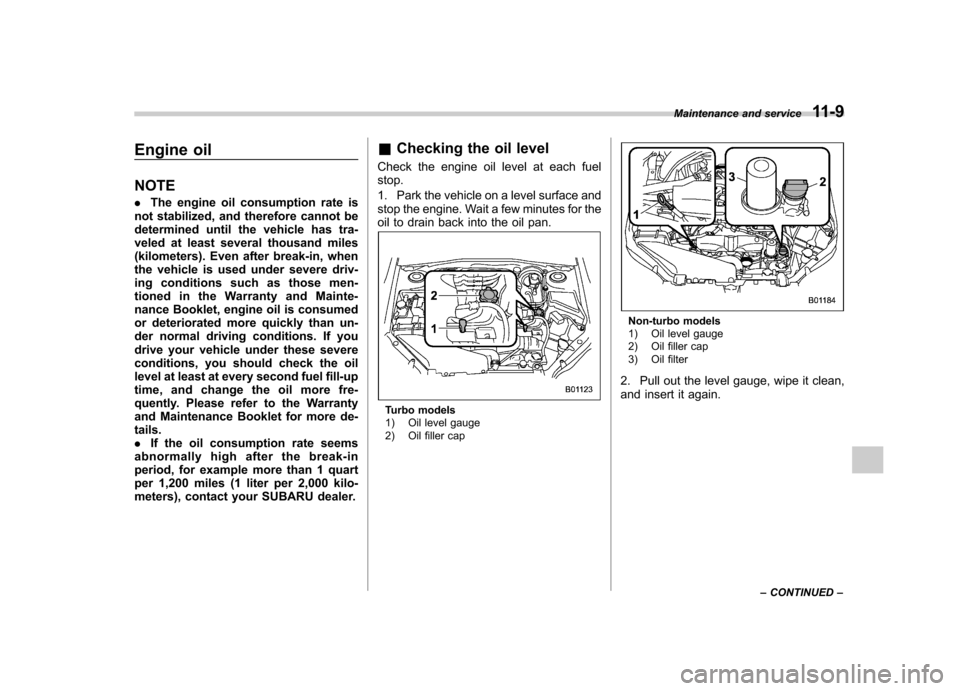
Check the engine oil level at each fuelstop.
1. Park the vehicle on a level surface and
stop the engine. Wait a few minutes for the
oil to drain back into the oil pan.
Turbo models
1) Oil level gauge
2) Oil filler cap
Non-turbo models
1) Oil level gauge
2) Oil filler cap
3) Oil filter
2. Pull out the level gauge, wipe it clean,
and insert it again. Maintenance and service
11-9
– CONTINUED –
Page 347 of 436
11-10Maintenance and service
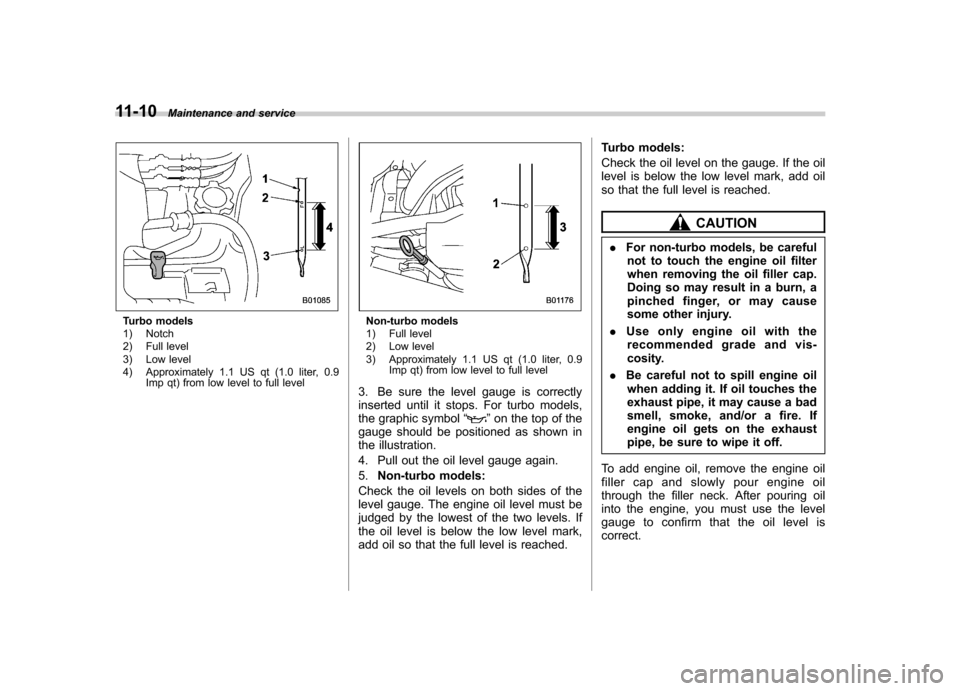
Turbo models
1) Notch
2) Full level
3) Low level
4) Approximately 1.1 US qt (1.0 liter, 0.9
Imp qt) from low level to full levelNon-turbo models
1) Full level
2) Low level
3) Approximately 1.1 US qt (1.0 liter, 0.9
Imp qt) from low level to full level
3. Be sure the level gauge is correctly
inserted until it stops. For turbo models,
the graphic symbol “
”on the top of the
gauge should be positioned as shown in
the illustration.
4. Pull out the oil level gauge again.5. Non-turbo models:
Check the oil levels on both sides of the
level gauge. The engine oil level must be
judged by the lowest of the two levels. If
the oil level is below the low level mark,
add oil so that the full level is reached. Turbo models:
Check the oil level on the gauge. If the oil
level is below the low level mark, add oil
so that the full level is reached.
CAUTION
. For non-turbo models, be careful
not to touch the engine oil filter
when removing the oil filler cap.
Doing so may result in a burn, a
pinched finger, or may cause
some other injury.
. Use only engine oil with the
recommended grade and vis-
cosity.
. Be careful not to spill engine oil
when adding it. If oil touches the
exhaust pipe, it may cause a bad
smell, smoke, and/or a fire. If
engine oil gets on the exhaust
pipe, be sure to wipe it off.
To add engine oil, remove the engine oil
filler cap and slowly pour engine oil
through the filler neck. After pouring oil
into the engine, you must use the level
gauge to confirm that the oil level iscorrect.
Page 348 of 436
NOTE .Just after driving or while the engine
is warm, the engine oil level reading
may be in a range between the full level
and the notch mark (turbo models).
This is caused by thermal expansion of
the engine oil.. To prevent overfilling the engine oil,
do not add any additional oil above the
full level when the engine is cold. & Changing the oil and oil filter
CAUTION
. If you change your own oil, be
sure to drain all the oil from the
filter before disposal.
. Do not dispose of used engine oil
by placing it in the trash, or by
pouring it onto the ground, into
sewers, or into any body of water.
Check with your local govern-
ment office for the proper dis-
posal options available to you.
Change the oil and oil filter according to
the maintenance schedule in the “War-
ranty and Maintenance Booklet ”.
The engine oil and oil filter must be
changed more frequently than listed in
the maintenance schedule when driving on dusty roads, when short trips are
frequently made, or when driving in
extremely cold weather.
1. Warm up the engine by letting the
engine idle for approximately 10 minutes
to ease draining the engine oil.
2. Park the vehicle on a level surface and
stop the engine.
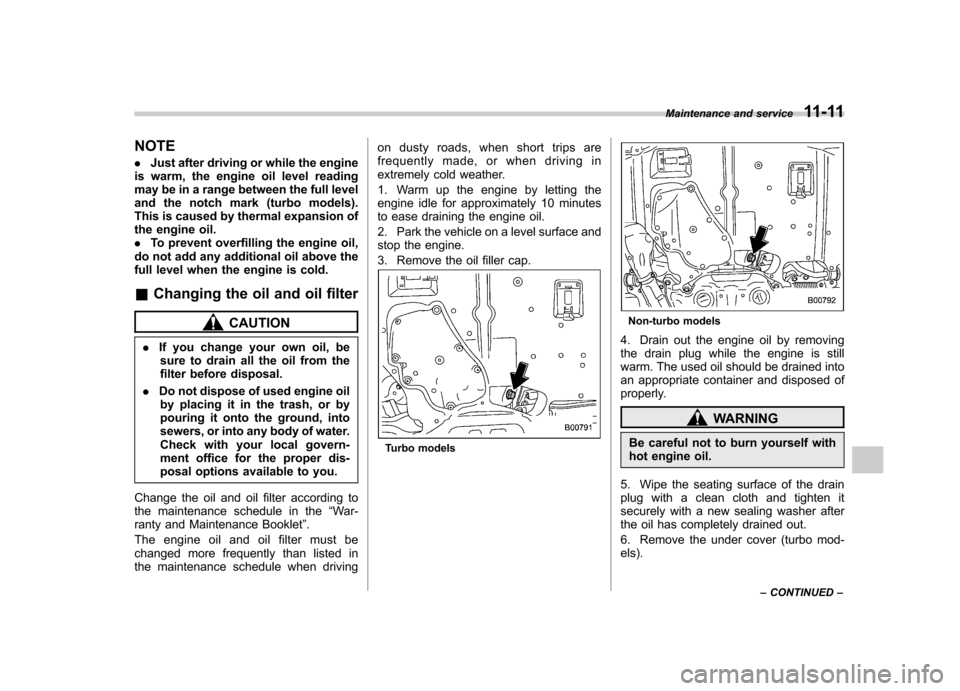
3. Remove the oil filler cap.
Turbo models
Non-turbo models
4. Drain out the engine oil by removing
the drain plug while the engine is still
warm. The used oil should be drained into
an appropriate container and disposed of
properly.
WARNING
Be careful not to burn yourself with
hot engine oil.
5. Wipe the seating surface of the drain
plug with a clean cloth and tighten it
securely with a new sealing washer after
the oil has completely drained out.
6. Remove the under cover (turbo mod- els). Maintenance and service
11-11
– CONTINUED –