Page 89 of 110
 Opens the Visual Guidance settings screen.
More / Settings / Visual Guidance (See Page 172.)
( Traffic) Opens the overall traffic conditions screen.")
Navigation 167
Reference Data
(Visual
Guidance) Opens the Visual Guidance settings screen.
More / Settings / Visual Guidance (See Page 172.)
( Traffic) Opens the overall traffic conditions screen.
Touch the navigation menu or the Map screen's
road icons.
(Avoid) Avoids part of the recommended route.
My Route / Avoidances
(Trip Monitor) Opens the trip monitor screen from whic
h you can manage your saved trip logs
and path logs. More / Trip Monitor (See Page
162.)
(Itinerary) Opens a list of changes in the ro
ute (distances). Touch the top of the Map screen during navigation.
(Save Route) The route being navigated is saved to be
used later. My Route / More / Save Route
(Load Route) Changes to a saved, previously navigate
d route. My Route / More / Load Route
(Find Places) Searches for your favorite sp
ots using a variety of methods. Find / Find Places (See Page 120.)
(Simulate Navigation) The Map screen opens and a simulation of
the route being navigated starts. My Route / More / Simulate Navigation (See Page
153 .)
(GPS Info) Opens the GPS information screen showing satellite positions and signal
strength. Touch the top of the Map screen if there is no GPS
reception.
Button
Explanation Primary LocationVisual Guidance
Traffic
Avoid
Trip Monitor
Itinerary
Save Route
Load Route
Find Places
Simulate Navigation
GPS Info
Page 90 of 110
:
Turns")
168 Navigation
Reference Data
Tra f f i c
Sets On/Off of traffic information display and the method to use the
received real-time traffic in formation on route search.
• ( Traffic Receiver):
Turns on or off the traffic information display.
• (Detour):
Set to use real-time traffic information when searching for a route.
When searching for a new route, or when it is necessary to search
again based on the traffic information received, it searches for merits
to avoiding the current traffic conditions.
Set so that confirmation is need ed every time you perform another
search by delaying the timing when the search is remade.
- (Never offer detour):
When this button is touched, routes th at do not satisfy traffic conditions are
not searched.
- (Offer detour if
the calculated route saves more than:):
When this button is touched, routes that satisfy traffic conditions are
searched.
Time slider:
Adjust the timing before starting anot her route search. (You can set 0 to 60
every 5 minutes)
- (Do you want to confirm
the offered route?):
You can turn the route confirmation di splay on or off for each new search.
• (Event Types):
Touch this button to open a list of types of traffic conditions, and
select the events to take into consideration when searching for a
route.
Settings button for each type of traffic condition
- (All events in this category will be:):
You can select "Considered" or "Ignored" when searching for a route.
- ( Visible on map):
Yo u c a n t u r n t h e i c o n d i s p lay on the map on or off.Traffic Receiver
Detour
Never offer detour
Offer detour if the calculated route saves more than:
Do you want to confirm the offered route?
Event Types
All events in this category will be:
Visible on map
Page 91 of 110
:
Sets various factors to take into account when performing a search,
such as fuel consumption, vehicle model,")
Navigation 169
Reference Data
Route Settings
Sets the route search method.• (Vehicle):
Sets various factors to take into account when performing a search,
such as fuel consumption, vehicle model, fuel costs, and maximum
speeds on normal roads and expressways.
• (Navigation Mode):
You can change between On-road and Off-road.
Set to On-road to perform normal navigation, or set to Off-road to
navigate using the straightest possible route to the destination.
• (Route Planning Method):
By changing the route search method, you can search for the
optimum route for a variety of situations and types of vehicle. See
the following items for more details.
You can set which road categories to include or to avoid in the route to
match the user's preferences.
Avoiding a road category is simply a matter of changing the priority
level. This does not mean that the se lected road category will never be
used. If the navigation cannot reac h the destination without using a
road category that should be avoided, the road category will be used,
but only as little as possible. If this does happen, a warning icon is
displayed on the My Route screen. In the road category list you can check the number of sections used for
each road category on the current route and the overall distance.
• (Highways):
Select whether or not to use the expressway when creating the
route.
• (Period Charge):
Select whether or not to use to ll roads (Period Charge) when
creating the route.
• (Per-use Toll):
Select whether or not to use toll roads (Per-use Toll) when creating
the route.
• (Ferries):
Select whether or not to us e ferries when creating the
route.(However, ferries might not always be selected for the
route.)However, information on temporary service ferries may not be
displayed on the map. There may be a fee for using the ferry.
• (Carpool/HOV ):
Select whether or not to use Carpool/HOV lanes when creating the
route.
• (Unpaved Roads):
Select whether or not to use un paved roads when creating the
route.
Vehicle
Navigation Mode
Route Planning Method
Highways
Period Charge
Per-use Toll
Ferries
Carpool/HOV
Unpaved Roads
Page 92 of 110
:
Select whether or not to consider energy efficiency when creating
the route.
Type of route search method:
- (Fast):
Searches all road")
170 Navigation
Reference Data
• (Calculate Green Alternative):
Select whether or not to consider energy efficiency when creating
the route.
Type of route search method:
- (Fast):
Searches all roads for the quickest ro ute following the speed limits of the
roads.
- (Green):
Searches for the route that conserves the most energy, taking into account
the merits of “Fast” and “Short”.
- (Short):
Searches for the shortest dist ance in all possible routes.
- (Easy):
Searches for a route that is easiest to drive, with few right and left turns.
Using this option, the prog ram allows you to avoid combinations of smaller
roads and to take the expressway.
Map Settings
Fine tunes the Map screen appearance. Performs adjustments for your
selected map display, selects from a list of color designs used for
daytime and nighttime, turns the path log on or off, and manages the
spot display categories (allows you to select the type of spot displayed
on the map).
Because the map is displayed on th e screen, you can check the results
as you change settings.
• ( View Mode 3D):
Select the display mode from a 3D bi rd's-eye view, a 2D heads-up flat
view, or a 2D North Up flat view.
• (Viewpoint Normal):
You can adjust the standard zoom an d the angle of tilt to suit your
needs. You can set the level in three stages.
• (Automatic Overview):
Automatically reduces the scale of the 2D map to display the entire
route. You can turn this function on and off.
Calculate Green Alternative
Fast
Green
Short
Easy
View Mode 3D
Viewpoint Normal
Automatic Overview
Page 93 of 110
:
Select the screen color used in daytime mode.
- The view changes between night view and day view each time you touch
or .
• (Night Map Color):")
Navigation 171
Reference Data
• (Day Map Color):
Select the screen color used in daytime mode.
- The view changes between night view and day view each time you touch
or .
• (Night Map Color):
Select the screen color used in nighttime mode.
- The view changes between night view and day view each time you touch
or .
• (Track Logs):
Turns the path log save function on or off (saves in positional order
for each trip).
• (Place Markers):
Select a spot displayed on th e map during navigation. We
recommend reducing the number of spots displayed as much as
possible as the map is difficult to see if there are too many spots.
Because of this, the software is designed to allow multiple spot
displays. Follow the steps below.
- Touch the check box to show or hide the spot category.
- Touch the spot category name to open a sub-category.
- Touch (More) to save the currentl y displayed spot position, or read
spot displays saved previously. You can also restore the default display
settings.
Day Map Color
Night Map Color
Track Logs
Place Markers
More
Page 94 of 110
:
You can set the data fields displaye d at the corner of the Map screen
to match your")
172 Navigation
Reference Data
Visual Guidance
Changes settings related to Map screen guidance.• (Data Fields):
You can set the data fields displaye d at the corner of the Map screen
to match your needs. Touch this button and select the guidance you
want to display. Values may differ when driving without having set a
destination in route navigation. You can select current speed or
altitude and so on for a standard trip data, or select route data related
to the final destination or th e next waypoint on the route.
• (Highway Services):
Displays service area information while driving on the expressway.
You can turn this function on and off.
• (Facility Types):
Touch this button and select the service area information display
items you want to display.
• (Signposts):
When information is available, lane information similar to overhead
road traffic signs is displayed at th e top of the map. You can turn this
function on and off.
• (Junction View):
When approaching an expressway exit or a complicated intersection,
the map switches to a 3D display if the necessary information can be
displayed. •
(Route Progress Bar):
Turns on the route progress bar which is displayed as a straight line
to the left of the map. This show s the progress made on the current
route. When a blue arrow is used to indicate position, the arrow
continues to rise as you drive towards your destination. Waypoints
and traffic conditions are displayed on the line.
Data Fields
Highway Services
Facility Types
Signposts
Junction View
Route Progress Bar
Page 95 of 110
:
Sets the units used by the prog ram to measure distance. Voice
guidance languages do")
Navigation 173
Reference Data
Units and Formats
Sets display units and the date display.• (Units and Formats):
Sets the units used by the prog ram to measure distance. Voice
guidance languages do not support all units displayed in the list.
You can select to display the time in various international date
formats.
Types of display units and date display settings: • (Distance):
Buttons the units used to display distance.
• (Fuel Economy):
Buttons the units used to display fuel consumption.
• (Currency):
Displays the keyboard screen allowing you to enter the currency
name. (For the keyboard, see “Using the Keyboard” on Page 88.)
• (Date Format):
Buttons the units used to display the date.
• (Date Delimiter):
Buttons the date delimiter.
• (Coordinate Display Format):
Buttons the coordinate display format.
Tr i p M o n i to r
Contains useful information on the user's distance moved in the trip
logs and path logs. You can save trip logs automatically by turning this
setting on, or save them manually wh en arriving at a destination. You
can view all logs on the trip monitor. Launch the trip monitor from the
“Others” menu. • (Enable Auto-Saving):
The trip monitor saves statistical data for the distance traveled. You
can set it so that the route is sa ved automatically if you need a log
after driving.
• Trip Database Size:
This is not a button. This line indi cates the current size of the trip
database. This shows the total for all saved trip logs and path logs.
• (Save Track Log):
You can save path logs (positional order acquired from GPS receiver)
in the trip log.
Units and Formats
Distance
Fuel Economy
Currency
Date Format
Date Delimiter
Coordinate Display Format
Enable Auto-Saving
Save Track Log
Page 96 of 110
, but to acquire a 3D position at least four
signals")
174 Navigation
Glossary
2D/3D GPS reception
The GPS receiver uses signals from satellites to calculate its current
position (the user's position), but to acquire a 3D position at least four
signals are necessary, including altitude. The GPS device may not be
able to acquire signals from four satellites as they are constantly moving
and obstacles may block satellite signals. Although the accuracy
decreases when only three signals ca n be acquired, and altitude data
cannot be sent, the receiver can ca lculate a latitude and longitude GPS
position. Only 2D reception is possible.
Route being navigated
The route currently being navigated. When a destination is set, the
route will be continuously navigate d until the destination is deleted,
you arrive at the destination, or the software is closed. Also see “Route”.
City center
The center of the city/town is not th e geographical center of the city/
town, but a location set by the cartog rapher. In towns and villages, this
is usually the most important intersec tion, while in larger cities it is
selected from multiple important intersections. Color design
The color design used for the map and menu screens differs for daytime
and nighttime. Each design has a diff
erent graphic setting, with 2D and
3D each having colors for roads, bl ocks, seas, and lakes, whilst shadow
changes and shadows are displa yed differently in 3D mode.
Daytime screen and nighttime screen designs for the map and menu
are selected one at a time. The design changes automatically when day
becomes night and night becomes day.
GPS accuracy
Various factors can contribute to a margin of error between the user's
actual position and the position acquired from the GPS device. For
example, signal delays in the iono sphere or reflections from objects
around the GPS equipment, can infl uence the accuracy with which the
GPS device can calculate the user's position.
 1
1 2
2 3
3 4
4 5
5 6
6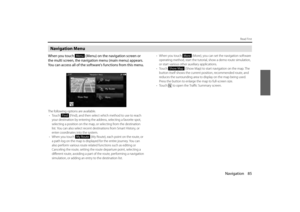 7
7 8
8 9
9 10
10 11
11 12
12 13
13 14
14 15
15 16
16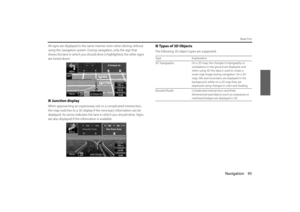 17
17 18
18 19
19 20
20 21
21 22
22 23
23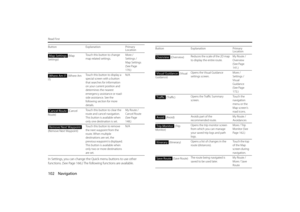 24
24 25
25 26
26 27
27 28
28 29
29 30
30 31
31 32
32 33
33 34
34 35
35 36
36 37
37 38
38 39
39 40
40 41
41 42
42 43
43 44
44 45
45 46
46 47
47 48
48 49
49 50
50 51
51 52
52 53
53 54
54 55
55 56
56 57
57 58
58 59
59 60
60 61
61 62
62 63
63 64
64 65
65 66
66 67
67 68
68 69
69 70
70 71
71 72
72 73
73 74
74 75
75 76
76 77
77 78
78 79
79 80
80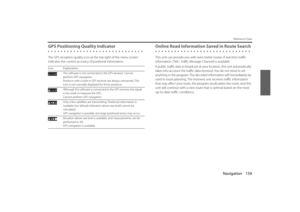 81
81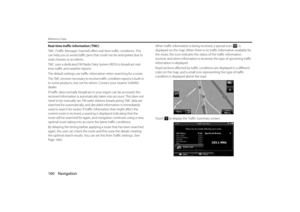 82
82 83
83 84
84 85
85 86
86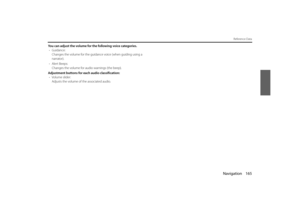 87
87 88
88 89
89 90
90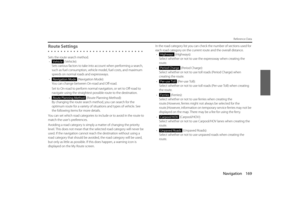 91
91 92
92 93
93 94
94 95
95 96
96 97
97 98
98 99
99 100
100 101
101 102
102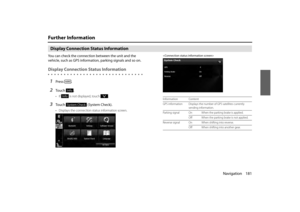 103
103 104
104 105
105 106
106 107
107 108
108 109
109