2013 SMART FORTWO COUPE ELECTRIC DRIVE service
[x] Cancel search: servicePage 120 of 218
starter switch before opening the service
flap.
If the windshield wipers should
inadvertently be switched on, you could be
seriously injured by the wiper washer
drive, which is located just below the
service flap.
G
WARNING
Make sure the service flap is locked while
driving. Otherwise, the service flap could
become detached and pose a hazard to you
or others.
! Check the fill level satregular
intervals.
! Carefully remove ice, snow, and any
other deposits from the air intake
grilles above the service flap to ensure
air intake at all times.
X Park the vehicle on level ground.
X Switch off the ignition.
X Engage the parking brake.
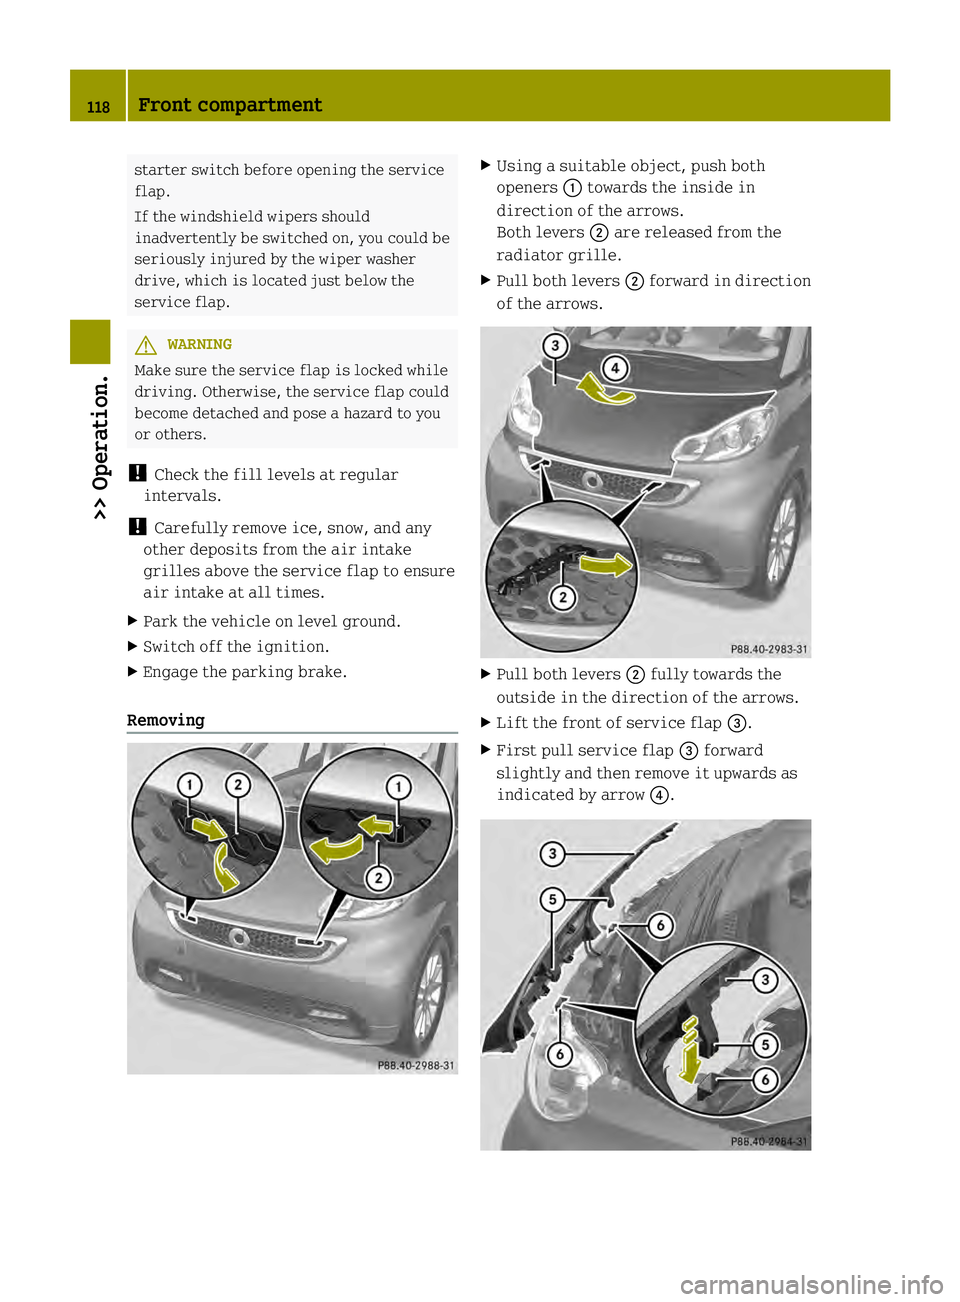
Removing X
Using a suitable object, push both
openers 0002towards the inside in
direction of the arrows.
Both levers 0003are released from the
radiator grille.
X Pull both levers 0003forward in direction
of the arrows. X
Pull both levers 0003fully towards the
outside in the direction of the arrows.
X Lift the front of service flap 002B.
X First pull service flap 002Bforward
slightly and then remove it upwards as
indicated by arrow 002A.118
Front compartment>> Operation.
Page 121 of 218
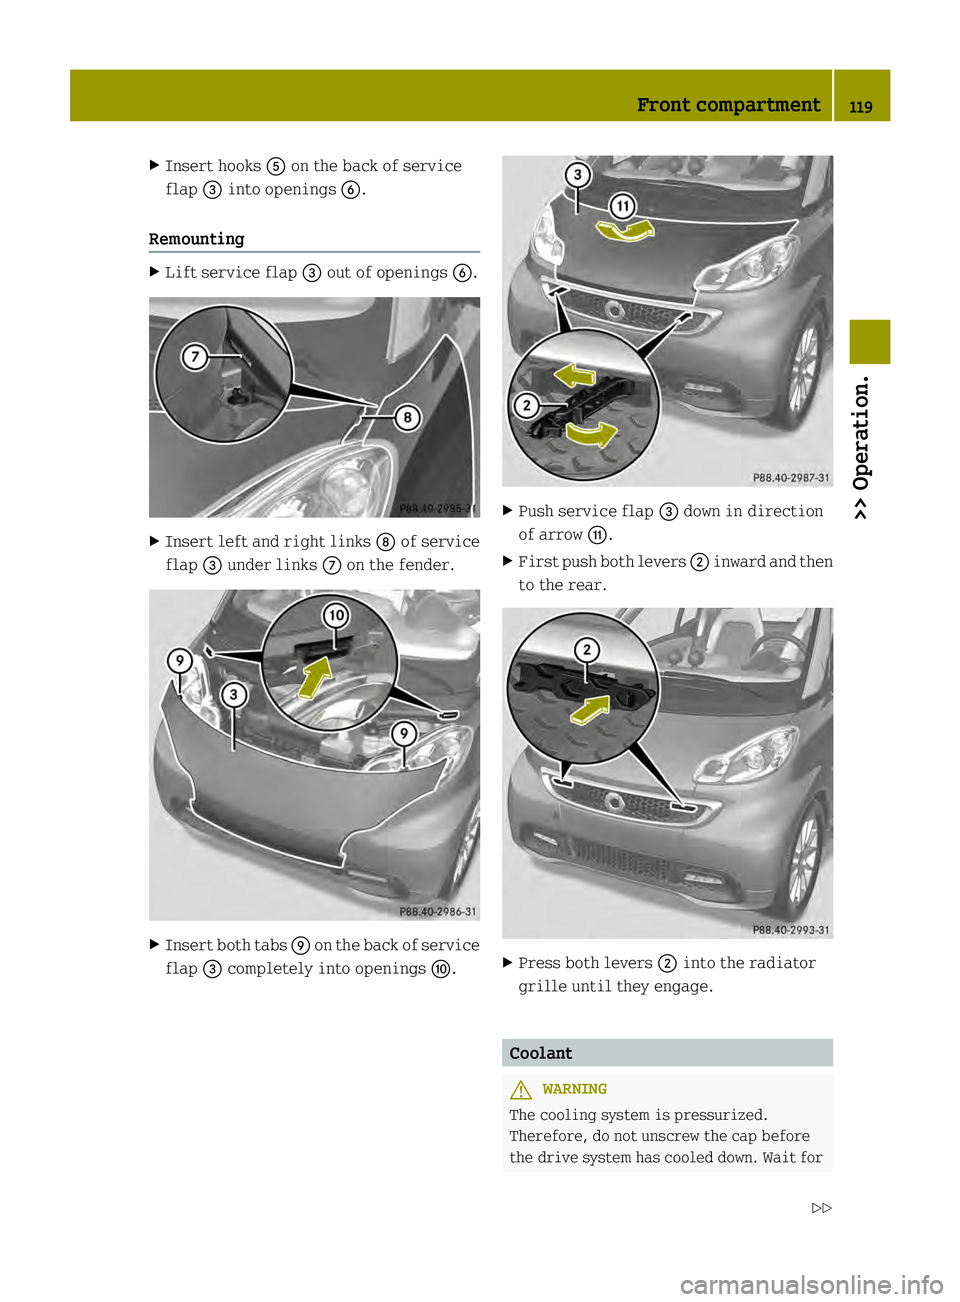
X
Insert hooks 0028on the back of service
flap 002Binto openings 0029.
Remounting X
Lift service flap 002Bout of openings 0029. X
Insert left and right links 0019of service
flap 002Bunder links 0018on the fender. X
Insert both tabs 001Aon the back of service
flap 002Bcompletely into openings 001B. X
Push service flap 002Bdown in direction
of arrow 001D.
X First push both levers 0003inward and then
to the rear. X
Press both levers 0003into the radiator
grille until they engage. Coolant
G
WARNING
The cooling system is pressurized.
Therefore, do not unscrew the cap before
the drive system has cooled down. Wait for Front compartment
119>> Operation.
Z
Page 122 of 218
a cooling period of at least 30 minutes.
Otherwise, you could be seriously burned if
hot coolant escapes.
The coolant is a mixture of water and
anticorrosion/antifreeze. To check the
coolant level the vehicle must be parked on
level ground and the drive system must have
cooled down. For more information, see
„Coolants“ (Y page 213).
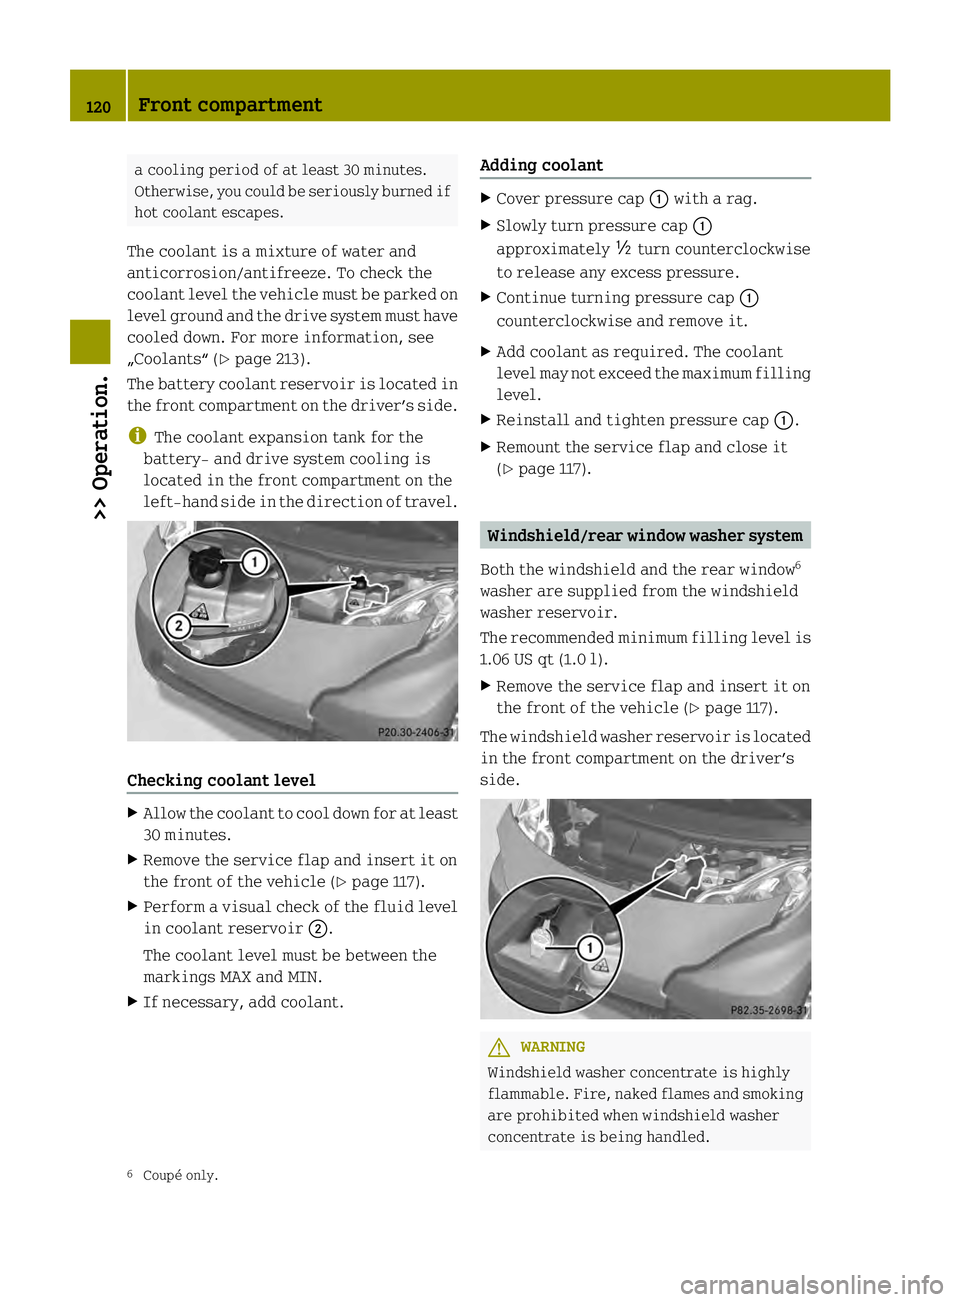
The battery coolant reservoir is located in
the front compartment on the driver’s side.
i The coolant expansion tank for the
battery‑ and drive system cooling is
located in the front compartment on the
left-hand side in the direction of travel. Checking coolant level
X
Allow the coolant to cool down for at least
30 minutes.
X Remove the service flap and insert it on
the front of the vehicle (Y page 117).
X Perform avisual check of the fluid level
in coolant reservoir 0003.
The coolant level must be between the
markings MAX and MIN.
X If necessary, add coolant. Adding coolant X
Cover pressure cap 0002with a rag.
X Slowly turn pressure cap 0002
approximately 0001turn counterclockwise
to release any excess pressure.
X Continue turning pressure cap 0002
counterclockwise and remove it.
X Add coolant as required. The coolant
level may not exceed the maximum filling
level.
X Reinstall and tighten pressure cap 0002.
X Remount the service flap and close it
(Y page 117). Windshield/rear window washer system
Both the windshield and the rear window 6
washer are supplied from the windshield
washer reservoir.
The recommended minimum filling level is
1.06 US qt (1.0 l).
X Remove the service flap and insert it on
the front of the vehicle (Y page 117).
The windshiel dwasher reservoir is located
in the front compartment on the driver’s
side. G
WARNING
Windshield washer concentrate is highly
flammable. Fire, naked flames and smoking
are prohibited when windshield washer
concentrate is being handled.
6 Coupé only. 120
Front compartment>> Operation.
Page 123 of 218
X
Use a windshield washer concentrate
labeled for summer and water for
temperatures above freezing point.
X Use a windshield washer concentrate
labeled for winter and water for
temperatures below freezing point.
! Always use a windshield washer
concentrate labeled for winter where
temperatures may fall below freezing
point. Failure to do so could result in
damage to the washer system/reservoir.
X Premix the windshield washer fluid in a
suitable container.
Observe mixing ratios depending on the
outside temperature (Y page 212).
X Use the tab to pull cap 0002upwards.
X Refill the windshield washer reservoir.
X Push cap 0002onto the windshield washer
reservoir.
X Remount the service flap and close it
(Y page 117). Brake fluid
G
WARNING
During vehicle operation, the boiling
point of the brake fluid is continuously
reduced through the absorptio nofmoisture
from the atmosphere. Under extremely
strenuous operating conditions, this
moisture content can lead to the formation
of bubbles in the system, thus reducing the
system’s efficiency.
Therefore, the brake fluid must be replaced
regularly. Refer to your vehicle’s
Maintenance Booklet for replacement
interval.
The brake fluid level in the brake fluid
reservoir may be too low if the brake
warning lamp in the instrument cluster
comes on (Y page 21) although the parking
brake is released. !
If you find that the brake fluid in the
brake fluid reservoir has fallen to the
minimum mark or below, have the brake
system checked for brake pad thickness
and leaks immediately. Contact an
authorized electric drive smart center
immediately. Do not add brake fluid as
this will not solve the problem.
X Remove the service flap and insert it on
the front of the vehicle (Y page 117).
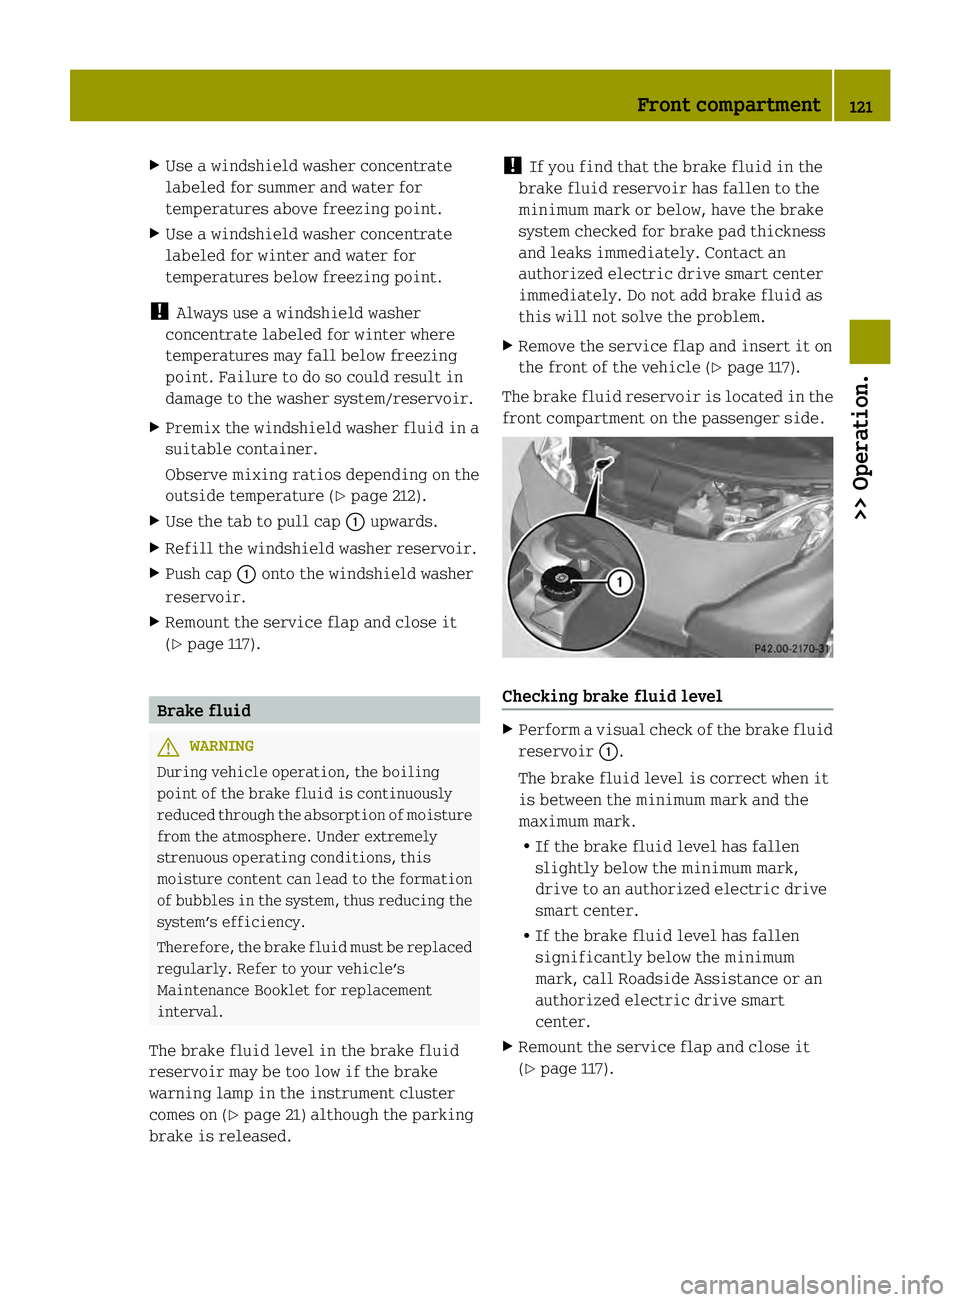
The brake fluid reservoir is located in the
front compartment on the passenger side. Checking brake fluid level
X
Perform a visual check of the brake fluid
reservoir 0002.
The brake fluid level is correct when it
is between the minimum mark and the
maximum mark.
R If the brake fluid level has fallen
slightly below the minimum mark,
drive to an authorized electric drive
smart center.
R If the brake fluid level has fallen
significantly below the minimum
mark, call Roadside Assistance or an
authorized electric drive smart
center.
X Remount the service flap and close it
(Y page 117). Front compartment
121>> Operation. Z
Page 124 of 218
Tires and wheels
Safety notes
Contact an authorized electric drive smart
center for information on tested and
recommended rims and tires for summer
and winter operation. They can also offer
advice concerning tire service and
purchase. G
WARNING
Replace rims or tires with the same
designation, manufacturer and type as
shown on the original part. For further
information contact an authorized electric
drive smart center. If incorrectly sized
rims and tires are mounted, the wheel
brakes or suspension components can be
damaged. Also, the operating clearance of
the wheels and the tires may no longer be
correct. G
WARNING
Worn, old tires can cause accidents. If the
tire tread is worn to minimum tread depth,
or if the tires have sustained damage,
replace them.
When replacing rims, only use genuine
smart wheel bolts specified for the
particular rim type. Failure to do so can
result in the bolts loosening and possibly
an accident.
Retreaded tires are not tested or
recommended by smart, since previous
damage cannot always be recognized on
retreads. The operating safety of the
vehicle cannot be assured when such tires
are used. G
WARNING
If you feel a sudden significant vibration
or ride disturbance, or you suspect that
possible damage to your vehicle has
occurred, you should turn on the hazard
warning flashers, carefully slow down, and
drive with caution to an area which is a safe
distance from the road. Inspect the tires and the vehicle underbody
for possible damage. If the vehicle or tires
appear unsafe, have the vehicle towed to the
nearest authorized electric drive smart
center or tire dealer for repairs.
G
WARNING
Do not drive with a flat tire. A flat tire
affects the ability to steer or brake the
vehicle. You could lose control of the
vehicle. Continued driving with aflat tire
or driving at high speed with a flat tire
will cause excessive heat build-up and
possibly a fire.
Modifications to the brake system and
wheels and the use of brake dust rings are
not permissible. Important guidelines
R Only use sets of tires and rims of the same
type and make.
R Tires must be of the correct size for the
rim.
R Break in new tires for approximately
60 miles (100 km) at moderate speeds.
R Regularly check the tires and rims for
damage. Dented or bent rims can cause
tire pressure loss and damage to the tire
beads.
R If vehicle is heavily loaded, check tire
inflation pressure and correct as
required.
R Do not allow your tires to wear down too
far. Adhesion properties on wet roads are
sharply reduced at tread depths of less
than 1
/ 8 in (3 mm). Recommended tire inflation pressure
G
WARNING
Follow recommended tire inflation
pressures. 122
Tires and wheels>> Operation.
Page 133 of 218
For more information on tire load rating
(Y page 135).
For information on calculating total and
cargo load capacities (Y page 129).Direction of rotation
Unidirectional tires offer added
advantages, such as better hydroplaning
performance. To benefit ,however, you must
make sure the tires rotate in the direction
specified.
An arrow on the sidewall indicates the
intended direction of rotation (spinning)
of the tire. Tire care and maintenance
G
WARNING
Regularly check the tires for damage.
Damaged tires can cause tire inflation
pressure loss. As a result, you could lose
control of your vehicle.
Worn, old tires can cause accidents. If the
tire tread is badly worn, or if the tires have
sustained damage, replace them.
Check the tire inflation pressure at least
once a month. For more information on
checking tire inflation pressure, see
“Recommended tire inflation pressure”
(Y page 122).
Tire inspection Every time you check the tire inflation
pressure, you should also inspect your
tires for the following
R excessive treadwear (Y page 131)
R cord or fabric showing through the tire’s
rubber
R bumps, bulges, cuts, cracks or splits in
the tread or side of the tire
Replace the tire if you find any of the above
conditions. Life of tire G
WARNING
Tires should be replaced after 6 years,
regardless of the remaining tread.
The service life of atire is dependent upon
varying factors including but not limited
to
R driving style
R tire inflation pressure
R distance driven
Tread depth G
WARNING
Although the applicable federal motor
vehicle safety laws consider a tire to be
worn when the treadwear indicators (TWI)
become visible at approximately 1
/ 16 in
(1.6 mm), we recommend that you do not allow
your tires to wear down to that level. As
tread depth approaches 1
/ 8 in (3 mm), the
adhesion properties on a wet road are
sharply reduced.
Depending upon the weather and/or road
surface (conditions), the tire traction
varies widely.
Do not allow your tires to wear down too far.
Adhesion properties on wet roads are
sharply reduced at tread depths of less
than 1
/ 8 in (3 mm).
Treadwear indicators (TWI) are required by
law. These indicators are located in six
places on the tread circumference and
become visible at a tread depth of
approximately 1
/ 16 in (1.6 mm), at which
point the tire is considered worn and
should be replaced.
Recommended minimum tire tread depth:
Summer tires 1
/ 8 in (3 mm)
Winter tires 1
/ 6 in (4 mm) Tires and wheels
131>> Operation. Z
Page 134 of 218
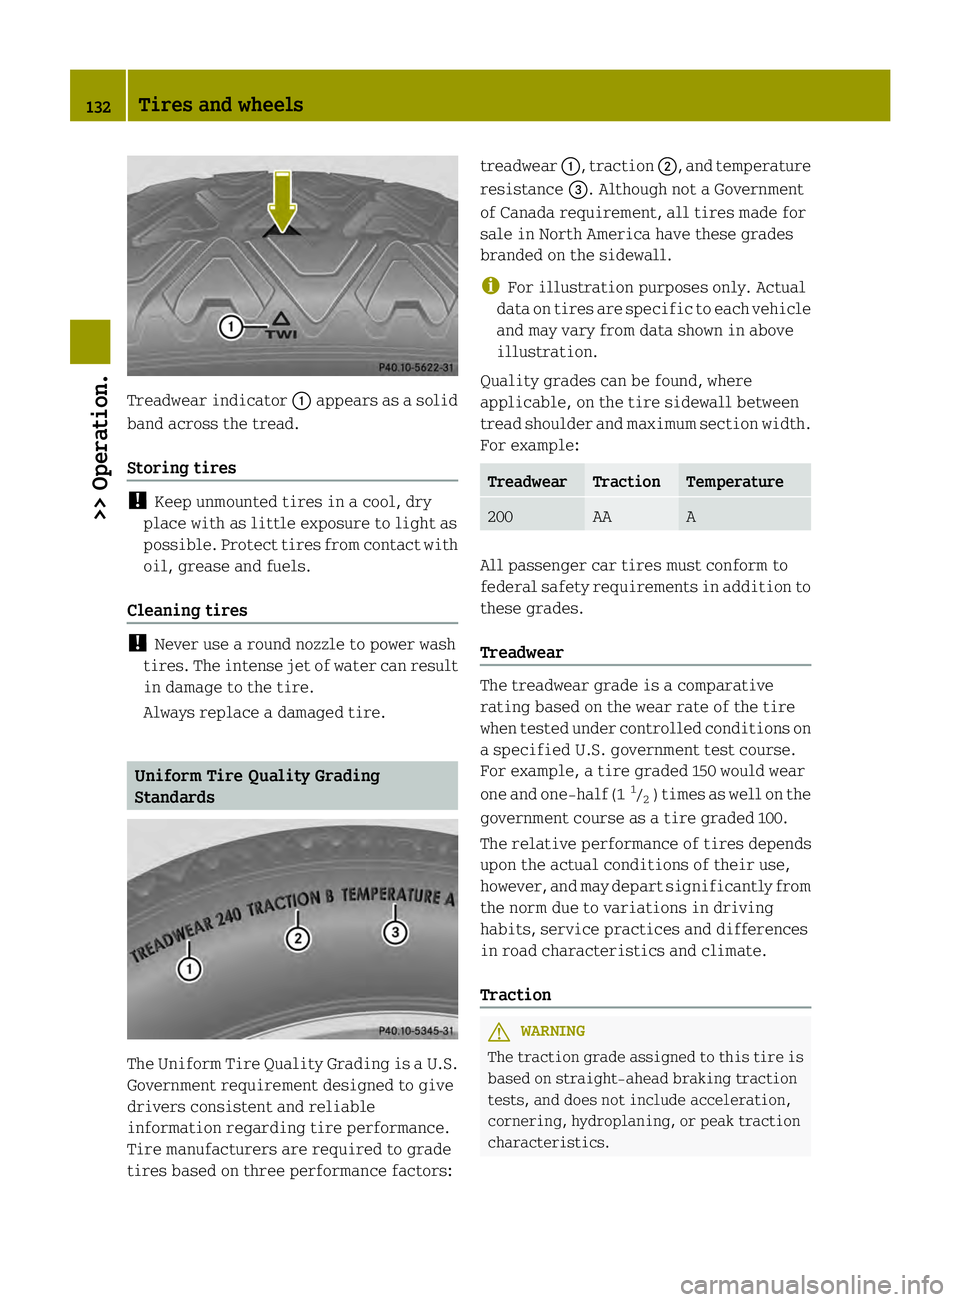
Treadwear indicator
0002appears as a solid
band across the tread.
Storing tires !
Keep unmounted tires in a cool, dry
place with as little exposure to light as
possible. Protect tires from contact with
oil, grease and fuels.
Cleaning tires !
Never use a round nozzle to power wash
tires. The intense jet of water can result
in damage to the tire.
Always replace a damaged tire. Uniform Tire Quality Grading
Standards
The Uniform Tire Quality Grading is a U.S.
Government requirement designed to give
drivers consistent and reliable
information regarding tire performance.
Tire manufacturers are required to grade
tires based on three performance factors: treadwear
0002,traction 0003,and temperature
resistance 002B. Although not a Government
of Canada requirement, all tires made for
sale in North America have these grades
branded on the sidewall.
i For illustration purposes only. Actual
data on tires are specific to each vehicle
and may vary from data shown in above
illustration.
Quality grades can be found, where
applicable, on the tire sidewall between
trea dshoulder and maximum sectio nwidth.
For example: Treadwear Traction Temperature
200 AA A
All passenger car tires must conform to
federal safety requirements in addition to
these grades.
Treadwear The treadwear grade is a comparative
rating based on the wear rate of the tire
when tested under controlled condition
son
a specified U.S. government test course.
For example, a tire graded 150 would wear
one and one-half (1 1
/ 2 )t
imes as well on the
government course as a tire graded 100.
The relative performance of tires depends
upon the actual conditions of their use,
however, and may depart significantly from
the norm due to variations in driving
habits, service practices and differences
in road characteristics and climate.
Traction G
WARNING
The traction grade assigned to this tire is
based on straight-ahead braking traction
tests, and does not include acceleration,
cornering, hydroplaning, or peak traction
characteristics. 132
Tires and wheels>> Operation.
Page 137 of 218
Tire load rating
G
WARNING
The tire load rating must always be at least
half of the GAWR of your vehicle. Otherwise,
tire failure may result and cause an
accident and/or serious personal injury to
you or others.
Always replace rims and tires with the same
designation, manufacturer and type as
shown on the original part. G
WARNING
Do not overload the tires by exceeding the
specified load limit as indicated on the
Tire and Loading Information placard on
the driver’s door B‑pillar. Overloading the
tires can overheat them, possibly causing
a blowout. Overloading the tires can also
result in handling or steering problems, or
brake failure.
Tire load rating 0028is a numerical code
associated with the maximum load a tire
can support.
For example, a load rating of 91
corresponds to a maximum load of 1356 lbs
(615 kg) the tire is designed to support.
See also “Maximum tire load” (Y page 130)
where the maximum load associated with
the load index is indicated in kilograms
and lbs.
For additional information on tire load
rating, see “Load identification”
(Y page 136).
Tire speed rating G
WARNING
Even when permitted by law, never operate
a vehicle at speeds greater than the
maximum speed rating of the tires.
Exceeding the maximum speed for which
tires are rated can lead to sudden tire
failure, causing loss of vehicle control and
possibly resulting in an accident and/or
personal injury and possible death, for you
and for others. Regardless of the tire speed rating, local
speed limits should be obeyed. Use prudent
driving speeds appropriate to prevailing
conditions.
Tire speed rating 0029indicates the
approved maximum speed for the tire.
Summer tires Index Speed rating
Q up to 100 mph (160 km/h)
R up to 106 mph (170 km/h)
S up to 112 mph (180 km/h)
T up to 118 mph (190 km/h)
H up to 130 mph (210 km/h)
V up to 149 mph (240 km/h)
W up to 168 mph (270 km/h)
Y up to 186 mph (300 km/h)
ZR...Y above 186 mph (300 km/h)
ZR...(Y) above 186 mph (300 km/h)
ZR above 149 mph (240 km/h)
R
At the tire manufacturer’s option, any
tire with a speed capability above
149 mph (240 km/h) can include a “ZR” in
the size designation (for example:
245/40 ZR18). To determine the maximum
speed capability of the tire, the service
description for the tire must be referred
to.
The service description is comprised of
tire load rating 0028and tire speed rating
0029.
If your tire includes “ZR” in the size
designation and no service description
is given, the tire manufacturer must be
consulted for the maximum speed
capability.
If a service description is given, the
speed capability is limited by the speed Tires and wheels
135>> Operation. Z