2013 SKODA YETI radio
[x] Cancel search: radioPage 179 of 266

Deactivating the front passenger airbagFig. 148
Key switch for front passenger airbag/warning light for front pas-
senger airbag activation/deactivation
First read and observe the introductory information given on page 175.
Only the front passenger airbag is deactivated with the key switch.
Switching off
›
Switch off the ignition.
›
Open the storage box on the front passenger's side.
›
Fold the key bit out completely for the radio key » .
›
Insert the key into the key slot in the key switch as far as the stop.
›
Use the key to turn the slot of the key switch carefully into the position
OFF » Fig. 148 -
.
›
Pull the key out of the slot in the key switch » .
›
Close the storage box on the front passenger's side.
›
Check that the warning light
in the text
» Fig. 148 -
lights up after the ignition is switched on.
Switching on
›
Switch off the ignition.
›
Open the storage box on the front passenger's side.
›
Fold the key bit out completely with the radio key » .
›
Carefully insert the key into the key slot in the key switch as far as the stop.
›
Use the key to turn the slot of the key switch carefully into the position
ON » Fig. 148 -
.
›
Pull the key out of the slot in the key switch » .
›
Close the storage box on the front passenger's side.
›Check that the warning light
in the text - lights up
after the ignition is switched on.
The warning light goes out 65 seconds after the key switch status has
changed or after the ignition is switched on.WARNING■ The driver is responsible for whether the airbag is switched on or switched
off.■
Only switch off the airbag when the ignition is switched off! Otherwise a
fault can occur in the system for deactivating the airbag.
■
If the warning light is flashing, the front passenger airbag will not be
deployed in an accident. Have the airbag system checked by a specialist ga- rage immediately.
■
The key can not be inserted in the key switch while driving. ■ Shocks can cause the key to turn in the slot and trigger the airbag!
■ The airbag can be triggered unexpectedly in an accident - it may result in
injury or death!
CAUTION
An insufficiently folded out key bit can damage the key switch!
176Safety
Page 191 of 266

Washing by handFirst read and observe the introductory information and safety warn-
ings
on page 187.
Soak the dirt with plenty of water and rinse as well as possible.
Clean the vehicle with a soft sponge, a washing glove or a washing brush . Work
from the top to the bottom - starting with the roof.
Only use a car shampoo for stubborn dirt.
Wash out the sponge or washing glove thoroughly at short intervals.
Clean wheels, door sills and similar parts last. Use a second sponge for such areas.
Give the vehicle a good rinse after washing it and dry it off using a chamois leath- er.
CAUTION
■ When washing the car by hand, protect your hands and arms from sharp-edged
metal parts (e.g. when cleaning the underfloor, the inside of the wheel housings
or the wheel trims, etc.) - there is a risk of cuts!■
Only apply slight pressure when cleaning the vehicle's paintwork.
Automatic car wash systems
First read and observe the introductory information and safety warn-
ings
on page 187.
The usual precautionary measures must be taken before washing the vehicle in
an automatic car wash system (e.g. closing the windows and the sliding/tilting
roof etc.).
If your vehicle is fitted with any particular attached parts, such as a spoiler, roof rack system, two-way radio aerial etc., it is best to consult the operator of the car
wash system beforehand.
After an automatic wash with wax treatment, the lips of the wipers should be cleaned with cleaning agents specially designed for the purpose, and then de-
greased.
WARNINGFold in the exterior mirrors to prevent damage before washing the vehicle in
an automatic car wash system.
Washing with a high-pressure cleaner
First read and observe the introductory information and safety warn-
ings
on page 187.
When washing the vehicle with a high-pressure cleaner, the instructions for use
of the equipment must be observed. This applies in particular to the pressure
used and to the spraying distance .
Maintain a sufficiently large distance to the parking aid sensors and soft materials such as rubber hoses or insulation material.
WARNINGNever use circular spray nozzles or dirt cutters!
CAUTION
■ If washing the vehicle in the winter using a hose or high-pressure cleaner, en-
sure that the jet of water is not aimed directly at the locking cylinders or the
door/panel joints – risk of freezing!■
To avoid damaging the parking aid sensors while cleaning with high-pressure
cleaners or steam jets, the sensors must only be directly sprayed for short periods
while a minimum distance of 10 cm must be observed.
■
The temperature of the water used for cleaning must not exceed 60 °C – risk of
damaging the vehicle.
■
See also Washing cars with decorative films using a high-pressure clean-
er » page 190 .
188General Maintenance
Page 213 of 266

It is necessary to disconnect both cables before charging the battery with high
amperages, known as “ rapid charging”.
The vent plugs of the vehicle battery should not be opened for charging.WARNING“Quick-charging” the vehicle battery is dangerous and requires a special
charger and specialist knowledge.
CAUTION
On vehicles with the START/STOP system, the pole terminal of the charger must
not be connected directly to the negative terminal of the vehicle battery, but only
to the engine earth » page 228, Jump-starting in vehicles with the START-STOP
system .
Note
We therefore recommend that vehicle batteries be rapid charged by a specialist
garage.
Replacing
First read and observe the introductory information and safety warn-
ings
on page 207.
The new vehicle battery must have the same capacity, voltage, current and the
same size as the original Battery. Suitable vehicle battery types can be purchased
from a specialist garage.
We recommend having the battery replaced by a specialist garage, where the
new vehicle battery will be installed properly and the original battery will be dis-
posed of in accordance with national regulations.
Disconnecting and reconnecting
First read and observe the introductory information and safety warn-
ings
on page 207.
On disconnecting and reconnecting the vehicle battery, the following functions
are initially deactivated or are no longer able to operate fault-free.
OperationOperating measureElectrical power window (operational faults)» page 44Panoramic sliding roof (operational faults)» page 234Enter the radio/navigation system code num-
ber» User manual of the radio
or » user manual of the naviga-
tion systemSetting the clock» page 13Data in the multifunction display are deleted.» page 25
Note
We recommend having the vehicle checked by a specialist garage in order to en-
sure full functionality of all electrical systems.
Automatic load deactivation
First read and observe the introductory information and safety warn-ings
on page 207.
The vehicle voltage control unit automatically prevents the battery from discharg-
ing when the battery is put under high levels of strain. This manifests itself by the
following.
› The idling speed is raised to allow the generator to deliver more electricity to
the electrical system.
› Where necessary, large convenience consumers such as seat heaters and rear
window heaters have their power limited or are shut off completely in the event
of an emergency.
CAUTION
■ Despite such intervention by the vehicle electric system management, the vehi-
cle battery may be drained. For example, when the ignition is switched on a long
time with the engine turned off or the side or parking lights are turned on during longer parking.■
Consumers that are supplied via a 12-V power socket can cause the vehicle bat-
tery to discharge when the ignition is switched off.
210General Maintenance
Page 234 of 266

Replacing the battery in the remote control keyFig. 183
Remove cover/take out battery
First read and observe the introductory information and safety warn-
ings
on page 230.
The battery change is carried out as follows.
›
Flip out the key.
›
Press off the battery cover
A
» Fig. 183 with your thumb or using a flat screw-
driver in the region of the arrows
1
.
›
Remove the discharged battery from the key by pressing the battery down in
the region of the arrow
2
.
›
Insert the new battery.
›
Place the battery cover
A
on the key and press it down until it clicks into place.
Note
■ The key has to be synchronised if the vehicle cannot be unlocked or locked with
the remote control key after replacing the battery » page 34.■
If a key has an affixed decorative cover, this will be destroyed when the battery
is replaced. A replacement cover can be purchased from a ŠKODA Partner.
replace battery in the remote control the auxiliary heating
(auxiliary heating)Fig. 184
Radio remote control: Battery
cover
First read and observe the introductory information and safety warn-
ings on page 230.
The battery is located under a cover on the back of the radio remote con-
trol » Fig. 184 .
›
Insert a flat, blunt object, such as a coin, into the gap of the battery cover.
›
Turn the cover against the direction of the arrow up to the mark to open the
cover.
›
Replace the battery.
›
Return the battery cover.
›
Turn the cover in the direction of the arrow up to the initial marking, engage.
231Emergency equipment and self-help
Page 240 of 266

›Insert a new fuse.›Replace the bracket at the original position.›
Re-insert the cover of the fuse box .
Fuse assignment in the dash panel
No.Power consumer1Heating of the gearbox ventilation (diesel engine)
Control unit for automatic gearbox DSG2-3Tow hitch4Instrument cluster, windshield wiper lever, turn signal light lever,
camera5Air blower for heating, radiator fan, air conditioning system, Clima-
tronic6Rear window wiper7Phone8Tow hitch9Vehicle voltage control unit - interior lights
Rear fog light10Rain sensor, light switch, diagnosis connector, removable light11Left side cornering lights12Right side cornering lights13Radio, DVD14Central control unit, engine control unit15Light switch16Haldex17KESSY controller, steering wheel locking18Diagnostic socket, engine control unit, brake sensor, Haldex19Control unit for ABS, ESP, switch for tyre air pressure control, control
unit for parking aid, switch for OFF ROAD mode, START STOP button20Switch and airbag control unit21WIV, tail lamp, dimming mirror, pressure sensor, telephone prepara- tion, air mass sensor, control unit for headlight range control and
headlight tilt22Instrument cluster controller for electro-mechanical power steering, control unit for data bus23Central locking system and bonnet lidNo.Power consumer24Rear power window25Rear window heater, auxiliary heating and ventilation26Power socket in the boot27Electric sliding/tilting roof, electric sun screen28Fuel pump, injection valves29Front power window30front and rear lighter31Headlight cleaning system32Front seat heating, regulator for seat heating33Heating, air conditioning, Climatronic, remote control for auxiliary
heating34Alarm, spare horn35Control unit for automatic gearbox DSG36Tow hitch
Fuses in the engine compartment
Fig. 194
Cover for the fuse box in the engine compartment / fuses
First read and observe the introductory information and safety warn-
ings
on page 236.
On some vehicles, the battery cover must be removed before removing the cover
for the fuse box » page 208.
237Fuses and light bulbs
Page 241 of 266
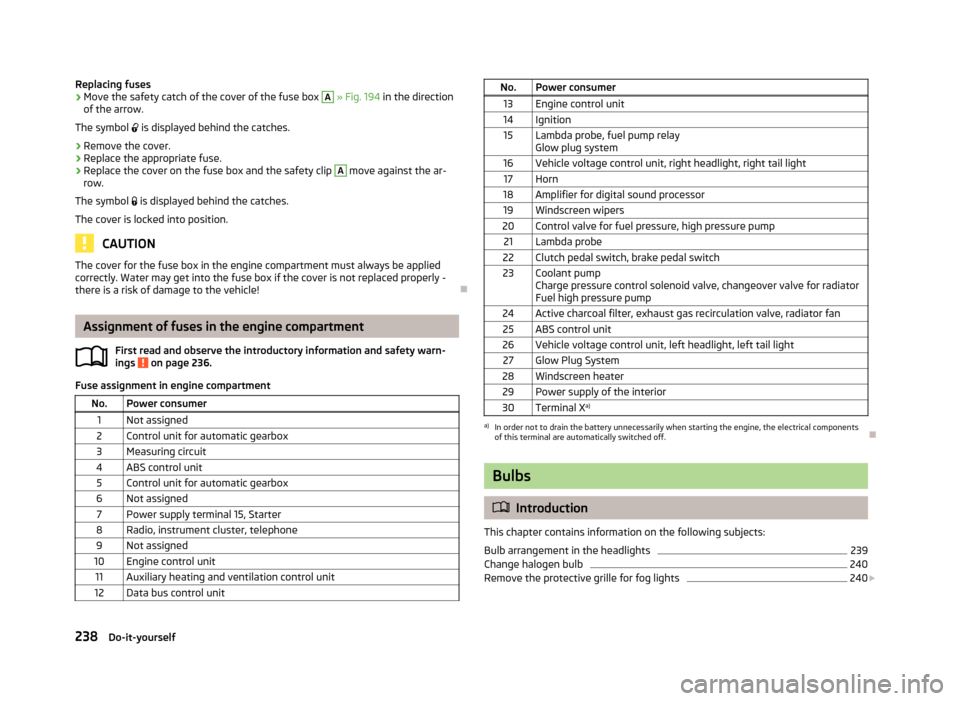
Replacing fuses›Move the safety catch of the cover of the fuse box A » Fig. 194 in the direction
of the arrow.
The symbol is displayed behind the catches.›
Remove the cover.
›
Replace the appropriate fuse.
›
Replace the cover on the fuse box and the safety clip
A
move against the ar-
row.
The symbol is displayed behind the catches.
The cover is locked into position.
CAUTION
The cover for the fuse box in the engine compartment must always be applied
correctly. Water may get into the fuse box if the cover is not replaced properly -
there is a risk of damage to the vehicle!
Assignment of fuses in the engine compartment
First read and observe the introductory information and safety warn-ings
on page 236.
Fuse assignment in engine compartment
No.Power consumer1Not assigned2Control unit for automatic gearbox3Measuring circuit4ABS control unit5Control unit for automatic gearbox6Not assigned7Power supply terminal 15, Starter8Radio, instrument cluster, telephone9Not assigned10Engine control unit11Auxiliary heating and ventilation control unit12Data bus control unitNo.Power consumer13Engine control unit14Ignition15Lambda probe, fuel pump relay
Glow plug system16Vehicle voltage control unit, right headlight, right tail light17Horn18Amplifier for digital sound processor19Windscreen wipers20Control valve for fuel pressure, high pressure pump21Lambda probe22Clutch pedal switch, brake pedal switch23Coolant pump
Charge pressure control solenoid valve, changeover valve for radiator
Fuel high pressure pump24Active charcoal filter, exhaust gas recirculation valve, radiator fan25ABS control unit26Vehicle voltage control unit, left headlight, left tail light27Glow Plug System28Windscreen heater29Power supply of the interior30Terminal X a)a)
In order not to drain the battery unnecessarily when starting the engine, the electrical components
of this terminal are automatically switched off.
Bulbs
Introduction
This chapter contains information on the following subjects:
Bulb arrangement in the headlights
239
Change halogen bulb
240
Remove the protective grille for fog lights
240
238Do-it-yourself
Page 254 of 266

Index
A
Abroad Driving abroad
135
Unleaded petrol135
ABS Operation
137
Warning light19
Accessories184
Adaptive headlights (AFS)50
Adjusting Belt height
167
Exterior mirrors59
Head restraints66
Interior mirror59
Seats62
Steering wheel117
Adjusting the headrests
67
Adjusting the seats161
Adjustment Headlight beam
47
Aerial188
See windows191
AFS50
Airbag169
Deactivating175
Deactivating the front passenger airbag176
Deployment169
Front airbag171
Head airbag174
Indicator light21
Knee airbag172
Modifications and damage to the airbag system 186
Side airbag
173
Airbag system169
Air conditioning Climatronic95
manual air conditioning94
Recirculation93
Air conditioning system Air outlets
92
Air outlets92
Alarm Switching off
39
Triggering39
Anti-theft alarm system Activating/deactivating
39
Trailer159
Antilock brake system (ABS)137
Armrest Front
65
Artificial leather194
Ashtray74
ASR warning light
18
Assistence systems OFF ROAD-mode
138
Assist systems136
ABS19, 137
ASR18
Cruise Control System147
DSR137
EDL137
ESC18, 136
HBA137
HHC138
Park assist143
Parking aid140
START-STOP149
TCS137
Auto Check Control13
Automatic driving lamp control49
Automatic gearbox Manual shifting of gears
127
Selector lever-emergency unlocking233
Starting-off and driving128
Tiptronic127
Automatic load deactivation210
Automatic transmission126
Kickdown128
Malfunction128
Selector lever lock127
Using the selector lever127
Auxiliary heating and ventilation System settings
98
auxiliary heating and ventilations Switching on and off directly
98
Auxiliary heating (auxiliary heating and ventila- tion)
97
Radio remote control99
B
Ball head Check fitting
155
Ball rod installing
154
Ready position153
removing155
Bar with sliding hook84
Battery In the remote control key
231
Belts164
Belt tensioners168
Bonnet Closing
200
Opening200
Boot Class N1 vehicles
88
see Boot lid41
Boot lid41
Automatic locking41
Warning light17
Brake information messages
15
warning light15
251Index
Page 260 of 266

Practical features70
Compartment for glasses77
Folding table in the middle seat backrest80
Folding table on front seat backrest80
Storage compartment in the front central con- sole
72
Storage compartments in the doors72
Storage net in the front centre console77
Waste container76
Practical Features Storage compartment on the dashboard
71
R
Radiator fan
201
Radio reception See windows
191
Radio remote control Auxiliary heating
99
Raise vehicle223
Rear-view mirror Exterior mirrors
59
Fold in passenger mirror60
Rear-view mirrors Synchronous adjustment of the rear-view mirrors 59
Rear fog light
51
Warning light19
Rear head restraints in the centre
67
Rear interior light54
Rear mirror58
Interior mirror59
rear seats in the longitudinal direction
68
Rear seats67
Setting the tilt of the seat backrests68
Rear window - heater55
Recirculation93
Refuelling196
Fuel196
Remote control Locking34
Replacing the battery231
Synchronisation process34
Unlocking34
Remote control key Replacing the battery
231
Removable light Removing light
87
replace batteries of the lights232
Removable ski bag81
Removing the variable loading floor
88
Repairs and technical alterations184
Replace the battery in the auxiliary heating (auxiliary
heating) in the remote control
231
replace - batteries of the lights232
Replacing bulb for fog lights
241
Bulb for the licence plate light242
Bulb in rear light243
Fuses236
Fuses in the dash panel236
Fuses in the engine compartment237
Vehicle battery210
windscreen wiper blades235
Replacing windscreen wiper blades234
Replenishing Coolant
206
Engine oil204
Windscreen washer fluid201
reversing assistant orientation lines and monitored area
142
Revolutions counter11
Roof rack system90
Roof load90
Running-in the first 1500 km
129
Running inBrake pads130
Engine129
Tyres129
S
SAFE See Safe securing system
35
SAFELOCK See Safe securing system
35
Safe securing system35
Safety160
Child safety177
Child safety seats177
Correct seated position161
Head restraints66
ISOFIX180
TOP TETHER181
Safety belts rear middle seat
167
Saving electrical energy130
Seals Taking care of your vehicle
190
Seat belt warning light
15
Seat belts164
Belt tensioners168
Cleaning195
fastening and unfastening166
Height adjustment167
Seatbelts Inertia reels
167
Seat belts The physical principle of a head-on collision
165
Seat functions64
Seats Electric adjustment
62
Folding front passenger seat66
Front armrest65
Head restraints66
257Index