Page 1 of 17
www.skoda-auto.com
Swing: Fabia, Roomster, Praktik, Rapid, Yeti, Superb
Rádio anglicky 11.2013
S00.5615.03.20
5J0 012 720 DD
SIMPLY CLEVER
Radio Swing
Owner's Manual
Page 2 of 17
Structure of this Owner's Manual
(explanations)
This Owner's Manual has been systematically designed to make it easy for you to
search for and obtain the information you require.
At the beginning of this manual you will find a table of contents where all the top-
ics arranged sequentially.
Direction indications
All direction indications such as “left”, “right”, “front” “rear”, relate to the direction of
travel of the vehicle.
Explanation of symbolsDenotes the end of a section.Denotes the continuation of a section on the next page.®Denotes a registered trademark.
Notes
WARNINGThe most important notes are marked with WARNING. These WARNING notes
draw your attention to a serious risk of accident or injury .
CAUTION
A CAUTION note alerts you to the possibility of damage to your vehicle (e.g. dam-
age to the gearbox), or points out general risks of an accident.
Note
A normal Note draws your attention to important information about the operation
of your vehicle.
Page 3 of 17
Table of Contents
General information
Important information
2
Anti-theft protection
2
Device specification and operation
3
Unit set-up
4
Radio
Using the system
6
CD player
Using the system
8
External sources
Using the system
11
Parking and manoeuvring
Visual parking system
131Table of Contents
Page 4 of 17
 Swing Car Radio Manual General information
Important information
Introductory information
Please read this Radio Swing (hereinafter referred to only as device) Owners Manual carefully, because operation in accordance with")
General information
Important information
Introductory information
Please read this Radio Swing (hereinafter referred to only as device) Owner's Manual carefully, because operation in accordance with these instructions is a
prerequisite for proper use of the unit.
This Owner's Manual describes all possible equipment variants without identify-
ing them as special equipment, model variants or market-driven equipment.
Consequently, this vehicle does not need to contain all of the equipment compo-
nents described in these operating instructions.
The scope of equipment of your vehicle relates to your purchase contract for the vehicle. More information is available from the ŠKODA Partner 1)
where you bought
the vehicle.
Please note that these instructions are meant only as an addendum to the infor-
mation provided in your vehicle's owner's manual. Therefore, they can be used
only in conjunction with the latest manual for this vehicle. For a detailed descrip-
tion of some of the functions listed in these instructions, see the owner's manual for your vehicle.
If you have any questions about your device, please contact a ŠKODA Partner.
The illustrations can differ in minor details from your device; they are only inten-
ded for general information.
Device operation
The device should only be used when traffic conditions permit safe use.
WARNING■ Concentrate fully at all times on your driving! As the driver, you are fully re-
sponsible for the operation of your vehicle.■
Only use the device such that you are in full control of your vehicle in every
traffic situation – there is the risk of accidents!
■
Adjust the volume to ensure that acoustic signals from outside the vehicle,
e.g. sirens from vehicles to give way to, such as the police, ambulance and fire
brigade , can be heard at all times.
■
High volumes can cause hearing damage!
Screen care
CAUTION
■ Do not use solvents such as benzine or turpentine, which may damage the
screen surface.■
Treat the screen with care. Finger pressure or contact with sharp objects may
cause dents and scratches on the surface.
Note
The screen can be cleaned with a soft cloth and alcohol if necessary.
Anti-theft protection
Anti-theft coding
Your device is equipped with a convenience coding. If the device is being operat-
ed for the first time, the safety code is not only stored in the radio but also in the
vehicle.
After disconnecting and reconnecting the battery, you must first switch on the ig-
nition using the ignition key before switching on the device.
If you want to install the device in another vehicle you will need to enter the safe-ty code. In this case you will have to call on a specialist garage.
1)
Explanation of terms
» Owner's Manual , chapter Foreword .
2General information
Page 5 of 17
 Swing Car Radio Manual As the unit only functions after entering the safety code, this practically excludes
its use after a theft - a contribution to increased anti-theft safety.
Note
The code is stored in the instrument cl")
As the unit only functions after entering the safety code, this practically excludes
its use after a theft - a contribution to increased anti-theft safety.
Note
The code is stored in the instrument cluster. This ensures that it is automatically
decoded (convenience coding). Manual input of the code is normally not necessa- ry.
Enter code
›
Switch on the radio with the ignition turned on.
›
Use the selection buttons 1 - 4
12
» Fig. 1 on page 3 to enter the safety
code.
›
Confirm the safety code by pressing the selection buttons 6
12
.
If an incorrectly entered code is confirmed, the procedure can be repeated once
again.
If the code number is entered incorrectly for the second time, the unit will be
blocked for approx. one hour. It is possible to enter the safety code again after
one hour has expired if both the device and the ignition have stayed turned on
during that time.
The cycle - two attempts, blocked for an hour - will continue to apply.
Device specification and operation
Device specification
Fig. 1
Equipment overview
- Setting up button
› to switch the device on/off
› for volume control (turn)
Settings knob › to access a menu for setting the parameters of the device or CD player
› to activate the Scan function
MEDIA
button to activate the play function of audio sources
RADIO button to activate the radio mode
Buttons › fast station finding in radio mode
› Select the track in the CD mode, fast forward/rewind in the CD mode
123453General information
Page 6 of 17
 Swing Car Radio Manual INFO button
› Display of radio text information
› Display of additional information of MP3 CDs
Button
for sound adjustment
AS button to store radio stations automatically
Button TP to activ")
INFO button
› Display of radio text information
› Display of additional information of MP3 CDs
Button
for sound adjustment
AS button to store radio stations automatically
Button TP to activate the reception of traffic reports
CD slot
CD eject button
Function buttons
› Select and store radio stations
› Select CD
› Enter code
Switching the unit on and off
›
The unit is switched on or off by briefly pressing the on/off knob
1
» Fig. 1 on
page 3.
If the key is removed from the ignition while the unit is still switched on, it will
turn off automatically. The unit can be switched on again by pressing the on/off
knob
1
. If the ignition is switched off, the unit protects the vehicle battery by
switching itself off automatically after approx. one hour.
If you have switched the device off by removing the ignition key, the radio switches back on when the ignition is turned on again.
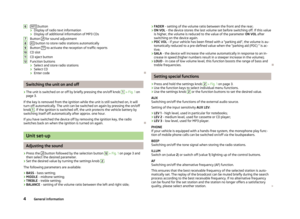
Unit set-up
Adjusting the sound
›
Press the button followed by the selection button
12
» Fig. 1 on page 3 and
then select the desired parameter.
›
Set the desired value by turning the settings knob
2
.
The following parameters are available:
› BASS
- bass setting;
› MIDDLE
- midtone setting;
› TREBLE
- treble setting;
› BALANCE
- setting of the volume ratio between the left and right side;
6789101112›FADER
- setting of the volume ratio between the front and the rear;
› ON VOL
- the device stores the last volume set before switching off. If this value
is higher, the volume is reduced to the value of the parameter ON VOL after
switching on the device again.
› PDC VOL
- if your vehicle has been fitted with a “parking aid”, the volume is au-
tomatically reduced to a pre-defined value when the “parking aid (PDC) ” is ac-
tive;
› GALA
- the device will increase the volume automatically in response to an in-
crease in speed (higher numbers result in a steeper increase in the volume);
› LOUD
- in case of low volume level, this function boosts the range of bass and
treble frequencies.
Setting special functions
›
Press and hold the settings knob
2
» Fig. 1 on page 3.
›
Use the function keys to select individual menu functions.
›
Use the settings knob
2
or the function buttons to set the desired value.
AUX
Switching on/off the functions of the external audio source.
Setting of the input sensitivity AUX LEV:
› LEV 1
- high level, used in particular for notebooks;
› LEV 2
- medium level, used for cassette or CD player;
› LEV 3
- low level, used for MP3 player.
PHONE
If your vehicle is equipped with a hands-free system, the monophone play func- tion of mobile phone calls can be switched on/off via the loudspeakers.
BEEP
Switching on/off the tone signal when storing the radio stations.
ILLUM
Switch on (value 2) or switch off (value 1) lighting up of the control buttons.
AF
Switching on/off the alternative frequency (AF) function.
This ensures that the best receivable frequency of the selected station is auto-
matically set. The replay of the broadcast can be muted briefly during the search
process according to the best receivable frequency. If no alternative frequency
can be found for the set station and the station no longer offers a satisfactory
quality, please select another station.
4General information
Page 7 of 17
REG
Switching a regional program on/off.
Some stations broadcast regional programs with different content.
The unit attempts initially to set only alternative frequencies for the selected sta-
tion.
If the quality is however so low, that there is a risk of a “program loss”, the unit also accepts “related” frequencies.
› FIX
- the receiver switches to a regional “related” station, if the reception of the
current station could be interrupted;
› AUTO
- the receiver can access the regional “related” station unlimited.
BT-AUDIO
Switching on/off wireless transfer of files from a connected Bluetooth ®
device.
5General information
Page 8 of 17
 Swing Car Radio Manual Radio
Using the system
Change frequency range
Your device is capable of receiving a radio reception in the FM and AM analogue frequency range.
Two storage groups are available for each of these freque")
Radio
Using the system
Change frequency range
Your device is capable of receiving a radio reception in the FM and AM analogue frequency range.
Two storage groups are available for each of these frequency ranges, FM1/FM2/
FM3 and AM1/AM2/AM3. There are 6 memory slots available for each of these
groups.
›
To change the frequency range, press and hold the RADIO button and select the
FM or AM frequency range using the function key
12
.
›
Briefly press the RADIO button to change the storage group of the selected fre-
quency range.
Searching for and storing radio stations
Manual search
›
Set the frequency of the desired radio station by turning the settings knob
2
» Fig. 1 on page 3.
Store station
›
After selecting the radio station, press the selection button
12
, on which the
station should be stored and hold it pressed in until the radio station briefly switches to mute and a brief signal sounds.
Automatic station finding with storing the radio stations
›
Press the button AS. An automatic station finding is started during which the 6
stations with the strongest signal in the memory level FM3 and/or AM3 are stor-
ed.
When the process of storing the radio stations on the selection buttons
12
is com-
plete, you can press any selection button
12
to call up the desired radio station.
Note
The stored radio stations of the current waveband are updated and stored once
again in the memory level FM3 and/or AM3 by repeatedly pressing the button AS.
Function SCAN
The stations of a waveband can be played briefly one after the other (for ten sec- onds).›
By briefly pressing menu knob
2
» Fig. 1 on page 3, the device automatically
searches for all available stations within the current waveband.
›
To return to the original radio station, press the selection button CANCEL
12
» Fig. 1 on page 3.
›
The automatic station search is terminated by pressing the function button OK
12
. The current radio station remains selected.
›
To choose other radio stations, press the selection button SKIP
12
.
RDS Function
Certain radio stations transmit additional text information - designated as radio
text.
›
The information of the radio text is displayed by pressing the button INFO.
Note
■
The text information must not be available to all radio stations.■Depending on the quality of the signal, the device may need some time in order
to load all the displayed characters.
Traffic news function
Switching on/off
›
Press the TP switch.
The traffic service is deactivated by pressing the TP
switch again. The displayed
icon goes out.
Activating/deactivating traffic reports Functional readiness of the traffic news service is indicated via the
icon.
During playback in Media mode, the last selected radio station that supports traf-
fic news will continue to be received in the background. If a traffic news station
has not been set recently, then the most appropriate traffic news station is set
automatically in the background. While searching for an appropriate station, TP
SEEK is displayed on the screen.
6Radio


 Swing Car Radio Manual www.skoda-auto.com
Swing: Fabia, Roomster, Praktik, Rapid, Yeti, Superb
Rádio anglicky 11.2013
S00.5615.03.20
5J0 012 720 DD
SIMPLY CLEVER
Radio Swing
Owners Manual")
 Swing Car Radio Manual Structure of this Owners Manual
(explanations)
This Owners Manual has been systematically designed to make it easy for you to
search for and obtain the information you require.
At the beginning of t")
 Swing Car Radio Manual Table of Contents
General information
Important information
2
Anti-theft protection
2
Device specification and operation
3
Unit set-up
4
Radio
Using the system
6
CD player
Using the system
8
External")
 Swing Car Radio Manual REG
Switching a regional program on/off.
Some stations broadcast regional programs with different content.
The unit attempts initially to set only alternative frequencies for the selected sta-
tion.
I")