2013 SKODA ROOMSTER wiper blades
[x] Cancel search: wiper bladesPage 51 of 219
Sun visorsFig. 29
Sun visor: swivelling out
First read and observe the introductory information given on page 47.
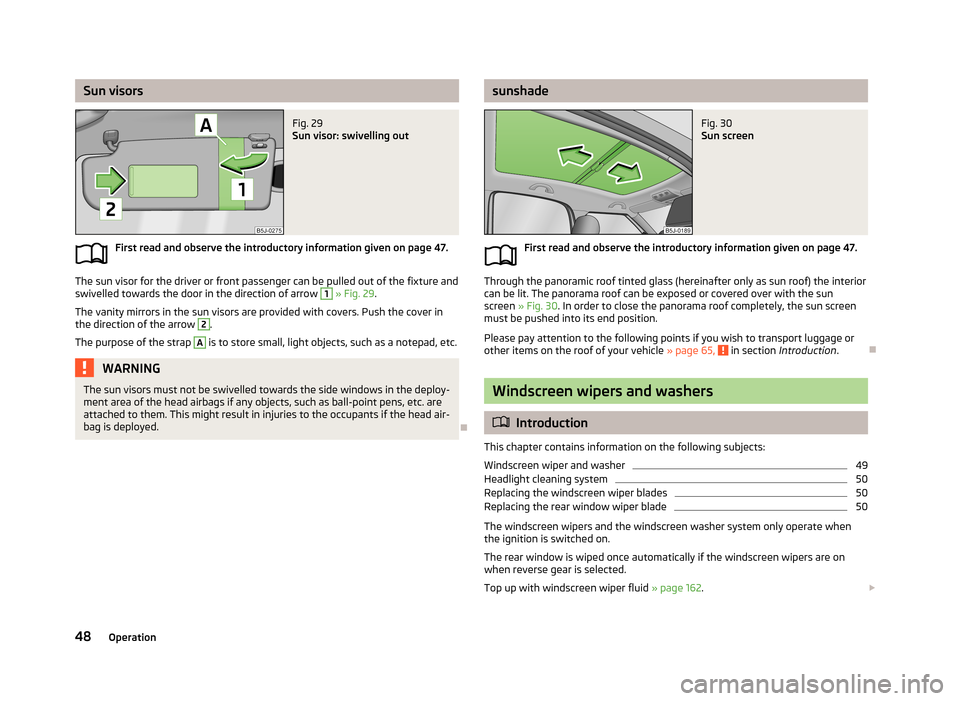
The sun visor for the driver or front passenger can be pulled out of the fixture and
swivelled towards the door in the direction of arrow
1
» Fig. 29 .
The vanity mirrors in the sun visors are provided with covers. Push the cover in the direction of the arrow
2
.
The purpose of the strap
A
is to store small, light objects, such as a notepad, etc.
WARNINGThe sun visors must not be swivelled towards the side windows in the deploy-
ment area of the head airbags if any objects, such as ball-point pens, etc. are attached to them. This might result in injuries to the occupants if the head air-
bag is deployed.
sunshadeFig. 30
Sun screen
First read and observe the introductory information given on page 47.
Through the panoramic roof tinted glass (hereinafter only as sun roof) the interior can be lit. The panorama roof can be exposed or covered over with the sun
screen » Fig. 30 . In order to close the panorama roof completely, the sun screen
must be pushed into its end position.
Please pay attention to the following points if you wish to transport luggage or other items on the roof of your vehicle » page 65,
in section Introduction .
Windscreen wipers and washers
Introduction
This chapter contains information on the following subjects:
Windscreen wiper and washer
49
Headlight cleaning system
50
Replacing the windscreen wiper blades
50
Replacing the rear window wiper blade
50
The windscreen wipers and the windscreen washer system only operate when
the ignition is switched on.
The rear window is wiped once automatically if the windscreen wipers are on when reverse gear is selected.
Top up with windscreen wiper fluid » page 162.
48Operation
Page 52 of 219
WARNING■Properly maintained windscreen wiper blades are essential for clear visibility
and safe driving » page 50.■
Do not use the windscreen washer system at low temperatures, without
heating the windscreen beforehand. Otherwise the window cleaner could
freeze on the windscreen and restrict the view to the front.
■
Replace the windscreen wiper blades once or twice a year for safety rea-
sons. These can be purchased from a ŠKODA Partner.
CAUTION
■ In cold temperatures and during the winter, check before the journey or before
switching on the ignition that the wiper blades are not frozen to the windscreen. If the windscreen wipers are switched on when the blades are frozen to the
windscreen, this may damage both the blades and windscreen wiper motor!■
If the ignition is switched off while the windscreen wipers are switched on, the
windscreen wipers will continue wiping in the same mode after the ignition is
turned back on. The windscreen wipers could freeze up in cold temperatures be- tween the time the ignition was turned off and when it was turned back on again.
■
Carefully detach frozen wiper blades from the front or rear window.
■
Remove snow and ice from the windscreen wipers before driving.
■
If the windscreen wipers are handled carelessly, there is a risk of damage to the
windscreen.
Note
■ The windscreen washer nozzles for the windscreen are heated when the en-
gine is running and the outside temperature is less than approx. +10 °C.■
The content of the windscreen washer fluid reservoir is 3.5 litres. On vehicles
fitted with the headlight cleaning system, the volume is around 5.4 litres.
■
The wiper blades should be cleaned on a regular basis with a windscreen clean-
er to avoid any smears. The wiper blades should be cleaned with a sponge or
cloth if they are heavily soiled by insect residues, for example.
Windscreen wiper and washerFig. 31
Operating lever: Windscreen
wipers and washer settings
First read and observe the introductory information and safety warn-
ings on page 48.
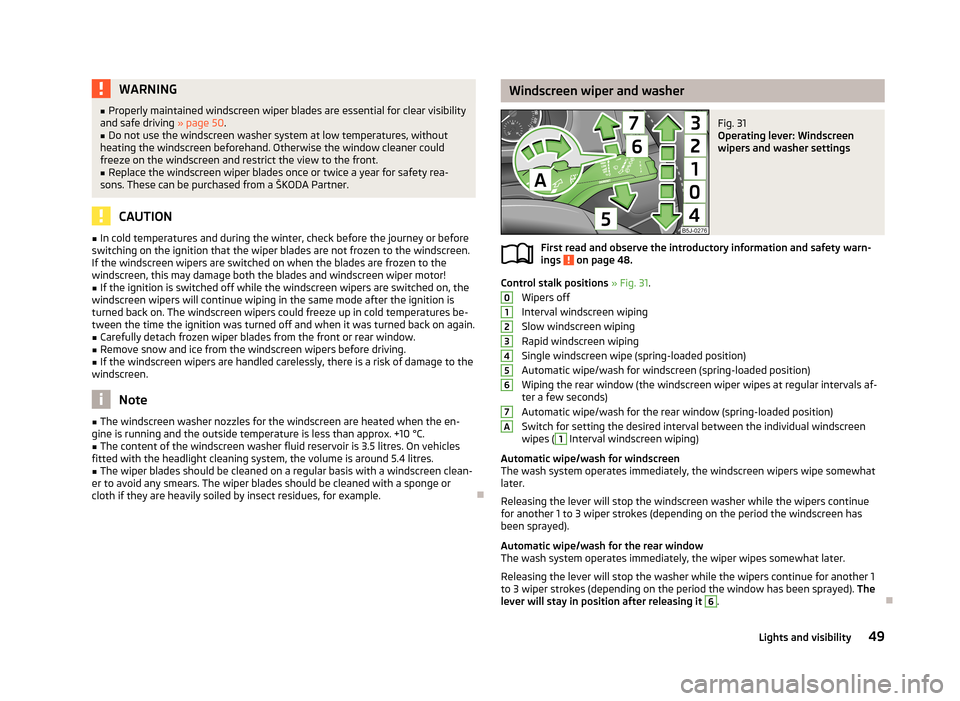
Control stalk positions » Fig. 31 .
Wipers off
Interval windscreen wiping Slow windscreen wiping
Rapid windscreen wiping
Single windscreen wipe (spring-loaded position)
Automatic wipe/wash for windscreen (spring-loaded position) Wiping the rear window (the windscreen wiper wipes at regular intervals af- ter a few seconds)
Automatic wipe/wash for the rear window (spring-loaded position)
Switch for setting the desired interval between the individual windscreen wipes (
1
Interval windscreen wiping)
Automatic wipe/wash for windscreen
The wash system operates immediately, the windscreen wipers wipe somewhat
later.
Releasing the lever will stop the windscreen washer while the wipers continue
for another 1 to 3 wiper strokes (depending on the period the windscreen has
been sprayed).
Automatic wipe/wash for the rear window The wash system operates immediately, the wiper wipes somewhat later.
Releasing the lever will stop the washer while the wipers continue for another 1
to 3 wiper strokes (depending on the period the window has been sprayed). The
lever will stay in position after releasing it
6
.
01234567A49Lights and visibility
Page 53 of 219
Headlight cleaning systemFirst read and observe the introductory information and safety warn-
ings
on page 48.
The headlights are sprayed briefly if the low beam or main beam are switched on
and the windscreen wiper stalk is pulled to position
5
» Fig. 31 on page 49. To
clean the headlights, the windshield is also sprayed after every five squirts.
You should remove stubborn dirt (such as insect residues) from the headlight len-
ses at regular intervals, for example when refuelling. The following guidelines
must be observed » page 153, Headlight lenses .
To ensure the proper operation of the cleaning system during the winter, any
snow should be removed from the washer nozzle fixtures and ice should be
cleared with a de-icing spray.
CAUTION
Never remove the nozzles from the headlight cleaning system by hand – there is
risk of damage.
Replacing the windscreen wiper blades
Fig. 32
Windscreen wiper blade
First read and observe the introductory information and safety warn- ings on page 48.
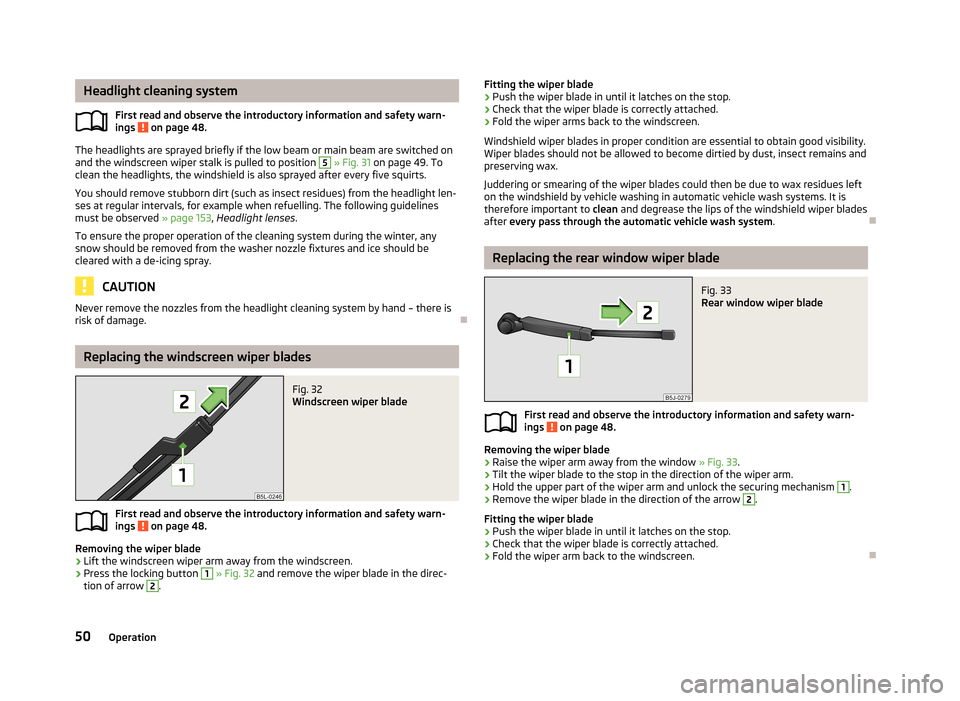
Removing the wiper blade
›
Lift the windscreen wiper arm away from the windscreen.
›
Press the locking button
1
» Fig. 32 and remove the wiper blade in the direc-
tion of arrow
2
.
Fitting the wiper blade›Push the wiper blade in until it latches on the stop.›
Check that the wiper blade is correctly attached.
›
Fold the wiper arms back to the windscreen.
Windshield wiper blades in proper condition are essential to obtain good visibility.
Wiper blades should not be allowed to become dirtied by dust, insect remains and
preserving wax.
Juddering or smearing of the wiper blades could then be due to wax residues left on the windshield by vehicle washing in automatic vehicle wash systems. It is
therefore important to clean and degrease the lips of the windshield wiper blades
after every pass through the automatic vehicle wash system .
Replacing the rear window wiper blade
Fig. 33
Rear window wiper blade
First read and observe the introductory information and safety warn-
ings on page 48.
Removing the wiper blade
›
Raise the wiper arm away from the window » Fig. 33.
›
Tilt the wiper blade to the stop in the direction of the wiper arm.
›
Hold the upper part of the wiper arm and unlock the securing mechanism
1
.
›
Remove the wiper blade in the direction of the arrow
2
.
Fitting the wiper blade
›
Push the wiper blade in until it latches on the stop.
›
Check that the wiper blade is correctly attached.
›
Fold the wiper arm back to the windscreen.
50Operation
Page 151 of 219
We recommend that you use ŠKODA Genuine Accessories in your vehicle. ŠKODA
AUTO a.s. offers a warranty on the reliability, safety and suitability for your partic-
ular vehicle of these accessories. Although we constantly monitor the market, we
are not able to assess or offer a warranty on other products even though in some
instances such products may have a type approval or may have been approved by
a nationally recognised approval authority.
All accessory products go through a fastidious process of technical development(technical tests) and quality inspection (customer tests), and only if all tests are positive does the product become a ŠKODA Genuine Accessory.
Our ŠKODA Genuine Accessories service also provides expert advice and profes-
sional fitting if requested by the customer.
ŠKODA Service Partners are liable for any defects in ŠKODA Genuine Parts for a period of 2 years after installation or delivery in accordance with materials defectliability legislation, unless otherwise agreed in the purchase contract or in any
other agreements. You should keep the confirmed warranty certificate and the
receipt for these accessories for this period, so that the commencement of the
warranty term may be verified.
In addition, ŠKODA Service Partners also stock a range of suitable car care prod-
ucts as well as those parts which are subject to natural wear and tear, such as
tyres, batteries, bulbs and wiper blades.
Note
The accessories authorized by ŠKODA AUTO a.s. will be offered by the ŠKODA
Partners in all countries where ŠKODA AUTO a.s. has a sales and service network.
This will usually be in the form of a printed catalogue of Original ŠKODA Accesso-
ries, in the form of separate printed brochures or in the form of offers for ŠKODA
Genuine Accessories on the ŠKODA Partner's website.
Spoiler
First read and observe the introductory information and safety warn-ings
on page 146.
If your new vehicle is fitted with a spoiler on the front bumper in combination
with the spoiler on the luggage compartment lid, the following instructions must
be adhered to.
› For safety reasons, the vehicle must only be fitted with a spoiler on the front
bumper in combination with the associated spoiler on the luggage compart-
ment lid.
› This kind of spoiler cannot be left on the front bumper either on its own, in
combination with another spoiler not on the luggage compartment lid or in combination with an unsuitable spoiler on the luggage compartment lid.
› We recommend that you consult the ŠKODA service partner for any repairs to or
replacement, addition or removal of spoilers.
WARNINGIf work on your vehicle's spoilers is not carried out properly, this can lead to
operational faults - risk of accident and serious injuries.
Airbags
First read and observe the introductory information and safety warn-
ings
on page 146.
The system components of the airbag system can be situated in the front bump-
er, doors, front seats, roof lining or body.
WARNINGAny work on the airbag system including the installation and removal of sys-
tem components due to other repair work (e.g. removal of the steering wheel) must only be carried out by a specialist garage.■
Modifications, repairs and technical alterations that have been carried out
unprofessionally can cause damage and operational faults, and can also seri-
ously impair the effectiveness of the airbag system – risk of accident and fatal
injury!
■
The airbag system will then have to be replaced if the airbag is deployed.
Airbag modules cannot be repaired.
148General Maintenance
Page 213 of 219

Onboard computersee Multifunction display13
Operation in winter Diesel fuel
159
Vehicle battery170
Outside temperature15
Overview Engine compartment
162
warning lights20
P
Paintwork See Paintwork care
151
Paintwork care151
Panoramic roof48
Parking Parking aid
112
Parking lights41
Part replacement146
Passive safety Before setting off
123
Driving safety124
Safety equipment123
Passive Safety123
Pedals100
Footmats100
Petrol refer to Fuel
158
Polishing the paintwork See Taking care of your vehicle
151
Power steering95
Power window force limiter39
praktik adjusting the safety partition
75
Praktik73
Adjustable safety partition behind the front seats
74
emergency release of the loading area door75
Fastening the loading floor74
Internal lighting75
Internal lights75
R
Radiator fan
162
Radio reception See windows
152
Raise vehicle183
Rear-view mirror Exterior mirrors
51
Manually dimmed rear-view mirror51
Rear fog light44
rear seats in the longitudinal direction
54
Tilt the seat backrest54
Rear seats54
Rear Seats fold back into the starting position
56
Rear window heating47
Recirculated air mode Manual air conditioning
82
Recommended gear13
Refuelling157
Fuel157
Regulation Headlight beam
42
Remote control34
Synchronisation process35
Remote control key Replacing the battery
29
Repairs and technical alterations146
Replacing Bulb for the licence plate light
197
Bulbs194
Bulbs in the tail light198
Fuses191
Fuses in the dash panel192
Fuses in the engine compartment193
Vehicle battery171
Windscreen wiper blades50
Replenishing Coolant
167
Engine oil165
Windscreen washer fluid162
Running-in The first 1500 km
103
Running in Brake pads
104
Engine103
Tyres104
S
SAFE see Safe securing
32
SAFELOCK see Safe securing
32
Safe securing32
Safety123
Child safety139
Child safety seats139
Correct seated position124
Head restraints56
ISOFIX141
TOP TETHER143
Safety belts rear middle seat
130
Saving electrical energy104
Seals Taking care of your vehicle
152
Seat Adjusting
53
Seat belt warning light
21
Seat belt height adjuster130
Seat belts127
Belt tensioners131
Cleaning156
fastening and unfastening129
210Index
Page 216 of 219
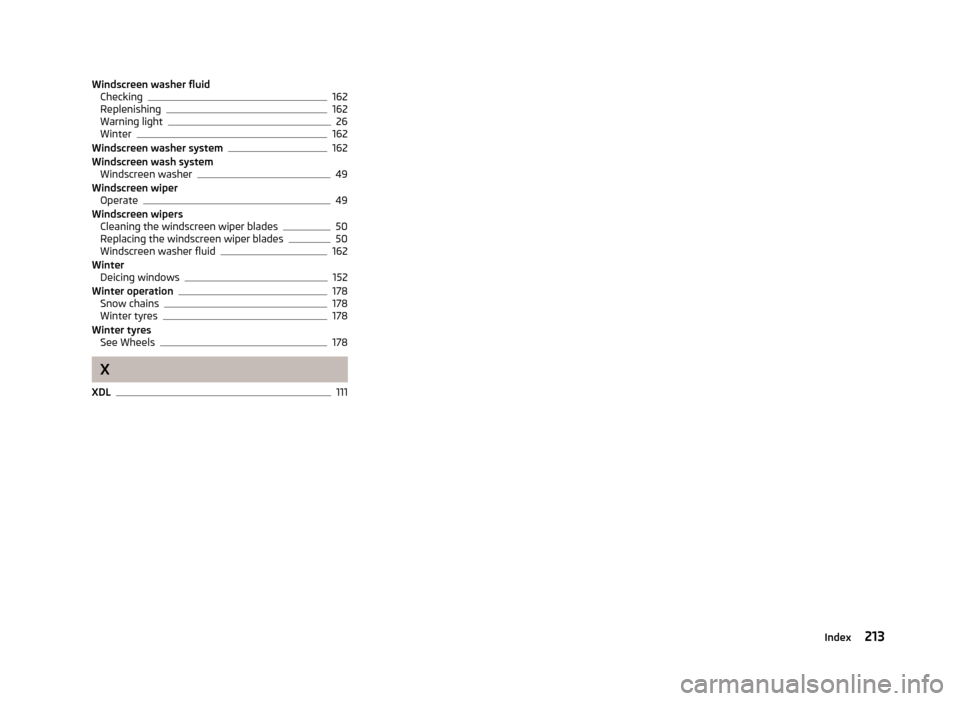
Windscreen washer fluidChecking162
Replenishing162
Warning light26
Winter162
Windscreen washer system162
Windscreen wash system Windscreen washer
49
Windscreen wiper Operate
49
Windscreen wipers Cleaning the windscreen wiper blades
50
Replacing the windscreen wiper blades50
Windscreen washer fluid162
Winter Deicing windows
152
Winter operation178
Snow chains178
Winter tyres178
Winter tyres See Wheels
178
X
XDL
111
213Index