2013 SKODA ROOMSTER lights
[x] Cancel search: lightsPage 124 of 219

The distribution of the weight is very poor if your vehicle is unladen and the trail-
er is laden. Maintain a particularly low speed if you cannot avoid driving with this
combination.
Tyre pressure
Correct the tyre inflation pressure on your vehicle for a “full load” » page 173,
Service life of tyres .
Trailer load
The permissible trailer load must not be exceeded under any circumstan- ces » page 199 , Technical data .
The trailer loads specified apply only to altitudes up to 1 000 metres above mean
sea level.
The engine output falls as altitude increases, as does the ability to climb. There-
fore, for every additional 1000 m in height (or part), the maximum permissible
towed weight must be reduced by 10 %.
The towed weight comprises the actual weights of the (loaded) towing vehicleand the (loaded) trailer.
The trailer and drawbar load information on the type plate of the towing equip-
ment are merely test data for the towing equipment. The vehicle-specific values
are detailed in the vehicle documents.WARNING■ Do not exceed the maximum permissible axle and drawbar load and the
maximum permissible total or towed weight of the vehicle and the trailer –
there is the risk of an accident and serious injury.■
Slipping loads can significantly affect the stability and safety of the vehicle/
trailer combination – there is the risk of an accident and serious injury.
Towing a trailer
First read and observe the introductory information and safety warn-
ings
on page 120.
Exterior mirrors
You have to have additional exterior mirrors fitted if you are not able to see the
traffic behind the trailer with the standard rear-view mirrors. The national legal requirements must be observed.
Headlights
The front of the vehicle can be lifted when a trailer is being towed and the head- lights can dazzle other road users.
Adjust the headlight setting on the headlight range control » page 42, Headlight
beam adjustment .
Driving speed
For safety reasons, do not drive faster than 80 km/h when towing a trailer.
Immediately reduce your speed as soon as even the slightest swaying of the trail- er is detected. Never attempt to stop the trailer from “swaying” by accelerating.
Brakes
Apply the brakes in good time! If the trailer is fitted with a trailer brake, apply the
brakes gently at first, then brake firmly. This will avoid brake jolts resulting from
the trailer wheels locking.
On downhill sections shift down a gear in good time to also use the engine as a
brake.
Engine overheating
The speed must be reduced immediately if the needle for the coolant tempera-
ture gauge moves into the right-hand area or the red area of the scale.
Stop and switch off the engine if the warning light
in the instrument cluster
starts to flash. Wait a few minutes and check the level of coolant » page 166,
Checking the coolant level .
The following guidelines must be observed » page 22,
Coolant .
The coolant temperature can be reduced by switching on the heating.WARNING■ Adapt your speed to the conditions of the road surface and to the traffic sit-
uation.■
Improper or incorrectly connected electric cables can energise the trailer and
cause functional faults to the vehicle's entire electrical system as well as acci-
dents and severe injuries.
■
Work on the electrical system must only be carried out by specialist garages.
■
Never directly connect the trailer's electrical system with the electrical con-
nections for the tail lights or other current sources.
121Towing a trailer
Page 125 of 219

Note■After coupling the trailer and connecting up the power socket, check the rear
lights on the trailer to ensure they work.■
If there is an error in the trailer lighting system, check the fuses in the fuse box
in the dashboard » page 192.
■
If you tow a trailer frequently, you should also have your car inspected between
service intervals.
■
The handbrake on the towing vehicle must be applied when coupling and un-
coupling the trailer.
Anti-theft alarm system
First read and observe the introductory information and safety warn-
ings
on page 120.
When the vehicle is locked, the alarm is activated as soon as the electrical con- nection to the trailer is interrupted.
Always switch off the anti-theft alarm system before a trailer is coupled or uncou- pled » page 35 .
Conditions for including a trailer in the anti-theft alarm system. The vehicle is factory-fitted with an anti-theft alarm system and towingequipment.
The trailer is electrically connected to the towing vehicle by means of the
trailer socket.
The electrical system of the vehicle and trailer is functional. The vehicle is locked with the vehicle key and the anti-theft alarm system isactivated.
Note
For technical reasons, trailers with rear LED lights cannot be connected to the an-
ti-theft alarm system.
122Driving
Page 140 of 219
Deactivating airbagsFirst read and observe the introductory information given on page 136.
Deactivating an airbag should be considered in cases such as the ones below.› If using a rear-facing child seat on the front passenger seat (due to different le-
gal regulations, the airbag must be deactivated if using a forwards-facing child
seat in some countries) » page 139, Transporting children safely .
› If it is not possible to maintain a distance of at least 25 cm between the middle
of the steering wheel and chest, despite the driver's seat being correctly adjus-
ted.
› If special attachments are required in the area of the steering wheel because of
a physical disability.
› If different seats have been fitted (e.g. orthopaedic seats without side airbags).
The front passenger airbag can be switched off with the key-operated
switch » page 137 .
We recommend that you ask a ŠKODA service partner to deactivate any other air- bags.
Monitoring the airbag system
The operational capability of the airbag system is monitored electronically, includ-
ing when one of the airbags is switched off.
Airbag deactivated using diagnostic equipment
› The warning light
lights up for approx. 3 seconds after switching on the igni-
tion and then flashes again for approx. 12 seconds.
Front passenger airbag deactivated using the key switch in the storage com-
partment
› The warning light
lights up for approx. 3 seconds after switching on the igni-
tion.
› The
3
» Fig. 119 on page 137 warning light comes on when the ignition is
switched on.
Note■ The national regulations for switching off airbags must be observed.■A ŠKODA service partner will be able to inform you which, if any, of your vehi-
cle's airbags can or must be deactivated.
Deactivating the front passenger airbag
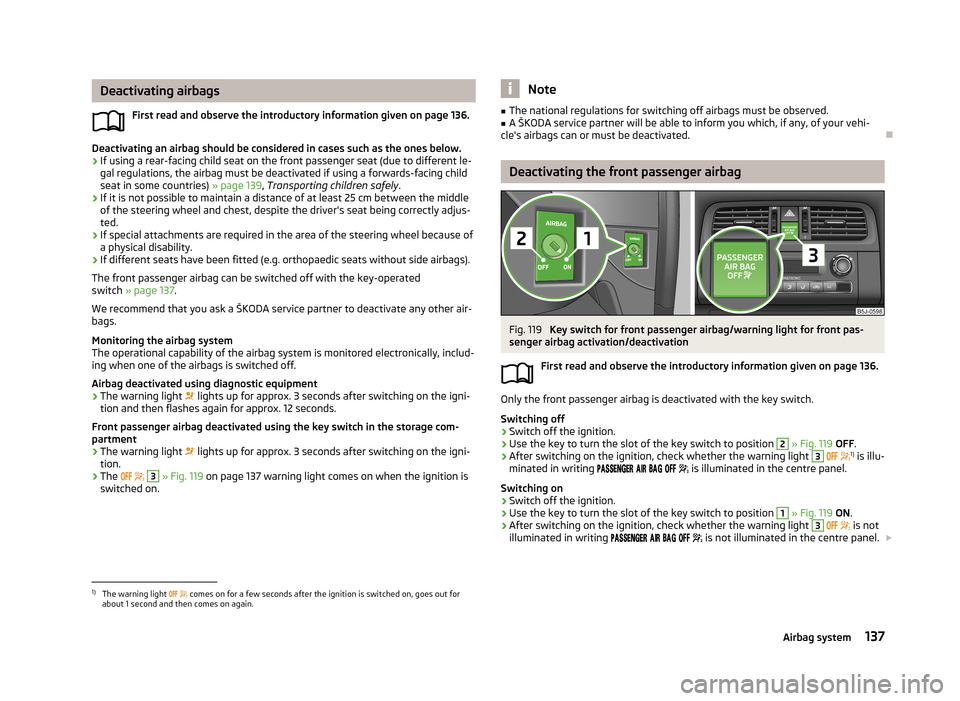
Fig. 119
Key switch for front passenger airbag/warning light for front pas-
senger airbag activation/deactivation
First read and observe the introductory information given on page 136.
Only the front passenger airbag is deactivated with the key switch.
Switching off
›
Switch off the ignition.
›
Use the key to turn the slot of the key switch to position
2
» Fig. 119 OFF .
›
After switching on the ignition, check whether the warning light
3
1)
is illu-
minated in writing
is illuminated in the centre panel.
Switching on
›
Switch off the ignition.
›
Use the key to turn the slot of the key switch to position
1
» Fig. 119 ON .
›
After switching on the ignition, check whether the warning light
3
is not
illuminated in writing
is not illuminated in the centre panel.
1)
The warning light
comes on for a few seconds after the ignition is switched on, goes out for
about 1 second and then comes on again.
137Airbag system
Page 156 of 219
■When removing snow or ice from windows and mirror lenses ensure that the
paintwork of the vehicle is not to damage.■
Do not clean the inside of the windows with sharp-edged objects or corrosive
and acidic cleaning agents – there is a risk of damaging the heating elements or
window aerial.
Headlight lenses
First read and observe the introductory information and safety warn-ings
on page 150.
Clean plastic front headlight lenses using clean, warm water and soap.
CAUTION
■ Never wipe headlights to dry.■Do not use any sharp objects to clean the plastic lenses, as this may damage
the protective paintwork and consequently cause cracks to form on the headlight lenses.■
Do not use any harsh cleaning products or chemical solvents to clean the head-
lights, as this could damage the headlight lenses.
Door lock cylinders
First read and observe the introductory information and safety warn-
ings
on page 150.
Specific products must be used for de-icing door lock cylinders.
CAUTION
When washing your vehicle, ensure as little water as possible gets into the lock-
ing cylinders.
Cavity protection
First read and observe the introductory information and safety warn-
ings
on page 150.
All the cavities of your vehicle which are at risk from corrosion are protected for life by a layer of protective wax applied in the factory.
This wax protection does not need to be inspected or re-applied.
If any small amount of wax flow out of the cavities at high temperatures, these
must be removed with a plastic scraper and the stains cleaned using a petroleum cleaner.WARNINGSafety regulations should be observed when using petroleum cleaner to re-
move wax – risk of fire!
Wheels
First read and observe the introductory information and safety warn-
ings
on page 150.
Wheel rims
Also thoroughly wash the wheel rims when washing the vehicle on a regular ba- sis.
Regularly remove salt and brake abrasion, otherwise the rim material will be cor-
roded.
Damage to the paint layer on the wheel rims must be touched up immediately.
Light alloy wheels
After washing thoroughly and treat the wheel rims with a protective product for
light alloy wheels. Products which cause abrasion must not be used to treat the
wheel rims.
CAUTION
Severe layers of dirt on the wheels can also result in wheel imbalance. This may
show itself in the form of a wheel vibration which is transmitted to the steering
wheel which, in certain circumstances, can cause premature wear of the steering.
This means it is necessary to remove the dirt.
153Car care
Page 165 of 219

Engine compartment overviewFig. 128
Principle sketch: Engine compartment
First read and observe the introductory information and safety warn- ings
on page 159.
Coolant expansion reservoir
166
Windscreen washer fluid reservoir
162
Engine oil filler opening
165
Engine oil dipstick
164
Brake fluid reservoir
167
Vehicle battery
168
Note
The location of the inspection points in the engine compartment of petrol and
diesel engines is practically identical.
123456Radiator fan
First read and observe the introductory information and safety warn-
ings
on page 159.
The radiator fan is powered by an electric motor. Operation is controlled accord-
ing to the temperature of the coolant.
WARNINGAfter switching off the ignition, the fan may intermittently continue to oper-
ate for approx. 10 minutes.
Windscreen washer system
Fig. 129
Engine compartment: Wind-
screen washer fluid reservoir
First read and observe the introductory information and safety warn- ings on page 159.
The windscreen washer fluid reservoir is located in the engine compartment and
contains the cleaning fluid for the windscreen and rear window and for the head- light cleaning system.
The capacity of the container is about 3.5 litres and about 5.4 litres on vehicles
that have a headlight washing system 1)
.
Clear water is not sufficient to intensively clean the windscreen and headlights. We recommend using clean water together with a screen cleaner from the range
of ŠKODA Original Accessories (with antifreeze in winter), which will remove any
stubborn dirt.
1)
In some countries, 5.4 litres applies for both variants.
162General Maintenance
Page 166 of 219

The washing water should always be mixed with antifreeze in winter even if thevehicle has heated windscreen washer nozzles.
Under exceptional circumstances, methylated spirits can also be used if no screen
cleaner with antifreeze is available. The concentration of methylated spirits must
not be more than 15 %. The freeze protection at this concentration is sufficient only to -5 °C.
CAUTION
■ Under no circumstances must radiator antifreeze or other additives be added to
the windscreen washer fluid.■
If the vehicle is fitted with a headlight cleaning system, only cleaning products
which do not attack the polycarbonate coating of the headlights must be added
to the windscreen washer fluid.
■
Do not remove the filter from the windscreen washer fluid reservoir when refill-
ing, as this may cause contamination of the liquid transportation system, leading
in turn to a windscreen washer system malfunction.
Engine oil
Introduction
This chapter contains information on the following subjects:
Specifications and capacity
163
Checking the oil level
164
Replenishing
165
Changing
165
The engine has been factory-filled with a high-grade oil that can be use through-
out the year - except in extreme climate zones.
The engine oils are undergoing continuous further development. Thus the infor-
mation stated in this Owner's Manual is only correct at the time of publication.
ŠKODA Service Partners are informed about the latest changes by the manufac-
turer. We therefore recommend that the oil change be completed by a ŠKODA
Service Partner.
The specifications (VW standards) stated in the following can be indicated sepa-
rately or together with other specifications on the bottle.
The oil capacities include oil filter change. Check the oil level when filling; do not
over fill. The oil level must be between the markings » page 164.WARNING■
The engine compartment of your car is a hazardous area. The following
warning instructions must be followed at all times when working in the en-
gine compartment » page 159.■
Do not continue your journey if for some reason it is not possible to top
up the engine oil under the prevailing conditions! Switch off the engine and
seek assistance from a specialist garage.
■
Do not drive on if the oil level is above range
A
» Fig. 130 on page 164.
Switch off the engine and seek assistance from a specialist garage.
CAUTION
Do not pour any additives into the engine oil – risk of serious damage to the en-
gine parts!
Note
■ Before a long drive we recommend that you purchase and carry with you engine
oil which complies with the specification for your vehicle.■
We recommend that you use oils from ŠKODA Original Accessories.
■
If oil comes into contact with your skin, the affected area must be washed thor-
oughly.
Specifications and capacity
First read and observe the introductory information and safety warn-
ings
on page 163.
Specifications and capacity (in l) for vehicles with flexible service intervals
Petrol enginesSpecificationCapacity1.2 litres/51 kWVW 503 00, VW 504 002.81.2 litres/63 kW TSIVW 504 003.91.2 litres/77 kW TSIVW 504 003.91.4 litres/63 kWVW 503 00, VW 504 003.2 163Inspecting and replenishing
Page 171 of 219
ChangingFirst read and observe the introductory information and safety warn-ings
on page 167.
Brake fluid absorbs moisture. Over time it therefore absorbs moisture from theenvironment.
Excessive water in the brake fluid may be the cause of corrosion in the brake sys-
tem.
The water content lowers the boiling point of the brake fluid.
The brake fluid must comply with the following standards or specifications: › VW 50114;
› FMVSS 116 DOT4.
Vehicle battery
Introduction
This chapter contains information on the following subjects:
Open cover
169
Checking the electrolyte level
170
Operation in winter
170
Charging
170
Disconnecting or reconnecting
171
Replacing
171
Automatic load deactivation
171
Warning symbols on the vehicle battery
SymbolMeaningAlways wear eye protection.Battery acid is severely caustic. Always wear gloves and eye protec- tion.Keep fire, sparks, open flames and lit cigarettes well clear of the ve-
hicle battery.SymbolMeaningWhen charging the vehicle battery, a highly explosive gas mixture is produced.Keep children away from the vehicle battery.WARNINGThere is risk of injuries, poisoning, chemical burns, explosions or fire when
working on the battery and on the electrical system. It is essential to comply
with the generally applicable rules of safety as well as the warning instruc-
tions outlined below.■
Keep children away from the vehicle battery.
■
Do not tilt the battery otherwise battery electrolyte may flow out of the bat-
tery vent openings. Protect your eyes by wearing safety goggles or a face
shield – risk of blindness!
■
Always wear protective gloves, eye and skin protection when handling the
vehicle battery.
■
The battery acid is strongly corrosive and must, therefore, be handled with
the greatest of care.
■
Corrosive fumes in the air irritate the air passages and lead to conjunctivitis
and inflammation of the air passages in the lungs.
■
Battery acid corrodes dental enamel and, if it comes into contact with the
skin, causes deep wounds that take a long time to heal. Repeated contact
with diluted acids causes skin diseases (inflammations, ulcers, slin cracks).
■
If any battery acid comes into contact with your eyes, rinse the affected eye
immediately with clean water for several minutes and consult a doctor imme-
diately!
■
Splashes of acid on your skin or clothes should be neutralised as soon as
possible using soap suds and then rinsed with plenty of water. If you swallow
battery acid, consult a doctor immediately!
WARNING■ It is prohibited to work with naked flames or lights.■It is prohibited to smoke or carry out any activities that produce sparks.■
Never use a damaged vehicle battery – risk of explosion!
■
Never charge a frozen or thawed vehicle battery – risk of explosion and
chemical burns!
168General Maintenance
Page 174 of 219

WARNING“Quick-charging” the vehicle battery is dangerous and requires a special
charger and specialist knowledge.
CAUTION
On vehicles with the START/STOP system, the pole terminal of the charger must
not be connected directly to the negative terminal of the vehicle battery, but only
to the engine earth » page 188, Jump-starting in vehicles with the START-STOP
system .
Note
We therefore recommend that vehicle batteries be rapid charged by a specialist
garage.
Disconnecting or reconnecting
First read and observe the introductory information and safety warn-ings
on page 168.
The following functions are initially deactivated or are no longer able to operate
faultlessly after the vehicle battery has been disconnected and reconnected.
OperationOperating measureElectrical power window (operational faults)» page 40Enter the radio/navigation system code num-
ber» User manual of the radio
or » user manual of the naviga-
tion systemSetting the clock» page 12Data in the multifunction display are deleted.» page 13
Note
We recommend having the vehicle checked by a specialist garage in order to en-
sure full functionality of all electrical systems.
Replacing
First read and observe the introductory information and safety warn-
ings
on page 168.
When replacing a battery, the new vehicle battery must have the same capacity,
voltage, amperage and be the same size. Suitable vehicle battery types can be purchased from a specialist garage.
We recommend having the battery replaced by a specialist garage, where the
new vehicle battery will be installed properly and the original battery will be dis-
posed of in accordance with national regulations.
Automatic load deactivation
First read and observe the introductory information and safety warn-ings
on page 168.
The vehicle voltage control unit automatically prevents the battery from discharg-
ing when the battery is put under high levels of strain. This may be noticed from
the following.
› The idling speed is raised to allow the generator to deliver more electricity to
the electrical system.
› Where necessary, large convenience consumers such as seat heaters and rear
window heaters have their power limited or are shut off completely in the event
of an emergency.
CAUTION
■ Despite such intervention by the vehicle electric system management, the vehi-
cle battery may be drained. For example, when the ignition is switched on a long
time with the engine turned off or the side or parking lights are turned on during longer parking.■
Consumers that are supplied via a 12-V power socket can cause the vehicle bat-
tery to discharge when the ignition is switched off.
Note
Driving comfort is not impaired by consumers being deactivated. The driver is of-
ten not aware of it having taken place.
171Inspecting and replenishing