2013 SKODA ROOMSTER turn signal
[x] Cancel search: turn signalPage 44 of 219
Lights and visibility
Lights
Introduction
This chapter contains information on the following subjects:
Parking and low beam lights
41
Headlight beam adjustment
42
Daylight running lights (DAY LIGHT)
42
Turn signal and main beam lights
43
Halogen projector headlights with cornering light function
43
Fog lights
44
Foglights with the CORNER function
44
Rear fog light
44
Tourist lights
44
Hazard warning light system
45
Parking lights
45
Unless otherwise stated, the lights only work when the ignition is on.
The layout of the controls differs in part from that shown in » Fig. 21 on page 41
on right-hand drive vehicles. The symbols which mark the positions of the con-
trols are identical.
WARNING■ Never drive with only the side lights on! The side lights are not bright
enough to light up the road sufficiently in front of you or to be seen by other
oncoming traffic. Therefore always switch on the low beam when it is dark or
if visibility is poor.■
The activation of the lights should only be undertaken in accordance with
national legal requirements.
■
The driver is always responsible for the correct settings and use of the
lights.
NoteThe headlights may mist up temporarily. When the driving lights are switched on,
the light outlet areas are free from condensation after a short time, although the
headlight lenses may still be misted up around the edge. This mist has no influ-
ence on the life of the lighting system.
Parking and low beam lights
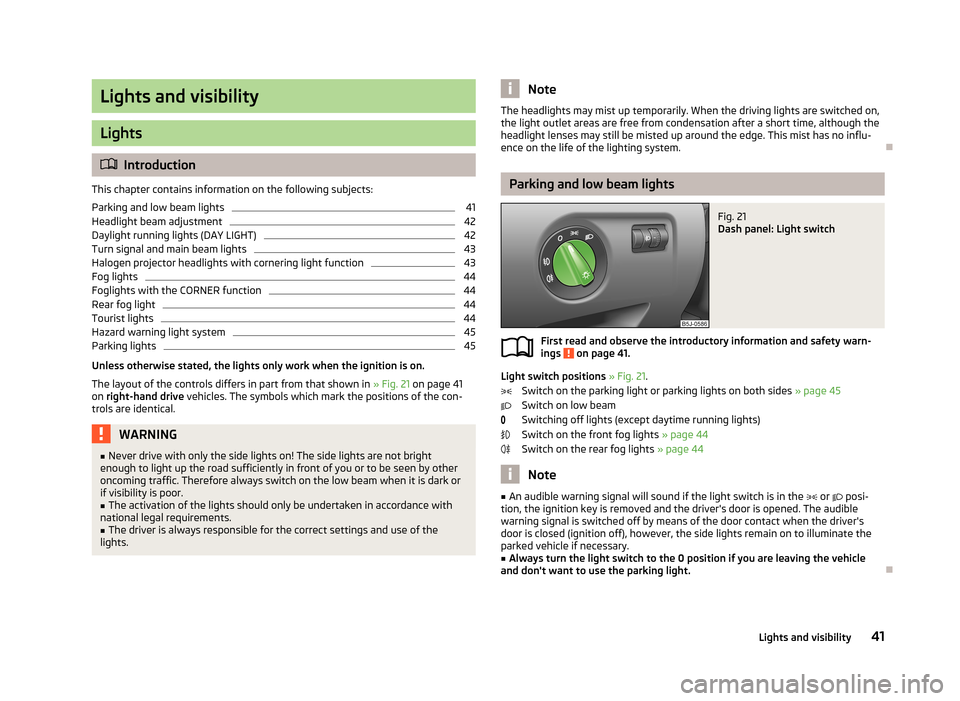
Fig. 21
Dash panel: Light switch
First read and observe the introductory information and safety warn-
ings on page 41.
Light switch positions » Fig. 21 .
Switch on the parking light or parking lights on both sides » page 45
Switch on low beam
Switching off lights (except daytime running lights) Switch on the front fog lights » page 44
Switch on the rear fog lights » page 44
Note
■
An audible warning signal will sound if the light switch is in the or posi-
tion, the ignition key is removed and the driver's door is opened. The audible warning signal is switched off by means of the door contact when the driver's door is closed (ignition off), however, the side lights remain on to illuminate the
parked vehicle if necessary.■
Always turn the light switch to the 0 position if you are leaving the vehicle
and don't want to use the parking light.
41Lights and visibility
Page 45 of 219

Headlight beam adjustmentFig. 22
Dash panel: Lights and visibility
First read and observe the introductory information and safety warn-
ings on page 41.
Turning the rotary switch » Fig. 22 from position
to
gradually adjusts the
headlight beam thereby shortening the beam of light.
The positions of the rotary switch correspond approximately to the following
car load.
Front seats occupied, boot empty.
All seats occupied, boot empty.
All seats occupied, boot loaded.
Driver seat occupied, boot loaded.
WARNINGAlways adjust the headlight beam to satisfy the following conditions.■The vehicle does not dazzle other road users, especially oncoming vehicles.■
The beam range is sufficient for safe driving.
Note
We recommend you adjust the headlight beam when the low beam is switched
on.
Daylight running lights (DAY LIGHT)
First read and observe the introductory information and safety warn-
ings
on page 41.
Switching on daytime running lights
›
Turn the light switch to position 0 » Fig. 21 on page 41.
Activating/deactivating the daytime running lights function
›
Activate and deactivate the daytime running lights by fitting/removing the fuse
with the appropriate ampere rating for daytime running lights » page 192,
Fuses in the dash panel .
Deactivating on vehicles with the START-STOP system
›
Switch off the ignition.
›
At the same time, pull the turn signal light stalk » Fig. 23 on page 43 towards
the steering wheel, push it downwards, and hold it in this position.
›
Switch on the ignition - wait until the left-turn signal light flashes 4x.
›
Switch off the ignition - an audible signal sounds which confirms the deactiva- tion of the daylight driving lights.
›
Release the turn signal stalk.
Activating on vehicles with the START-STOP system
›
Switch off the ignition.
›
At the same time, pull the turn signal light stalk » Fig. 23 on page 43 towards
the steering wheel, push it upwards, and hold it in this position.
›
Switch on the ignition - wait until the right-turn signal light flashes 4x.
›
Switch off the ignition - an audible signal sounds which confirms the activation
of the daylight driving lights.
›
Release the turn signal stalk.
On vehicles with separate lights for daylight driving lights in the fog lights or in
the front bumper, the parking lights and the licence plate light do not come on
when activating the function daylight driving lights (neither front nor rear).
If the vehicle is not equipped with separate lights for daylight driving lights, the
combination of the low beam, the parking lights (front and rear) including the li-
cence plate light is used as daylight driving lights.
Note
The daytime driving lights also serve as parking lights on vehicles with separate
lights for daylight driving lights (in the bumper below the main headlights).
42Operation
Page 46 of 219
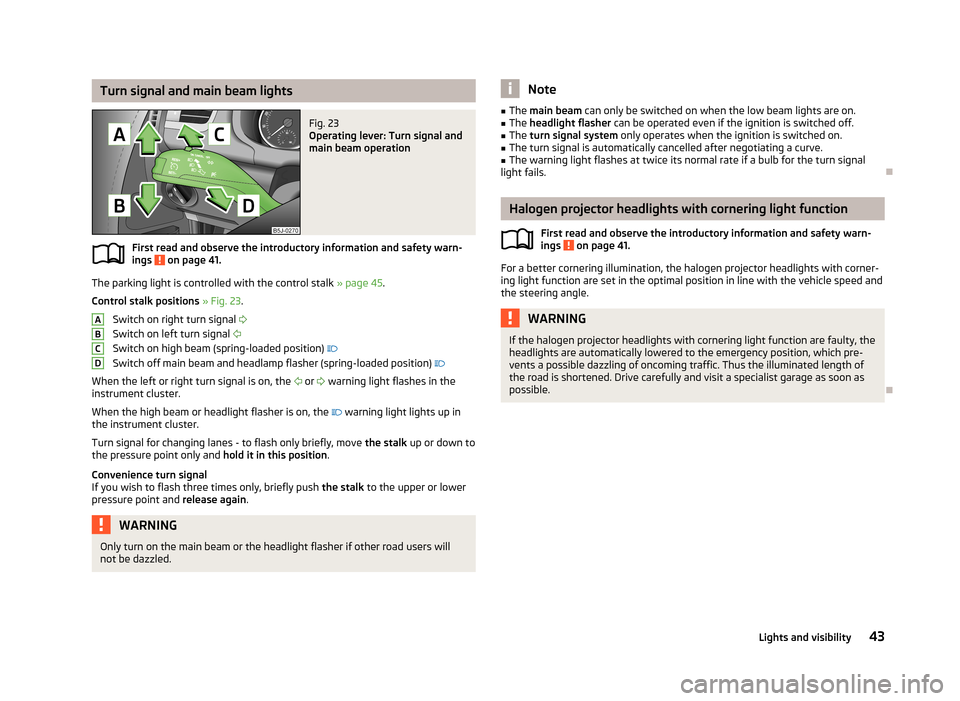
Turn signal and main beam lightsFig. 23
Operating lever: Turn signal and
main beam operation
First read and observe the introductory information and safety warn-
ings on page 41.
The parking light is controlled with the control stalk » page 45.
Control stalk positions » Fig. 23 .
Switch on right turn signal
Switch on left turn signal
Switch on high beam (spring-loaded position)
Switch off main beam and headlamp flasher (spring-loaded position)
When the left or right turn signal is on, the
or
warning light flashes in the
instrument cluster.
When the high beam or headlight flasher is on, the
warning light lights up in
the instrument cluster.
Turn signal for changing lanes - to flash only briefly, move the stalk up or down to
the pressure point only and hold it in this position.
Convenience turn signal If you wish to flash three times only, briefly push the stalk to the upper or lower
pressure point and release again.
WARNINGOnly turn on the main beam or the headlight flasher if other road users will
not be dazzled.ABCDNote■ The main beam can only be switched on when the low beam lights are on.■The headlight flasher can be operated even if the ignition is switched off.■
The turn signal system only operates when the ignition is switched on.
■
The turn signal is automatically cancelled after negotiating a curve.
■
The warning light flashes at twice its normal rate if a bulb for the turn signal
light fails.
Halogen projector headlights with cornering light function
First read and observe the introductory information and safety warn-
ings
on page 41.
For a better cornering illumination, the halogen projector headlights with corner-
ing light function are set in the optimal position in line with the vehicle speed and
the steering angle.
WARNINGIf the halogen projector headlights with cornering light function are faulty, the
headlights are automatically lowered to the emergency position, which pre- vents a possible dazzling of oncoming traffic. Thus the illuminated length of
the road is shortened. Drive carefully and visit a specialist garage as soon as possible.
43Lights and visibility
Page 47 of 219
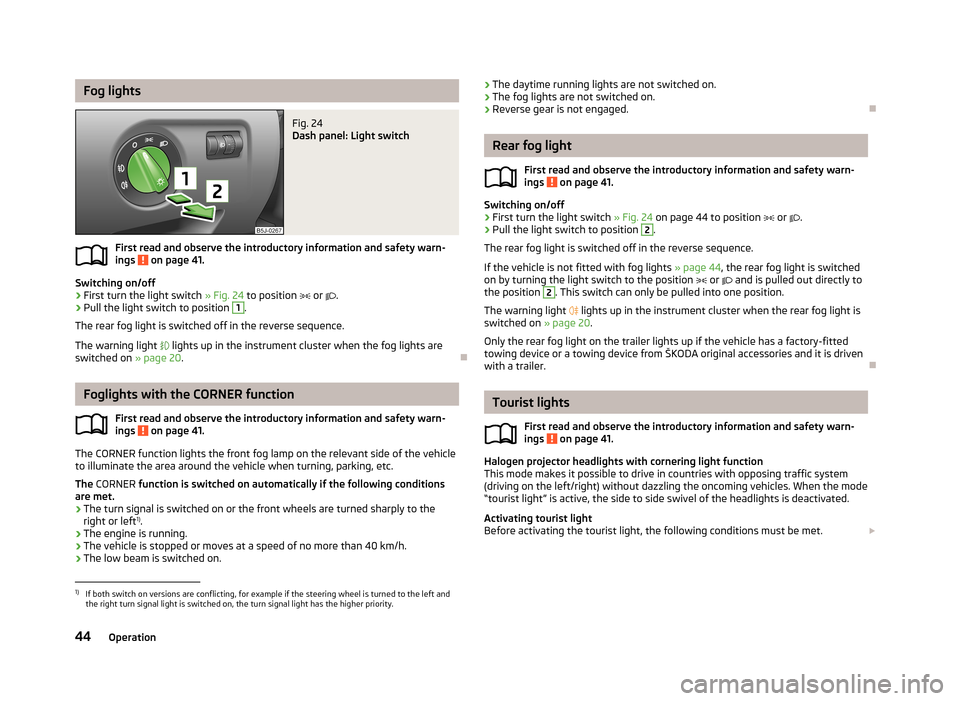
Fog lightsFig. 24
Dash panel: Light switch
First read and observe the introductory information and safety warn-ings on page 41.
Switching on/off
›
First turn the light switch » Fig. 24 to position
or
.
›
Pull the light switch to position
1
.
The rear fog light is switched off in the reverse sequence.
The warning light
lights up in the instrument cluster when the fog lights are
switched on » page 20.
Foglights with the CORNER function
First read and observe the introductory information and safety warn-ings
on page 41.
The CORNER function lights the front fog lamp on the relevant side of the vehicle
to illuminate the area around the vehicle when turning, parking, etc.
The CORNER function is switched on automatically if the following conditions
are met.
› The turn signal is switched on or the front wheels are turned sharply to the
right or left 1)
.
› The engine is running.
› The vehicle is stopped or moves at a speed of no more than 40 km/h.
› The low beam is switched on.
›
The daytime running lights are not switched on.
› The fog lights are not switched on.
› Reverse gear is not engaged.
Rear fog light
First read and observe the introductory information and safety warn-
ings
on page 41.
Switching on/off
›
First turn the light switch » Fig. 24 on page 44 to position or .
›
Pull the light switch to position
2
.
The rear fog light is switched off in the reverse sequence.
If the vehicle is not fitted with fog lights » page 44, the rear fog light is switched
on by turning the light switch to the position
or
and is pulled out directly to
the position
2
. This switch can only be pulled into one position.
The warning light
lights up in the instrument cluster when the rear fog light is
switched on » page 20.
Only the rear fog light on the trailer lights up if the vehicle has a factory-fitted
towing device or a towing device from ŠKODA original accessories and it is driven
with a trailer.
Tourist lights
First read and observe the introductory information and safety warn-ings
on page 41.
Halogen projector headlights with cornering light function
This mode makes it possible to drive in countries with opposing traffic system
(driving on the left/right) without dazzling the oncoming vehicles. When the mode
“tourist light” is active, the side to side swivel of the headlights is deactivated.
Activating tourist light
Before activating the tourist light, the following conditions must be met.
1)
If both switch on versions are conflicting, for example if the steering wheel is turned to the left and
the right turn signal light is switched on, the turn signal light has the higher priority.
44Operation
Page 48 of 219
Ignition switched off, light switched off (light switch in position 0), control dial for
headlamp beam adjustment in the position, no gear engaged or selector lever
in the N position (automatic gearbox), tourist light deactivated.›
Switch on the ignition.
Within 10 seconds of the ignition being switched on:
›
Turn the light switch to the position » page 41 , Parking and low beam lights .
›
Engage reverse gear (manual gearbox) or move the selector lever to the R posi-
tion (automatic gearbox),
›
Turn the headlamp beam adjustment dial from to » page 42 .
Deactivating tourist light
Before deactivating the tourist light, the following conditions must be met.
Ignition switched off, light switched off (light switch in position 0), control dial for
headlamp beam adjustment in the
position, no gear engaged or selector lever in
the N position (automatic gearbox), tourist light activated.
›
Switch on the ignition.
Within 10 seconds of the ignition being switched on:
›
Turn the light switch to the
position » page 41 , Parking and low beam lights .
›
Engage reverse gear (manual gearbox) or move the selector lever to the R posi-
tion (automatic gearbox),
›
Turn the headlamp beam adjustment dial from
to
» page 42 .
Further information » page 109, Headlights .
Note
When the “tourist light” mode is active, the warning light flashes for 10 sec-
onds each time the ignition is switched on.
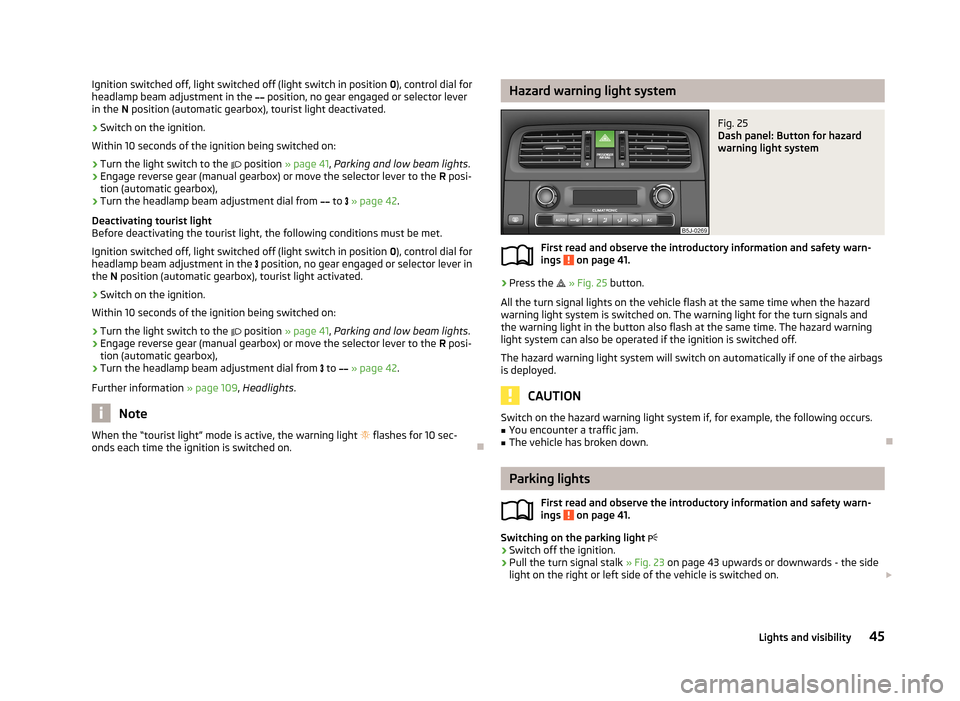
Hazard warning light systemFig. 25
Dash panel: Button for hazard
warning light system
First read and observe the introductory information and safety warn-
ings on page 41.
›
Press the
» Fig. 25 button.
All the turn signal lights on the vehicle flash at the same time when the hazard
warning light system is switched on. The warning light for the turn signals and
the warning light in the button also flash at the same time. The hazard warning
light system can also be operated if the ignition is switched off.
The hazard warning light system will switch on automatically if one of the airbags
is deployed.
CAUTION
Switch on the hazard warning light system if, for example, the following occurs.■You encounter a traffic jam.■
The vehicle has broken down.
Parking lights
First read and observe the introductory information and safety warn-ings
on page 41.
Switching on the parking light
›
Switch off the ignition.
›
Pull the turn signal stalk
» Fig. 23 on page 43 upwards or downwards - the side
light on the right or left side of the vehicle is switched on.
45Lights and visibility
Page 49 of 219
Switching on the side lights on both sides ›Turn the light switch » Fig. 21 on page 41 to the position and lock the vehicle.
Note
■
The parking light can only be activated if the ignition is switched off.■If the right or left turn signal light has been switched on and the ignition is
switched off, the parking light is not automatically switched on.
Interior lights
Introduction
This chapter contains information on the following subjects:
Interior lighting - version 1
46
Interior lighting - version 2
46
Illuminated storage compartment on the passenger side
47
Luggage compartment light
47
Interior lighting - version 1
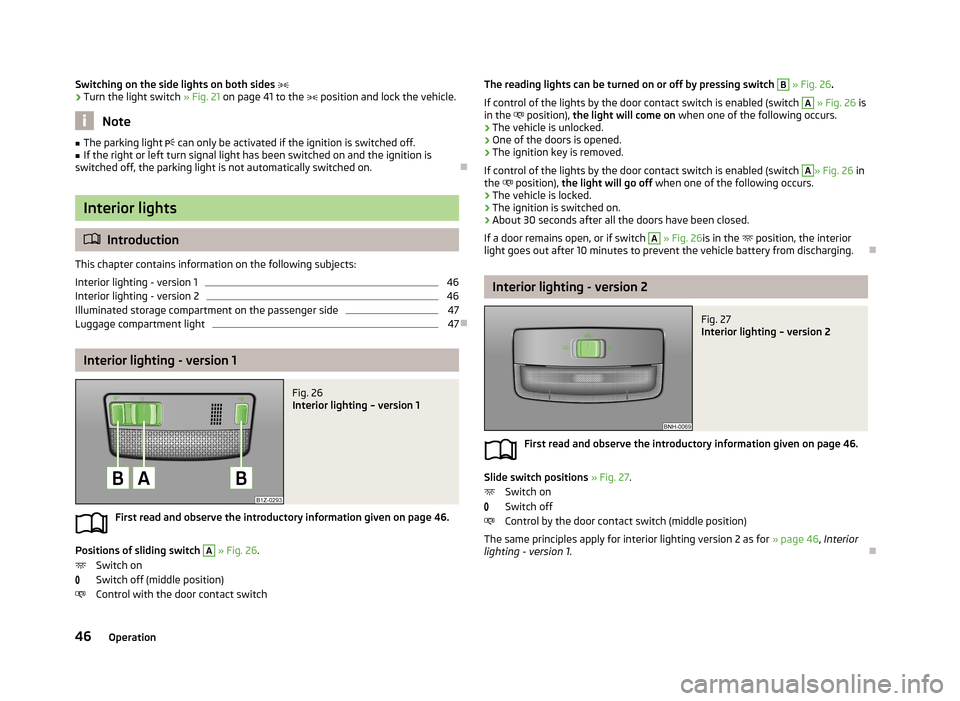
Fig. 26
Interior lighting – version 1
First read and observe the introductory information given on page 46.
Positions of sliding switch
A
» Fig. 26 .
Switch on
Switch off (middle position)
Control with the door contact switch
The reading lights can be turned on or off by pressing switch B » Fig. 26 .
If control of the lights by the door contact switch is enabled (switch A
» Fig. 26 is
in the position), the light will come on when one of the following occurs.
› The vehicle is unlocked.
› One of the doors is opened.
› The ignition key is removed.
If control of the lights by the door contact switch is enabled (switch
A
» Fig. 26 in
the position), the light will go off when one of the following occurs.
› The vehicle is locked.
› The ignition is switched on.
› About 30 seconds after all the doors have been closed.
If a door remains open, or if switch
A
» Fig. 26 is in the
position, the interior
light goes out after 10 minutes to prevent the vehicle battery from discharging.
Interior lighting - version 2
Fig. 27
Interior lighting – version 2
First read and observe the introductory information given on page 46.
Slide switch positions » Fig. 27 .
Switch on
Switch off
Control by the door contact switch (middle position)
The same principles apply for interior lighting version 2 as for » page 46, Interior
lighting - version 1 .
46Operation
Page 91 of 219

Button/wheel
» Fig. 84ActionOperation
1Press brieflyAccept call, terminate call, entry in the main menu of the telephone, list of selected numbers1Press button for a long period of timeReject call, last number dialled a)
, switch voice control on/off b)2Press brieflySwitch on/off voice control2Turn upwardsIncrease the volume2Turn downwardsDecrease volumea)
Valid for vehicles with the Amundsen+ navigation system.
b)
Valid for vehicles without the Amundsen+ navigation system.
Inserting the mobile phone and adapterFig. 85
Universal telephone preinstalla-
tion
First read and observe the introductory information given on page 86.
Only one telephone mount is factory-fitted. An adapter for the mobile phone can
be purchased from ŠKODA Original Accessories.
Fitting
›
First of all push adapter
A
in the direction of the arrow » Fig. 85 into the mount
as far as the stop. Then press the adapter slightly downwards, until it locks se-
curely into position.
›
Insert the mobile phone into the adapter
A
(as specified in the instructions
from the manufacturer of the adapter).
Removing
›
Press the side locks on the mount » Fig. 85 at the same time and remove the
adapter with the mobile phone.
CAUTIONTaking the mobile phone out of the adapter during the call can lead to interrup-
tion of the connection. When removing the mobile phone, the connection to the factory-fitted antenna is interrupted, which reduces the quality of the transmit-
ting and receiving signal. The charging of the mobile phone battery is also inter- rupted.
88Operation
Page 126 of 219
Safety
Passive Safety
General information
Introduction
This chapter contains information on the following subjects:
Safety equipment
123
Before setting off
123
What influences the driving safety?
124
In this section you will find important information, tips and notes on the subject
of passive safety in your vehicle.
We have combined everything here which you should be familiar with, for exam- ple, regarding seat belts, airbags, child seats and safety of children.
WARNING■ This chapter contains important information on how to use the vehicle for
the driver and his occupants.■
You can find further information on safety concerning you and those travel-
ling with you in the following chapters of this owner's manual.
■
The complete on-board literature should always be in the vehicle. This ap-
plies in particular, if you rent out or sell the vehicle.
Safety equipment
First read and observe the introductory information and safety warn-ings
on page 123.
The following list contains only part of the safety equipment in your vehicle.
› Three-point seat belts for all the seats.
› Belt force limiters for the front seats.
› Belt tensioners for the front seats.
› Seat belt height adjusters for the front seats.
›
Front airbag for the driver and the front passenger.
› Side airbags.
› Head airbags.
› Anchoring points for child seats using the ISOFIX system.
› Anchoring points for child seats using the TOP TETHER system.
› Head restraints adjustable for height.
› Adjustable steering column.
The specified safety equipment works together, in order to optimally protect you
and those travelling with you in accident situations.
The safety equipment does not protect you or the people travelling with you, if
you or your occupants adopt an incorrect seated position or the equipment is not
correctly adjusted or used.
If the seat belt is not fastened properly, this may result in injuries if an airbag is
activated in the event of an accident.
Before setting off
First read and observe the introductory information and safety warn-
ings
on page 123.
For your own safety and the safety of the people travelling with you, please pay
attention to the following points before setting off.
› Ensure that the lighting and the turn signal system are functioning properly.
› Check the tyre inflation pressure.
› Ensure that all of the windows offer good visibility to the outside.
› Secure all items of luggage
» page 57.
› Ensure that no objects can obstruct the pedals.
› Adjust the mirrors, the front seat and head restraint to your body size.
› Advise your passengers to adjust the head restraints to their body size.
› Protect children in suitable child seats with correctly fastened seat
belts » page 139 , Transporting children safely .
› Adopt the correct seated position
» page 124. Tell your passengers to assume
the correct seated position.
› Correctly fasten the seat belt. Also inform passengers to fasten the seat belt
correctly » page 127 , Using seat belts .
123Passive Safety