2013 SKODA ROOMSTER fuel
[x] Cancel search: fuelPage 23 of 219

Note■Warning messages shown in the MAXI DOT display must be confirmed with but-
ton B » Fig. 7 on page 18 to call up the main menu.■
As long as the operational faults are not rectified, the symbols are always indi-
cated again. After they are displayed for the first time, the symbols continue to be
indicated without any extra messages for the driver.
Warning lights
Introduction
This chapter contains information on the following subjects:
Handbrake
20
Brake system
20
Seat belt warning light
21
Alternator
21
Door open
21
Engine oil
21
Coolant
22
Power steering
23
Electronic Stability Control (ESC)
23
Traction Control System (ASR)
23
Anti-lock brake system (ABS)
24
Rear fog light
24
Bulb failure
24
Exhaust inspection system
24
Glow plug system (diesel engine)
24
ECU fault light (petrol engine)
25
Diesel particulate filter (diesel engine)
25
Fuel reserve
25
Airbag system
26
Tyre pressures
26
Windscreen washer fluid level
26
Traction control (TCS) switched off
26
Turn signal system
26
Low beam
27 Fog lights27 Cruise control system27
Selector lever lock
27
Main beam
27
The warning lights show certain functions/faults and may be accompanied by au-
dible signals.
WARNING■ If illuminated warning lights and the corresponding descriptions and warn-
ing notes are not observed, this may result in severe injuries or major vehicle
damage.■
The engine compartment of your car is a hazardous area. There is a risk of
injuries, scalding, accidents and fire when working in the engine compart-
ment, e.g. inspecting and replenishing oil and other fluids. It is essential to ob-
serve safety notes » page 159, Engine compartment .
Handbrake
First read and observe the introductory information and safety warn-
ings
on page 20.
The warning light
comes on if the handbrake is applied. An audible warning is
also given if you drive the vehicle for at least 3 seconds at a speed of more than
6 km/h.
The following message is shown in the MAXI DOT display.
Release parking brake!
Brake system
First read and observe the introductory information and safety warn-
ings
on page 20.
The
indicator light comes on if the brake fluid level in the braking system is too
low or there is a fault in the ABS.
The following message is shown in the MAXI DOT display. Brake fluid: Read manual.
20Operation
Page 25 of 219

The warning light comes on for a few seconds when the ignition is switched
on 1)
.
Stop the vehicle, switch off the engine, and check the engine oil level » page 164.
Even if the oil level is correct, do not drive any further if the warning light is
flashing. Also do not leave the engine running at an idling speed.
Seek help from a specialist garage.
The warning light lights up yellow (oil quantity too low)
The following message is shown in the MAXI DOT display. Check oil level!
Stop the vehicle, switch off the engine, and check the engine oil level » page 164.
An audible signal sounds as a warning signal. The warning light will go out if the bonnet is left open for more than 30 seconds.If no engine oil has been replenished, the warning light will come on again after
driving about 100 km.
The warning light
flashes yellow (engine oil level sensor faulty)
The following message is shown in the MAXI DOT display. Oil sensor workshop!
If the engine oil level sensor is faulty, the warning light flashes
several times
and an audible signal sounds when the ignition is turned on.
Seek help from a specialist garage.WARNINGIf you have to stop for technical reasons, park the vehicle at a safe distance
from the traffic, switch off the engine and switch on the hazard warning lights
system » page 45 .
CAUTION
The red oil pressure light
is not an oil level indicator! One should therefore
check the oil level at regular intervals, preferably after every refuelling stop. Coolant
First read and observe the introductory information and safety warn- ings
on page 20.
The indicator light remains lit until the engine reaches operating temperature 2)
.
Avoid high speeds, full throttle and high engine loads.
If the warning light lights up or flashes, either the coolant temperature is too
high or the coolant level is too low.
An audible signal sounds as a warning tone.
The following message is shown in the MAXI DOT display.
Check coolant. Read manual.
Stop the vehicle, switch off the engine, check the level of the coolant » page 166,
and refill the coolant if necessary » page 167.
If the coolant is within the specified range, the increased temperature may be
caused by an operating problem at the radiator fan. Check the fuse for the radia-
tor fan, replace if necessary » page 193, Fuses in the engine compartment .
Do not continue driving if the warning light
does not go off even though the
coolant level is correct and the fuse for the fan is in working order!
Seek help from a specialist garage.
WARNING■ If you have to stop for technical reasons, then park the vehicle at a safe dis-
tance from the traffic, switch off the engine and activate the hazard warning
light system » page 45.■
Carefully open the coolant expansion bottle. If the engine is hot, the cooling
system is pressurized - risk of scalding! It is therefore best to allow the engine to cool down before removing the cap.
■
Do not touch the radiator fan. The radiator fan may switch itself on auto-
matically even if the ignition is off.
1)
The warning light does not light up in vehicles fitted with the MAXI DOT display when the ignition
is switched on, but only if there is a fault or the engine oil level is too low.
2)
Not on vehicles with the MAXI DOT display.
22Operation
Page 28 of 219
ECU fault light (petrol engine)First read and observe the introductory information and safety warn-
ings
on page 20.
If the warning light comes on or begins to flash while driving, a fault exists in
the engine control unit. The engine control unit allows the vehicle to run in emer-
gency mode.
Seek help from a specialist garage.
Diesel particulate filter (diesel engine)
First read and observe the introductory information and safety warn-ings
on page 20.
The diesel particulate filter separates the soot particles from the exhaust. The
soot particles collect in the diesel particulate filter where they are burnt on a reg-
ular basis.
The
warning light comes on if soot has accumulated in the filter.
In order to clean the filter, and where traffic conditions permit »
, the vehicle
should be driven for at least 15 minutes or until the warning light goes out at an
steady speed of at least 60 km/h at engine speeds of 1800 - 2500 rpm with 4th
or 5th gear engaged (automatic gearbox: position S).
The
warning light only goes out once the diesel particulate filter has been
successfully cleaned.
If the filter is not properly cleaned, the warning light
does not go out and the
warning light
begins to flash.
The following message is shown in the MAXI DOT display. Diesel particulate filter: Read manual.
The engine control unit allows the vehicle to run in emergency mode. After switching the ignition off and on again the indicator light, the indicator light
also lights up.
Seek help from a specialist garage.
WARNING■ The diesel particle filter achieves very high temperatures. Therefore do not
park in areas where the hot filter can come into direct contact with dry grass
or other combustible materials – there is the risk of fire.■
Always adjust your speed to suit weather, road, region and traffic condi-
tions. The recommendations indicated by the warning light must not tempt
you to disregard the national regulations for road traffic.
CAUTION
As long as the warning light lights up, one must take into account an in-
creased fuel consumption and in certain circumstances a power reduction of the
engine.
Note
■ We recommend avoiding regularly driving short distances to assist the combus-
tion process of the soot particles in the filter.■
Using diesel fuel with an increased sulphur content can considerably reduce the
service life of the filter. A ŠKODA Service Partner will be able to tell you which countries use diesel fuel with a high sulphur content.
■
If the engine is turned off during the filter cleaning process or shortly after-
wards, the cooling fan may turn on automatically for a few minutes.
Fuel reserve
First read and observe the introductory information and safety warn-ings
on page 20.
The indicator light will come on if the fuel level is less than 7 litres.
An audible signal sounds as a warning signal.
The following message is shown in the MAXI DOT display.
Please refuel. Range: ... km
Note
The text in the MAXI DOT display only goes out after the vehicle has been refuel-
led and driven a short distance.
25Instruments and Indicator Lights
Page 41 of 219
The period after which the tailgate locks automatically can be extended by a spe-
cialist garage.
Delayed locking
If the tailgate was opened with the button on the remote control key, then it
is possible to open the lid within a limited period of it being closed.
There is a risk of unwanted entry into the vehicle before the boot lid is locked au-tomatically. Therefore always lock the vehicle with the button on the remote
control.
Delayed locking can be disabled by a specialist garage at any time.
Note
More detailed information is available from a ŠKODA Partner.
Emergency unlocking
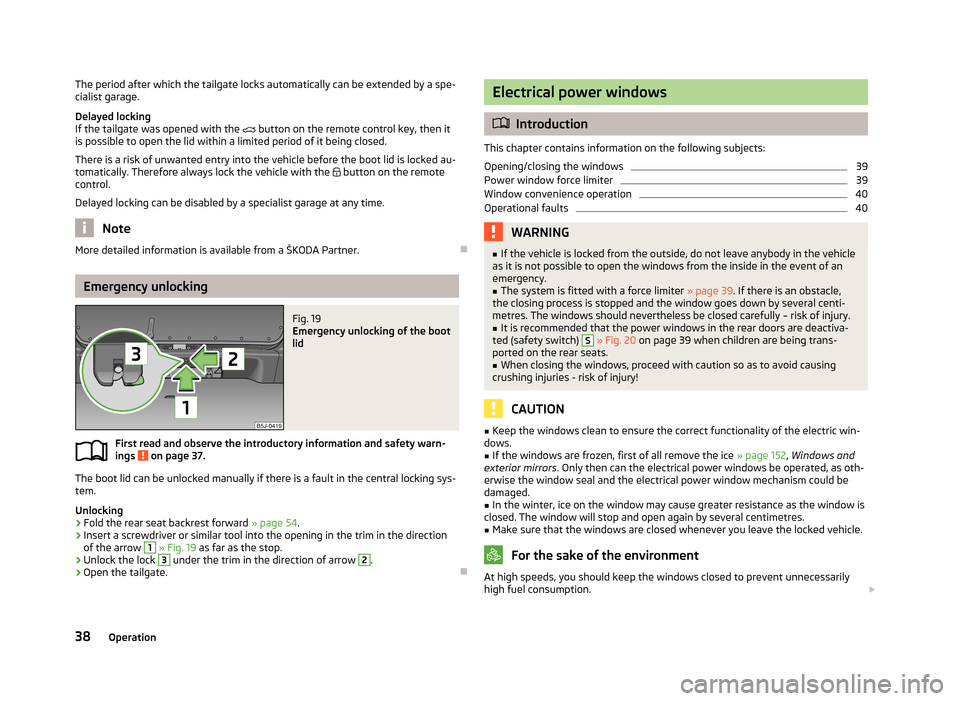
Fig. 19
Emergency unlocking of the boot
lid
First read and observe the introductory information and safety warn-
ings on page 37.
The boot lid can be unlocked manually if there is a fault in the central locking sys-
tem.
Unlocking
›
Fold the rear seat backrest forward » page 54.
›
Insert a screwdriver or similar tool into the opening in the trim in the direction
of the arrow
1
» Fig. 19 as far as the stop.
›
Unlock the lock
3
under the trim in the direction of arrow
2
.
›
Open the tailgate.
Electrical power windows
Introduction
This chapter contains information on the following subjects:
Opening/closing the windows
39
Power window force limiter
39
Window convenience operation
40
Operational faults
40WARNING■ If the vehicle is locked from the outside, do not leave anybody in the vehicle
as it is not possible to open the windows from the inside in the event of an
emergency.■
The system is fitted with a force limiter » page 39. If there is an obstacle,
the closing process is stopped and the window goes down by several centi-
metres. The windows should nevertheless be closed carefully – risk of injury.
■
It is recommended that the power windows in the rear doors are deactiva-
ted (safety switch)
S
» Fig. 20 on page 39 when children are being trans-
ported on the rear seats.
■
When closing the windows, proceed with caution so as to avoid causing
crushing injuries - risk of injury!
CAUTION
■ Keep the windows clean to ensure the correct functionality of the electric win-
dows.■
If the windows are frozen, first of all remove the ice » page 152, Windows and
exterior mirrors . Only then can the electrical power windows be operated, as oth-
erwise the window seal and the electrical power window mechanism could be
damaged.
■
In the winter, ice on the window may cause greater resistance as the window is
closed. The window will stop and open again by several centimetres.
■
Make sure that the windows are closed whenever you leave the locked vehicle.
For the sake of the environment
At high speeds, you should keep the windows closed to prevent unnecessarily
high fuel consumption. 38Operation
Page 50 of 219
Illuminated storage compartment on the passenger sideFirst read and observe the introductory information given on page 46.›
When opening the flap of the storage compartment on the front passenger side
the lighting in the storage compartment comes on.
›
The light switches on automatically when the parking light is switched on and
goes out when the flap is closed.
Luggage compartment light
First read and observe the introductory information given on page 46.
The light comes on automatically when the boot lid is opened. If the tailgate re-
mains open for more than 10 minutes, the luggage compartment light switches
off automatically.
Visibility
Introduction
This chapter contains information on the following subjects:
Rear window heater
47
Sun visors
48
sunshade
48
Rear window heaterFig. 28
Button for rear window heater
First read and observe the introductory information given on page 47.
›
The rear window heater is switched on or off by pressing the
but-
ton » Fig. 28 , the warning light in the switch comes on or goes out.
The rear window heater can only be switched on when the engine is running. The rear window heater switches off automatically after approximately 7 mi-
nutes.
For the sake of the environment
The heating should be switched off as soon as the window is de-iced or free from
mist. The reduced current consumption will have a favourable effect on fuel econ-
omy » page 107 , Saving electrical energy .
Note
If the on-board voltage drops, the rear window heater switches off automatically,
in order to provide sufficient electrical energy for the engine control » page 171,
Automatic load deactivation .
47Lights and visibility
Page 53 of 219
Headlight cleaning systemFirst read and observe the introductory information and safety warn-
ings
on page 48.
The headlights are sprayed briefly if the low beam or main beam are switched on
and the windscreen wiper stalk is pulled to position
5
» Fig. 31 on page 49. To
clean the headlights, the windshield is also sprayed after every five squirts.
You should remove stubborn dirt (such as insect residues) from the headlight len-
ses at regular intervals, for example when refuelling. The following guidelines
must be observed » page 153, Headlight lenses .
To ensure the proper operation of the cleaning system during the winter, any
snow should be removed from the washer nozzle fixtures and ice should be
cleared with a de-icing spray.
CAUTION
Never remove the nozzles from the headlight cleaning system by hand – there is
risk of damage.
Replacing the windscreen wiper blades
Fig. 32
Windscreen wiper blade
First read and observe the introductory information and safety warn- ings on page 48.
Removing the wiper blade
›
Lift the windscreen wiper arm away from the windscreen.
›
Press the locking button
1
» Fig. 32 and remove the wiper blade in the direc-
tion of arrow
2
.
Fitting the wiper blade›Push the wiper blade in until it latches on the stop.›
Check that the wiper blade is correctly attached.
›
Fold the wiper arms back to the windscreen.
Windshield wiper blades in proper condition are essential to obtain good visibility.
Wiper blades should not be allowed to become dirtied by dust, insect remains and
preserving wax.
Juddering or smearing of the wiper blades could then be due to wax residues left on the windshield by vehicle washing in automatic vehicle wash systems. It is
therefore important to clean and degrease the lips of the windshield wiper blades
after every pass through the automatic vehicle wash system .
Replacing the rear window wiper blade
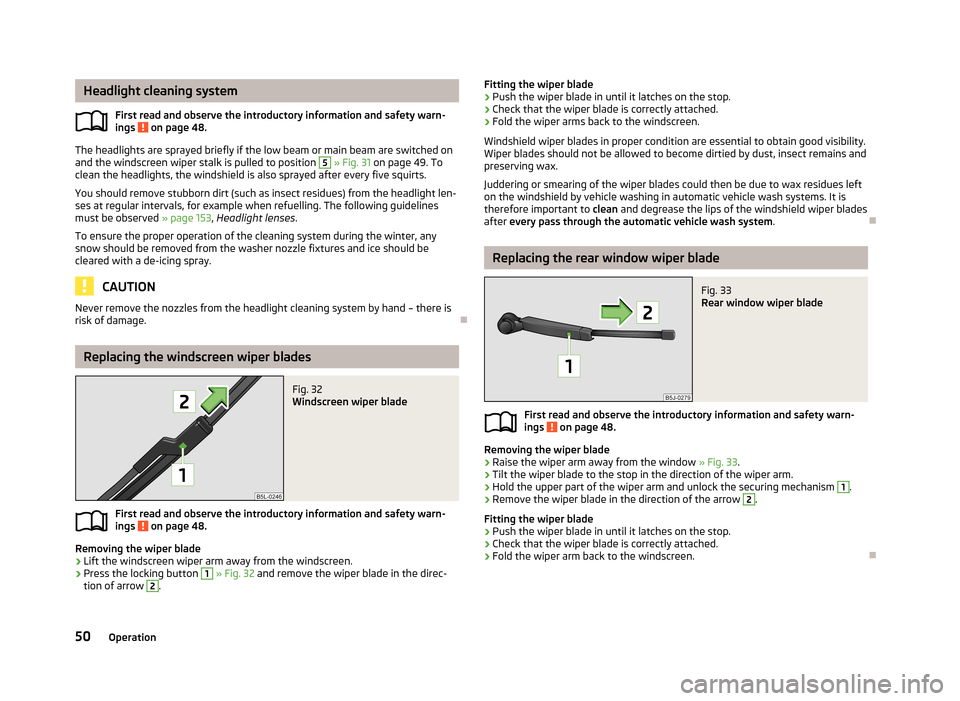
Fig. 33
Rear window wiper blade
First read and observe the introductory information and safety warn-
ings on page 48.
Removing the wiper blade
›
Raise the wiper arm away from the window » Fig. 33.
›
Tilt the wiper blade to the stop in the direction of the wiper arm.
›
Hold the upper part of the wiper arm and unlock the securing mechanism
1
.
›
Remove the wiper blade in the direction of the arrow
2
.
Fitting the wiper blade
›
Push the wiper blade in until it latches on the stop.
›
Check that the wiper blade is correctly attached.
›
Fold the wiper arm back to the windscreen.
50Operation
Page 68 of 219
›Position the clamp with the rubber part to the front (in direction of travel) as
low down on the seat post as possible and lock it » Fig. 56 - .›
When transporting two bicycles, stretch the belt » Fig. 56 - between the sad-
dles by moving the bicycles apart.
›
Hook the carabiners on the ends of the belt into the lashing eyes behind the rear seats » Fig. 56 - .
›
Pull the belt through the tensioning clasps on both sides in turn.
›
If necessary, you can correct the position of the bicycles in the vehicle.
Roof rack system
Introduction
This chapter contains information on the following subjects:
Roof load
65WARNING■ The transported items on the roof rack must be securely attached – risk of
accident!■
Always secure the load with appropriate and undamaged lashing straps or
tensioning straps.
■
Distribute the load evenly over the roof rack system.
■
Transporting heavy or large objects on the roof rack alters the handling
properties of the vehicle due to the displacement of the centre of gravity or
the increased wind exposure area – risk of accident! The style of driving and
speed must therefore be adapted to the current circumstances.
■
Avoid abrupt and sudden driving/braking manoeuvres.
■
Adjust the speed and driving style to the visibility, weather, road and traffic
conditions.
■
The permissible roof load, permissible axle loads and permissible total vehi-
cle weight must not be exceeded under any circumstances – risk of accident!
CAUTION
■ Only use roof rack systems approved by ŠKODA AUTO a.s.■The fitting instructions supplied with the roof luggage rack system must be ob-
served when handling roof racks.■
Ensure that the boot lid does not hit the roof load when opened.
■ The height of the vehicle changes after mounting a roof luggage rack system
and the load that is secured to it. Compare the vehicle height with available clear- ances, such as underpasses and garage doors.■
Always remove the roof luggage rack system before entering an automated car
wash.
■
Ensure the roof aerial is not impaired by the secured load.
For the sake of the environment
The increased aerodynamic drag results in a higher fuel consumption.
Note
If the vehicle is not factory-equipped with a roof rack, it can be purchased from
the ŠKODA Original Accessories.
Roof load
First read and observe the introductory information and safety warn-
ings
on page 65.
The maximum permissible roof load (including roof rack system) of 75 kg and the
maximum permissible total weight of the vehicle should not be exceeded.
The full permissible roof load cannot be used if a roof rack system with a lower
load carrying capacity is used. In this case, the roof rack system must only be loa-
ded up to the maximum weight limit specified in the fitting instructions.
Useful equipment
Introduction
This chapter contains information on the following subjects:
Cupholders
66
Ashtray
66
Cigarette lighter
67
12-volt power outlet
67
Clothes hook
68
Car park ticket holder
68
65Seats and stowing
Page 81 of 219

Close air outlet vents 3 and 4›Turn the vertical wheel (air vents 3) » Fig. 80 or the horizontal wheel (air outlet
nozzles 4) to the 0 position.
Change air flow of air outlet vents 3 and 4›
In order to change the strength of the air flow, swivel the horizontal lamellas with the aid of the moveable adjuster » Fig. 80.
›
In order to change the lateral direction of the air flow, swivel the vertical lamel-
las with the aid of the moveable adjuster.
Set the air supply to the individual vents with the air distribution control
C
» Fig. 81 on page 79.
Note
Do not cover the air outlet vents with objects of any kind.
Using the air conditioning system economically
First read and observe the introductory information and safety warn-ings
on page 77.
The air conditioning system compressor uses power from the engine when in
cooling mode, which will affect the fuel consumption.
It recommended to open the windows or the doors of a vehicle for which the inte-rior has been strongly heated through the effect of direct sunlight in order to al-
low the heated air to escape.
The cooling system should not be switched on if the windows are open.
For the sake of the environment
Pollutant emissions are also lower when fuel is being saved » page 104.
Operational problems
First read and observe the introductory information and safety warn-
ings
on page 77.
If the cooling system does not operate at outside temperatures higher than +5 °C,
there is a problem in the system. The reasons for this may be.
› One of the fuses has blown. Check the fuse and replace if necessa-
ry » page 191 .
› The cooling system has switched off automatically for a short time because the
coolant temperature of the engine is too hot » page 11.
If you are not able to resolve the operational problem yourself, or if the cooler
output has reduced, switch off the cooling system and seek assistance from a
specialist garage.
Heating
Introduction
This chapter contains information on the following subjects:
Operation
79
Setting
79
Recirculated air mode
80
78Operation