2013 SKODA ROOMSTER airbag off
[x] Cancel search: airbag offPage 6 of 219

Table of Contents
Materials defect liability and ŠKODA warranty for
new cars5
Mobility warranty and ŠKODA extended
warranty
6
Abbreviations
Operation
Cockpit
9
Overview
8
Instruments and Indicator Lights
10
Instrument cluster
10
Multifunction display (MFD)
13
Service Interval Display
16
MAXI DOT display
18
Warning lights
20
Unlocking and locking
28
Unlocking and locking
28
Central locking system
31
Remote control
34
Anti-theft alarm system
35
Luggage compartment lid
37
Electrical power windows
38
Lights and visibility
41
Lights
41
Interior lights
46
Visibility
47
Windscreen wipers and washers
48
Rear window
51
Seats and stowing
52
Front seats
52
Rear seats
54Head restraints56Boot57
Variable loading floor in the luggage
compartment (Estate)
61
Bicycle carrier in the luggage compartment
63
Roof rack system
65
Useful equipment
65
Storage compartments
68
Praktik
73
Heating and air-conditioning
77
Heating, ventilation, cooling
77
Heating
78
Air conditioning system (manual air conditioning system)
80
Climatronic (automatic air conditioningsystem)
83
Communication and multimedia
86
Universal telephone preinstallation GSM II
86
Voice control
91
Multimedia
92
Driving
Starting-off and Driving
95
Steering
95
Starting and stopping the engine
96
Brakes
98
Manual gear changing and pedals
99
Automatic transmission
100
Running in
103
Economical driving and environmental
sustainability
104
Avoiding damage to your vehicle
108
Driving abroad
109
Assist systems
110
Brake assist systems
110
Parking aid
112Cruise Control System113START-STOP115
Towing a trailer
117
Towing device
117
Trailer
120
Safety
Passive Safety
123
General information
123
Correct seated position
124
Seat belts
127
Using seat belts
127
Inertia reels and belt tensioners
130
Airbag system
132
Description of the airbag system
132
Airbag overview
133
Deactivating airbags
136
Transporting children safely
139
Child seat
139
Fastening systems
141
General Maintenance
Car care
144
Service intervals
144
Services, modifications and technical
alterations
146
Washing your car
149
Taking care of your vehicle exterior
150
Taking care of the interior
154
Inspecting and replenishing
157
Fuel
157
Engine compartment
159
Engine oil
163
Coolant
1653Table of Contents
Page 23 of 219

Note■Warning messages shown in the MAXI DOT display must be confirmed with but-
ton B » Fig. 7 on page 18 to call up the main menu.■
As long as the operational faults are not rectified, the symbols are always indi-
cated again. After they are displayed for the first time, the symbols continue to be
indicated without any extra messages for the driver.
Warning lights
Introduction
This chapter contains information on the following subjects:
Handbrake
20
Brake system
20
Seat belt warning light
21
Alternator
21
Door open
21
Engine oil
21
Coolant
22
Power steering
23
Electronic Stability Control (ESC)
23
Traction Control System (ASR)
23
Anti-lock brake system (ABS)
24
Rear fog light
24
Bulb failure
24
Exhaust inspection system
24
Glow plug system (diesel engine)
24
ECU fault light (petrol engine)
25
Diesel particulate filter (diesel engine)
25
Fuel reserve
25
Airbag system
26
Tyre pressures
26
Windscreen washer fluid level
26
Traction control (TCS) switched off
26
Turn signal system
26
Low beam
27 Fog lights27 Cruise control system27
Selector lever lock
27
Main beam
27
The warning lights show certain functions/faults and may be accompanied by au-
dible signals.
WARNING■ If illuminated warning lights and the corresponding descriptions and warn-
ing notes are not observed, this may result in severe injuries or major vehicle
damage.■
The engine compartment of your car is a hazardous area. There is a risk of
injuries, scalding, accidents and fire when working in the engine compart-
ment, e.g. inspecting and replenishing oil and other fluids. It is essential to ob-
serve safety notes » page 159, Engine compartment .
Handbrake
First read and observe the introductory information and safety warn-
ings
on page 20.
The warning light
comes on if the handbrake is applied. An audible warning is
also given if you drive the vehicle for at least 3 seconds at a speed of more than
6 km/h.
The following message is shown in the MAXI DOT display.
Release parking brake!
Brake system
First read and observe the introductory information and safety warn-
ings
on page 20.
The
indicator light comes on if the brake fluid level in the braking system is too
low or there is a fault in the ABS.
The following message is shown in the MAXI DOT display. Brake fluid: Read manual.
20Operation
Page 29 of 219
Airbag systemFirst read and observe the introductory information and safety warn-ings
on page 20.
If the warning light lights up, there is a fault in the airbag system.
The following message is shown in the MAXI DOT display. Fault: Airbag
The operational capability of the airbag system is monitored electronically, even if one of the airbags is switched off.
If a front, side or head airbag or belt tensioner has been switched off using the vehicle system tester:
› The
warning light comes on for around 4 seconds after the ignition is switch-
ed on and then flashes for approximately another 12 seconds at 2 second inter-
vals.
The following message is shown in the MAXI DOT display.
Airbag/belt tensioner deactivated.
If the front passenger's front airbag was switched off using the key-operated
switch on the side of the dash panel on the passenger side:
› The
warning light comes on for around 4 seconds after the ignition has been
switched on.
› switching off the airbag is indicated in the middle of the dash panel by the light-
ing up of the yellow indicator light in display
» page 137 .
WARNINGIf there is a fault, have the airbag system checked immediately by a specialist
garage. Otherwise, there is a risk of the airbag not being activated in the
event of an accident.
Tyre pressures
First read and observe the introductory information and safety warn-
ings
on page 20.
The warning light
lights up, if there is a substantial drop in inflation pressure in
one of the tyres. Check and adjust the pressure in all tyres.
The warning light coming on indicates a fault in the system.
Seek help from a specialist garage.
Further information » page 175, Tyre pressure monitor .
Note
If the battery has been disconnected, the warning light illuminates after the ig-
nition is switched on. The warning light should go out after driving a short dis-
tance.
Windscreen washer fluid level
First read and observe the introductory information and safety warn-ings
on page 20.
If the windscreen washer fluid level is too low, the warning light
comes on.
The following message is shown in the MAXI DOT display. Top up wash fluid!
Top up with liquid » page 162.
Traction control (TCS) switched off
First read and observe the introductory information and safety warn-ings
on page 20.
The ASR is switched off by pressing the button » page 111 and the warning light
illuminates.
The following message is shown in the MAXI DOT display.
Traction control (ASR) deactivated.
Turn signal system
First read and observe the introductory information and safety warn-ings
on page 20.
Either the left
or right
warning light flashes depending on the position of the
turn signal lever.
26Operation
Page 48 of 219
Ignition switched off, light switched off (light switch in position 0), control dial for
headlamp beam adjustment in the position, no gear engaged or selector lever
in the N position (automatic gearbox), tourist light deactivated.›
Switch on the ignition.
Within 10 seconds of the ignition being switched on:
›
Turn the light switch to the position » page 41 , Parking and low beam lights .
›
Engage reverse gear (manual gearbox) or move the selector lever to the R posi-
tion (automatic gearbox),
›
Turn the headlamp beam adjustment dial from to » page 42 .
Deactivating tourist light
Before deactivating the tourist light, the following conditions must be met.
Ignition switched off, light switched off (light switch in position 0), control dial for
headlamp beam adjustment in the
position, no gear engaged or selector lever in
the N position (automatic gearbox), tourist light activated.
›
Switch on the ignition.
Within 10 seconds of the ignition being switched on:
›
Turn the light switch to the
position » page 41 , Parking and low beam lights .
›
Engage reverse gear (manual gearbox) or move the selector lever to the R posi-
tion (automatic gearbox),
›
Turn the headlamp beam adjustment dial from
to
» page 42 .
Further information » page 109, Headlights .
Note
When the “tourist light” mode is active, the warning light flashes for 10 sec-
onds each time the ignition is switched on.
Hazard warning light systemFig. 25
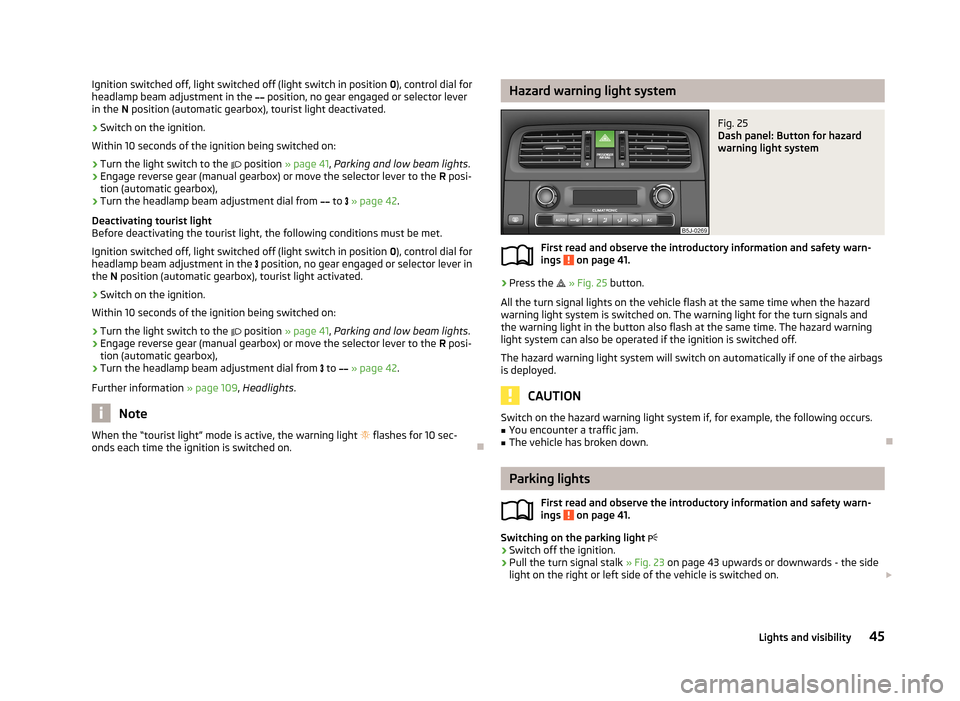
Dash panel: Button for hazard
warning light system
First read and observe the introductory information and safety warn-
ings on page 41.
›
Press the
» Fig. 25 button.
All the turn signal lights on the vehicle flash at the same time when the hazard
warning light system is switched on. The warning light for the turn signals and
the warning light in the button also flash at the same time. The hazard warning
light system can also be operated if the ignition is switched off.
The hazard warning light system will switch on automatically if one of the airbags
is deployed.
CAUTION
Switch on the hazard warning light system if, for example, the following occurs.■You encounter a traffic jam.■
The vehicle has broken down.
Parking lights
First read and observe the introductory information and safety warn-ings
on page 41.
Switching on the parking light
›
Switch off the ignition.
›
Pull the turn signal stalk
» Fig. 23 on page 43 upwards or downwards - the side
light on the right or left side of the vehicle is switched on.
45Lights and visibility
Page 60 of 219
WARNING■The head restraints must be correctly adjusted in order to offer effective
protection for the occupants in the event of an accident.■
Never drive with the head restraints removed - risk of injury.
■
If the rear seats are occupied, the rear head restraint must not be in the
lower position.
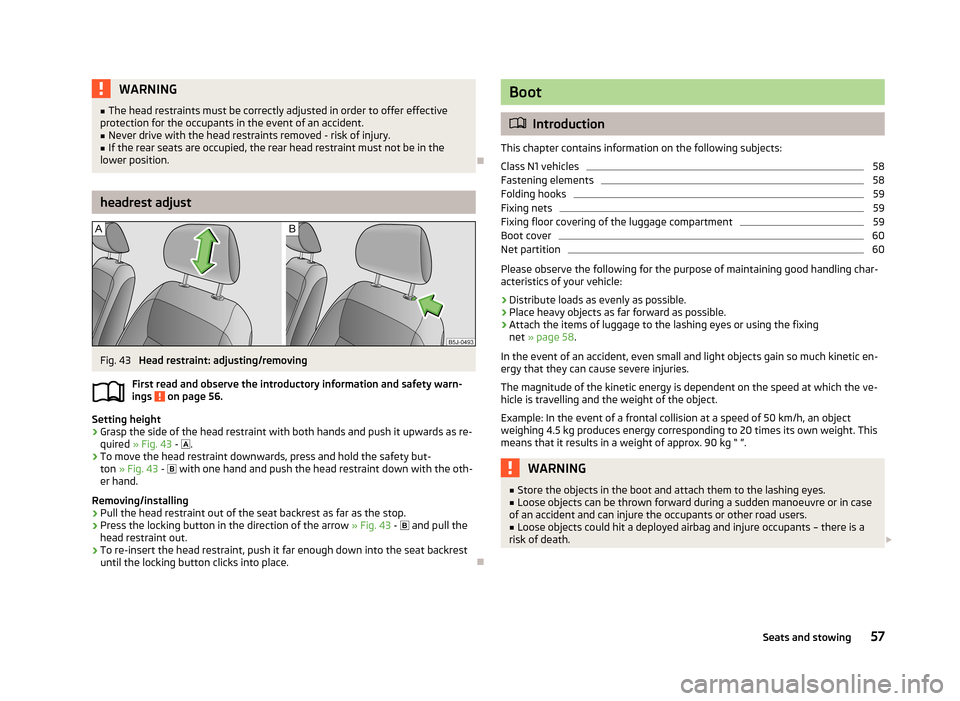
headrest adjust
Fig. 43
Head restraint: adjusting/removing
First read and observe the introductory information and safety warn- ings
on page 56.
Setting height
›
Grasp the side of the head restraint with both hands and push it upwards as re-
quired » Fig. 43 -
.
›
To move the head restraint downwards, press and hold the safety but-
ton » Fig. 43 -
with one hand and push the head restraint down with the oth-
er hand.
Removing/installing
›
Pull the head restraint out of the seat backrest as far as the stop.
›
Press the locking button in the direction of the arrow » Fig. 43 -
and pull the
head restraint out.
›
To re-insert the head restraint, push it far enough down into the seat backrest until the locking button clicks into place.
Boot
Introduction
This chapter contains information on the following subjects:
Class N1 vehicles
58
Fastening elements
58
Folding hooks
59
Fixing nets
59
Fixing floor covering of the luggage compartment
59
Boot cover
60
Net partition
60
Please observe the following for the purpose of maintaining good handling char-
acteristics of your vehicle:
›
Distribute loads as evenly as possible.
›
Place heavy objects as far forward as possible.
›
Attach the items of luggage to the lashing eyes or using the fixing net » page 58 .
In the event of an accident, even small and light objects gain so much kinetic en-
ergy that they can cause severe injuries.
The magnitude of the kinetic energy is dependent on the speed at which the ve-
hicle is travelling and the weight of the object.
Example: In the event of a frontal collision at a speed of 50 km/h, an object
weighing 4.5 kg produces energy corresponding to 20 times its own weight. This
means that it results in a weight of approx. 90 kg “ ”.
WARNING■ Store the objects in the boot and attach them to the lashing eyes.■Loose objects can be thrown forward during a sudden manoeuvre or in case
of an accident and can injure the occupants or other road users.■
Loose objects could hit a deployed airbag and injure occupants – there is a
risk of death.
57Seats and stowing
Page 71 of 219
■If electrical consumers are switched on when the engine is not running, this will
cause the car battery to discharge – risk of battery discharge!■
Only use matching plugs to avoid damaging the 12-volt power socket.
■
Only use accessories that have been tested for electromagnetic compatibility in
accordance with the applicable directives.
■
Before turning the ignition on or off, and before starting the car, switch off the
device connected to the 12-volt power socket to prevent any damage caused by
voltage fluctuations.
■
Observe the operating instructions for the connected devices!
Clothes hook
First read and observe the introductory information and safety warn-ings
on page 65.
The clothes hooks are located on the handle of the headliner above each of therear doors.
WARNING■ Ensure that any clothes hanging from the hooks do not impair your vision to
the rear.■
Only use the hooks for hanging light items of clothing and ensure that there
are no heavy or sharp-edged objects in the pockets.
■
Do not use clothes hangers for hanging up items of clothing otherwise this
may reduce the effectiveness of head airbags.
CAUTION
The maximum permissible load of the hooks is 2 kg.
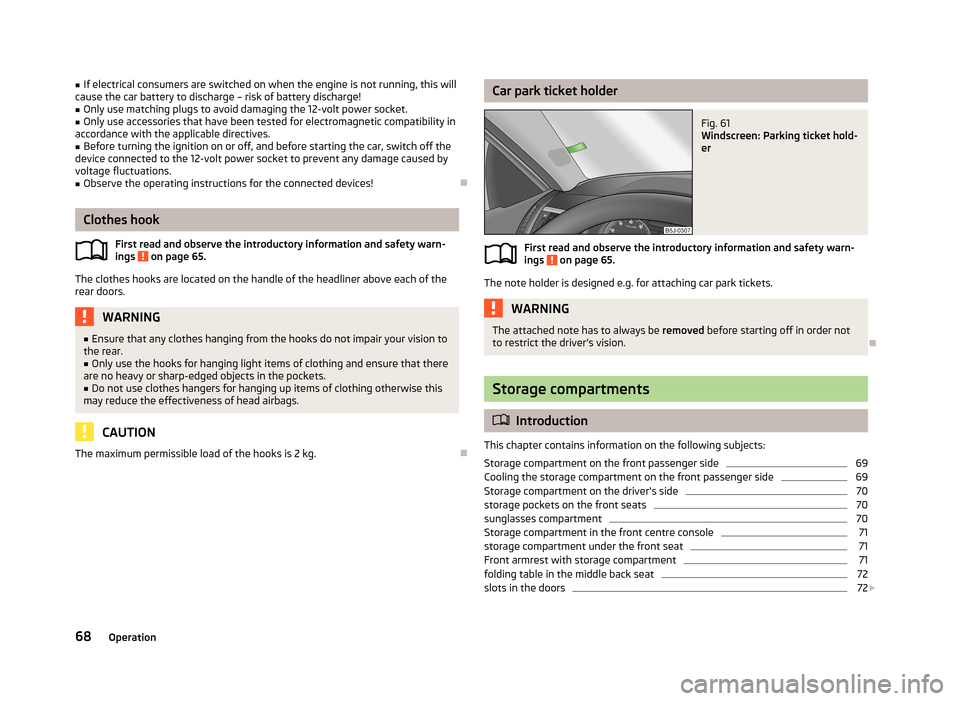
Car park ticket holderFig. 61
Windscreen: Parking ticket hold-
er
First read and observe the introductory information and safety warn-
ings on page 65.
The note holder is designed e.g. for attaching car park tickets.
WARNINGThe attached note has to always be removed before starting off in order not
to restrict the driver's vision.
Storage compartments
Introduction
This chapter contains information on the following subjects:
Storage compartment on the front passenger side
69
Cooling the storage compartment on the front passenger side
69
Storage compartment on the driver's side
70
storage pockets on the front seats
70
sunglasses compartment
70
Storage compartment in the front centre console
71
storage compartment under the front seat
71
Front armrest with storage compartment
71
folding table in the middle back seat
72
slots in the doors
72
68Operation
Page 89 of 219

Communication and multimedia
Universal telephone preinstallation GSM II
Introduction
This chapter contains information on the following subjects:
Mobile phones and two-way radio systems
86
Introductory information
86
Phone Phonebook
87
Operating the phone on the multifunction steering wheel
87
Inserting the mobile phone and adapter
88
Managing telephone calls with the help of the adapter
89
Connecting the mobile phone to the hands-free system
89
Symbols in the MAXI DOT display
90
Telephone operation in the MAXI DOT display
90
Mobile phones and two-way radio systems
First read and observe the introductory information given on page 86.
ŠKODA permits the operation of mobile phones and two-way radio systems with
a professionally installed external aerial and a maximum transmission power of
up to 10 watts.
Please consult a ŠKODA Partner for information about the possibility of installing
and operating mobile phones and two-way radio systems with a transmission
power of more than 10 W.
Operating mobile phones or two-way radio systems may interfere with the func-tionality of the electronic systems in your vehicle.
This could be for the following reasons.
› no external aerial.
› external aerial incorrectly installed.
› transmission power greater than 10 watts.
WARNING■
Concentrate fully at all times on your driving! As the driver you are fully re-
sponsible for road safety. Use the telephone system only to such an extent that you are in full control of your vehicle at any time.■
The national regulations for using a mobile phone in a vehicle must be ob-
served.
■
If a mobile phone or a two-way radio system is operated in a vehicle without
an external aerial or an external aerial which has been installed incorrectly,
this can increase the strength of the electromagnetic field inside the vehicle.
■
Two-way radio systems, mobile phones or mounts must not be installed on
airbag covers or within the immediate deployment range of the airbags.
■
Never leave a mobile phone on a seat, on the dash panel or in another area,
from which it can be thrown during a sudden braking manoeuvre, an accident
or a collision - risk of injury.
■
The Bluetooth ®
function must be switched off by a specialist workshop be-
fore the vehicle is transported by air.
Note
■ We recommend that mobile phones and two-way radio systems be installed in
the a vehicle by a specialist workshop.■
Not all mobile phones that enable Bluetooth ®
communication are compatible
with the universal telephone preinstallation GSM II. You can ask a ŠKODA Partner
whether your telephone is compatible with the GSM II universal telephone fitting.
■
The range of the Bluetooth ®
connection to the hands-free system is restricted
to the vehicle interior. The range is dependent on local factors, e.g. obstacles be-
tween the devices and mutual interferences with other devices. If your mobile
phone is in a jacket pocket, for example, this can lead to difficulties when estab-
lishing a connection with the hands-free-system or transferring data.
Introductory information
First read and observe the introductory information given on page 86.
The universal telephone preinstallation GSM II (hands-free system) includes a
convenience mode for the mobile phone via voice control, the multifunction
steering wheel, the adapter, radio or the navigation system.
86Operation
Page 98 of 219
Driving
Starting-off and Driving
Steering
Introduction
This chapter contains information on the following subjects:
Adjusting the steering wheel position
95
Power steering
95WARNING■ When driving, hold the steering wheel with both hands firmly on the outer
edge in the 9 o'clock and 3 o'clock position. Never hold the steering wheel in
the 12 o'clock position or in any other way (e.g. in the middle or inner edge of
the steering wheel). In such cases, you could severely injure the arms, hands
and head when the driver airbag is deployed.■
Never adjust the steering wheel when the vehicle is moving only when the
vehicle is stationary!
■
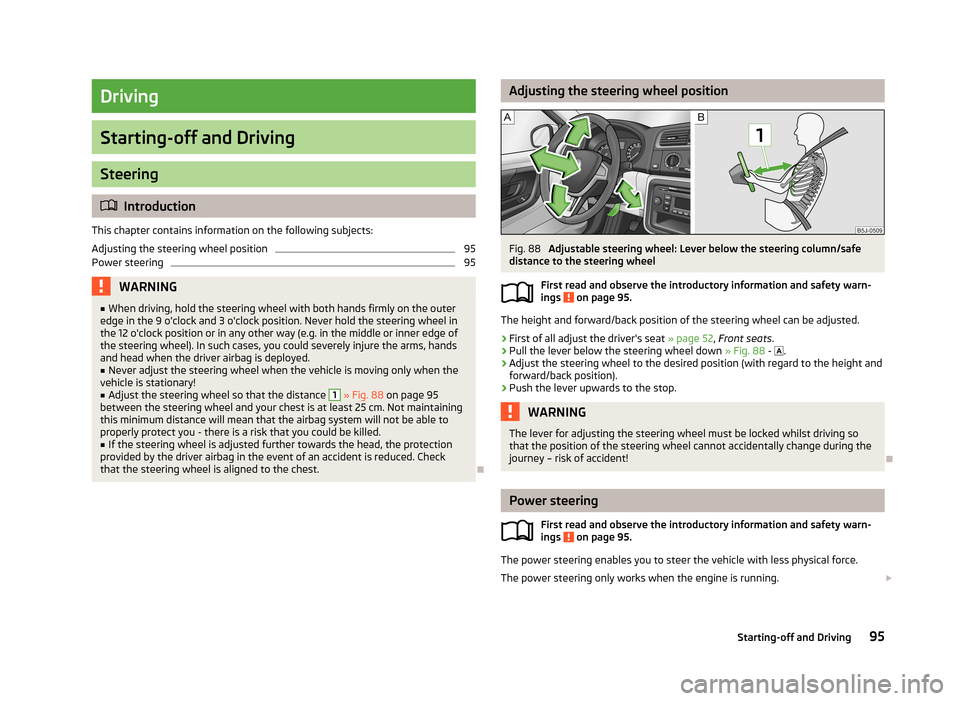
Adjust the steering wheel so that the distance
1
» Fig. 88 on page 95
between the steering wheel and your chest is at least 25 cm. Not maintaining
this minimum distance will mean that the airbag system will not be able to
properly protect you - there is a risk that you could be killed.
■
If the steering wheel is adjusted further towards the head, the protection
provided by the driver airbag in the event of an accident is reduced. Check
that the steering wheel is aligned to the chest.
Adjusting the steering wheel positionFig. 88
Adjustable steering wheel: Lever below the steering column/safe
distance to the steering wheel
First read and observe the introductory information and safety warn-
ings
on page 95.
The height and forward/back position of the steering wheel can be adjusted.
›
First of all adjust the driver's seat » page 52, Front seats .
›
Pull the lever below the steering wheel down » Fig. 88 -
.
›
Adjust the steering wheel to the desired position (with regard to the height and
forward/back position).
›
Push the lever upwards to the stop.
WARNINGThe lever for adjusting the steering wheel must be locked whilst driving so
that the position of the steering wheel cannot accidentally change during the
journey – risk of accident!
Power steering
First read and observe the introductory information and safety warn-ings
on page 95.
The power steering enables you to steer the vehicle with less physical force.
The power steering only works when the engine is running.
95Starting-off and Driving