2013 SKODA OCTAVIA child lock
[x] Cancel search: child lockPage 124 of 287

›Depress and hold the clutch pedal (vehicles with a manual gearbox) or brake
pedal (vehicles with an automatic gearbox) until the engine starts.›
Turn the key into position
3
as far as it will go - the engine's starting proce-
dure will commence (do not touch the accelerator).
›
Release the key, the engine will start automatically.
After letting go, the vehicle key will return to position
2
.
›
Release the handbrake.
If the engine does not start within 10 seconds, turn the key to position
1
. Repeat
the start-up process after approx. half a minute.
Vehicles with manual transmission
The engine will not start if the clutch pedal is not depressed.
The following message is shown in the information cluster display. Press the clutch to start.
PRESS CLUTCH
Vehicles with automatic transmission
The engine will not start if the brake pedal is not depressed.
The following message is shown in the information cluster display. Apply the brake to start.
APPLY BRAKE
CAUTION
■ If the engine does not start up after a second attempt, one of the following
fuses may be defective. ■Petrol engine - fuse for the fuel pump.
■ Diesel engine - fuse for the glow plug control unit or fuel pump.■
Check the fuse and replace if necessary » page 251, or seek assistance from a
specialist garage.
Stopping the engine
First read and observe the introductory information and safety warn-ings
on page 119.
Switch off the engine by turning the ignition key into position
1
» Fig. 115 on
page 120.
NoteFor vehicles with automatic transmission, the ignition key can only be removed if
the selector lever is in position P .
Starting and stopping the engine - KESSY
Introduction
This chapter contains information on the following subjects:
Steering lock / unlock
122
Switching on the ignition
123
Starting the engine
123
Switching off the ignition
123
Switching off the engine
123
Emergency start-up of the engine
124
Emergency ignition shutoff system
124
The KESSY system (Keyless Entry Exit System, hereinafter referred to only as sys- tem) allows the switching on or switching off of the ignition and starting or stop-
ping of the engine without the active use of the key.
A key must be in the vehicle to unlock the steering, switch on the ignition and
start the vehicle. When travelling the key must be in the vehicle.
The engine running noises may louder at first be louder for a short time afterstarting the cold engine. This is quite normal and is not an operating problem.
WARNING■ Never leave the key in the vehicle when you exit the vehicle. This is particu-
larly important if children are left in the vehicle. Otherwise the children could,
for example, start the engine – risk of accident or injury!■
Never leave the vehicle unattended with the engine running.
■
Never switch off the engine before the vehicle is stationary – risk of acci-
dent!
121Starting-off and Driving
Page 127 of 287

The engine and the ignition are switched off simultaneously.
Emergency start-up of the engine
Fig. 117
Emergency start-up of engine
First read and observe the introductory information and safety warn-ings on page 121.
If the authorisation check for the key fails, the following message appears in the instrument cluster display.
Key not found.
NO KEY
The emergency start-up must be completed.
› Press the starter button directly with the key
» Fig. 117.
Or
› Press the starter button and then hold the key to the starter button.
Note
During an emergency start-up of the engine, the key bit must face the starter
button » Fig. 117 .
Emergency ignition shutoff system
First read and observe the introductory information and safety warn-
ings
on page 121.
The ignition can be turned off in an emergency even when travelling at a speed of
more than 2 km / hr.
› Press the starter button
» Fig. 116 on page 122 for longer than 1 second or twice
within 1 second.
After emergency stop of the ignition, the steering is unlocked.
Brakes
Introduction
This chapter contains information on the following subjects:
Information on braking
125
Handbrake
125WARNING■ Greater physical effort for braking is required when the engine is switched
off – risk of accident!■
During the braking procedure on a vehicle with manual transmission, when
the vehicle is in gear and at low revs, press the clutch pedal. If you fail to do
so, the functionality of the brake booster can be impaired – risk of accident!
■
Never leave children unattended in the vehicle. The children might, for ex-
ample, release the handbrake or take the vehicle out of gear. The vehicle might then move off – risk of accident!
WARNING■ In the event of damage occurring to the standard fitted front spoiler or the
retrofitting of another front spoiler, wheel hubs etc. » page 200, Service work,
adjustments and technical alterations , It must be ensured that the air supply
to the front brakes is not impaired. The front brakes may overheat which can
have a negative impact on the functioning of the braking system – risk of acci-
dent!
CAUTION
■ Observe the recommendations on the new brake pads » page 131.■Never let the brakes slip with light pressure on the pedal if braking is not neces-
sary. This causes the brakes to overheat and can also result in a longer braking
distance and excessive wear.
124Driving
Page 180 of 287

›Secure all items of luggage
» page 91, Luggage compartment .
› Ensure that no objects can obstruct the pedals.
› Adjust the mirrors, the front seat and head restraint to your body size.
› Advise your passengers to adjust the head restraints to their body size.
› Protect children in suitable child seats with correctly fastened seat
belts » page 193 , Transporting children safely .
› Adopt the correct seated position
» page 177, Correct seated position . Tell your
passengers to assume the correct seated position.
› Correctly fasten the seat belt. Also inform passengers to fasten the seat belt
correctly » page 180 , Using seat belts .
What influences driving safety?
First read and observe the introductory information and safety warn-
ings
on page 176.
The driver is fully responsible for himself and his occupants. If your driving safety
is effected, you place yourself and the oncoming traffic at risk.
The following guidelines must therefore be observed. › Do not get distracted from concentrating on the traffic situation, e.g. by your
passengers or mobile phone calls.
› Never drive when your driving ability is impaired, e.g. through medication, alco-
hol or drugs.
› Keep to the traffic regulations and the permissible speed limit.
› Always adjust the driving speed to the road, traffic and weather conditions.
› Take regular breaks on long journeys – at least every two hours.
Correct seated position
Introduction
This chapter contains information on the following subjects:
Correct seated position for the driver
178
Correct seated position for the front passenger
178
Correct seated position for the passengers in the rear seats
178
Examples of an incorrect seated position
179WARNINGGeneral information■At all times, the front seats and head restraints must be adjusted to match
the person's body size and the seat belt must be attached properly to provide
the most effective levels of protection to passengers.■
If the occupant adopts an incorrect seated position, he is exposed to life-
threatening injuries, in case he is hit by a deployed airbag.
■
If the occupants on the rear seats are not sitting upright, the risk of injury is
increased due to incorrect routing of the seat belt.
■
The seat backrests must not be angled too far back when driving otherwise
this will affect proper operation of the seat belts and of the airbag system –
risk of injury!
WARNINGInformation for the driver■Always assume the correct seated position before setting off and do not
change this position while driving. Also advise your passengers to adopt the
correct seated position and not to change this position while the car is mov-
ing.■
Maintain a distance of at least 25 cm from the steering wheel, and a dis-
tance of at least 10 cm between the legs and the dash panel at the height of
the knee airbag. Not maintaining this minimum distance will mean that the airbag system will not be able to properly protect you – hazard!
■
When driving, hold the steering wheel with both hands firmly on the outer
edge in the 9 o'clock and 3 o'clock position. Never hold the steering wheel in
the 12 o'clock position or in any other way (e.g. in the middle or inner edge of the steering wheel). In such cases, you could severely injure the arms, handsand head when the driver airbag is deployed.
■
Ensure that there are no objects in the driver's footwell as they may get
caught behind the pedals when driving or applying the braking. You would
then no longer be able to operate the clutch, brake or accelerate.
177Passive Safety
Page 184 of 287

WARNINGObserve the following instructions for the proper use of the seat belts.■Never use one seat belt to secure two people (including children). The seat-
belt must not be placed over a child who is sitting on the lap of another pas-
senger.■
The lock tongue should only be inserted into the lock which is the correct
one for your seat. Wrong use of the safety belt will reduce its capacity to pro-
tect and the risk of injury increases.
■
The slot of the belt tongue must not be blocked otherwise the belt tongue
will not lock in place properly.
■
Many layers of clothing and loose clothing (e. g. a winter coat over a jacket)
do not allow you to be correctly seated and impairs proper operation of the
seat belts.
■
It is prohibited to use clamps or other objects to adjust seat belts (e. g. for
shortening the belts for smaller persons).
■
The seat belts for the rear seats can only fulfil their function reliably when
the seat backrests are correctly locked into position » page 78.
WARNINGObserve the following instructions for proper use of the seat belts.■The belt webbing must always be kept clean. Soiled belt webbing may im-
pair proper operation of the inertia reel » page 211.■
The seat belts must not be removed or changed in any way. Do not attempt
to repair the seat belts yourself.
■
Check the condition of all the seat belts on a regular basis. If any damage to
the seat belts, seat belt connections, inertia reel or the lock is detected, the
relevant seat belt must be replaced by a specialist garage.
■
Damaged seat belts which have been subjected to stress in an accident and
were therefore stretched, must be replaced – this is best done by a specialist
garage. The anchorage points for the belts should also be checked.
Note
The national legal requirements must be observed when using seat belts.
The physical principle of a head-on collisionFig. 160
Driver without a fastened seat belt/rear seat passenger without a
fastened seat belt
First read and observe the introductory information and safety warn-
ings
on page 180.
As soon as the vehicle is moving, so-called kinetic energy (the energy of motion)
is produced both in terms of the car as well as in terms of the occupants.
The magnitude of this kinetic energy depends essentially on the speed at which
the vehicle is travelling and on the weight of the vehicle including the occupants.
The greater the speed and weight increase, the greater the amount of energy
which has to be absorbed in the event of an accident.
The speed of the vehicle is the most important factor. Doubling the speed of the
vehicle from 25 km/h up to 50 km/hour increases the kinetic energy four times.
The opinion that it is possible to support your body in a minor accident with your
hands, is incorrect. Even in a collision at only a low speed, the forces acting on the body are such that it is no longer possible to support your body.
Even if you only drive at a speed of 30 km/h to 50 km/h, the forces that your body is exposed to in the event of an accident can exceed a metric ton (1000 kg).
For example, a person's weight of 80 kg “increases” at 50 km/h to 4.8 tons
(4800 kg).
In the event of a frontal collision, occupants of the car not wearing a seat belt are thrown forward and strike parts of the vehicle interior in an uncontrolled manner, such as the steering wheel, dash panel or windscreen » Fig. 160 -
. In certain
circumstances you could even be thrown out of the vehicle, which could cause life
threatening or even fatal injuries.
181Seat belts
Page 185 of 287

It is also important that rear seat occupants fasten their seat belts as they willotherwise be thrown through the vehicle in an uncontrolled manner in the eventof an accident.
Rear seat passengers who have not fastened their seat belts are a danger not only to themselves but also to those seated at the front » Fig. 160 – .
Fastening and unfastening seat belts
Fig. 161
Fastening/unfastening the seat belt
Fig. 162
Routing of belt webbing over the shoulders and the lap belt/Rout-
ing of belt webbing for an expectant mother
First read and observe the introductory information and safety warn-
ings on page 180.
Fasten
›
Correctly adjust the front seat and head restraint 1)
before fastening the seat
belt » page 177 .
›
Use the lock tongue to slowly pull the webbing over your chest and pelvis.
›
Insert the lock tongue into the belt buckle for the seat » Fig. 161 - until it au-
dibly clicks into place.
›
Pull on the belt to check that it has engaged correctly in the lock.
A plastic knob in the belt webbing holds the belt tongue in a position which is
easy to get hold of.
It is important that the belt is properly routed to ensure seat belts offer the maxi- mum protection.
The shoulder part of the seat belt must never run across the neck but must
roughly run over the middle of the shoulder and fit snugly against the chest. The
lap part of the belt must run across the pelvis, must not be positioned across the
stomach and must always fit snugly » Fig. 162 -
.
Expectant women must also always wear a seat belt. This is the only way of en-
suring optimal protection for the unborn child.
With pregnant women, the lap part of the belt must be positioned as low as pos-sible on the pelvis to avoid exerting any pressure on the lower abdomen » Fig. 162
-
.
Release
Release the seat belt only when the vehicle is stationary.
›
Press the red button in the belt buckle » Fig. 161 -
; the lock tongue pops out.
›
Manually guide the belt back so that it is easier to fully roll up the webbing, the
seat belt does not twist.
CAUTION
When releasing the seatbelt ensure that the tongue of the lock does not damage
the door trim or other parts of the interior.
1)
Not valid for sport seats.
182Safety
Page 199 of 287

Fastening elements
Introduction
This chapter contains information on the following subjects:
eyes belonging to the lISOFIX system
196
Use of child seats with the ISOFIX system
196
Locking eyes of the TOP TETHER system
197
eyes belonging to the lISOFIX system
Fig. 174
Rear seat: ISOFIX
First read and observe the introductory information given on page 196.
There are two locking eyes between the seat backrest and the seat cushion of
the outer rear seats and front passenger seat for fixing the ISOFIXsystem child seat in place » Fig. 174.
First remove the caps to access the locking eyes.
After removing the child seat, replace he caps.
WARNING■ Always refer to the instructions from the manufacturer of the child seat
when installing and removing a child seat with the ISOFIX system.■
Never attach other child seats, belts or objects to the locking eyes intended
for the installation of a child seat with the ISOFIX system – risk of death!
Note
■ A child seat fitted with the ISOFIX system can only be mounted in a vehicle with
the help of the ISOFIX system if the child seat in question has been approved for this type of vehicle. Further information is available from a ŠKODA Partner.■
Child seats with the ISOFIX system can be purchased from ŠKODA Original Ac-
cessories.
Use of child seats with the ISOFIX system
First read and observe the introductory information given on page 196.
Overview of the usefulness of child seats fastened with the ISOFIX system on
each of the seats in accordance with the ECE-R 16 standard.
GroupSize class of
the child seat a)Front passenger seat b)Rear seats outsideRear seat middle0
up to 10 kgEXIL-SUX0+
up to 13 kgE
XIL-SUX
DC 196Safety
Page 200 of 287
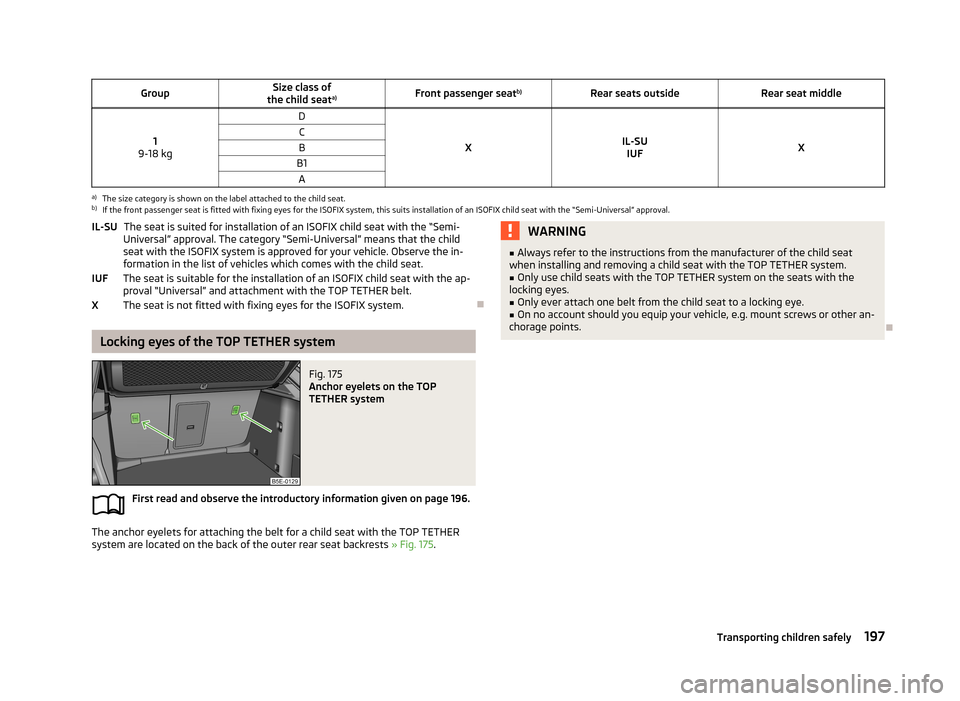
GroupSize class of
the child seat a)Front passenger seat b)Rear seats outsideRear seat middle
1
9-18 kg
D
XIL-SU IUFX
CBB1Aa)
The size category is shown on the label attached to the child seat.
b)
If the front passenger seat is fitted with fixing eyes for the ISOFIX system, this suits installation of an ISOFIX child seat with the “Semi-Universal” approval.
The seat is suited for installation of an ISOFIX child seat with the “Semi-
Universal” approval. The category “Semi-Universal” means that the child
seat with the ISOFIX system is approved for your vehicle. Observe the in-
formation in the list of vehicles which comes with the child seat.
The seat is suitable for the installation of an ISOFIX child seat with the ap- proval “Universal” and attachment with the TOP TETHER belt.
The seat is not fitted with fixing eyes for the ISOFIX system.
Locking eyes of the TOP TETHER system
Fig. 175
Anchor eyelets on the TOP
TETHER system
First read and observe the introductory information given on page 196.
The anchor eyelets for attaching the belt for a child seat with the TOP TETHER
system are located on the back of the outer rear seat backrests » Fig. 175.
IL-SU
IUFXWARNING■
Always refer to the instructions from the manufacturer of the child seat
when installing and removing a child seat with the TOP TETHER system.■
Only use child seats with the TOP TETHER system on the seats with the
locking eyes.
■
Only ever attach one belt from the child seat to a locking eye.
■
On no account should you equip your vehicle, e.g. mount screws or other an-
chorage points.
197Transporting children safely
Page 208 of 287

WARNINGNever use circular spray nozzles or dirt cutters!
CAUTION
■If washing the vehicle in the winter using a hose or high-pressure cleaner, en-
sure that the jet of water is not aimed directly at the locking cylinders or the
door/panel joints – risk of freezing!■
To avoid damaging the parking aid sensors while cleaning with high-pressure
cleaners or steam jets, the sensors must only be directly sprayed for short periods
while a minimum distance of 10 cm must be observed.
■
The temperature of the water used for cleaning must not exceed 60 °C – risk of
damaging the vehicle.
■
See also Washing cars with decorative films using a high-pressure clean-
er » page 206 .
Taking care of your vehicle exterior
Introduction
This chapter contains information on the following subjects:
Taking care of your vehicle's paintwork
205
Plastic parts
206
Rubber seals
206
Chrome parts
206
Decorative films
206
De-icing windows and exterior mirrors
207
Headlight lenses
207
Door lock cylinders
207
Cavity protection
208
Wheels
208
Underbody protection
208
Regular and proper care help to retain the efficiency and value of your vehicle. It
may also be one of the requirements for the acceptance of warranty claims relat- ing to corrosion damage and paint defects on the bodywork.
We recommend using care products from ŠKODA Original Accessories that areavailable from ŠKODA Partners. The instructions for use on the package must be
observed.WARNING■ Care products may be harmful to your health if not used according to the in-
structions.■
Always store vehicle care products safely, in particular out of the reach of
children – risk of poisoning!
■
Protect your hands and arms from sharp-edged metal parts when cleaning
the underfloor, the inside of the wheel housings or the wheel trims – risk of cuts!
CAUTION
■ Do not use any insect sponges, rough kitchen sponges or similar cleaning prod-
ucts – risk of damaging the paintwork surface.■
Cleaner that contain solvents can damage the material being cleaned.
For the sake of the environment
Used vehicle care product cans represent hazardous waste that is harmful to the
environment. These must be disposed of in accordance with national legal regula- tions.
Note
Due to the special tools and knowledge required, and to avoid any potential prob-
lems with the cleaning and care of your vehicle's exterior, we recommend that
the cleaning and care of your vehicle be carried out by a ŠKODA Service Partner.
Taking care of your vehicle's paintwork
First read and observe the introductory information and safety warn-ings
on page 205.
Minor paint damage such as scratches, scuffs or stone chips should be treated im-
mediately if possible, using touch-up pens or sprays .
205Vehicle care