2013 SKODA OCTAVIA phone
[x] Cancel search: phonePage 4 of 90

Table of Contents
Abbreviations
Familiarization with the unit
Introductory information
4
Important notes
4
Unit overview
5
Unit operation
8
Concerning the device screen operation
8
Operation through the MAXI DOT display
10
Voice control
15
Unit settings
19
Setup menu
19
Audio/Video/Images
Radio
24
Operation
24
Radio settings
27
Media
29
Operation
29
signal sources
32
DVD video
37
Images
39
Phone
Communication
41
Telephones and two-way radio systems
41
Connect to the device to the mobile telephone
44
Telephone functions
47Navigation
Description of the navigation system51
Preface to navigation
51
Settings
52
Operating the map
54
Extra window
56
Navigation
60
Enter new destination
60
Entry of saved destinations
62
POI
63
POI categories
66
Route guidance
67
traffic reports
70
My tour
71
Destination management
72
Vehicle
Vehicle systems
74
Vehicle settings
74
Index
2Table of Contents
Page 5 of 90

AbbreviationsAbbreviationDefinitionA2DPAdvanced Audio Distribution Profile - a software profile for da-ta transfer via Bluetooth ®,
designed for a one-way transfer of
audio dataACCAdaptive cruise controlAFAlternative frequencies - alternative frequencies of the cur-
rent radio stationAMAmplitude modulation - denomination of the radio frequency
rangeTCSTraction Control of the drive wheelsAVRCPA software profile for data transmission by means of Blue- tooth ®,
which supports multimedia functionsAVAudio / visual source signal - typical for DVD player or TV tunerBTBluetooth ®
- wireless communication for reception and trans-
mission of voice and data informationDABDigital Audio Broadcasting - digital radio receptionDRMDigital Rights Management - technical methods to monitor or
restrict the use of digital media contentESCElectronic Stability ControlEXIFExchangeable image file format - additional information data to an image fileFMFrequency modulation - Identification of the radio frequency rangeHFPHands-free profile - a software profile for data transfer via
Bluetooth ®,
which allows for communication between a mo-
bile phone and the in-vehicle hands-free equipmentGPSGlobal Positioning System - satellite system for determining
positionGSMGroupe Spécial Mobile - Global System for Mobile communica- tion, the most popular standard for mobile phonesID3 tagan additional feature of a music file, which allows for the dis-
play of artist, title, album name, etc.KESSYkeyless unlocking, starting and lockingAbbreviationDefinitionNTSCNational Television System Committee - Audio-visual encoding
standard in North and Central America and some countries in Southeast AsiaPALphase alternating line - Audio-visual encoding standard inmost European countriesPIProgram identification - Station identification by means of aRDS codeRDSRadio Data System - system for the transmission of additionalinformation for FM radio receptionTMCTraffic Message Channel - service for transmitting traffic infor- mation to the driverTPTraffic Program identification - Program identifier for the
transmission of traffic informationvCard. File format - vcf for contact data exchange, especially elec-
tronic business cards, can include first and last names, ad-
dresses, phone numbers, URLs, logos, photos and audio clipsVINVehicle identification numberWMAWindows Media Audio - compressed audio format
3Abbreviations
Page 7 of 90

If the component protection does not activate by switching on the ignition,
please contact a ŠKODA specialist garage.
Unit overview
Introduction
This chapter contains information on the following subjects:
Description of the unit
5
Touch screen
6
Switching the unit on/off
6
Unit menus
6
Adjusting volume
7
First and foremost, pay attention to the safety instructions » page 4 , Important
notes .
This chapter deals with the unit, the unit's buttons and their functions. It also
covers switching the unit on and off, the main menus and adjusting the volume
on the unit.
Description of the unitFig. 1
Description of the device
First read and observe the introductory information given on page 5.
Description of the device - Control for switching on/off; volume adjustment
Menu button for calls and confirmations RADIO
- Radio menu » page 24
MEDIA - Media menu » page 29
PHONE - Phone menu » page 41
VOICE - Voice control » page 15
NAV - Navigation Menu » page 51
TRAFFIC - List of traffic reports » page 70
CAR - Settings of the vehicle system » page 74
MENU - Displays the unit menus » page 6
Touch screen » page 8
12345678910115Introductory information
Page 8 of 90

Touch screenFirst read and observe the introductory information given on page 5.
The unit is equipped with a so-called touch screen
11
» Fig. 1 on page 5which can
only be operated by the touch of a finger.
CAUTION
■ The screen can be operated by a slight touch of a finger. Do not apply pressure
to the screen - risk of damage!■
Do not use any objects to operate the screen - risk of damage!
■
Do not use solvents such as benzene or turpentine for cleaning, since they may
damage the screen surface.
Note
■ Use a soft cloth and, if necessary, methylated spirits, to remove fingerprints
from the screen. When doing so, ensure that you do not cause damage to other parts of the interior.■
It is not possible to operate the screen with your fingernails or while wearing
gloves.
■
Do not affix anything to the area of the unit below the screen. This could affect
the functioning of the sensors for the zoom effect.
■
To protect the screen, you can use a suitable screen protector for touchpads
that does not affect its functionality.
■
The brightness of the screen is adjusted automatically depending on the bright-
ness of the interior lighting. The automatic setting can be adjusted manual-
ly » page 20 .
Switching the unit on/off
First read and observe the introductory information given on page 5.
›
Press the knob to switch the device on or off.
When the device is switched on, the audio source and operating mode that were active before switching off the device will be restored.
If telephone mode was active before you switched off the unit and the ignition
and Bluetooth ®
function is not switched on, the screen displays the mes-
sage » page 42 . Switch on the ignition or the Bluetooth ®
function » page 22 .
If the vehicle key is pulled out of the ignition lock while the unit is switched on, the unit will switch off automatically. After switching on the ignition, the unit isturned on automatically.
If the device was switched off using the
knob, then the device will not switch
on automatically after switching on the ignition.
The unit will switch off automatically after the engine is switched off and the
door is opened if your vehicle is fitted with the KESSY system. If you open the
driver's door before switching off the engine, the device will also switch off.
When the ignition is switched off, the device switches off automatically after ap-
prox. half an hour (discharge protection of the vehicle battery).
Unit menus
Fig. 2
Unit menus
First read and observe the introductory information given on page 5.
Function keys in the MENU main menu
- Radio » page 24
- Media » page 29
- Images » page 39
- Sound settings » page 20
- Unit settings » page 19
- Vehicle systems settings » page 74
- Navigation » page 51
- Telephone » page 41
6Familiarization with the unit
Page 11 of 90

Set value› by touching the function keys with the symbols
/ , / , - / +
› Touch or move your finger over the scale
Note
For some menus or menu items, the current setting is displayed, e.g.
Distance:km
or Distance: mi .
Input screen with keyboard for searching
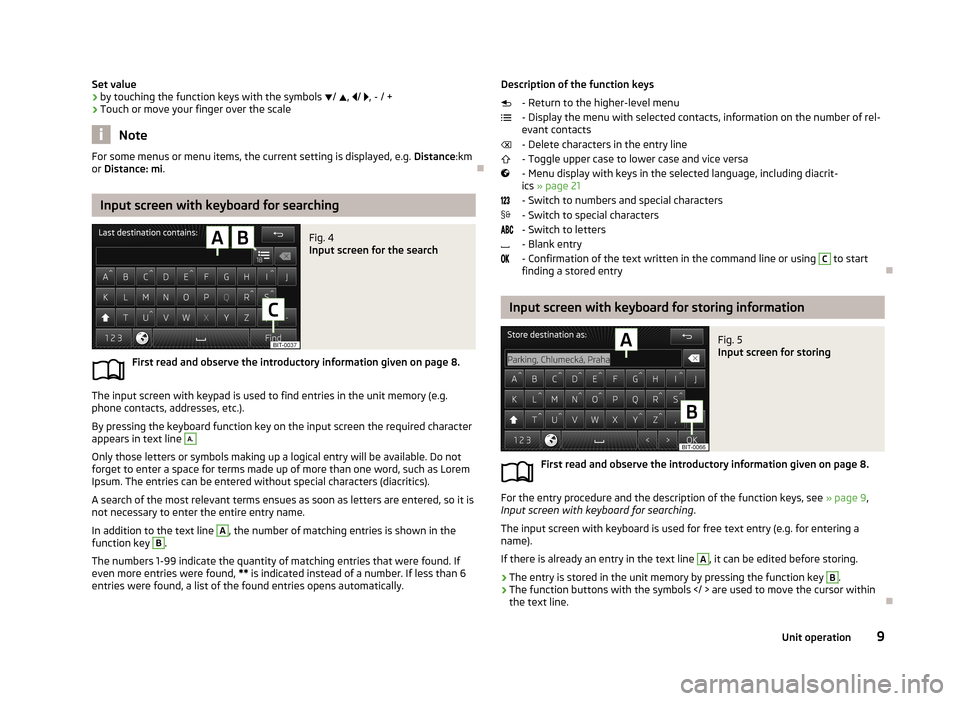
Fig. 4
Input screen for the search
First read and observe the introductory information given on page 8.
The input screen with keypad is used to find entries in the unit memory (e.g.
phone contacts, addresses, etc.).
By pressing the keyboard function key on the input screen the required character
appears in text line
A.
Only those letters or symbols making up a logical entry will be available. Do not
forget to enter a space for terms made up of more than one word, such as Lorem Ipsum. The entries can be entered without special characters (diacritics).
A search of the most relevant terms ensues as soon as letters are entered, so it is
not necessary to enter the entire entry name.
In addition to the text line
A
, the number of matching entries is shown in the
function key
B
.
The numbers 1-99 indicate the quantity of matching entries that were found. If
even more entries were found, ** is indicated instead of a number. If less than 6
entries were found, a list of the found entries opens automatically.
Description of the function keys
- Return to the higher-level menu
- Display the menu with selected contacts, information on the number of rel-
evant contacts
- Delete characters in the entry line
- Toggle upper case to lower case and vice versa
- Menu display with keys in the selected language, including diacrit- ics » page 21
- Switch to numbers and special characters - Switch to special characters
- Switch to letters
- Blank entry
- Confirmation of the text written in the command line or using C
to start
finding a stored entry
Input screen with keyboard for storing information
Fig. 5
Input screen for storing
First read and observe the introductory information given on page 8.
For the entry procedure and the description of the function keys, see » page 9,
Input screen with keyboard for searching .
The input screen with keyboard is used for free text entry (e.g. for entering a
name).
If there is already an entry in the text line
A
, it can be edited before storing.
›
The entry is stored in the unit memory by pressing the function key
B
.
›
The function buttons with the symbols are used to move the cursor within
the text line.
9Unit operation
Page 12 of 90

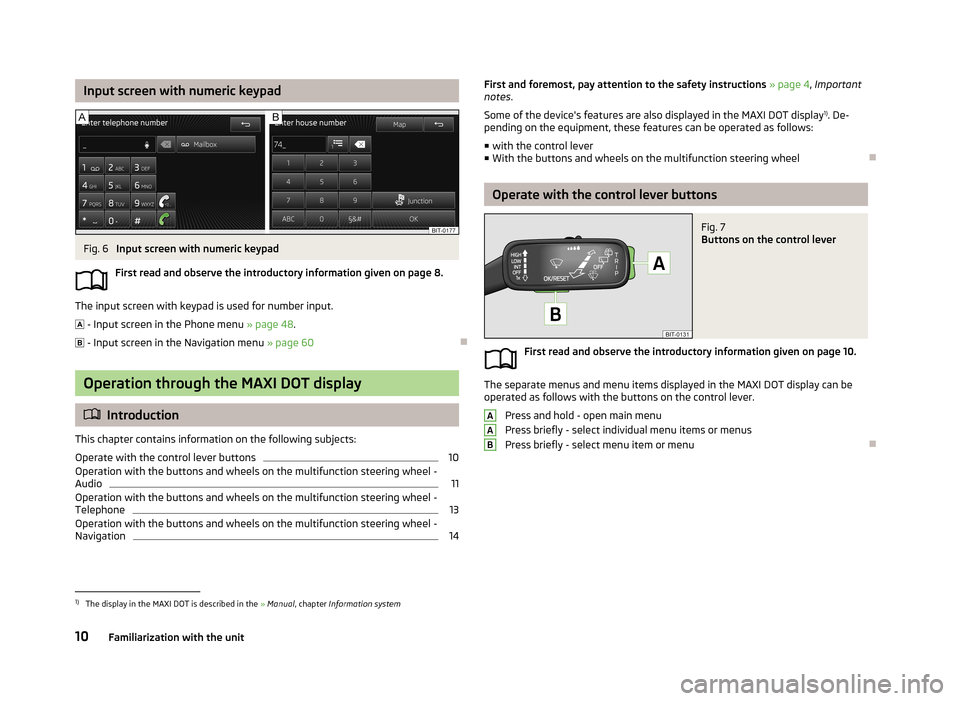
Input screen with numeric keypadFig. 6
Input screen with numeric keypad
First read and observe the introductory information given on page 8.
The input screen with keypad is used for number input.
- Input screen in the Phone menu » page 48.
- Input screen in the Navigation menu » page 60
Operation through the MAXI DOT display
Introduction
This chapter contains information on the following subjects:
Operate with the control lever buttons
10
Operation with the buttons and wheels on the multifunction steering wheel - Audio
11
Operation with the buttons and wheels on the multifunction steering wheel - Telephone
13
Operation with the buttons and wheels on the multifunction steering wheel -
Navigation
14First and foremost, pay attention to the safety instructions » page 4 , Important
notes .
Some of the device's features are also displayed in the MAXI DOT display 1)
. De-
pending on the equipment, these features can be operated as follows:
■ with the control lever
■ With the buttons and wheels on the multifunction steering wheel
Operate with the control lever buttons
Fig. 7
Buttons on the control lever
First read and observe the introductory information given on page 10.
The separate menus and menu items displayed in the MAXI DOT display can be
operated as follows with the buttons on the control lever.
Press and hold - open main menu
Press briefly - select individual menu items or menus
Press briefly - select menu item or menu
AAB1)
The display in the MAXI DOT is described in the » Manual , chapter Information system
10Familiarization with the unit
Page 15 of 90

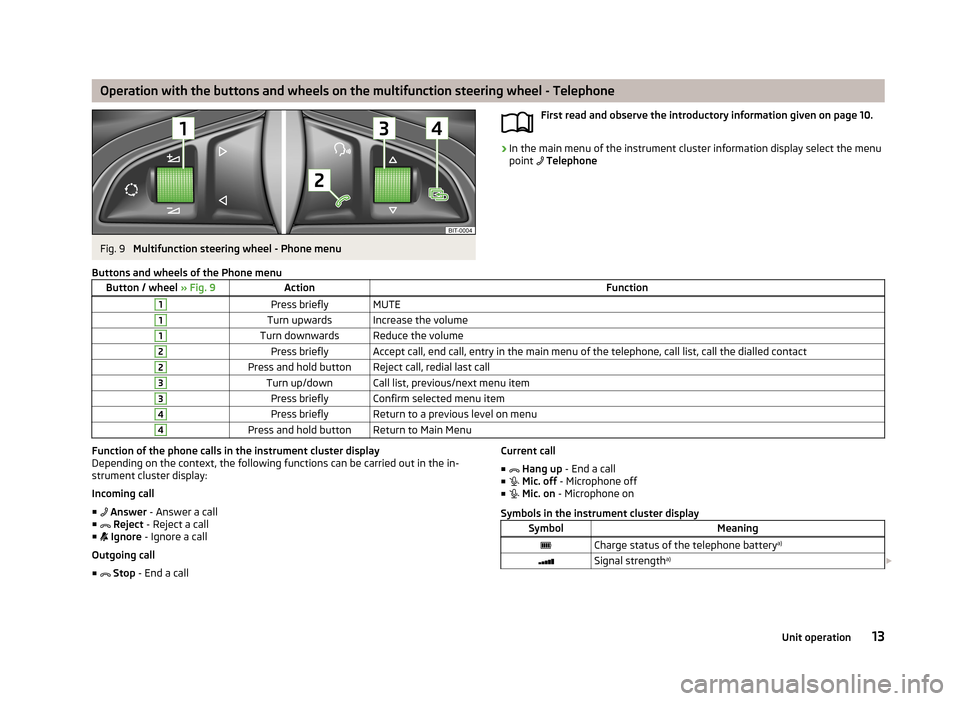
Operation with the buttons and wheels on the multifunction steering wheel - TelephoneFig. 9
Multifunction steering wheel - Phone menu
First read and observe the introductory information given on page 10.›
In the main menu of the instrument cluster information display select the menu
point Telephone
Buttons and wheels of the Phone menuButton / wheel
» Fig. 9ActionFunction1Press brieflyMUTE1Turn upwardsIncrease the volume1Turn downwardsReduce the volume2Press brieflyAccept call, end call, entry in the main menu of the telephone, call list, call the dialled contact2Press and hold buttonReject call, redial last call3Turn up/downCall list, previous/next menu item3Press brieflyConfirm selected menu item4Press brieflyReturn to a previous level on menu4Press and hold buttonReturn to Main MenuFunction of the phone calls in the instrument cluster display
Depending on the context, the following functions can be carried out in the in-strument cluster display:
Incoming call
■ Answer - Answer a call
■ Reject - Reject a call
■ Ignore - Ignore a call
Outgoing call
■ Stop - End a callCurrent call
■ Hang up - End a call
■ Mic. off - Microphone off
■ Mic. on - Microphone on
Symbols in the instrument cluster displaySymbolMeaningCharge status of the telephone battery a)Signal strengtha)
13Unit operation
Page 16 of 90

SymbolMeaningA phone is connected to the unitMissed calls (if there are several missed calls, the number ofcalls is shown next to the symbol)a)
This function is only supported by some telephones.
Call list
Only the call list can be displayed and used in the instrument cluster display.
The following message appears in the instrument cluster display if there are no
entries in the call list: No entries available.
The following symbols are displayed next to each entry in the call list.SymbolMeaningIncoming callOutgoing callMissed call
Note
■
The buttons and wheels on the multifunction steering wheel will also be lit if
the ignition and the side light are switched on.
Operation with the buttons and wheels on the multifunction steering wheel - Navigation
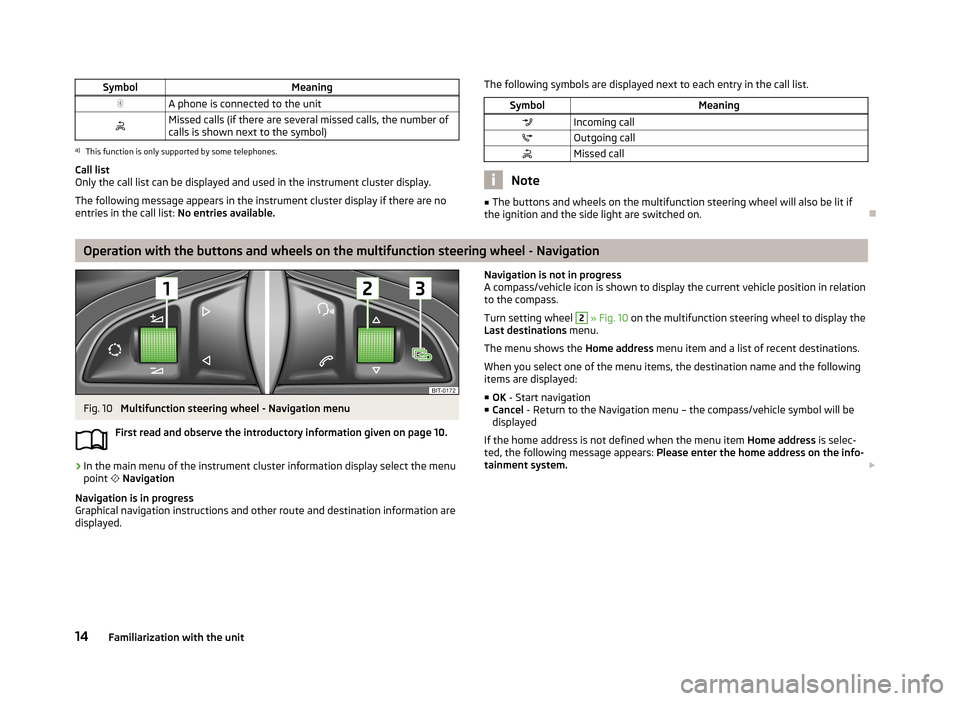
Fig. 10
Multifunction steering wheel - Navigation menu
First read and observe the introductory information given on page 10.
›
In the main menu of the instrument cluster information display select the menu
point
Navigation
Navigation is in progress
Graphical navigation instructions and other route and destination information are
displayed.
Navigation is not in progress
A compass/vehicle icon is shown to display the current vehicle position in relation to the compass.
Turn setting wheel 2
» Fig. 10 on the multifunction steering wheel to display the
Last destinations menu.
The menu shows the Home address menu item and a list of recent destinations.
When you select one of the menu items, the destination name and the following
items are displayed:
■ OK - Start navigation
■ Cancel - Return to the Navigation menu – the compass/vehicle symbol will be
displayed
If the home address is not defined when the menu item Home address is selec-
ted, the following message appears: Please enter the home address on the info-
tainment system.
14Familiarization with the unit