2013 SKODA CITIGO tow
[x] Cancel search: towPage 57 of 176
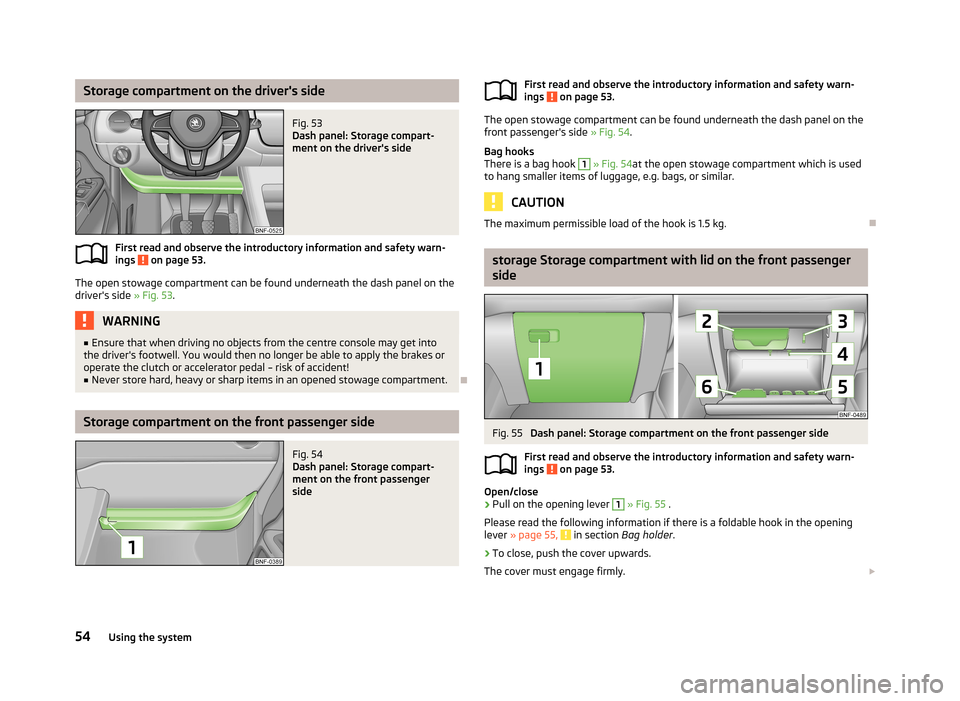
Storage compartment on the driver's sideFig. 53
Dash panel: Storage compart-
ment on the driver's side
First read and observe the introductory information and safety warn-
ings on page 53.
The open stowage compartment can be found underneath the dash panel on the
driver's side » Fig. 53.
WARNING■
Ensure that when driving no objects from the centre console may get into
the driver's footwell. You would then no longer be able to apply the brakes or
operate the clutch or accelerator pedal – risk of accident!■
Never store hard, heavy or sharp items in an opened stowage compartment.
Storage compartment on the front passenger side
Fig. 54
Dash panel: Storage compart-
ment on the front passenger
sideFirst read and observe the introductory information and safety warn-
ings on page 53.
The open stowage compartment can be found underneath the dash panel on the
front passenger's side » Fig. 54.
Bag hooks
There is a bag hook
1
» Fig. 54 at the open stowage compartment which is used
to hang smaller items of luggage, e.g. bags, or similar.
CAUTION
The maximum permissible load of the hook is 1.5 kg.
storage Storage compartment with lid on the front passenger
side
Fig. 55
Dash panel: Storage compartment on the front passenger side
First read and observe the introductory information and safety warn-
ings
on page 53.
Open/close
›
Pull on the opening lever
1
» Fig. 55 .
Please read the following information if there is a foldable hook in the opening
lever » page 55,
in section Bag holder .
›
To close, push the cover upwards.
The cover must engage firmly.
54Using the system
Page 58 of 176

Overview of the stowage compartment:Opening lever
Glasses storage box
Notepad holder
Pen holder
Coin holder
Card holderWARNINGThe storage compartment must always be closed when driving for safety rea-
sons.
Bag holder
Fig. 56
Dash panel: folding hooks
First read and observe the introductory information and safety warn-
ings on page 53.
There is a foldable hook in the opening lever of the storage compartment on the
front passenger's side » Fig. 56, which is used to suspend smaller items of lug-
gage, e.g. bags, etc.
CAUTION
■ The maximum permissible load of the hook is 1.5 kg.■When the hook is folded forward, it folds back automatically when the storage
compartment is opened.■
We recommend detaching suspended luggage from the hook before the stor-
age compartment lid is opened.
123456Photo holderFig. 57
Dash panel: Photo holder
First read and observe the introductory information and safety warn- ings on page 53.
The middle part of the dashboard has a holder » Fig. 57which is used to fasten
e.g. photos, notes, etc.
CAUTION
Do not damage the holders when handling them.
Storage compartment in the front centre console
Fig. 58
Front centre console: Stowage
compartment
First read and observe the introductory information and safety warn-
ings on page 53.
The open stowage compartment in the centre console » Fig. 58.
55Seats and stowing
Page 59 of 176

Multimedia holderFig. 59
Front centre console: Multimedia
holder
First read and observe the introductory information and safety warn-
ings on page 53.
The multimedia holder can be found in the stowage compartment of the front
centre console » Fig. 59.
You can use this holder to store e.g. a mobile phone, MP3 player or similar devi-
ces.
WARNINGNever use the multimedia holder as an ashtray or for storing flammable ob-
jects – risk of fire!
Meshed pockets on the front seat rests
Fig. 60
Front seat rests: Meshed pockets
First read and observe the introductory information and safety warn- ings on page 53.
The insides of the front seat rests have meshed pockets » Fig. 60.
These meshed pockets are designed for small, light objects, such as a mobile phone or MP3 player.
WARNINGYou can use the meshed pockets to store items with a gross weight of up to
150 g. Heavy objects are not secured sufficiently – risk of injury!
CAUTION
Never put large objects into the meshed pockets, e.g. bottles or objects with
sharp edges – risk of damaging the meshed pockets.
Storage compartments in front of the rear seats
Fig. 61
In front of the rear seats: Stow-
age compartment
First read and observe the introductory information and safety warn-
ings on page 53.
There are open stowage compartments located in front of the rear seats » Fig. 61.
56Using the system
Page 62 of 176

SettingFirst read and observe the introductory information given on page 58.
Recommended basic settings of the heating controls.
Set-upSetting the regulator » Fig. 63 on page 58Air outlet vents 1 » Fig. 62 on page 57ABCDefrosting the windscreen and side windowsTo the right up to the stop3Open and align with the side windowFree windscreen and side windows from mistDesired temperature2 or 3
Open and align with the side windowThe fastest heatingTo the right up to the stop3OpeningComfortable heatingDesired temperature2 or 3
OpeningFresh air mode – ventilationTo the left up to the stopDesired positionOpeningNoteIf the air distribution is positioned towards the windows, the total amount of air is
used to defrost the windows and thus no air will be fed to the footwell. This can
lead to restriction of the heating comfort.
Air conditioning system
Introduction
This chapter contains information on the following subjects:
Control elements
60
Setting the air conditioning system
61
Recirculated air mode
61
Using the air conditioning system economically
62
Operational problems
62The cooling system only operates if the following conditions are met. The cooling system is switched on » page 60.
The engine is running.
The outside temperature is above approx. +2 °C.
The blower switch is switched on (positions 1-4).
The cooling system is switched off at a high coolant temperature in order to pro-
vide cooling at a high load of the engine.
CAUTION
■ Under certain circumstances, air at a temperature of about 5 °C can flow out of
the vents when the cooling system is switched on.■
Lengthy and uneven distribution of the air flow out of the vents (especially
around the feet) and large differences in temperature, for example, when getting
out of the vehicle, can cause susceptible individuals to catch a cold.
59Heating and air-conditioning
Page 63 of 176

NoteWe recommend that you have the air conditioning system cleaned by a specialist
garage once every year.
Control elements
Fig. 64
The air conditioning system: Control elements
First read and observe the introductory information and safety warn- ings
on page 59.
Functions of the individual controls » Fig. 64 :
Set the temperature (turn to the left: to reduce the temperature: turn to the right: to increase temperature)
Set the blower stage (stage 0: Fan out, stage 4: the highest blower speed)
Set the direction of the air outlet » page 57
Switch recirculation on / off » page 61
Switching the cooling system on/off
ABCDENote■ If the air distribution is positioned towards the windows, the total amount of air
is used to defrost the windows and thus no air will be fed to the footwell. This can lead to restriction of the heating comfort.■
The warning light in the button ( » Fig. 64, Pos.
E
) lights after activation,
even if not all of the conditions for the function of the cooling system have been met » page 59 . As a result, the readiness for cooling is signalled when all condi-
tions are satisfied » page 59.
60Using the system
Page 69 of 176

Driving
Starting-off and Driving
Steering
Introduction
This chapter contains information on the following subjects:
Adjusting the steering wheel position
66
Power steering
66WARNING■ When driving, hold the steering wheel with both hands firmly on the outer
edge in the 9 o'clock and 3 o'clock position. Never hold the steering wheel in
the 12 o'clock position or in any other way (e.g. in the middle or inner edge of
the steering wheel). Otherwise, activation of the driver airbag could cause se-
vere injuries to arms, hands and head.■
Never adjust the steering wheel when the vehicle is moving only when the
vehicle is stationary!
■
Adjust the steering wheel so that the distance
B
» Fig. 67 on page 66be-
tween the steering wheel and your chest is at least 25 cm. Not maintaining
this minimum distance will mean that the airbag system will not be able to
properly protect you – hazard!
■
If the steering wheel is adjusted further towards the head, the protection
provided by the driver airbag in the event of an accident is reduced. Check
that the steering wheel is aligned to the chest.
Adjusting the steering wheel positionFig. 67
Adjustable steering wheel: Lever below the steering wheel/safe dis-
tance to the steering wheel
First read and observe the introductory information and safety warn-
ings
on page 66.
The height of the steering wheel can be adjusted.
›
First of all adjust the driver's seat » page 43.
›
Swing the lever
A
» Fig. 67 below the steering wheel down.
›
Adjust the height of the steering wheel to the desired position.
›
Push the lever upwards to the stop.
WARNINGThe lever for adjusting the steering wheel must be locked whilst driving so
that the position of the steering wheel cannot accidentally change during the
journey – risk of accident!
Power steering
First read and observe the introductory information and safety warn-ings
on page 66.
The power steering enables you to steer the vehicle with less physical force.
The power steering only works when the engine is running.
66Driving
Page 70 of 176

It is still fully possible to steer the vehicle if the power steering fails or if the en-gine is not running (e.g. when towing). However, greater physical effort is re-
quired to turn the steering wheel.
If there is a fault in the power steering, the warning light or
lights up in the
instrument cluster » page 18.
Starting and stopping the engine
Introduction
This chapter contains information on the following subjects:
Electronic immobilizer
68
Ignition lock
68
Starting the engine
68
Switching off the engine
68
The engine can only be started using a correctly coded original key.
The engine running noises may louder at first be louder for a short time afterstarting the cold engine. This is quite normal and is not an operating problem.
WARNING■ When driving, the ignition key must always be in the position 2 » Fig. 68 on
page 68 (ignition switched on) without the engine running. This position is
indicated by the warning lights coming on. If this is not the case, this could re-
sult in unexpected locking of the steering wheel – risk of accident!■
Only pull the ignition key from the ignition lock when the vehicle has come
to a complete stop (by applying the handbrake). Otherwise, the steering could
be blocked – risk of accident!
■
When leaving the vehicle, the ignition must always be removed. This is par-
ticularly important if children are left in the vehicle. Children could otherwise
start the engine for example – risk of accident or injury!
■
Never leave the vehicle unattended with the engine running.
■
Never switch off the engine before the vehicle is stationary – risk of acci-
dent!
WARNING■ Never leave the engine running in unventilated or closed rooms. The ex-
haust gases from the engine contain substances such as odourless and col-
ourless carbon monoxide (a poisonous gas) – risk to life!■
Carbon monoxide can cause unconsciousness and death.
CAUTION
■ The starter must only be operated when the engine is not running and the vehi-
cle is at a standstill. The starter or engine can be damaged if the starter is activa-
ted when the engine is running 3
» Fig. 68 on page 68.
■
If the engine does not start up after a second attempt, the fuse for the fuel
pump may have a fault. Check the fuse and replace if necessary » page 154,
Fuses on the underside of the dash panel , or seek assistance from a specialist ga-
rage.
■
Let go of the ignition key as soon as the engine starts otherwise the starter
could be damaged.
■
Do not tow start the engine – there is a risk of damaging the engine and the
catalytic converter. The battery from another vehicle can be used as a jump-start
aid » page 150 , Jump-starting .
CAUTION
■
Avoid high engine revolutions, full throttle and high engine loads before the en-
gine has reached its operating temperature – risk of damaging the engine!■
Do not switch the engine off immediately at the end of your journey after the
engine has been operated over a prolonged period at high loads but leave it to
run at an idling speed for about 1 minute. This prevents any possible accumulation
of heat when the engine is switched off.
For the sake of the environment
Do not warm up the engine while the vehicle is stationary. If possible, start your
journey as soon as the engine has started. Through this the engine reaches its
operating temperature more rapidly and the pollutant emissions are lower.
Note
After switching off the ignition, the radiator fan can intermittently continue to op-
erate for approx. 10 minutes.
67Starting-off and Driving
Page 72 of 176

WARNING■Greater physical effort is required for braking when the engine is switched
off – risk of accident!■
The clutch pedal must be actuated when braking on a vehicle with manual
transmission, when the vehicle is in gear and at low revs. Otherwise, the func-
tion of the brake booster may be impaired – risk of accident!
■
In the event of damage occurring to the standard fitted front spoiler or the
retrofitting of another front spoiler, wheel hubs etc. » page 110, Modifica-
tions, adjustments and technical alterations , It must be ensured that the air
supply to the front brake is not impaired. The front brakes may overheat,
which can have a negative impact on the functioning of the braking system –
risk of accident!
■
Never leave children unattended in the vehicle. The children might, for ex-
ample, release the handbrake or take the vehicle out of gear. The vehicle could then start to move – risk of accident!
CAUTION
■ Observe the recommendations on the new brake pads » page 74.■Never let the brakes slip with light pressure on the pedal if braking is not neces-
sary. This causes the brakes to overheat and can also result in a longer braking distance and excessive wear.
Information on braking
First read and observe the introductory information and safety warn-
ings
on page 68.
If the brakes are applied in full and the control unit for the braking system consid-
ers the situation to be dangerous for the following traffic, the brake light flashes
automatically.
After the speed was reduced below around 10 km/h or the vehicle was stopped,
the brake light stops flashing and the hazard warning light system switches on.
The hazard warning light system is switched off automatically after accelerating
or driving off again.
Before travelling a long distance at a steep gradient, reduce speed and shift into
the next lowest gear. As a result, the braking effect of the engine will be used,
reducing the load on the brakes. Any additional braking should be completed in-
termittently, not continuously.
Wear-and-tear
The wear of the brake pads is dependent on the operating conditions and driving
style.
The brake pads wear more quickly if a lot of journeys are completed in towns and over short distances or if a very sporty style of driving is adopted.
Under these severe conditions , the thickness of the brake pads must also be
checked by a specialist garage between service intervals.
Wet roads or road salt
The performance of the brakes can be delayed as the brake discs and brake pads
may be moist or have a coating of ice or layer of salt on them in winter. The
brakes are cleaned and dried by applying the brakes several times.
Corrosion
Corrosion on the brake discs and dirt on the bake pads occur if the vehicle has
been parked for a long period and if you do not make much use of the braking
system. The brakes are cleaned and dried by applying the brakes several times.
Faults in the brake surface
If it is found that the braking distance has suddenly become longer and that the
brake pedal can be depressed further, the brake system may be faulty.
Visit a specialist garage immediately and adjust your style of driving appropriatelyas you will not know the exact extent of the damage.
Low brake fluid level
An insufficient level of brake fluid may result in problems in the brake system. The
level of the brake fluid is monitored electronically » page 16,
Braking system .
Brake booster The brake booster increases the pressure generated with the brake pedal. The brake booster only operates when the engine is running.
69Starting-off and Driving