2013 Seat Exeo audio
[x] Cancel search: audioPage 150 of 167
INFO (Traffic information)149
Operating
RADIO, MEDIA (audiovisual
systems)
NAME, TEL
NAV, INFO
CAR, SETUP
Setting timer start time
–Select Timer 1 or Timer 2 ⇒ page 148, fig. 190 .
– Press the control knob. The hour display for the corresponding timer will then be highlighted white.
– Rotate the control knob to set the hour.
– Press the control knob. The minute display for the corresponding timer will then be highlighted white.
– Rotate the control knob to set the minutes.
– Press the control knob to confirm your selection.With this function you can set the start time of two separate timers for
recording traffic news announcements.
From the time set in Timer 1 or Timer 2 , the navigation system can store traffic
announcements for approx. two hours.
Use the Timer status option to activate the times you have set. e.g. in the
timer status function, if you select timer 1, the traffic announcements are
stored for approx. two hours as of the time set by you.
You can access the recorded traffic announcements using the TP memo
control button ⇒ page 146.
When you park your vehicle, the timers will remain on for a total of 72 hours.
During these 72 hours the system will record the traffic announcements it
receives at the times you have specified. If you have not used your vehicle for
longer than 72 hours the timers will be deactivated to avoid draining the
battery.
Recorded traffic announcements will be deleted after about six hours.
Note
•Traffic announcements can only be recorded if the Traffic programme
option in Radio Setup is set to on.•All incoming traffic news announcements will be recorded. As the system
has a limited memory capacity, all old traffic announcements are overwritten
by new ones.•To avoid draining the battery we recommend that you only activate the
timers when necessary.TMC announcements
When the route guidance is activated, you can switch the TMC
announcement option on or off as desired.TMC stands for “Traffic Message Channel”.
– Starting from any one of the INFO menus, press the ⇒page 9 button.
– Select TMC announcement ⇒ page 148, fig. 188 .
– Select on to activate the option for TMC announcements, or
– Select off to deactivate the option for TMC announcements.If there is an obstruction, but your route cannot be adapted, you will hear a
TMC announcement.
Whenever there is an obstruction, you will hear two TMC announcements (if
applicable). The first announcement will be made about 30 km before you
reach the traffic obstruction and a second announcement will follow about
two km before the obstruction.
SETUP
media_systemE_EN.book Seite 149 Montag, 21. September 2009 1:48 13
Page 152 of 167
CAR (vehicle settings)151
Operating
RADIO, MEDIA (audiovisual
systems)
NAME, TEL
NAV, INFO
CAR, SETUP
CAR, SETUPCAR (vehicle settings)IntroductionSelecting CAR function– Press the function button ⇒page 9. The main Car menu or
the menu for the Version function will be displayed.If you select the Ve rsi o n function in the main Car menu, the hardware and
software status for the “SEAT Media System E” will be displayed.
Note
If you press the button within the Car function, you can programme
sound and tuning settings and adjust the brightness of the display.
Software update
CARSETUP
Fig. 191 Display open:
Navigation drive DVDFig. 192 Display: Soft-
ware update
media_systemE_EN.book Seite 151 Montag, 21. September 2009 1:48 13
Page 153 of 167

CAR (vehicle settings)
152
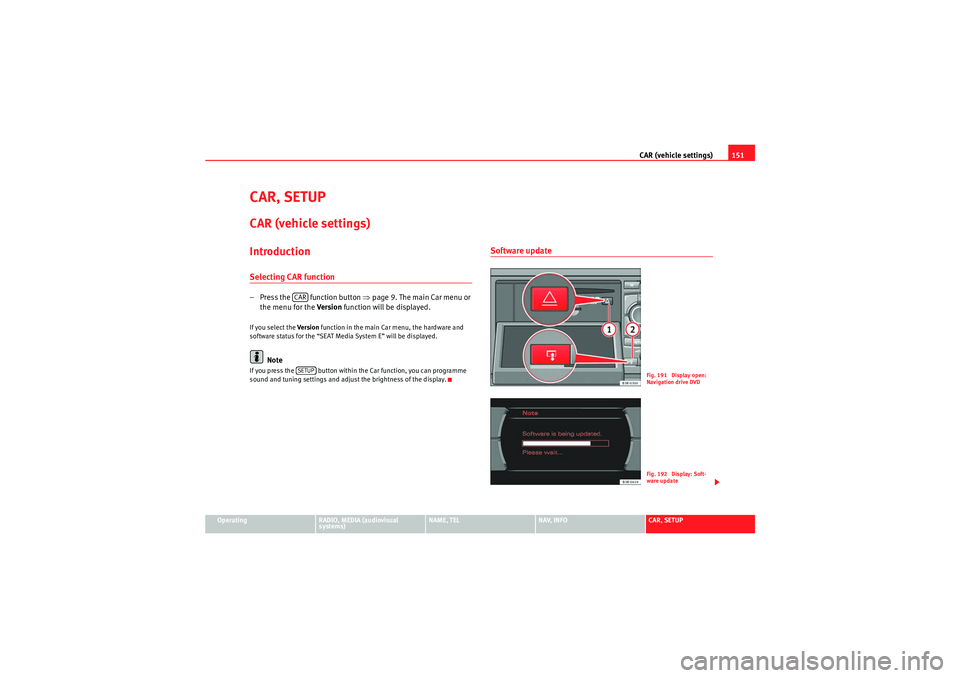
– Press the button ⇒ page 151, fig. 191 to fold open the
display.
– Check whether there is already a DVD or CD in the drive. If there is a DVD or CD in the drive, press the eject button and remove it
⇒page 24.
– Insert the up-to-date navigation DVD into the drive, keeping it level (printed side faces up). Hold the navigation DVD at the
centre hole and at the outer ri m. The navigation DVD will be
drawn into the drive automatically. The update will start automat-
ically ⇒page 151, fig. 192 .
– Switch the navigation system on manually ⇒page 4 once the
update has been completed.When it is inserted the navigation DVD will first be checked. When the check
has been completed you can monitor the progress of the software update by
means of the graph shown in the display ⇒ page 151, fig. 192. The graph will
show approx. 10% ⇒ page 151, fig. 192 while it is deleting the old software.
Once the software update has been completed the navigation system will re-
start automatically. If necessary the audio software will then also be updated.
The display will show a message. When the complete software update has
been finalised the navigation system will be switched off. Switch the naviga-
tion system on manually ⇒ page 4.
Note
•Switch on the engine before you start the update in order to avoid
draining the battery.•When you insert the DVD for the first time, new software for the navigation
system will automatically be installed.
A2
media_systemE_EN.book Seite 152 Montag, 21. September 2009 1:48 13
Page 154 of 167
SETUP153
Operating
RADIO, MEDIA (audiovisual
systems)
NAME, TEL
NAV, INFO
CAR, SETUP
SETUPIntroductionGeneral safety precautionsWe recommend that you only make adjustments to the system configuration
while the vehicle is stationary. In this way you can be sure that you will not
be unnecessarily distracted from the traffic when reading the messages on
the display. Please note ⇒page 6, “Notes on road safety”.Selecting system setup functionIn addition to the main setup menus for the individual main func-
tions, the Settings , Sound and Display submenus are available for
adjusting system settings. These setup submenus are the same for
all of the main functions. – Press the button
⇒page 9 in addition to any other main
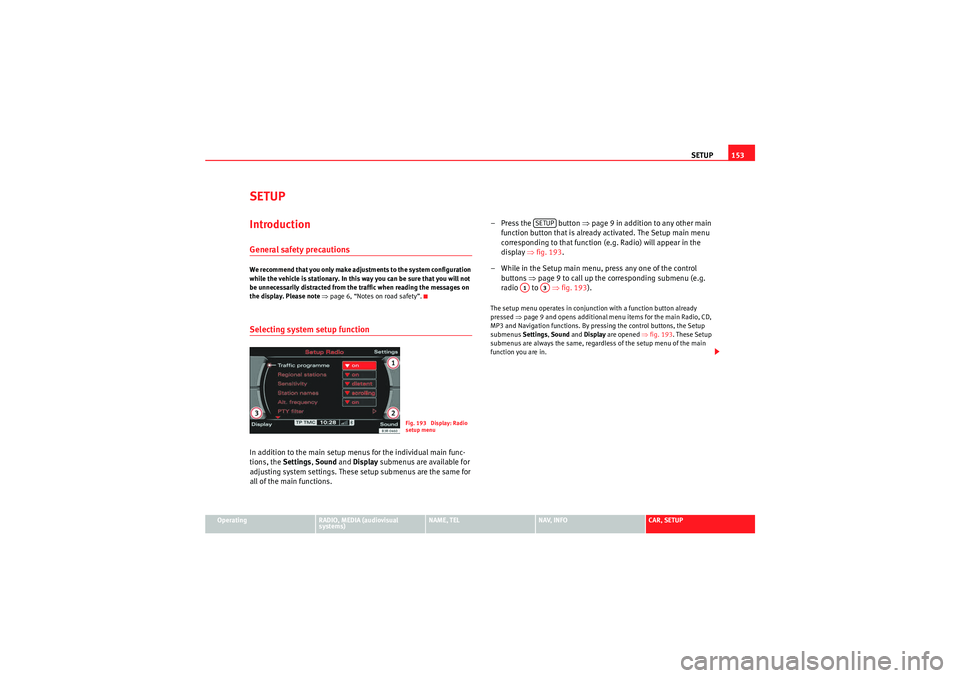
function button that is already activated. The Setup main menu
corresponding to that function (e.g. Radio) will appear in the
display ⇒fig. 193 .
– While in the Setup main menu, press any one of the control buttons ⇒page 9 to call up the corresponding submenu (e.g.
radio to ⇒fig. 193 ).
The setup menu operates in conjunction with a function button already
pressed ⇒page 9 and opens additional menu items for the main Radio, CD,
MP3 and Navigation functions. By pressing the control buttons, the Setup
submenus Settings, Sound and Display are opened ⇒fig. 193. These Setup
submenus are always the same, regardless of the setup menu of the main
function you are in.
Fig. 193 Display: Radio
setup menu
SETUP
A1
A3
media_systemE_EN.book Seite 153 Montag, 21. September 2009 1:48 13
Page 156 of 167

SETUP155
Operating
RADIO, MEDIA (audiovisual
systems)
NAME, TEL
NAV, INFO
CAR, SETUP
•Spanish•PortugueseNote
•You can only select the menu language when the vehicle is stationary. The
option is greyed out when driving and cannot be selected.Setting the distance unit (km/miles)– Press the Settings control button in the Setup menu.
–Select Distance unit .
– Select either km or miles .Setting the time
Time of date and date can be adjusted through this function.
Setting the time format
–Press the Settings control button in the Setup menu.
– Select Time settings ⇒page 154, fig. 194 .
– Select Time format ⇒ fig. 195 .
– Select 24h or 12h .
Setting the date format
–Press the Settings control button in the Setup menu.
– Select Time setting ⇒page 154, fig. 194 .
– Select Date format ⇒ fig. 195 .
– Select the option DD.MM for the “day/month” format or MM/DD
for the “month/day” format.The instrument panel acts as the source for the time and date display.
Should the instrument panel not be be available as a source for the settings,
the time and date can be received via GPS. In this case the menu option Time
source will show GPS. The GPS time can be adjusted via the menu option GMT
+/- .
Note
If the instrument panel source is not available, please contact a dealer or
other qualified workshop.
Fig. 195 Setup: Setting
the time format (24h)
media_systemE_EN.book Seite 155 Montag, 21. September 2009 1:48 13
Page 158 of 167
SETUP157
Operating
RADIO, MEDIA (audiovisual
systems)
NAME, TEL
NAV, INFO
CAR, SETUP
Brightness
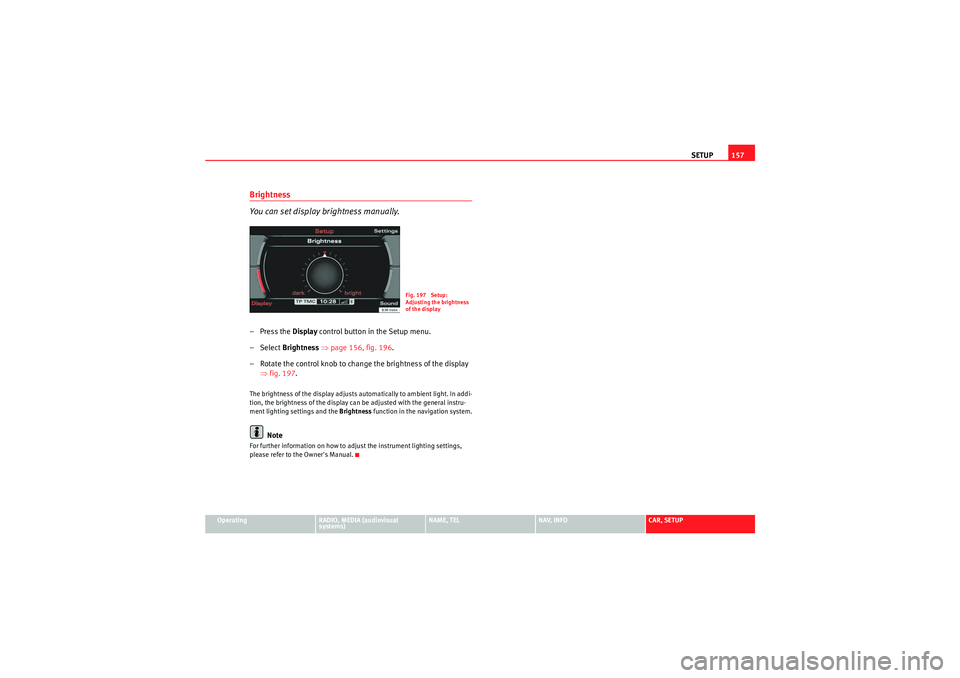
You can set display brightness manually.– Press the Display control button in the Setup menu.
–Select Brightness ⇒ page 156, fig. 196.
– Rotate the control knob to change the brightness of the display ⇒fig. 197 .The brightness of the display adjusts automatically to ambient light. In addi-
tion, the brightness of the display can be adjusted with the general instru-
ment lighting settings and the Brightness function in the navigation system.
Note
For further information on how to adjust the instrument lighting settings,
please refer to the Owner's Manual.
Fig. 197 Setup:
Adjusting the brightness
of the display
media_systemE_EN.book Seite 157 Montag, 21. September 2009 1:48 13
Page 160 of 167

Frequently Asked Questions (FAQ)159
Operating
RADIO, MEDIA (audiovisual
systems)
NAME, TEL
NAV, INFO
CAR, SETUP
Navigation
system
you are not shown the destination entry
screen with the final destination?
The Route with stopover function is on. Select the Route without stopover item has been set
using the control knob in the Route function, the screen for entering the destination will
appear with a final destination ⇒ page 120.
the navigation system does not calculate
route detours, although there has been a traf-
fic jam reported on the current route?
Either the dynamic navigation function has not been activated ⇒page 121 or the calculated
detour to avoid the traffic jam would take longer than estimated waiting time in the traffic jam.
Another possibility is that there are no TMC traffic announcements available for your route.
you cannot leave the active side menu?
Press the button to leave the side menu ⇒page 125.
the system does not find any special destina-
tions along the route?
The system is able to find special destinations which are located directly on or in the immedi-
ate vicinity of the calculated route. If there are no special destinations along the next section of
your route you can also search using the option In immediate vicinity ⇒ page 110.
the instrument panel display does not show
the on-board computer which was it was last
set to, but is now displaying the compass/
street name?
You can deactivate the display of the compass or current road/street in Setup Navigation
⇒page 138.
INFO
you can see TMC traffic announcements on
the display but cannot hear them?
You can activate the function by selecting TMC announcement in Setup Info ⇒page 149.
you call up the TMC function Show on map
⇒ page 144 but the map display does not
show any arrows/symbols indicating a traffic
obstruction?
Select the Map contents function in the navigation setup menu, rotate the control knob to
select TMC announcements and the arrows/symbols will appear on the map ⇒page 134.
Category
What's wrong if...
Solution
RETURN
media_systemE_EN.book Seite 159 Montag, 21. September 2009 1:48 13
Page 162 of 167
Index161
Index
AAnswer call . . . . . . . . . . . . . . . . . . . . . . . . . . . . . . 84
Answering a call . . . . . . . . . . . . . . . . . . . . . . . . . . 75
Answering the phone . . . . . . . . . . . . . . . . . . . . . 75
Arrows . . . . . . . . . . . . . . . . . . . . . . . . . . . . . . . . . . 17
Audio sources: selecting . . . . . . . . . . . . . . . . . . . 50
AudioPilot® . . . . . . . . . . . . . . . . . . . . . . . . . . . . . 60
Auto intersection zoom . . . . . . . . . . . . . . . . . . . 137
Automatic seek mode . . . . . . . . . . . . . . . . . . . . . 39
Aux-in . . . . . . . . . . . . . . . . . . . . . . . . . . . . . . . . . . 33 Connecting a portable player . . . . . . . . . . . . 33BBluetoothSettings . . . . . . . . . . . . . . . . . . . . . . . . . . . . . 84
Bluetooth® . . . . . . . . . . . . . . . . . . . . . . . . . . . . . 71CCall options Answer calls . . . . . . . . . . . . . . . . . . . . . . . . . . 84
Compact discs Basic settings . . . . . . . . . . . . . . . . . . . . . . . . 51
Main menu . . . . . . . . . . . . . . . . . . . . . . . . . . . 51
Selecting a track . . . . . . . . . . . . . . . . . . . . . . 51
Concept for handling . . . . . . . . . . . . . . . . . . . . . . . 8 Control panel
Cleaning and care . . . . . . . . . . . . . . . . . . . . . . 6
Cursor . . . . . . . . . . . . . . . . . . . . . . . . . . . . . . . . . . 17
DDeleting data . . . . . . . . . . . . . . . . . . . . . . . . . . . . 20
Directory Deleting all . . . . . . . . . . . . . . . . . . . . . . . . . . . 66
Entries: creating . . . . . . . . . . . . . . . . . . . . . . . 64
Entries: deleting . . . . . . . . . . . . . . . . . . . . . . 66
Entries: editing . . . . . . . . . . . . . . . . . . . . . . . 65
Entries: searching . . . . . . . . . . . . . . . . . . . . . 65
Main menu . . . . . . . . . . . . . . . . . . . . . . . . . . . 63
Selecting . . . . . . . . . . . . . . . . . . . . . . . . . . . . 63
Setting a destination . . . . . . . . . . . . . . . . . . . 66
Viewing entry list . . . . . . . . . . . . . . . . . . . . . . 65
Display Arrows . . . . . . . . . . . . . . . . . . . . . . . . . . . . . . 17
Brightness . . . . . . . . . . . . . . . . . . . . . . . . . . 157
Cleaning and care . . . . . . . . . . . . . . . . . . . . . . 6
Cursor . . . . . . . . . . . . . . . . . . . . . . . . . . . . . . . 17
Elements: alphanumeric keyboard . . . . . . . 18
Elements: status line . . . . . . . . . . . . . . . . . . . 16
Orientation . . . . . . . . . . . . . . . . . . . . . . . . . . . 15
Selected option . . . . . . . . . . . . . . . . . . . . . . . 18
See also Display . . . . . . . . . . . . . . . . . . . . . . . 15
Display (navigation system) Opening and closing . . . . . . . . . . . . . . . . . . . . 5 Drives
Aux-in connection . . . . . . . . . . . . . . . . . . . . . 33
iPod: interface . . . . . . . . . . . . . . . . . . . . . . . . 28
MP3 Player . . . . . . . . . . . . . . . . . . . . . . . . . . . 22
Navigation DVD . . . . . . . . . . . . . . . . . . . . . . . 22
USB: interface . . . . . . . . . . . . . . . . . . . . . . . . 31
DSP ("Digital Signal Processing") . . . . . . . . . . . 60
Dynamic navigation . . . . . . . . . . . . . . . . . . . . . . 100
EEmergencies . . . . . . . . . . . . . . . . . . . . . . . . . . . 158
Ending a call . . . . . . . . . . . . . . . . . . . . . . . . . . . . 76
Entering a navigation destination From the map . . . . . . . . . . . . . . . . . . . . . . . . 111
Post code . . . . . . . . . . . . . . . . . . . . . . . . . . . 108
Special destination . . . . . . . . . . . . . . . . . . . 110
Street . . . . . . . . . . . . . . . . . . . . . . . . . . . . . . 109
Entering data . . . . . . . . . . . . . . . . . . . . . . . . . . . . 20FFrequently Asked Questions . . . . . . . . . . . . . . . 158
Function buttons INFO (navigation system) . . . . . . . . . . . . . . 142
NAME (directory) . . . . . . . . . . . . . . . . . . . . . . 63
NAV (navigation system) . . . . . . . . . . . . . . . 102
RADIO . . . . . . . . . . . . . . . . . . . . . . . . . . . . . . . 35
media_systemE_EN.book Seite 161 Montag, 21. September 2009 1:48 13