2013 Ram 1500 change wheel
[x] Cancel search: change wheelPage 33 of 196

• For maximum deceleration (engine braking) move the console shift lever left (-)and hold, or toggle the switch on the column shift lever down (-) and hold. Your
vehicle will automatically select the lowest safe gear for optimal engine braking.
• To disable ERS, push and hold the console shift lever to the right (+) or push and hold the column shift lever switch up (+) until “D” is displayed in the odometer.
• Switching between ERS and DRIVE mode can be done at any vehicle speed.
• Refer to your Owner's Manual on the DVD for further details.
ELECTRONIC RANGE SELECT (ERS) OPERATION – 8 SPEED TRANSMISSION
• The Electronic Range Select (ERS) shift control allows the driver to limit
the highest available gear when the
transmission shifter switch is in the
DRIVE position
• You can switch between DRIVE and ERS mode at any vehicle speed.
•
Tapping the ERS (-) switch (on the
steering wheel) will activate ERS mode.
•Once in ERS mode, tapping the ERS (-)
or (+) switch will change the top avail-
able gear.
• To exit ERS mode, simply press and hold the ERS (+) switch until “D” is
once again displayed in the transmis-
sion gear position indicator in the instrument cluster.
OPERATING YOUR VEHICLE
31
Page 35 of 196

NOTE:
Aero Mode may be disabled through vehicle settings in the Electronic Vehicle
Information Center (EVIC) or in the Uconnect
®8.4 Radio (If Equipped).
•
Entry/Exit Mode (Lowers the vehicle approximately 2 in (51 mm)- This position lowers
the vehicle for easier passenger entry and exit as well as lowering the rear of the
vehicle for easier loading and unloading of cargo. To enter Entry/Exit Mode, press
the “Down” button once from the NHR while the vehicle speed is below 33 mph
(53 km/h). Once the vehicle speed goes below 15 mph (24 km/h) the vehicle
height will begin to lower. If the vehicle speed remains between 15 mph (24 km/h)
and 25 mph (40 km/h) for greater than 60 seconds, or the vehicle speed exceeds
25 mph (40 km/h) the Entry/Exit change will be cancelled. To return to Normal
Height Mode, press the “Up” button once while in Entry/Exit or drive the vehicle
over 15 mph (24 km/h). Entry/Exit mode may not be available due to vehicle
payload, an EVIC message will be displayed when this occurs. Refer to "Electronic
Vehicle Information Center (EVIC)" in "Understanding Your Instrument Panel" for
further information.
• Refer to your Owner’s Manual on the DVD for further details.
Air Suspension Modes
• The Air Suspension system has multiple modes to protect the system in unique situations:
Tire Jack Mode
•
To assist with changing a spare tire, the air suspension system has a feature which
allows the automatic leveling to be disabled. Refer to “Electronic Vehicle Information
Center (EVIC)” in “Understanding Your Instrument Panel” for further information.
NOTE:
This mode is intended to be enabled with engine running.
Transport Mode
• To assist with flat bed towing, the air suspension system has a feature which will put the vehicle into Entry/Exit height and disable the automatic load leveling
system. Refer to “Electronic Vehicle Information Center (EVIC)” in “Understand-
ing Your Instrument Panel” for further information.
NOTE:
This mode is intended to be enabled with engine running.
Wheel Alignment Mode
•
Before performing a wheel alignment this mode must be enabled. Refer to “Elec-
tronic Vehicle Information Center (EVIC)” in “Understanding Your Instrument Panel”
for further information.
NOTE:
This mode is intended to be enabled with engine running.
OPERATING YOUR VEHICLE
33
Page 61 of 196

•Pressing the Media hard-key, then touch the source soft-key and then select USB/
iPod®to change the mode to the USB device if the device is connected, allowing the
music from your portable device to play through the vehicle's speakers.
Audio Jack (AUX)
• The AUX allows a portable device, such as an MP3 player or an iPod
®,tobe
plugged into the radio and utilize the vehicle’s audio system, using a 3.5 mm audio
cable, to amplify the source and play through the vehicle speakers.
• Pressing the Media hard-key, then touch the source soft-key and then select AUX to change the mode to auxiliary device if the audio jack is connected, allowing the
music from your portable device to play through the vehicle's speakers.
• The functions of the portable device are controlled using the device buttons, not the buttons on the radio. The volume may be controlled using the radio or portable
device.
Bluetooth®
• If using a Bluetooth
®- equipped device, you may also be able to stream music to
your vehicle's sound system.
• Press the Media hard-key, then touch the Source soft-key. Select Bluetooth
®to
change the mode to Bluetooth®if the device is paired, allowing the music from
your portable device to play through the vehicle's speakers.
Uconnect® 5.0 Available Media Hubs
Uconnect®
5.0 Media Hub
(USB, AUX
Ports) Media Hub
(SD, USB,
AUX Ports)Remote USB
Port (Fully
Functional)Remote USB
Port (Charg-
ing Only)Dual Charg-
ing Ports
S--SO
S = Standard Equipment
O = Optional Equipment
VOICE COMMAND QUICK REFERENCE
Uconnect® 5.0 Voice Command Quick Reference
•If the Uconnect Voice Commandbutton exists on your steering wheel, you
have the Voice Command feature, which is optimized for the driver. The Voice
Command feature lets you keep your hands on the wheel, and your eyes on the road.
• When you press the Voice Commandbutton located on the steering wheel,
you will hear a beep. After the beep, give your command. If you do not know what
commands to say, you can say “help” and the system will provide options to you.
If you ever wish to interrupt the system while it lists options, press the Voice
Command
button, after the beep, say your command.
ELECTRONICS
59
Page 69 of 196
MEDIA HUB – PLAYING iPod/USB/MP3 DEVICES
• There are many ways to play music from iPod
®/MP3 players or USB devices
through your vehicle's sound system. Touch your Media soft-key to begin.
Audio Jack (AUX)
• The AUX allows a portable device, such as an MP3 player or an iPod
®,tobe
plugged into the radio and utilize the vehicle’s sound system, using a 3.5 mm
audio cable, to amplify the source and play through the vehicle speakers.
• Touching the AUX soft-key will change the mode to auxiliary device if the audio jack is connected, allowing the music from your portable device to be heard
through the vehicle's speakers. In order to activate the AUX, plug in the audio jack.
• The functions of the portable device are controlled using the device buttons. The volume may be controlled using the radio or portable device.
• To route the audio cable out of the center console, use the access cut out in the front of the console.
USB Port
• Connect your iPod
®or compatible device using a USB cable into the USB Port.
USB Memory sticks with audio files can also be used. Audio from the device can
be played on the vehicles sound system while providing metadata (artist, track
title, album, etc.) information on the radio display.
• When connected, the iPod
®/compatible USB device can be controlled using the
radio or Steering Wheel Audio Controls to play, skip to the next or previous track,
browse, and list the contents.
• The iPod
®battery charges when plugged into the USB port (if supported by the
specific device).
• To route the USB/iPod
®cable out of the center console, use the access cut out.
ELECTRONICS
67
Page 70 of 196
NOTE:
When connecting your iPod®device for the first time, the system may take several
minutes to read your music, depending on the number of files. For example, the
system will take approximately 5 minutes for every 1000 songs loaded on the device.
Also during the reading process, the Shuffle and Browse functions will be disabled.
This process is needed to ensure the full use of your iPod
®features and only happens
the first time it is connected. After the first time, the reading process of your iPod®
will take considerably less time unless changes are made or new songs are added to
the playlist.
• The USB port supports certain Mini, Classic, Nano, Touch, and iPhone
®devices.
The USB port also supports playing music from compatible external USB Mass
Storage Class memory devices. Some iPod
®software versions may not fully
support the USB port features. Please visit Apple’s website for iPod®software
updates.
SD Card
• Play songs stored on an SD card inserted into the SD card slot.
• Song playback can be controlled using the radio or Steering Wheel Audio Controls to play, skip to the next or previous track, browse, and list the contents.
Bluetooth® Streaming Audio
• If equipped with Uconnect
®Voice Command, your Bluetooth-equipped iPod®
devices, cell phones or other media players, may also be able to stream music to
your vehicle's sound system. Your connected device must be Bluetooth-
compatible, and paired with your system (see Uconnect
®Phone for pairing
instructions). You can access the music from your connected Bluetooth®device by
touching the Bluetooth®soft-key while in Media mode.
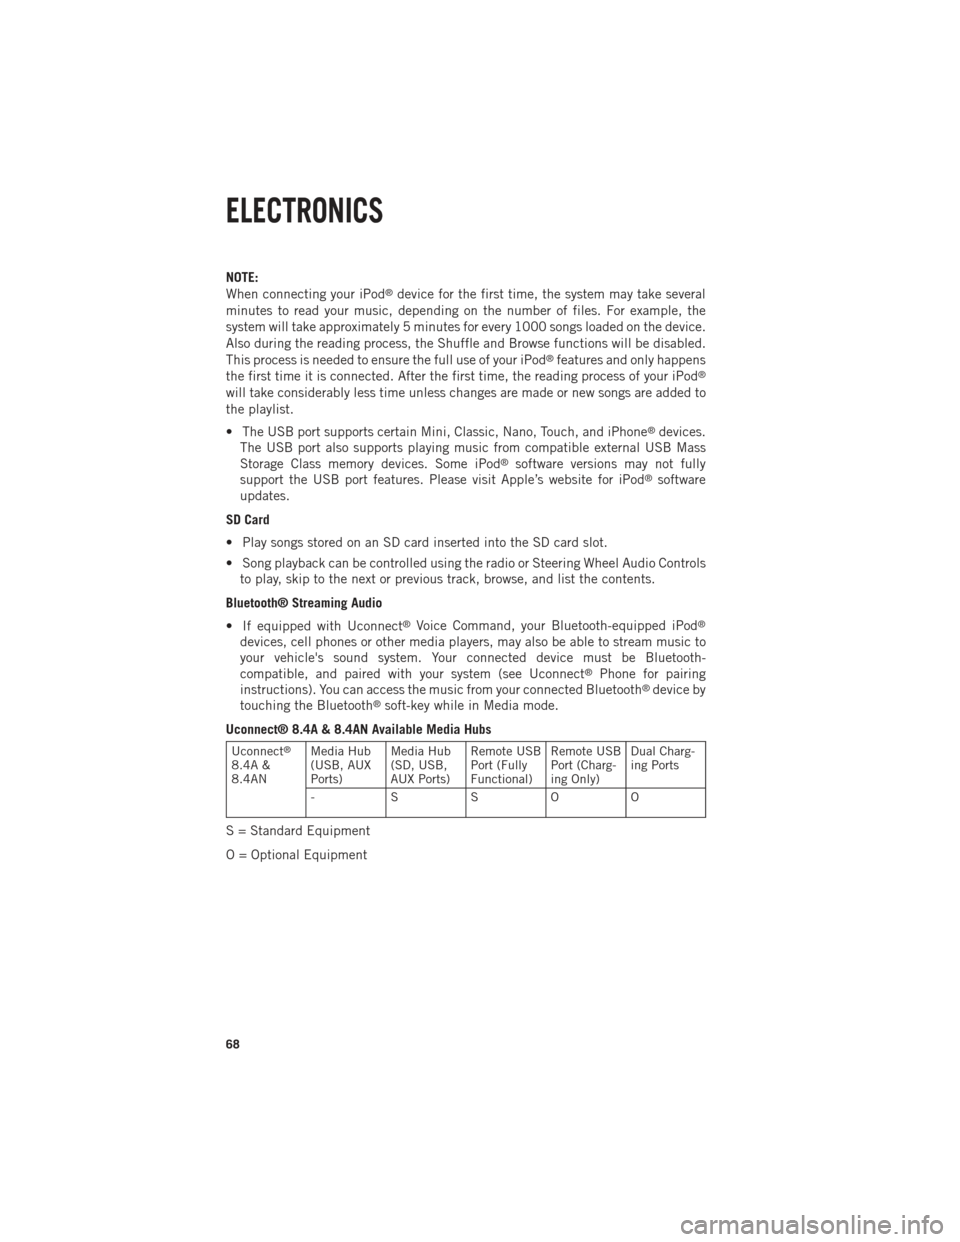
Uconnect® 8.4A & 8.4AN Available Media Hubs
Uconnect®
8.4A &
8.4AN Media Hub
(USB, AUX
Ports) Media Hub
(SD, USB,
AUX Ports)Remote USB
Port (Fully
Functional)Remote USB
Port (Charg-
ing Only)Dual Charg-
ing Ports
- SSOO
S = Standard Equipment
O = Optional Equipment
ELECTRONICS
68
Page 87 of 196
Audio Jack (AUX)
•
The AUX allows a portable device, such as an MP3 player or an iPod®, to be plugged
into the radio and utilize the vehicle’s sound system, using a 3.5 mm audio cable, to
amplify the source and play through the vehicle speakers.
•Touching the AUX soft-key will change the mode to auxiliary device if the audio jack
is connected, allowing the music from your portable device to be heard through the
vehicle's speakers. To activate the AUX, plug in the audio jack.
• The functions of the portable device are controlled using the device buttons. The volume may be controlled using the radio or portable device.
• To route the audio cable out of the center console, use the access cut out in the front of the console.
USB Port
• Connect your iPod
®or compatible device using a USB cable into the USB Port.
USB Memory sticks with audio files can also be used. Audio from the device can
be played on the vehicles sound system while providing metadata (artist, track
title, album, etc.) information on the radio display.
• When connected, the iPod
®/compatible USB device can be controlled using the
radio or Steering Wheel Audio Controls to play, skip to the next or previous track,
browse, and list the contents.
• The iPod
®battery charges when plugged into the USB port (if supported by the
specific device).
• To route the USB/iPod
®cable out of the center console, use the access cut out.
NOTE:
When connecting your iPod
®device for the first time, the system may take several
minutes to read your music, depending on the number of files. For example, the
system will take approximately five minutes for every 1000 songs loaded on the
device. Also during the reading process, the Shuffle and Browse functions will be
disabled. This process is needed to ensure the full use of your iPod
®features and
only happens the first time it is connected. After the first time, the reading process
of your iPod
®will take considerably less time unless changes are made or new songs
are added to the playlist.
•
The USB port supports certain Mini, Classic, Nano, Touch, and iPhone®devices. The
USB port also supports playing music from compatible external USB Mass Storage
Class memory devices. Some iPod
®software versions may not fully support the USB
port features. Please visit Apple’s website for iPod®software updates.
SD Card
• Play songs stored on an SD card inserted into the SD card slot.
• Song playback can be controlled using the radio or Steering Wheel Audio Controls to play, skip to the next or previous track, browse, and list the contents.
ELECTRONICS
85
Page 99 of 196
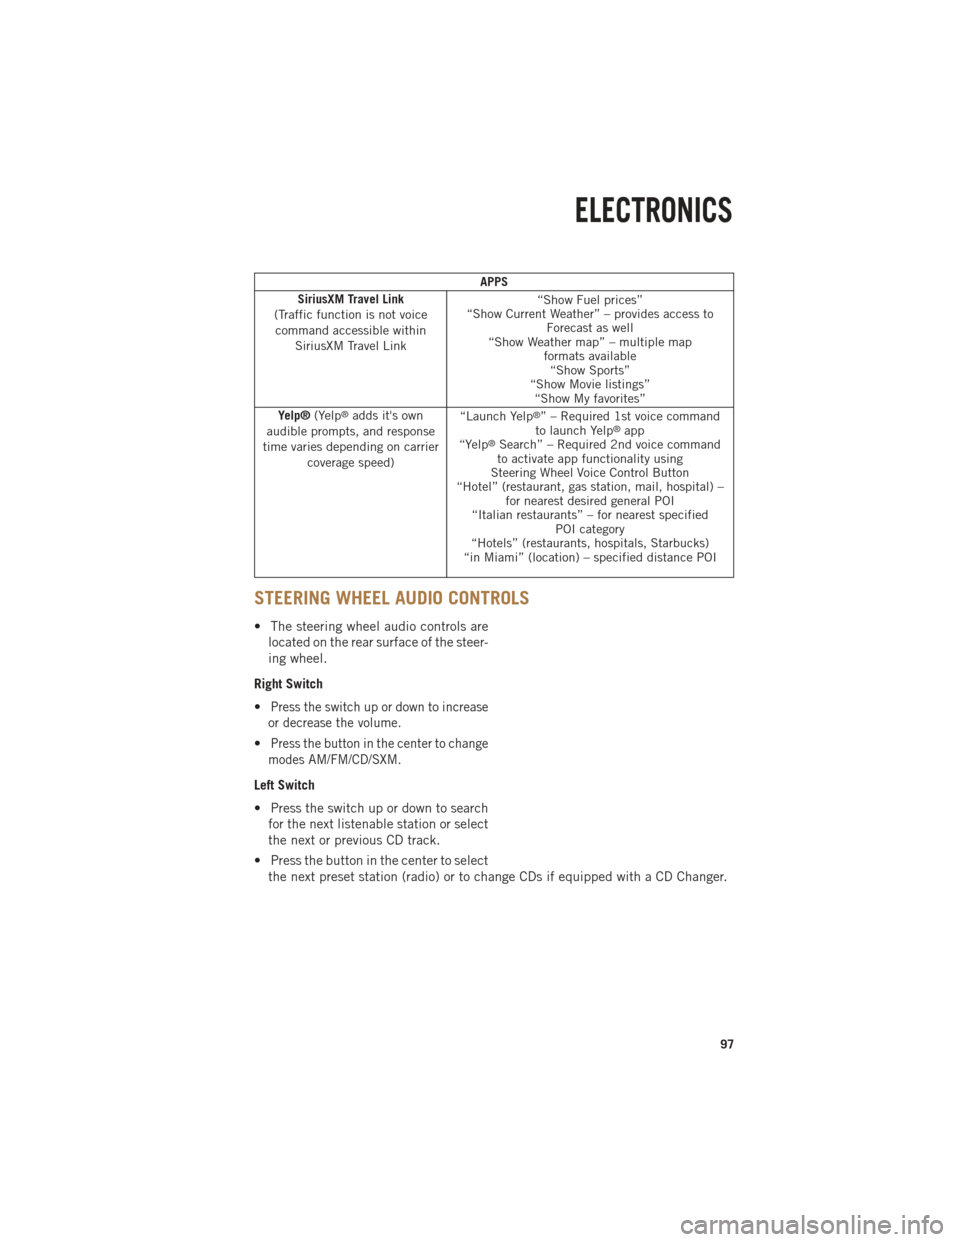
APPS
SiriusXM Travel Link
(Traffic function is not voice command accessible within SiriusXM Travel Link “Show Fuel prices”
“Show Current Weather” – provides access to Forecast as well
“Show Weather map” – multiple map formats available“Show Sports”
“Show Movie listings” “Show My favorites”
Yelp® (Yelp
®adds it's own
audible prompts, and response
time varies depending on carrier coverage speed) “Launch Yelp®” – Required 1st voice command
to launch Yelp®app
“Yelp®Search” – Required 2nd voice command
to activate app functionality using
Steering Wheel Voice Control Button
“Hotel” (restaurant, gas station, mail, hospital) – for nearest desired general POI
“Italian restaurants” – for nearest specified POI category
“Hotels” (restaurants, hospitals, Starbucks)
“in Miami” (location) – specified distance POI
STEERING WHEEL AUDIO CONTROLS
• The steering wheel audio controls are
located on the rear surface of the steer-
ing wheel.
Right Switch
•
Press the switch up or down to increase
or decrease the volume.
•Press the button in the center to change
modes AM/FM/CD/SXM.
Left Switch
• Press the switch up or down to search for the next listenable station or select
the next or previous CD track.
• Press the button in the center to select the next preset station (radio) or to change CDs if equipped with a CD Changer.
ELECTRONICS
97
Page 100 of 196
ELECTRONIC VEHICLE INFORMATION CENTER (EVIC)
•The EVIC features a driver interactive
display that is located in the instrument
cluster. Pressing the controls on the left
side of the steering wheel allows the
driver to select vehicle information and
Personal Settings. For additional infor-
mation, refer to Programmable Features
in this guide.
•Press and release the UPbutton to
scroll upward through the main menus
(Fuel Economy, Vehicle Info, Tire PSI,
Cruise, Messages, Trip Info, Vehicle
Speed and Turn Menu Off) and sub menus.
•Press and release the DOWNbutton to scroll downward through the main menus
and sub menus.
• Press and release the RIGHTbuttonfor access to main menus, sub menus or to
select a personal setting in the setup menu. Press and hold the RIGHT
button for
two seconds to reset features.
• Press the BACK/LEFTbutton to scroll back to a previous menu or sub menu.
Compass Calibration
• This compass is self-calibrating, which eliminates the need to set the compass manually. When the vehicle is new, the compass may appear erratic and the EVIC
will display “CAL” until the compass is calibrated.
• You may also calibrate the compass by completing one or more 360 degree turns (in an area free from large metal or metallic objects) until the “CAL” message
displayed in the EVIC turns off. The compass will now function normally.
PROGRAMMABLE FEATURES
Programmable Features
• The EVIC can be used to view or change the following settings. Press the UP
or
DOWN
button until System Setup displays, then press the RIGHTbutton.
Scroll through the settings using the UP or DOWN buttons. Press the RIGHT
button to change the setting. Press the BACK/LEFTbutton to scroll back to a
previous menu or sub menu.
• Radio Info • Trip Info
• Fuel Economy Info • Tire Pressure
• Cruise Control Info • Vehicle Info
• Digital Vehicle Speed • Stored Warning Messages
• Stop/Start • Turn Menu OFF
• Screen Setup
ELECTRONICS
98