2013 Ram 1500 clock
[x] Cancel search: clockPage 56 of 196

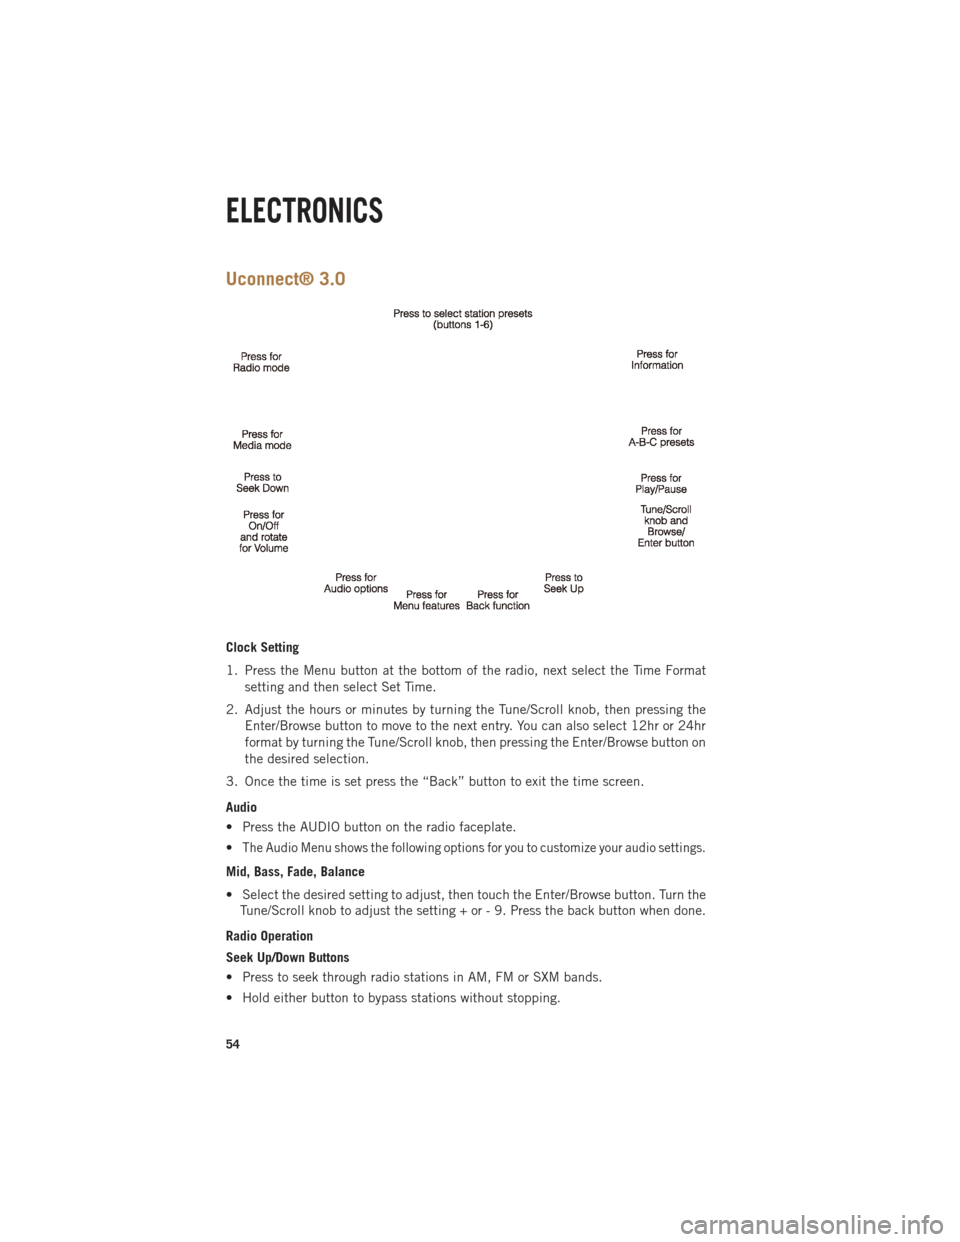
Uconnect® 3.0
Clock Setting
1. Press the Menu button at the bottom of the radio, next select the Time Formatsetting and then select Set Time.
2. Adjust the hours or minutes by turning the Tune/Scroll knob, then pressing the Enter/Browse button to move to the next entry. You can also select 12hr or 24hr
format by turning the Tune/Scroll knob, then pressing the Enter/Browse button on
the desired selection.
3. Once the time is set press the “Back” button to exit the time screen.
Audio
• Press the AUDIO button on the radio faceplate.
•
The Audio Menu shows the following options for you to customize your audio settings.
Mid, Bass, Fade, Balance
• Select the desired setting to adjust, then touch the Enter/Browse button. Turn the Tune/Scroll knob to adjust the setting + or - 9. Press the back button when done.
Radio Operation
Seek Up/Down Buttons
• Press to seek through radio stations in AM, FM or SXM bands.
• Hold either button to bypass stations without stopping.
ELECTRONICS
54
Page 58 of 196

Uconnect® 3.0 Available Media Hubs
Uconnect
3.0Media Hub
(USB, AUX
Ports) Media Hub
(SD, USB,
AUX Ports)Remote USB
Port (Fully
Functional)Remote USB
Port (Charg-
ing Only)Dual Charg-
ing Ports
S--OO
S = Standard Equipment
O = Optional Equipment
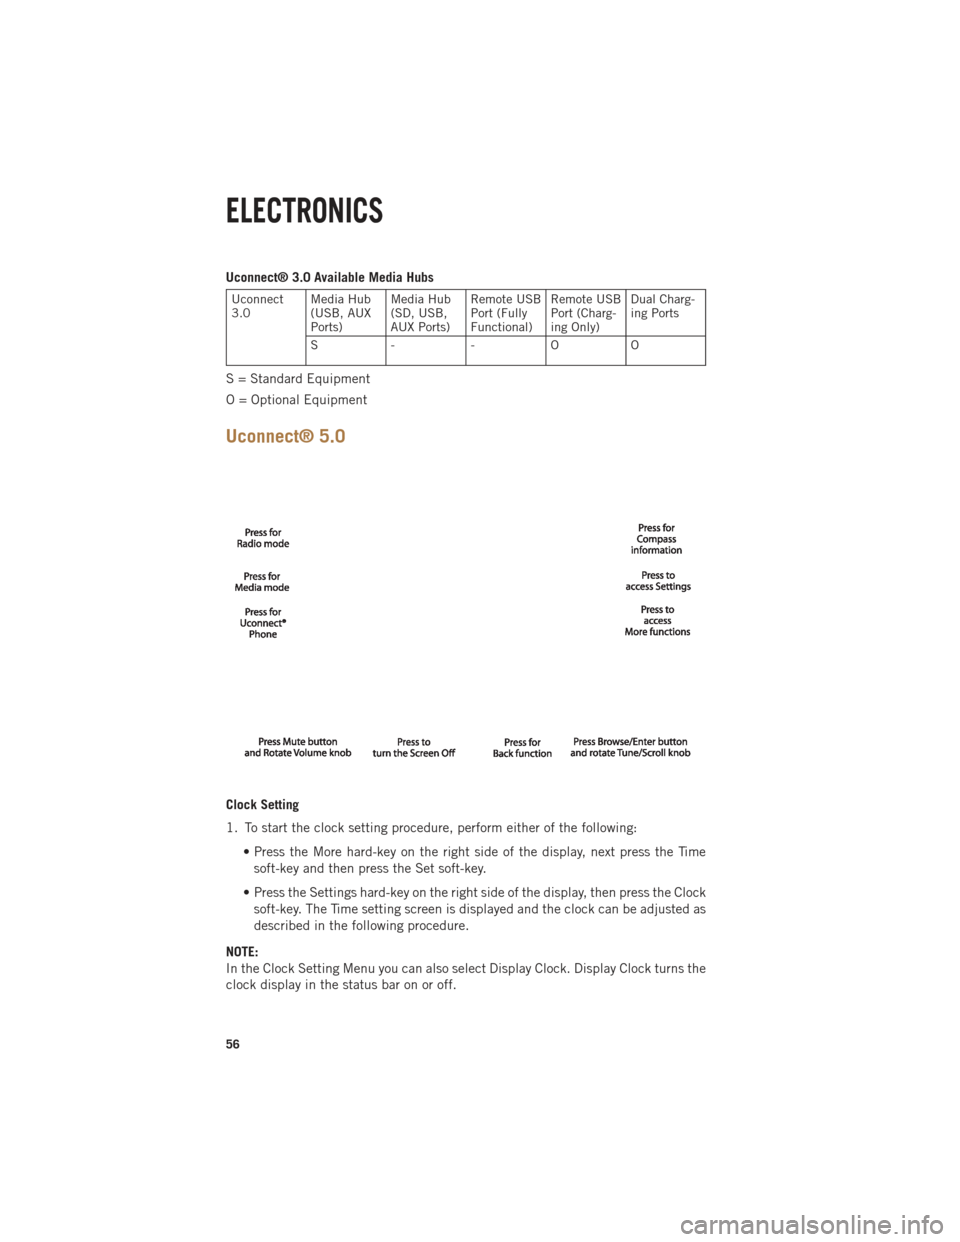
Uconnect® 5.0
Clock Setting
1. To start the clock setting procedure, perform either of the following: • Press the More hard-key on the right side of the display, next press the Timesoft-key and then press the Set soft-key.
• Press the Settings hard-key on the right side of the display, then press the Clock soft-key. The Time setting screen is displayed and the clock can be adjusted as
described in the following procedure.
NOTE:
In the Clock Setting Menu you can also select Display Clock. Display Clock turns the
clock display in the status bar on or off.
ELECTRONICS
56
Page 64 of 196

Uconnect® 8.4A
Uconnect® 8.4A AT A GLANCE
Displaying the Time
• If the time is not currently displayed on the radio or player main page, touch theSettings soft-key or the Apps soft-key and then the Settings soft-key. In the
Settings list, touch the Clock soft-key then touch the check box next to Show Time
in Status Bar.
Setting the Time
• Model 8.4AN synchronizes time automatically via GPS, so should not require any time adjustment. If you do need to set the time manually, follow the instructions
below for Model 8.4A.
• For Model 8.4A, turn the unit on, then touch the time display at the top of the screen. Touch Yes.
• If the time is not displayed at the top of the screen, touch the Settings soft-key or the Apps soft-key and then the Settings soft-key. In the Settings screen, touch the
Clock soft-key, then check or uncheck this option.
• Touch + or – next to Set Time Hours and Set Time Minutes to adjust the time.
• If these features are not available, uncheck the Sync with GPS box.
• Touch X to save your settings and exit out of the Clock Setting screen.
ELECTRONICS
62
Page 81 of 196

APPS
Yelp® (Yelp®adds it's own
audible prompts, and response
time varies depending on carrier coverage speed) “Launch Yelp®” – Required 1st voice command
to launch Yelp®app
“Yelp®Search” – Required 2nd voice command
to activate app functionality using Steering Wheel Voice Control Button
“Hotel” (restaurant, gas station, mail, hospital) – for nearest desired general POI
“Italian restaurants” – for nearest specified POI category
“Hotels” (restaurants, hospitals, Starbucks) “in Miami” (location) – specified distance POI
Uconnect® 8.4AN
Uconnect® 8.4AN AT A GLANCE
Displaying the Time
• If the time is not currently displayed on the radio or player main page, touch the
Settings soft-key or the Apps soft-key and then the Settings soft-key. In the
Settings list, touch the Clock soft-key then touch the check box next to Show Time
in Status Bar.
ELECTRONICS
79
Page 82 of 196

Setting the Time
• Model 8.4AN synchronizes time automatically via GPS, so should not require anytime adjustment. If you do need to set the time manually, follow the instructions
below for Model 8.4A.
• For Model 8.4A, turn the unit on, then touch the time display at the top of the screen. Touch Yes.
• If the time is not displayed at the top of the screen, touch Settings soft-key or the Apps soft-key and then the Settings soft-key. In the Settings screen, touch the
Clock soft-key, then check or uncheck this option.
• Touch + or – next to Set Time Hours and Set Time Minutes to adjust the time.
• If these features are not available, uncheck the Sync with GPS box.
• Touch X to save your settings and exit out of the Clock Setting screen.
Audio Settings
• Touch of the Audio soft-key to activate the Audio settings screen to adjust Balance\Fade, Equalizer, and Speed Adjusted Volume.
• You can return to the Radio screen by touching the X located at the top right.
Balance/Fade
• Touch the Balance/Fade soft-key to Balance audio between the front speakers or fade the audio between the rear and front speakers.
• Touching the Front, Rear, Left, or Right soft-keys or touch and drag the blue Speaker Icon to adjust the Balance/Fade.
Equalizer
• Touch the Equalizer soft-key to activate the Equalizer screen.
• Touch the + or - soft-keys, or by touching and dragging over the level bar for each of the equalizer bands. The level value, which spans between plus or minus 9, is
displayed at the bottom of each of the Bands.
Speed Adjusted Volume
• Touch the Speed Adjusted Volume soft-key to activate the Speed Adjusted Volume screen. The Speed Adjusted Volume is adjusted by touching the + and - buttons or
by touching and dragging over the level bar. This alters the automatic adjustment
of the audio volume with variation to vehicle speed.
ELECTRONICS
80
Page 101 of 196

Uconnect® Access Customer Programmable Features
• The Uconnect
®Access system allows you to access Customer Programmable
feature settings such as Display, Clock, Safety/Assistance, Lights, Doors & Locks,
Heated Seats, Engine Off Operation, Compass Settings, Audio, Phone/ Bluetooth
and SiriusXM Setup through soft-keys.
• Touch the More soft-key to on the bottom of the screen, then touch the Settings soft-key to access the Settings screen. When making a selection, scroll up or down
until the preferred setting is highlighted, then press and release the preferred
setting until a check-mark appears next to the setting, showing that setting has
been selected. The following feature settings are available:
• Display • Clock
• Safety / Assistance • Doors & Locks
• Auto-On Comfort & Remote Start • Engine Off Options
• Compass • Audio
• Phone / Bluetooth • SiriusXM Setup
• Lights
EVIC Reconfigurable Screen Setup
• The following settings allow you to change what information is displayed in the instrument cluster as well as the location that information is displayed.
Digital Speedometer
• Press and release the UP or DOWN arrow button until the Digital display icon ishighlighted in the EVIC. Press and release the RIGHT arrow button to change the
display between km/h and mph.
Vehicle Info (Customer Information Features)
• Press and release the UP or DOWN button until the Vehicle Info icon is highlightedin the EVIC. Press and release the RIGHT button and Coolant Temp will be
displayed. Press the UP or DOWN arrow button to scroll through the following
information sub-menus:• Tire Pressure
• Coolant Temperature
Trip A
• Press and release the UP or DOWN arrow button until the Trip A icon is highlighted in the EVIC. Press and release the RIGHT arrow button to display the Trip A
information.
Trip B
• Press and release the UP or DOWN arrow button until the Trip B icon is highlightedin the EVIC. Press and release the RIGHT arrow button to display the Trip B
information.
ELECTRONICS
99
Page 114 of 196

Divider Position
• There are 11 divider slots along the bed inner panels which allow for variouspositions to assist in managing your cargo.
• To install the bed extender into a divider position perform the following: • Make sure the center handle is unlocked using the vehicle key and rotate thecenter handle vertically to release the extender side gates.
• With the side gates open, position the extender so the outboard ends align with the intended slots in the sides of the bed.
• Rotate the side gates closed so that the outboard ends are secured into the intended slots of the bed.
• Rotate the center handle horizontally to secure the side gates in the closed position.
• Lock the center handle to secure the panel into place and assist against theft.
Extender Position
• The bed extender will add an additional 15 in (38 cm) in the back of the truck when additional cargo room is needed.
• To install the bed extender into the extender position, perform the following: • Lower the tailgate.
• Make sure the center handle is unlocked and rotate the center handle verticallyin order to release the extender side gates.
• Fit the end of the side gate ends onto the pin and handle.
• Rotate the handles to the horizontal position to secure into place.
Bed Rail Tie-Down System
• There are two adjustable cleats on each side of the bed that can be used to assist in securing cargo.
• Each cleat must be located and tightened down in one of the detents, along either rail, in order to keep cargo properly secure.
• To move the cleat to any position on the rail, turn the nut counterclockwise, approximately three turns. Then, pull out on the cleat and slide it to the detent
nearest the desired location. Make sure the cleat is seated in the detent and
tighten the nut.
• To remove the cleats from the utility rail, remove the end cap by pushing up on the locking tab, located on the bottom of the end cap. Slide the cleat off the end of the
rail.
UTILITY
112
Page 125 of 196

ENGINE MOUNTED FUEL FILTER/WATER SEPARATOR
Draining Fuel/Water Separator
•
If the “Water in Fuel” indicator lightis illuminated and an audible chime is
heard five times, you should stop the engine and drain the water from the separator.
• The drain is located on the bottom of the Fuel Filter and Water Separator assembly which is located on the driver's side of the engine.
• Turn the drain valve (located on the side of the filter) counterclockwise 1/4 turn, then turn the ignition switch to the ON/RUN position to allow any accumulated
water to drain.
• When clean fuel is visible, close the drain and switch the ignition to OFF.
• Refer to the Owner's Manual on the DVD for further details.
Fuel Filter Replacement
• With the engine off and a drain pan under the fuel filter drain hose, open the water drain valve 1/4 turn counterclockwise and completely drain fuel and water into the
approved container.
• Close the water drain valve and remove the lid using a socket or strap wrench; rotate counterclockwise for removal. Remove the used o-ring and discard it.
• Remove the used filter cartridge from the housing and dispose of according to your local regulations.
• Wipe clean the sealing surfaces of the lid and housing and install the new o-ring into ring groove on the filter housing and lubricate with clean engine oil.
• Install a new filter in the housing. Push down on the cartridge to ensure it is properly seated. Do not pre-fill the filter housing with fuel.
• Install the lid onto the housing and tighten to 22.5 ft lbs (30.5 N·m). Do not overtighten the lid.
• Start the engine and confirm no leaks are present.
The engine mounted filter housing is equipped with a No-Filter-No-Run (NFNR)
feature. Engine will not run if:
1. No filter is installed.
2.
Inferior/Non-approved filter is used. Use of OEM filter is required to ensure vehicle
will run.
CAUTION!
•Diesel fuel will damage blacktop paving surfaces. Drain the filter into an appro-
priate container.
•Do not prefill the fuel filter when installing a new fuel filter. There is a possibility
debris could be introduced into the fuel filter during this action. It is best to install
the filter dry and allow the in-tank lift pump to prime the fuel system.
•If the “Water In Fuel Indicator Light” remains on, DO NOT START the engine
before you drain water from the fuel filter to avoid engine damage.
DIESEL
123