2013 Peugeot 807 seats
[x] Cancel search: seatsPage 71 of 234

EASE OF USE and COMFORT
3
69
Seats
REAR BENCH SEAT
From the boot, you can pull
on strap B
and slide the seat
forwards to make it easier to load
the vehicle.
The rear bench seat must only be
fi tted in row 3.
Seat back folded position
1.
Place the head restraints in the low
position.
2.
Pull the strap C
upwards, from the
tailgate.
3.
Tilt the seat back on the seat
cushion.
Vertical position of the bench seat
1.
Place the head restraints in the low
position.
2.
Pull the strap C
upwards, from the
tailgate.
3.
Fold the seat back onto the seat
cushion.
4.
Pull the lever D
to unlock the rear
anchorages.
5.
Place the seat in the vertical
"folded" position.
When driving, attach the retaining
straps to the handles.
Forwards/backwards
adjustment
From the seat cushion, lift bar A
and
slide the seat towards the front or the
rear.
Page 72 of 234
70
Seats
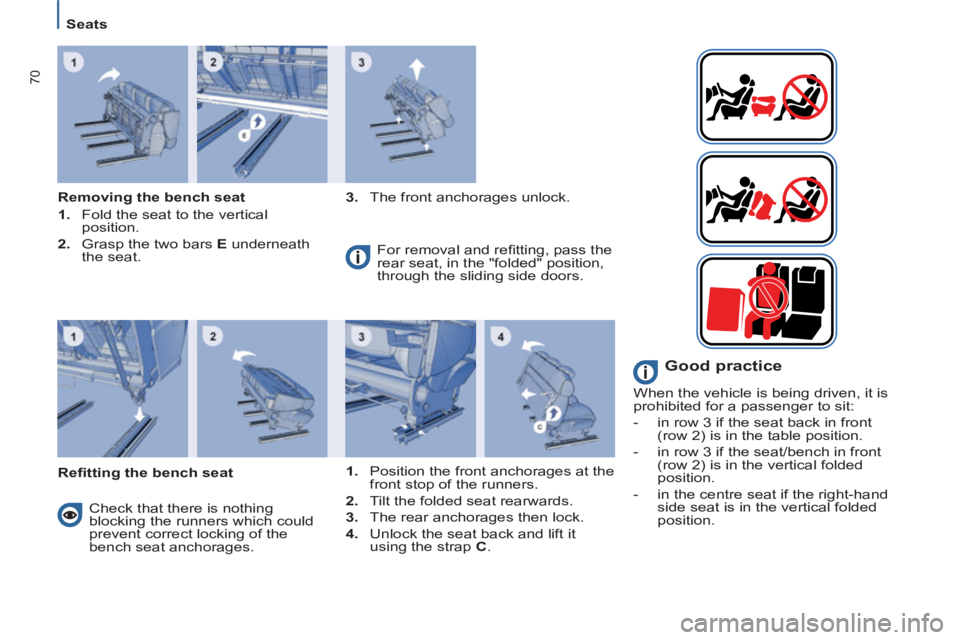
Removing the bench seat
1.
Fold the seat to the vertical
position.
2.
Grasp the two bars E
underneath
the seat.
3.
The front anchorages unlock.
Refi tting the bench seat For removal and refi tting, pass the
rear seat, in the "folded" position,
through the sliding side doors.
Check that there is nothing
blocking the runners which could
prevent correct locking of the
bench seat anchorages.
1.
Position the front anchorages at the
front stop of the runners.
2.
Tilt the folded seat rearwards.
3.
The rear anchorages then lock.
4.
Unlock the seat back and lift it
using the strap C
.
Good practice
When the vehicle is being driven, it is
prohibited for a passenger to sit:
- in row 3 if the seat back in front
(row 2) is in the table position.
- in row 3 if the seat/bench in front
(row 2) is in the vertical folded
position.
- in the centre seat if the right-hand
side seat is in the vertical folded
position.
Page 73 of 234
EASE OF USE and COMFORT
3
71
Seats
The centre seat may be installed
in the central position in row 2 and
in the left side position in row 3.
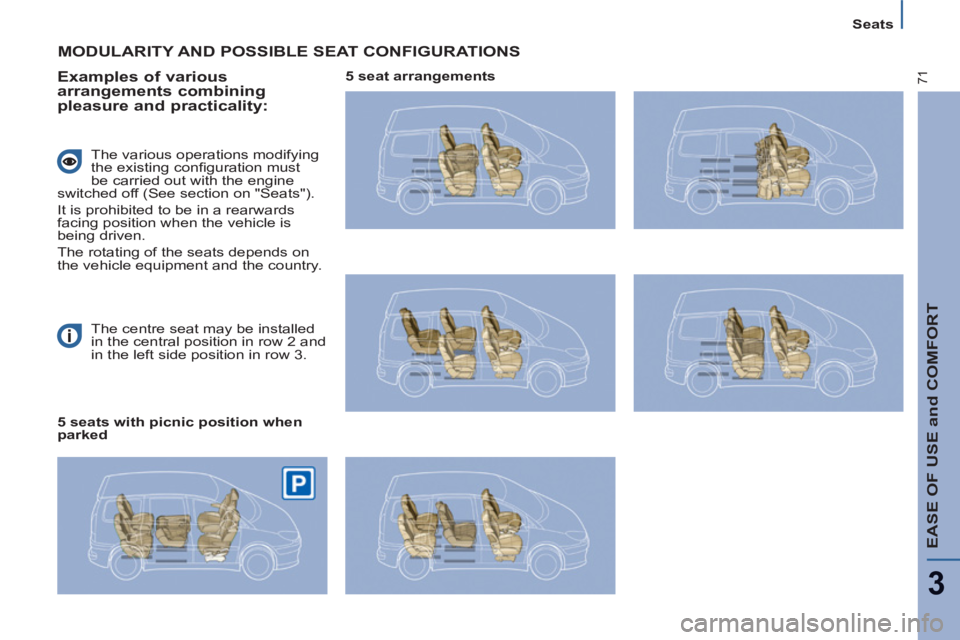
MODULARITY AND POSSIBLE SEAT CONFIGURATIONS
Examples of various
arrangements combining
pleasure and practicality:
The various operations modifying
the existing confi guration must
be carried out with the engine
switched off (See section on "Seats").
It is prohibited to be in a rearwards
facing position when the vehicle is
being driven.
The rotating of the seats depends on
the vehicle equipment and the country.
5 seats with picnic position when
parked
5 seat arrangements
Page 74 of 234
72
Seats
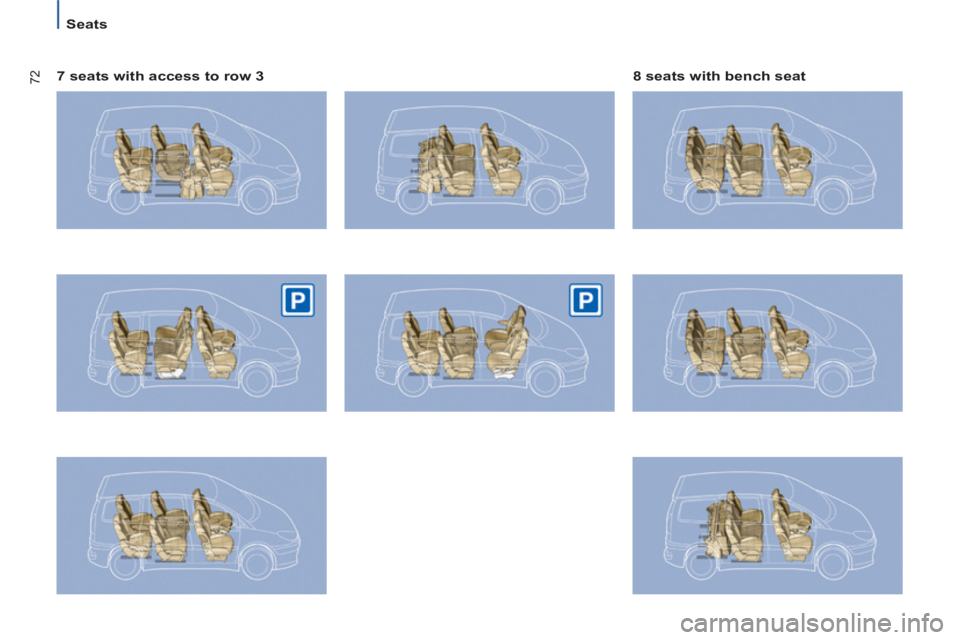
7 seats with access to row 3
8 seats with bench seat
Page 75 of 234
EASE OF USE and COMFORT
3
73
Seats
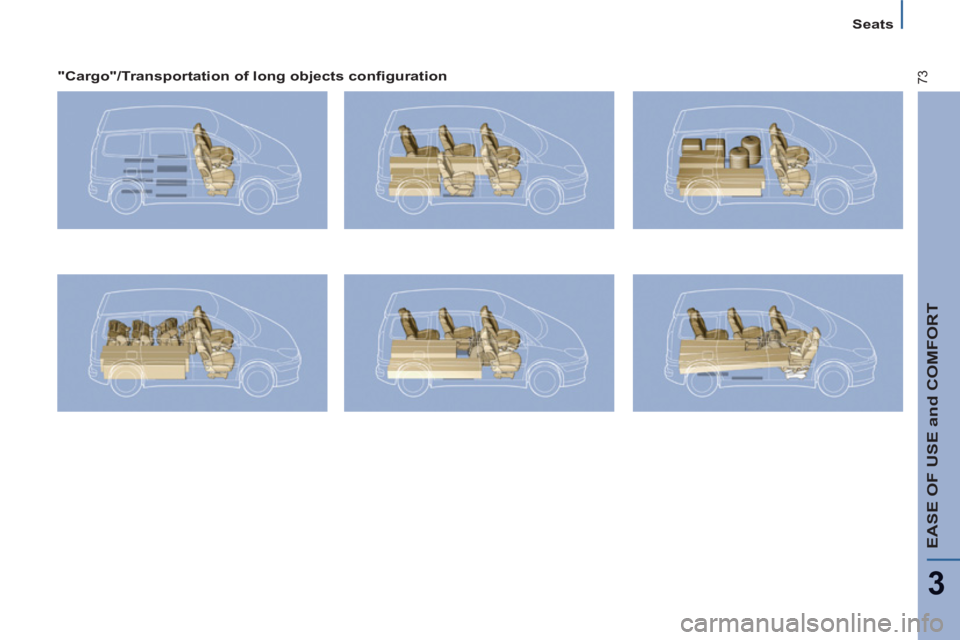
"Cargo"/Transportation of long objects confi guration
Page 79 of 234

EASE OF USE and COMFORT
3
77
Practical information
1. Driver's upper glove box
FRONT INTERIOR LAYOUT
This is fi tted with a lock.
To open the glove box, lift the handle.
The light comes on when the cover is
opened.
It contains three sockets for the
connection of video equipment and
access to the fascia fuse box.
It includes special compartments for
storing maps, a packet of cigarettes,
an A4 document etc.
RCA sockets.
This permits the connection of a mobile
telephone charger, a baby's bottle
warmer, etc.
To open, press the button.
To close, press the cover.
It includes special compartments for
storing a pen, a mobile telephone,
coins or tokens and credit cards.
2. Audio equipment concealing fl ap
Lower the fl ap fully to lock it in place.
Press the fl ap to raise it.
3. Central storage compartment
4. Passenger's upper glove box
To open, press the button.
To close, press the cover.
It includes special compartments for
storing a pair of spectacles, keys, fi ve
CDs and four audio cassettes or nine
audio CDs.
5. Passenger's lower glove box
6. Lighter or 12 V socket for
accessories (120 W)
12. Mat fi tting/removal
When removing the front mat, push
the seats as far back as possible and
remove the fi xings.
When refi tting, position the mat
correctly on the pins and clip the
fi xings. Check that the mat is secured
correctly.
To prevent the mat from becoming
caught under the pedals:
- only use mats suited to the fi xings
already present in the vehicle.
It
is imperative that these fi xings are
used.
- never fi t one mat on top of another.
7. Cooled compartment
It can hold up to three cans.
Slide the closer, located on the right, to
open (upwards) or close (downwards)
the air inlet.
8. Can holder and ashtray
This retractable and lit support contains
up to two can holders, a removable
ashtray and a location for the lighter
when it is used as a 12 V socket
(120 W).
9. Storage compartment or
additional telematics control
The storage compartment must not be
used as an ashtray.
If fi tted on your vehicle, the additional
telematics control is located on the
centre console.
10. Storage compartment
11. Door tray with space for a bottle
of water
Bluetooth.
Page 93 of 234
SAFETY
91
Seat belts
4
FRONT AND REAR SIDE SEAT
BELTS
The front seats and the rear side seats
of row 2 are fi tted with pre-tensioners
and force limiters. The lap strap must be positioned as
low as possible on the pelvis. The
chest strap must pass over the hollow
of the shoulder.
Check that the seat belt is fastened
correctly by pulling the strap. The force-limiting device reduces the
pressure of the seat belt against the
chest of the occupant, so increasing
his protection.
A bag placed on the front
passenger seat or a pet sitting on
this seat may trigger the lighting of
this warning light.
SEAT BELTS
Front seat belt warning light
If the driver and/or front
passenger has/have not
fastened his/their seat belt,
this warning light comes on.
Then, at a speed in excess of
approximately 15 mph (25 km/h), it
fl ashes accompanied by an audible
signal of increasing volume (for
approximately 90 seconds) and a
message on the display.
Row 2 rear side seat belts
For your comfort, if you are not using
the seat belt, slide the seat belt loop to
the upper stop to prevent the tongue
from vibrating.
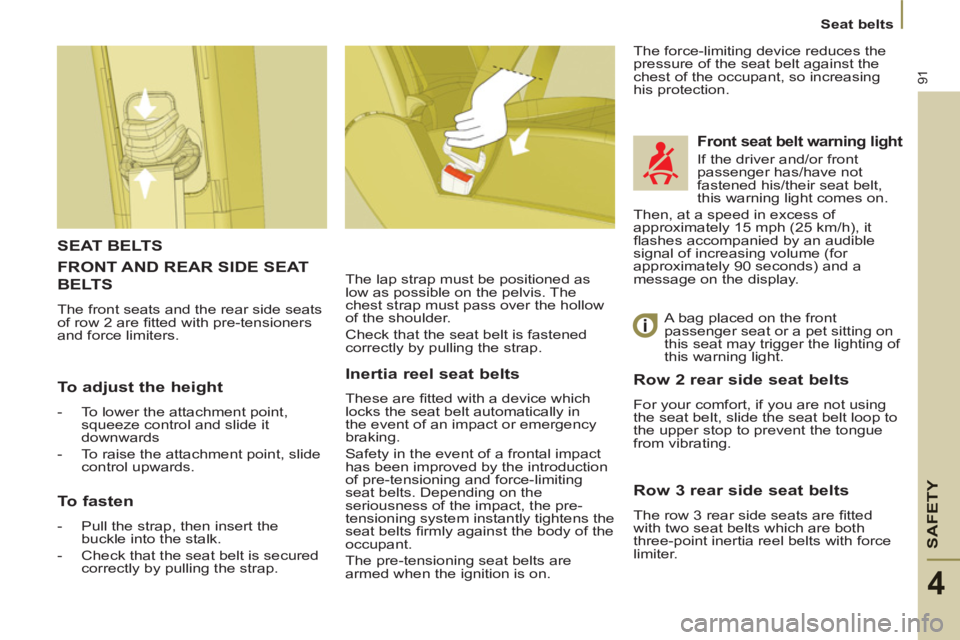
To adjust the height
-
To lower the attachment point,
squeeze control and slide it
downwards
-
To raise the attachment point, slide
control upwards.
To fasten
-
Pull the strap, then insert the
buckle into the stalk.
-
Check that the seat belt is secured
correctly by pulling the strap.
Inertia reel seat belts
These are fi tted with a device which
locks the seat belt automatically in
the event of an impact or emergency
braking.
Safety in the event of a frontal impact
has been improved by the introduction
of pre-tensioning and force-limiting
seat belts. Depending on the
seriousness of the impact, the pre-
tensioning system instantly tightens the
seat belts fi rmly against the body of the
occupant.
The pre-tensioning seat belts are
armed when the ignition is on.
Row 3 rear side seat belts
The row 3 rear side seats are fi tted
with two seat belts which are both
three-point inertia reel belts with force
limiter.
Page 94 of 234
92
Seat belts
Depending on the nature and
seriousness of any impact, the
pretensioning device may be triggered
before and independently of infl ation
of the air bags. It instantly tightens
the seat belts against the body of the
occupants.
Triggering of the pretensioners is
accompanied by a slight discharge
of harmless smoke and a noise, due
to the activation of the pyrotechnic
cartridge incorporated in the system.
The force limiter reduces the pressure
of the seat belt against the body of the
occupants.
The pretensioning seat belts are active
when the ignition is switched on.
The inertia reels are fi tted with a device
which automatically locks the strap in
the event of a collision or emergency
braking or if the vehicle rolls over.
You can unfasten the seat belt by
pressing the red button on the buckle.
Guide the seat belt after unfastening. The upper part of the seat belt should
be positioned in the hollow of the
shoulder.
The lap part should be placed as low
as possible on the pelvis.
Do not invert the seat belt buckles as
they will not fulfi l their role completely.
If the seats are fi tted with armrests, the
lap part of the seat belt should always
pass under the armrest.
Check that the seat belt is fastened
correctly by pulling the strap fi rmly.
Good practice
The driver must ensure that
passengers use the seat belts correctly
and that they are all strapped in
securely before moving off.
Wherever you are seated in the
vehicle, always fasten your seat belt,
even for short journeys.
The seat belts are fi tted with an inertia
reel which automatically adjusts the
length of the strap to your size.
Do not use accessories (clothes pegs,
clips, safety pins, etc.) which permit a
clearance with the seat belt straps.
Ensure that the seat belt is rolled up
correctly after use.
After folding or moving a seat or a rear
bench seat, ensure that the seat belt is
rolled up correctly and that the buckle
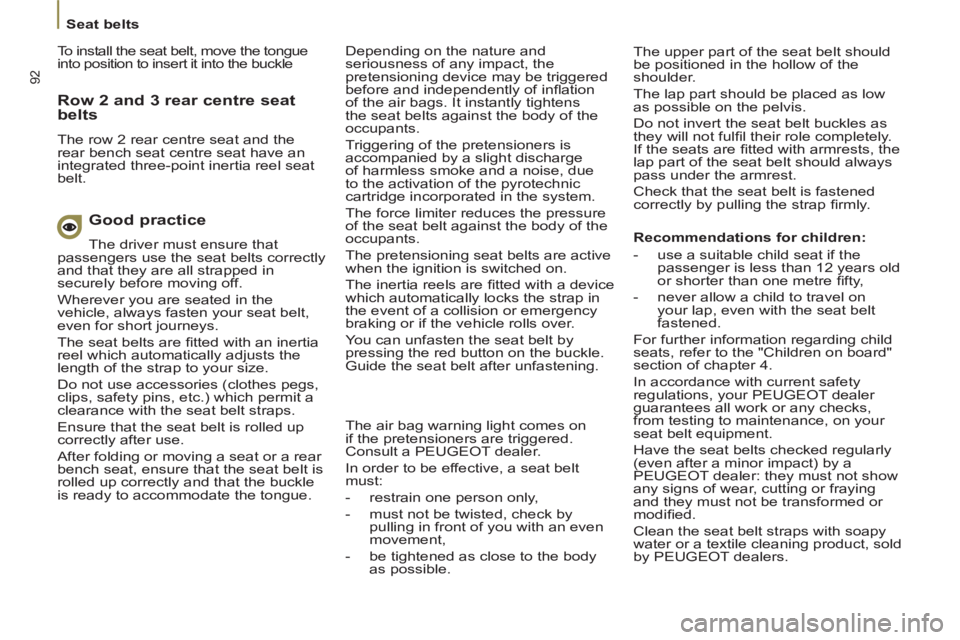
is ready to accommodate the tongue. To install the seat belt, move the tongue
into position to insert it into the buckle
Row 2 and 3 rear centre seat
belts
The row 2 rear centre seat and the
rear bench seat centre seat have an
integrated three-point inertia reel seat
belt.
The air bag warning light comes on
if the pretensioners are triggered.
Consult a PEUGEOT dealer.
In order to be effective, a seat belt
must:
- restrain one person only,
- must not be twisted, check by
pulling in front of you with an even
movement,
- be tightened as close to the body
as possible.
Recommendations for children:
- use a suitable child seat if the
passenger is less than 12 years old
or shorter than one metre fi fty,
- never allow a child to travel on
your lap, even with the seat belt
fastened.
For further information regarding child
seats, refer to the "Children on board"
section of chapter 4.
In accordance with current safety
regulations, your PEUGEOT dealer
guarantees all work or any checks,
from testing to maintenance, on your
seat belt equipment.
Have the seat belts checked regularly
(even after a minor impact) by a
PEUGEOT dealer: they must not show
any signs of wear, cutting or fraying
and they must not be transformed or
modifi ed.
Clean the seat belt straps with soapy
water or a textile cleaning product, sold
by PEUGEOT dealers.