2013 Peugeot 807 mirror
[x] Cancel search: mirrorPage 85 of 234

EASE OF USE and COMFORT
3
83
Mirrors and windows
ELECTRIC WINDOWS
4.
Rear left electric window switch.
5.
Rear electric windows disarming
switch (child safety).
- red strip visible: the rear switches
are activated.
- red strip covered: the rear switches
are disarmed. You have two options:
The electrical functions of the
electric windows are disarmed
one minute after switching off the
ignition.
Disarming the rear controls
For the safety of your children, press
switch 5
to disarm all of the electrical
controls in the rear:
- electric windows,
- sliding side doors,
- sunroofs.
1.
Driver's electric window switch.
2.
Passenger electric window
switch.
3.
Rear right electric window
switch.
Manual operation:
�)
press or pull switch 1
, without going
beyond the point of resistance. The
window stops when the switch is
released.
Automatic operation:
�)
press or pull switch 1
, beyond the
point of resistance: the window
opens or closes completely when
the switch is released. Pressing the
switch again stops the movement
of the window.
Page 86 of 234

84
Mirrors and windows
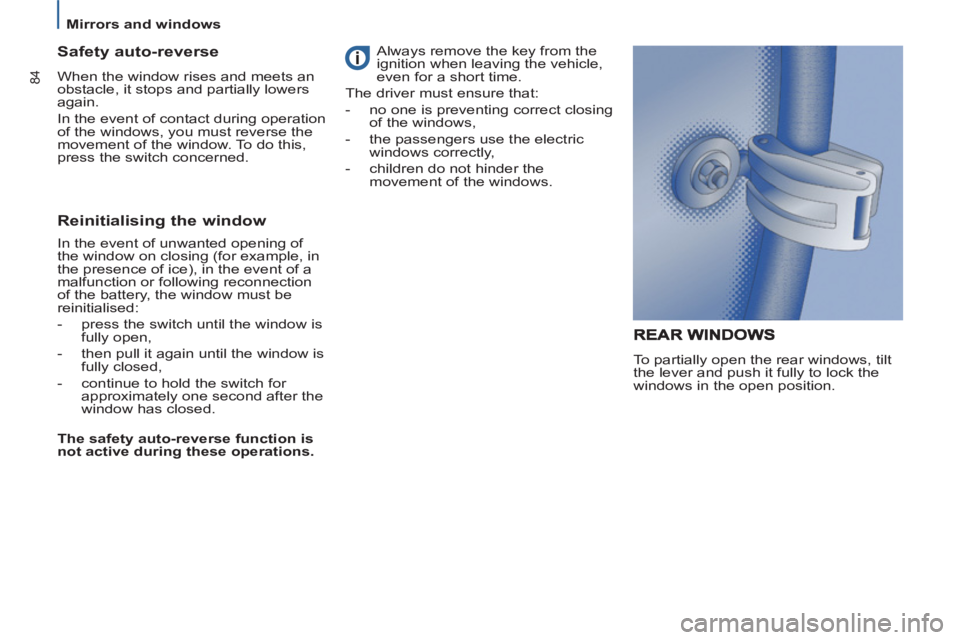
To partially open the rear windows, tilt
the lever and push it fully to lock the
windows in the open position.
Safety auto-reverse
When the window rises and meets an
obstacle, it stops and partially lowers
again.
In the event of contact during operation
of the windows, you must reverse the
movement of the window. To do this,
press the switch concerned.
Reinitialising the window
In the event of unwanted opening of
the window on closing (for example, in
the presence of ice), in the event of a
malfunction or following reconnection
of the battery, the window must be
reinitialised:
-
press the switch until the window is
fully open,
- then pull it again until the window is
fully closed,
- continue to hold the switch for
approximately one second after the
window has closed.
The safety auto-reverse function is
not active during these operations. Always remove the key from the
ignition when leaving the vehicle,
even for a short time.
The driver must ensure that:
- no one is preventing correct closing
of the windows,
- the passengers use the electric
windows correctly,
- children do not hinder the
movement of the windows.
Page 104 of 234

102
Child safety
ADVICE ON CHILD SEATS
The incorrect installation of a child seat
in a vehicle compromises the child's
protection in the event of an accident.
Remember to fasten the seat belts or
the child seat harnesses keeping the
slack
in relation to the child's body to a
minimum
, even for short journeys.
To protect young children from the
rays of the sun, fi t side blinds to
the rear windows.
CHILD MONITORING MIRROR
This mirror enables the driver or front
passenger to observe all the rear
seats.
Fitted on its own ball joint and able to
retract into its housing in the roof, it
provides a panoramic view of the rear
interior of the vehicle. For optimum installation of the "forward
facing" child seat, ensure that the back of
the child seat is in contact with the back
of the vehicle's seat and that the head
restraint does not cause any discomfort.
If the head restraint has to be removed,
ensure that it is stored or attached
securely to prevent it from being
thrown around the vehicle in the event
of sharp braking.
Children under the age of 10 must not
travel in the "forward facing" position
on the front passenger seat, unless
the rear seats are already occupied by
other children, cannot be used or are
absent.
Deactivate the passenger airbag when
a "rear facing" child seat is installed on
the front seat.
Otherwise, the child would risk being
seriously injured or killed if the airbag
were to infl ate.
As a safety precaution, do not leave:
- one or more children alone and
unsupervised in a vehicle,
- a child or an animal in a vehicle
which is exposed to the sun, with
the windows closed,
- the keys within reach of children
inside the vehicle.
To prevent accidental opening of the
doors, use the "Child Lock".
Take care not to open the rear windows
by more than one third.
Installing a booster seat
The chest part of the seat belt must
be positioned on the child's shoulder
without touching the neck.
Ensure that the lap part of the seat belt
passes correctly over the child's thighs.
PEUGEOT recommends the use of a
booster seat which has a back, fi tted
with a seat belt guide at shoulder level.
Page 118 of 234

11 6
Battery
ECONOMY MODE FUNCTION
After the engine has stopped, with
the key in the ignition position, certain
functions (windscreen wiper, electric
windows, courtesy lights, audio
equipment, etc.) can only be used for a
cumulative duration of thirty minutes, to
prevent discharging the battery.
Once the thirty minutes are over, the
message "Economy mode active"
appears on the display and the active
functions are put on standby.
To resume the use of these functions
immediately, start the engine and let it
run for a few seconds.
A fl at battery will prevent the engine
from starting.
To charge the battery using a
battery charger
- disconnect the battery,
- follow the instructions for use
given by the battery charger
manufacturer,
- reconnect starting with the negative
(-) terminal,
- check that the terminals and
connectors are clean. If they are
covered with sulphate (white or
greenish deposit), disconnect them
and clean them.
TERY
BATT
This is housed in a compartment
located underneath the fl oor, in front of
the driver's seat.
Before disconnecting the battery, you
must wait for 2 minutes after switching
off the ignition.
Never disconnect a terminal when the
engine is running.
Never charge a battery without fi rst
disconnecting the terminals.
Close the sunroof and the windows
before disconnecting the battery. If
they do not operate normally following
reconnection of the battery, they must
be reinitialised.
It is advisable to disconnect the
battery if the vehicle is not to be used
for a period of more than one month.
After every reconnection of the battery,
switch on the ignition and wait 1 minute
before starting to allow the electronic
systems to be initialised. If slight
diffi culties are experienced after this,
please contact a PEUGEOT dealer.
The door open monitoring electrical
system consumes power, remember
to close the sliding doors when your
vehicle is parked for long periods.
To start the vehicle from
another battery
- connect the red cable to the
positive (+) terminals of the two
batteries,
- connect one end of the green or
black cable to the negative (-)
terminal of the slave battery,
- connect the other end of the green
or black cable to an earth point on
the broken down vehicle as far as
possible from the battery,
- operate the starter, let the engine run,
- wait for the engine to return to idle,
then disconnect the cables. For the sunroofs safety auto-
reverse, refer to the "Accesses"
section of chapter 2. For the electric windows safety
auto-reverse, refer to the "Mirrors
and windows" section of chapter 3.
Page 124 of 234

122
Changing a bulb
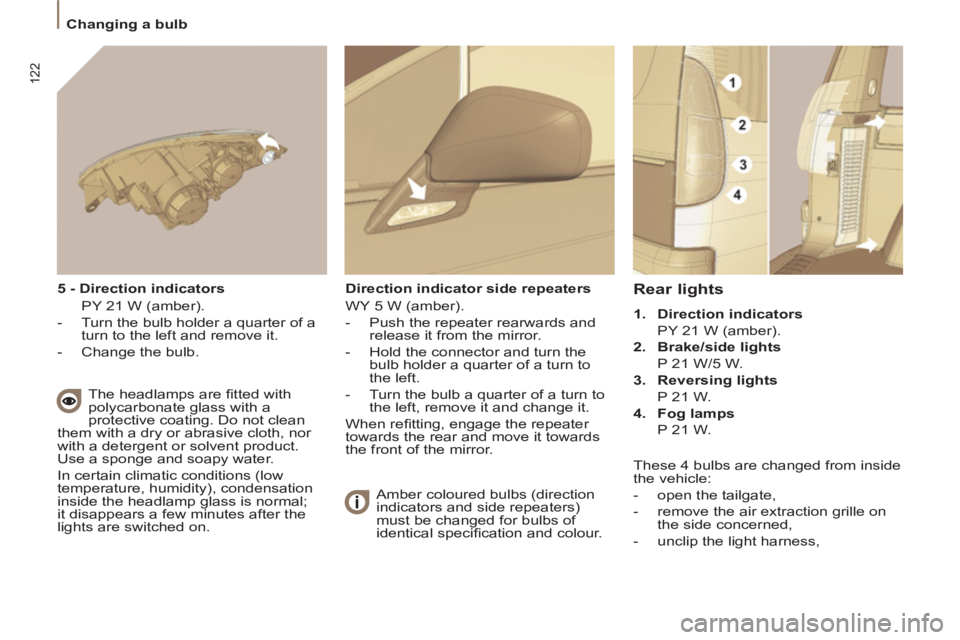
Rear lights
1.
Direction indicators
PY 21 W (amber).
2.
Brake/side lights
P 21 W/5 W.
3.
Reversing lights
P 21 W.
4.
Fog lamps
P 21 W.
5 - Direction indicators
PY 21 W (amber).
- Turn the bulb holder a quarter of a
turn to the left and remove it.
- Change the bulb.
The headlamps are fi tted with
polycarbonate glass with a
protective coating. Do not clean
them with a dry or abrasive cloth, nor
with a detergent or solvent product.
Use a sponge and soapy water.
In certain climatic conditions (low
temperature, humidity), condensation
inside the headlamp glass is normal;
it disappears a few minutes after the
lights are switched on.
Direction indicator side repeaters
WY 5 W (amber).
- Push the repeater rearwards and
release it from the mirror.
- Hold the connector and turn the
bulb holder a quarter of a turn to
the left.
- Turn the bulb a quarter of a turn to
the left, remove it and change it.
When refi tting, engage the repeater
towards the rear and move it towards
the front of the mirror.
Amber coloured bulbs (direction
indicators and side repeaters)
must be changed for bulbs of
identical specifi cation and colour.
These 4 bulbs are changed from inside
the vehicle:
- open the tailgate,
- remove the air extraction grille on
the side concerned,
- unclip the light harness,
Page 127 of 234

125
QUICK HELP
7
Changing a fuse
INSTRUMENT PANEL FUSES
- Open the lower glove box on the right-hand side.
- Pull the handle to open the cover and access the fuses.
N°
Rating
(Amps)
Functions
1
15
Rear wiper.
2
- Not used.
3
5
Airbag control unit.
4
10
Steering wheel angle sensor, Diagnostic socket, ESP sensor, Manual air conditioning, Clutch
switch, Headlamp beam height, Particle emission fi lter pump, Electrochromatic interior mirror.
5
30
Electric mirrors, Passenger's electric window motor, Sunroof row 1.
6
30
Front electric windows supply.
7
5
Courtesy lights, Glove box light, Courtesy mirror lights, Entertainment screen lights row 2.
8
20
Multifunction display, Anti-theft alarm siren, Audio equipment, Compact disc changer, Audio/
telephone, Diesel additive control unit, Tyre under-infl ation detection control unit, Sliding doors
module control unit.
9
30
Lighter.
10
15
Steering wheel switching, Trailer fuse box.
11
15
Diagnostic socket, Ignition switch, Automatic gearbox (4-speed).
12
15
Driver's seat memory unit, Passenger's electric seat, Airbag control unit, Parking assistance
control unit, Sliding side door buttons, Hands-free kit, Automatic gearbox (6-speed).
13
5
Engine fuse box, Trailer fuse box.
14
15
Rain sensor, Automatic air conditioning, Instrument panel, Sunroofs, Odometer warning lights
unit, Audio-telematics control.
15
30
Passenger's lock locking.
16
30
Locking/unlocking of the accesses.
17
40
Heated rear screen.
Page 223 of 234

139
VISUAL SEARCH
10
Exterior
Spare wheel, jack, changing,
fi tting 117-120 Rear lamps, direction indicators,
3rd brake lamp 43-45, 123
Changing rear bulbs 122-123 Accessories 107
Sun roof 26
Roof bars 105
Fuel fi ller cap 109
Fuel tank 31, 109
Fuel cut-off/priming 110
Boot, tailgate 25
Parking sensors 87
Towing, lifting 131
Towbar 103-104
Brakes 86, 88-89
ABS, EBFD 88
ASR, ESP 89
Tyre under-infl ation detection 90 Opening/closing doors 23-24
Locks 18
Opening/closing the bonnet 111
Electric child lock 25
Wiper blade 46, 130
Door mirror 82
Front lamps/foglamps,
direction indicators 43-45
Headlamp beam
height adjustment 45
Headlamp wash 46, 114
Changing front bulbs 121-122 Very cold climate screen 106 Key, starting, battery 18-21, 42
Central locking 18, 23
Alarm 22
EXTERIOR
Infl ating, pressure 17
Tyres, pressure 17
Page 225 of 234

141
VISUAL SEARC
H
10
Front interior
Instrument panels, dials,
counters 27-28
Warning lamps,
indicator lamps 29-33
Indicators, displays 34-36
Dimmer, trip recorder zero reset 36
Parking brake, handbrake 86 Heating, ventilation 54-58
- defrosting, demisting,
- air conditioning A/C,
- climate control,
- air recirculation.
Hazard warning lamps 86 In-car Technology Section 9
- Peugeot Connect Navigation
(RT6)
- Peugeot Connect Sound
Fittings 76-77
- cigarette lighter,
- glove box,
- cooled compartment,
- ashtray.
Interior fuses 124-125
Mirror, toll card,
car park ticket 81-82
Sun visor, mirror/
monitoring 81, 102
Courtesy lamp, interior lighting 80
Setting the date/time
Section 9
FRONT INTERIOR