2013 Peugeot 807 door lock
[x] Cancel search: door lockPage 72 of 234

70
Seats
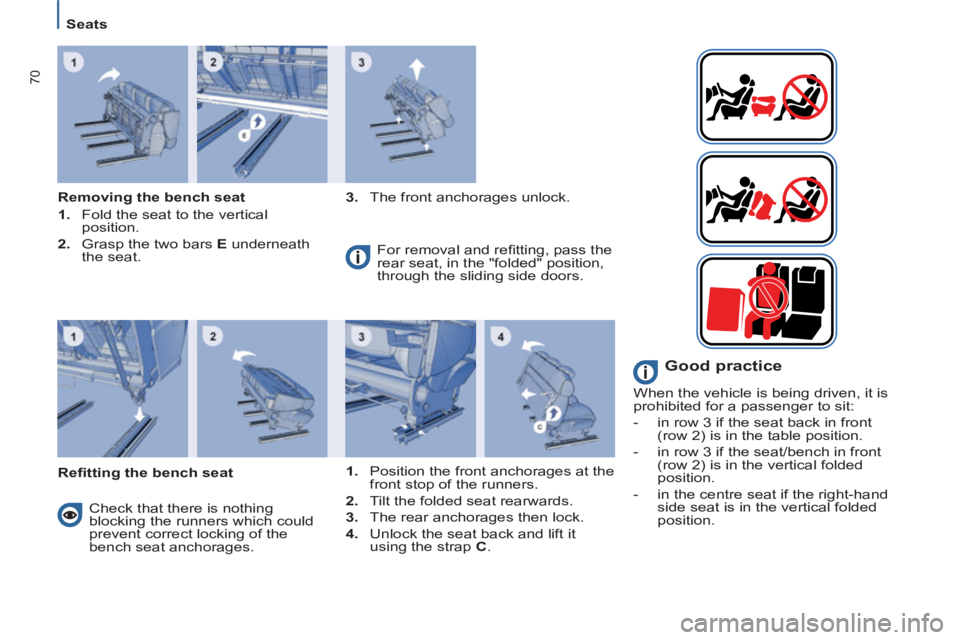
Removing the bench seat
1.
Fold the seat to the vertical
position.
2.
Grasp the two bars E
underneath
the seat.
3.
The front anchorages unlock.
Refi tting the bench seat For removal and refi tting, pass the
rear seat, in the "folded" position,
through the sliding side doors.
Check that there is nothing
blocking the runners which could
prevent correct locking of the
bench seat anchorages.
1.
Position the front anchorages at the
front stop of the runners.
2.
Tilt the folded seat rearwards.
3.
The rear anchorages then lock.
4.
Unlock the seat back and lift it
using the strap C
.
Good practice
When the vehicle is being driven, it is
prohibited for a passenger to sit:
- in row 3 if the seat back in front
(row 2) is in the table position.
- in row 3 if the seat/bench in front
(row 2) is in the vertical folded
position.
- in the centre seat if the right-hand
side seat is in the vertical folded
position.
Page 79 of 234

EASE OF USE and COMFORT
3
77
Practical information
1. Driver's upper glove box
FRONT INTERIOR LAYOUT
This is fi tted with a lock.
To open the glove box, lift the handle.
The light comes on when the cover is
opened.
It contains three sockets for the
connection of video equipment and
access to the fascia fuse box.
It includes special compartments for
storing maps, a packet of cigarettes,
an A4 document etc.
RCA sockets.
This permits the connection of a mobile
telephone charger, a baby's bottle
warmer, etc.
To open, press the button.
To close, press the cover.
It includes special compartments for
storing a pen, a mobile telephone,
coins or tokens and credit cards.
2. Audio equipment concealing fl ap
Lower the fl ap fully to lock it in place.
Press the fl ap to raise it.
3. Central storage compartment
4. Passenger's upper glove box
To open, press the button.
To close, press the cover.
It includes special compartments for
storing a pair of spectacles, keys, fi ve
CDs and four audio cassettes or nine
audio CDs.
5. Passenger's lower glove box
6. Lighter or 12 V socket for
accessories (120 W)
12. Mat fi tting/removal
When removing the front mat, push
the seats as far back as possible and
remove the fi xings.
When refi tting, position the mat
correctly on the pins and clip the
fi xings. Check that the mat is secured
correctly.
To prevent the mat from becoming
caught under the pedals:
- only use mats suited to the fi xings
already present in the vehicle.
It
is imperative that these fi xings are
used.
- never fi t one mat on top of another.
7. Cooled compartment
It can hold up to three cans.
Slide the closer, located on the right, to
open (upwards) or close (downwards)
the air inlet.
8. Can holder and ashtray
This retractable and lit support contains
up to two can holders, a removable
ashtray and a location for the lighter
when it is used as a 12 V socket
(120 W).
9. Storage compartment or
additional telematics control
The storage compartment must not be
used as an ashtray.
If fi tted on your vehicle, the additional
telematics control is located on the
centre console.
10. Storage compartment
11. Door tray with space for a bottle
of water
Bluetooth.
Page 82 of 234

80
Practical information
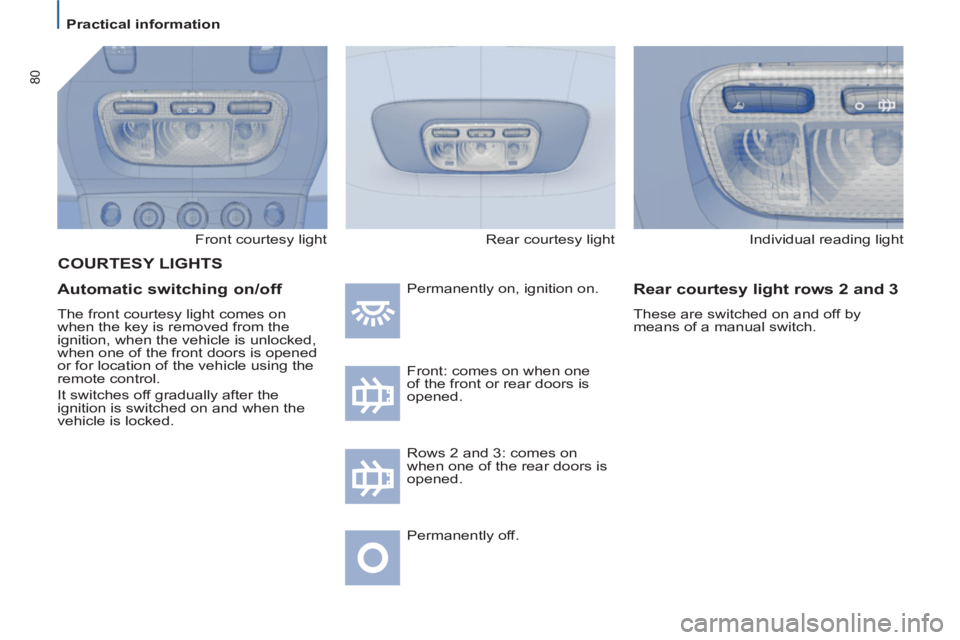
Front courtesy light
Automatic switching on/off
The front courtesy light comes on
when the key is removed from the
ignition, when the vehicle is unlocked,
when one of the front doors is opened
or for location of the vehicle using the
remote control.
It switches off gradually after the
ignition is switched on and when the
vehicle is locked. Permanently on, ignition on.
Front: comes on when one
of the front or rear doors is
opened.
Permanently off. Individual reading light
Rear courtesy light rows 2 and 3
These are switched on and off by
means of a manual switch.
COURTESY LIGHTS
Rows 2 and 3: comes on
when one of the rear doors is
opened. Rear courtesy light
Page 104 of 234

102
Child safety
ADVICE ON CHILD SEATS
The incorrect installation of a child seat
in a vehicle compromises the child's
protection in the event of an accident.
Remember to fasten the seat belts or
the child seat harnesses keeping the
slack
in relation to the child's body to a
minimum
, even for short journeys.
To protect young children from the
rays of the sun, fi t side blinds to
the rear windows.
CHILD MONITORING MIRROR
This mirror enables the driver or front
passenger to observe all the rear
seats.
Fitted on its own ball joint and able to
retract into its housing in the roof, it
provides a panoramic view of the rear
interior of the vehicle. For optimum installation of the "forward
facing" child seat, ensure that the back of
the child seat is in contact with the back
of the vehicle's seat and that the head
restraint does not cause any discomfort.
If the head restraint has to be removed,
ensure that it is stored or attached
securely to prevent it from being
thrown around the vehicle in the event
of sharp braking.
Children under the age of 10 must not
travel in the "forward facing" position
on the front passenger seat, unless
the rear seats are already occupied by
other children, cannot be used or are
absent.
Deactivate the passenger airbag when
a "rear facing" child seat is installed on
the front seat.
Otherwise, the child would risk being
seriously injured or killed if the airbag
were to infl ate.
As a safety precaution, do not leave:
- one or more children alone and
unsupervised in a vehicle,
- a child or an animal in a vehicle
which is exposed to the sun, with
the windows closed,
- the keys within reach of children
inside the vehicle.
To prevent accidental opening of the
doors, use the "Child Lock".
Take care not to open the rear windows
by more than one third.
Installing a booster seat
The chest part of the seat belt must
be positioned on the child's shoulder
without touching the neck.
Ensure that the lap part of the seat belt
passes correctly over the child's thighs.
PEUGEOT recommends the use of a
booster seat which has a back, fi tted
with a seat belt guide at shoulder level.
Page 111 of 234

109
Fuel
CHECKS
6
LOW FUEL LEVEL
Filling with fuel
The tank must be fi lled with fuel with
the engine off
.
- Open the fuel fi ller fl ap.
- Insert the key then turn it to the left.
- Remove the cap and attach it to
the clip located on the inside of the
fl ap.
It is usual to hear an air intake noise
when opening the cap as there is a
vacuum linked with the sealing of the
fuel circuit.
A label on the inside of the fl ap
indicates which type of fuel to use.
More than 5 litres of fuel must be
added in order to be registered by the
fuel gauge.
If you fi ll your tank, do not continue
after the third cut-off of the pump
nozzle. This could result in vehicle
malfunctions.
FILLING THE FUEL TANK
If the warning light fl ashes, this
indicates a fuel gauge malfunction.
Consult a PEUGEOT dealer.
When the tank's minimum
level is reached, this warning
light comes on, accompanied
by the message "Fuel level
low"
on the display. When
this warning light fi rst comes on, you
have approximately 8 litres
left,
depending on driving conditions and
the engine.
Fill up with fuel as soon as possible to
avoid running out.
Never continue to drive until you run
out of fuel as this could damage the
emission control and injection systems.
The capacity of the tank is
approximately 18 gallons ( 80
litres).
- After fi lling the tank, lock the cap
and close the fl ap.
When the fuel fi ller fl ap is open, a
system limits the opening of the
rear left sliding side door.
The key cannot be removed from the
cap's lock until the cap is refi tted on the
tank.
Page 127 of 234

125
QUICK HELP
7
Changing a fuse
INSTRUMENT PANEL FUSES
- Open the lower glove box on the right-hand side.
- Pull the handle to open the cover and access the fuses.
N°
Rating
(Amps)
Functions
1
15
Rear wiper.
2
- Not used.
3
5
Airbag control unit.
4
10
Steering wheel angle sensor, Diagnostic socket, ESP sensor, Manual air conditioning, Clutch
switch, Headlamp beam height, Particle emission fi lter pump, Electrochromatic interior mirror.
5
30
Electric mirrors, Passenger's electric window motor, Sunroof row 1.
6
30
Front electric windows supply.
7
5
Courtesy lights, Glove box light, Courtesy mirror lights, Entertainment screen lights row 2.
8
20
Multifunction display, Anti-theft alarm siren, Audio equipment, Compact disc changer, Audio/
telephone, Diesel additive control unit, Tyre under-infl ation detection control unit, Sliding doors
module control unit.
9
30
Lighter.
10
15
Steering wheel switching, Trailer fuse box.
11
15
Diagnostic socket, Ignition switch, Automatic gearbox (4-speed).
12
15
Driver's seat memory unit, Passenger's electric seat, Airbag control unit, Parking assistance
control unit, Sliding side door buttons, Hands-free kit, Automatic gearbox (6-speed).
13
5
Engine fuse box, Trailer fuse box.
14
15
Rain sensor, Automatic air conditioning, Instrument panel, Sunroofs, Odometer warning lights
unit, Audio-telematics control.
15
30
Passenger's lock locking.
16
30
Locking/unlocking of the accesses.
17
40
Heated rear screen.
Page 223 of 234

139
VISUAL SEARCH
10
Exterior
Spare wheel, jack, changing,
fi tting 117-120 Rear lamps, direction indicators,
3rd brake lamp 43-45, 123
Changing rear bulbs 122-123 Accessories 107
Sun roof 26
Roof bars 105
Fuel fi ller cap 109
Fuel tank 31, 109
Fuel cut-off/priming 110
Boot, tailgate 25
Parking sensors 87
Towing, lifting 131
Towbar 103-104
Brakes 86, 88-89
ABS, EBFD 88
ASR, ESP 89
Tyre under-infl ation detection 90 Opening/closing doors 23-24
Locks 18
Opening/closing the bonnet 111
Electric child lock 25
Wiper blade 46, 130
Door mirror 82
Front lamps/foglamps,
direction indicators 43-45
Headlamp beam
height adjustment 45
Headlamp wash 46, 114
Changing front bulbs 121-122 Very cold climate screen 106 Key, starting, battery 18-21, 42
Central locking 18, 23
Alarm 22
EXTERIOR
Infl ating, pressure 17
Tyres, pressure 17