2013 Peugeot 508 Hybrid towing
[x] Cancel search: towingPage 82 of 340
80
Comfort
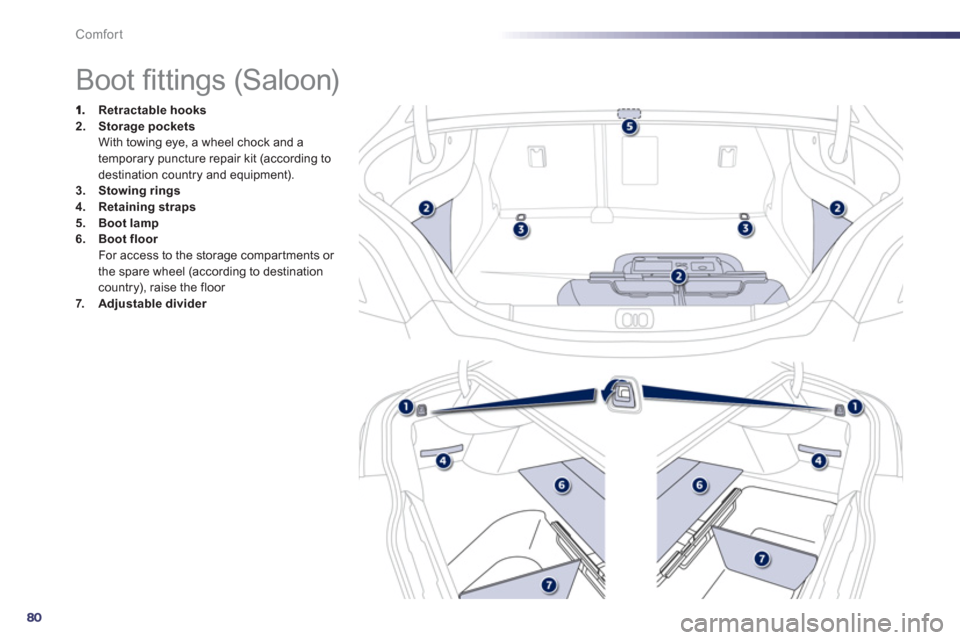
Boot fi ttings (Saloon)
Retractable hooks2.Storage pockets
With towing eye, a wheel chock and a
temporary puncture repair kit (according to
destination country and equipment).3.Stowing rings4.Retaining straps5.Boot lamp6.Boot floorFor access to the storage compar tments or
the spare wheel (according to destinationcountry), raise the floor 7.Adjustable divider
Page 83 of 340
3
81
Comfort
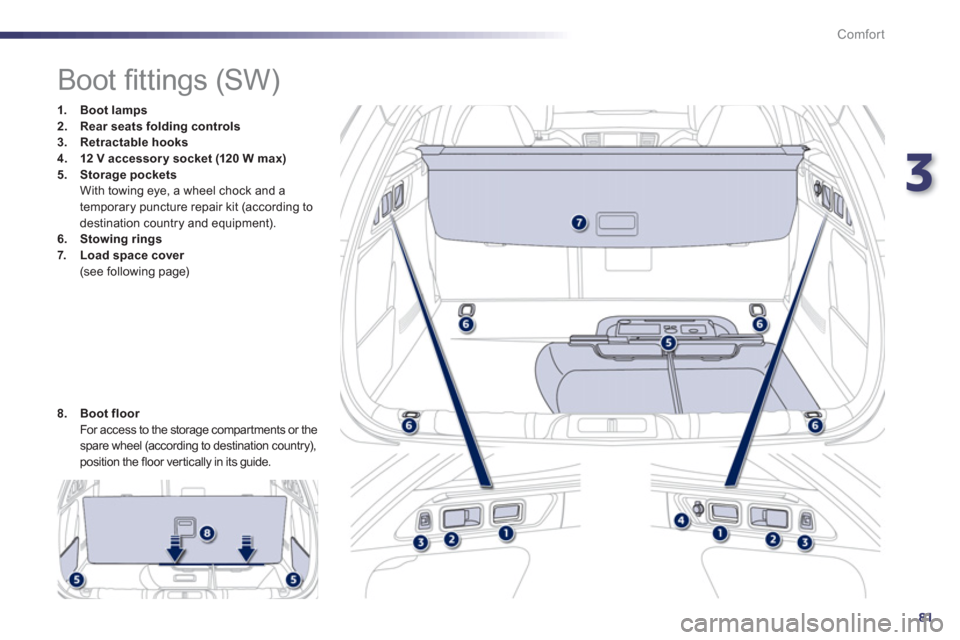
Boot fi ttings (SW)
1.Boot lamps2.Rear seats folding controls3.Retractable hooks
4.12 V accessory socket (120 W max)5.Storagepockets
With towing eye, a wheel chock and a
temporary puncture repair kit (according to
destination country and equipment).
6.Stowing rings7.Load space cover (see following page)
8.Boot floor
For access to the storage compar tments or the spare wheel (according to destination country), position the floor ver tically in its guide.
Page 85 of 340
3
83
Comfort
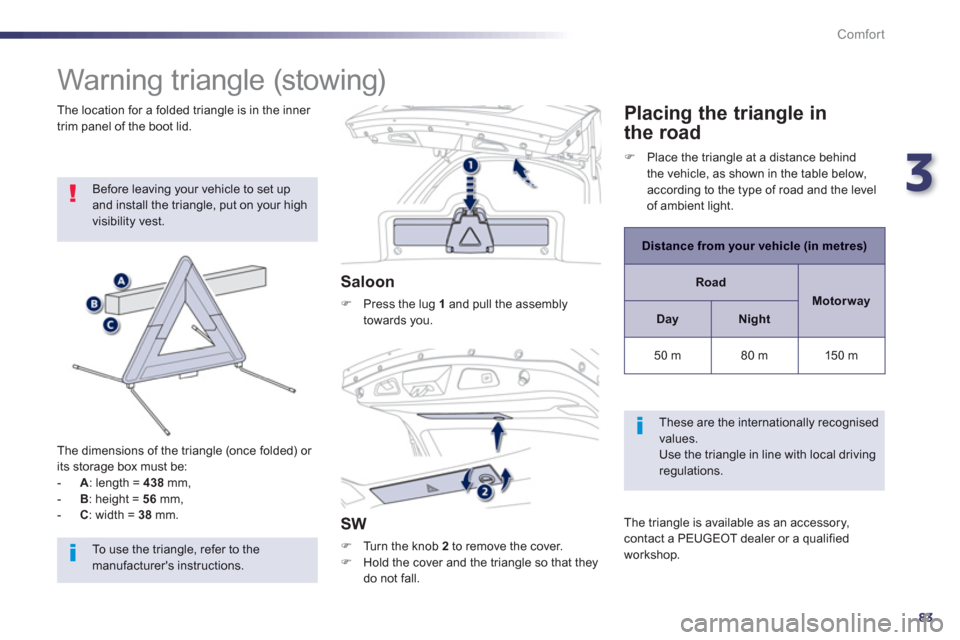
Warning triangle (stowing)
Before leaving your vehicle to set up and install the triangle, put on your high visibility vest.
The dimensions o
f the triangle (once folded) or its storage box must be:
-
A
: length = 438mm,
-
B: height = 56
mm,
- C: width = 38mm.
Saloon
FPress the lug 1and pull the assembly
towards you.
SW
FTurn the knob 2 to remove the cover.FHold the cover and the triangle so that theydo not fall.
The location for a folded trian
gle is in the inner
trim panel of the boot lid.Placing the triangle in
t
he road
Distance from your vehicle (in metres)
Road
Motorway
DayNight
50 m 80 m
150 m
These are the internationally recognisedvalues.
Use the triangle in line with local driving regulations.
The trian
gle is available as an accessory, contact a PEUGEOT dealer or a qualified
workshop.
F Place the triangle at a distance behindthe vehicle, as shown in the table below,
according to the type of road and the level
of ambient light.
To use the triangle, refer to themanufacturer's instructions.
Page 89 of 340
3
87
Comfort
In order for these systems to be fully effective, follow the operation and maintenance guidelines below: F
If the interior temperature remains very high after the vehicle has been parked in the sun for a considerable time, first ventilate the passenger compar tment for a few minutes. Place the air flow control at a sufficient level to provide an adequate renewal of air in the passenger compartment.F
To obtain an even air distribution, take care not to obstruct the exterior air intake grilles located at the base of the windscreen, the nozzles, the vents and the air outlets, as wellas the air extractor located in the boot. F
Use in preference the intake of exterior air as prolonged use of the air recirculation maycause misting of the windows and side windows.F
Do not cover the sunshine sensor, located on the dashboard; this is used for regulation of the automatic air conditioning system.F
Operate the air conditioning system for 5 to 10 minutes, once or twice a month to keep itin good working order. F
Ensure that the passenger compar tment filter is in good condition and have the filter elements replaced regularly (refer to the "Checks" section). We recommend the use of a combined passenger compartment filter. Thanks to its second special active filter, it contributes to the purification of the air breathed by the occupants and the cleanliness of the passenger compartment (reduction of allergic symptoms, bad odours and greasy deposits).F
The air conditioning uses power from the engine while operating. This results in anincrease in the vehicle's fuel consumption. When towing at or near maximum capacity or on steep slopes in high ambient temperatures, switching off the air conditioning saves engine power and so improvestowing capacity. Condensation created by the air conditioning results in a discharge of water under thevehicle when stationary, which is per fectly normal.F
To ensure correct operation of the air conditioning system, you are also advised to haveit checked regularly.F
If the system does not produce cold air, do not use it and contact a PEUGEOT dealer or a qualified workshop.
Recommendations for ventilation and air conditioning
The air conditioning system does notcontain chlorine and does not present any danger to the ozone layer.
Page 105 of 340
4
103
Driving
It is recommended that you do not apply the parking brake in very cold conditions (ice) and during towing
(breakdown, caravan...). Deactivate theautomatic functions and release theparking brake manually.
Before leaving the vehicle, check that parking brake warning lamps in the instrument panel and the control lever Aare on, not flashing.
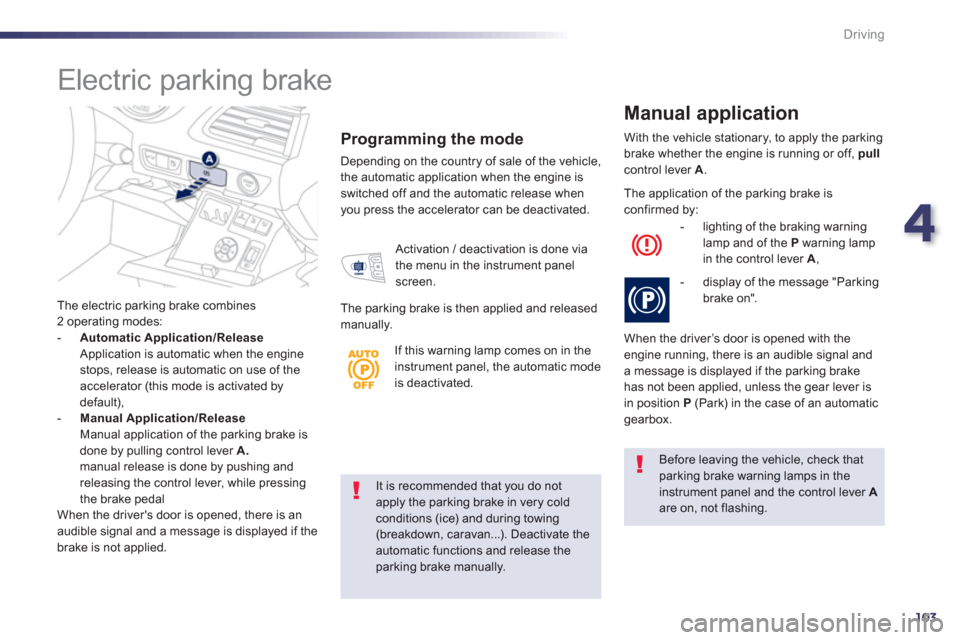
The electric parking brake combines
2 operating modes:
-
Automatic Application/Release Application is automatic when the engine stops, release is automatic on use of the accelerator (this mode is activated by
default), -Manual Application/Release Manual application of the parking brake is done by pulling control lever A. manual release is done by pushing and releasing the control lever, while pressing
the brake pedal
When the driver's door is opened, there is an
audible si
gnal and a message is displayed if the
brake is not applied.
Programming the mode
Depending on the country of sale of the vehicle,
the automatic application when the engine is switched off and the automatic release whenyou press the accelerator can be deactivated. With the vehicle stationary, to apply the parking
brake whether the en
gine is running or off, pull
control lever A
.
Manual application
Activation / deactivation is done via
the menu in the instrument panel
screen.
The parkin
g brake is then applied and released
manually. The application o
f the parking brake isconfirmed by:
- li
ghting of the braking warning lamp and of the Pwarning lamp
in the control lever A,
- displa
y of the message "Parking brake on".
When the driver’s door is opened with the
engine running, there is an audible signal and
a message is displayed if the parking brake
has not been applied, unless the gear lever is in position P(Park) in the case of an automatic gearbox.
Electric parking brake
If this warning lamp comes on in the instrument panel, the automatic modeis deactivated.
Page 106 of 340
104
Driving
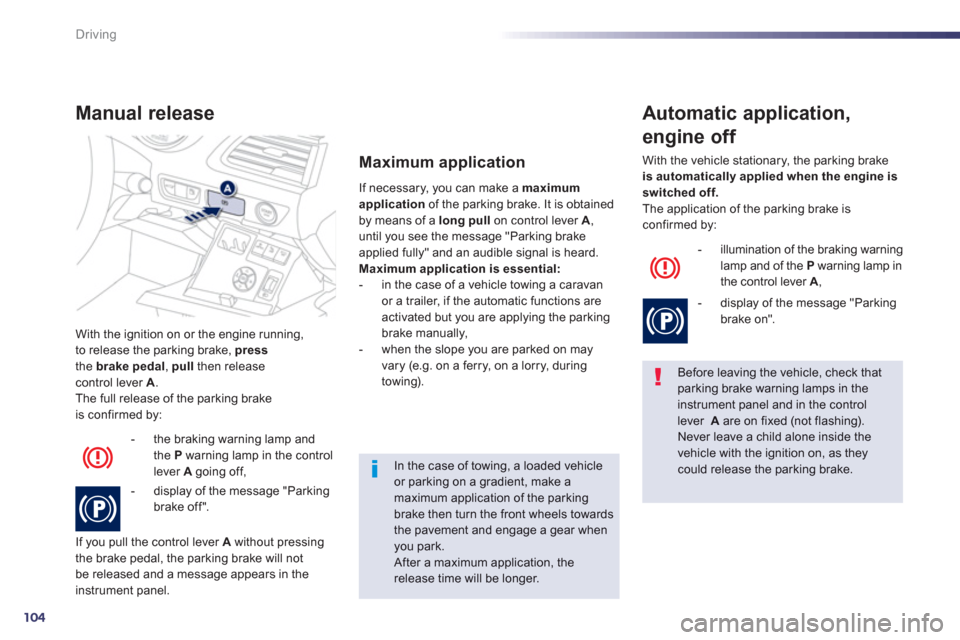
With the ignition on or the engine running,
to release the parking brake, pressthe brakepedal
, pullthen releasecontrol lever A
.
The full release of the parking brake
is confirmed by:
Manual release
- the braking warning lamp and
the P warning lamp in the controllever A
going off,
- displa
y of the message "Parking brake off".
I
f you pull the control lever Awithout pressing
the brake pedal, the parking brake will not
be released and a message appears in the
instrument panel. If necessar
y, you can make a maximum
applicationof the parking brake. It is obtained by means of a long pullon control lever A,
until you see the message "Parking brake
applied fully" and an audible signal is heard.Maximum application is essential:
- in the case of a vehicle towing a caravanor a trailer, if the automatic functions are
activated but you are applying the parkingbrake manually,
- when the slope you are parked on mayvary (e.g. on a ferry, on a lorry, during
towing).
Maximum application
Before leaving the vehicle, check that parking brake warning lamps in the instrument panel and in the control lever A
are on fixed (not flashing).
Never leave a child alone inside thevehicle with the ignition on, as they could release the parking brake.
Automatic application,
engine off
- illumination of the braking warning
lamp and of the Pwarning lamp in
the control lever A ,
- displa
y of the message "Parkingbrake on".
With the vehicle stationary, the parking brake is automatically applied when the engine is
switched off. The application of the parking brake is confirmed by:
In the case of towing, a loaded vehicleor parking on a gradient, make amaximum application of the parkingbrake then turn the front wheels towards the pavement and engage a gear whenyou park.
After a maximum application, the release time will be longer.
Page 180 of 340
178
Practical information
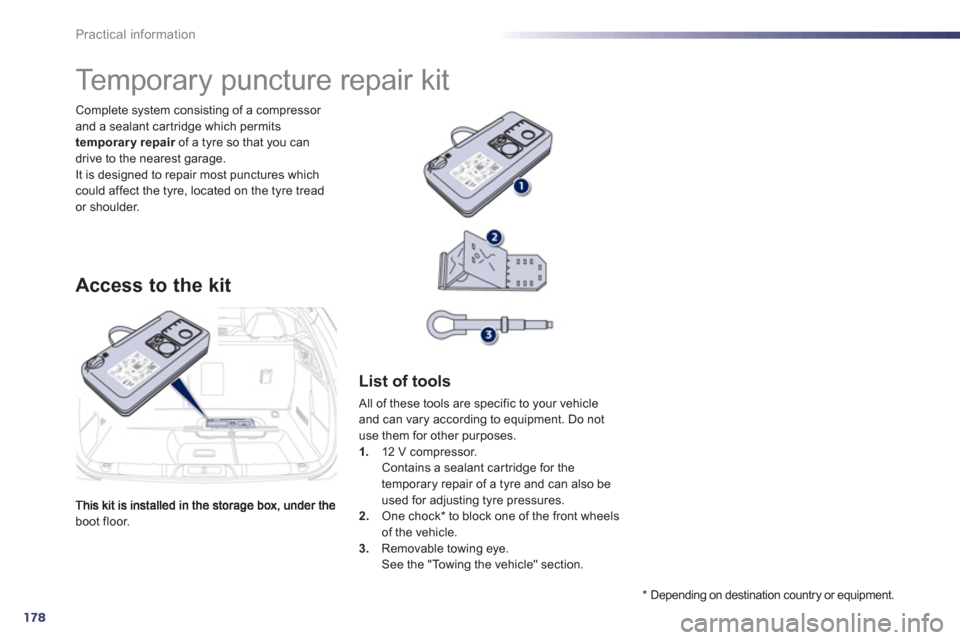
boot floor. Complete s
ystem consisting of a compressor and a sealant car tridge which permits
temporary repair of a tyre so that you can rdrive to the nearest garage.It is designed to repair most punctures which could affect the tyre, located on the tyre tread or shoulder.
Temporary puncture repair kit
Access to the kit
List of tools
All of these tools are specific to your vehicle
and can vary according to equipment. Do not
use them for other purposes. 1.12 V compressor.
Contains a sealant car tridge for the
temporary repair of a tyre and can also be used for adjusting tyre pressures.
2. One chock *
to block one of the front wheels of the vehicle.3.
Removable towing eye.
See the "Towing the vehicle" section.
*
Dependin
g on destination country or equipment.
Page 186 of 340
184
Practical information
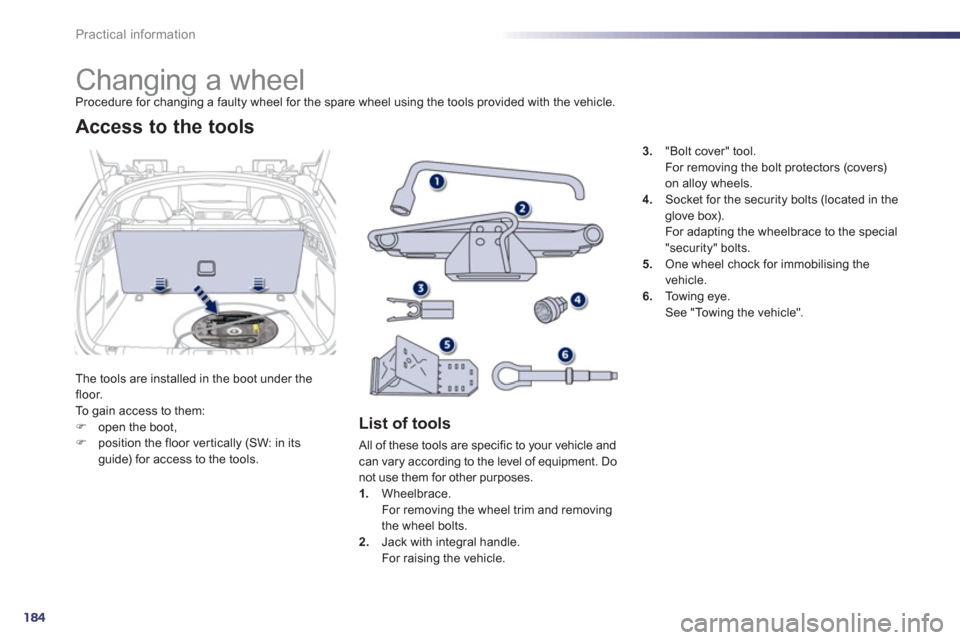
Changing a wheel Procedure for changing a faulty wheel for the spare wheel using the tools provided with the vehicle.
Th
e tools are installed in the boot under the
floor.
To gain access to them: Fopen the boot, Fposition the floor ver tically (SW: in itsguide) for access to the tools.
Access to the tools
List of tools
All of these tools are specific to your vehicle andcan vary according to the level of equipment. Do
not use them for other purposes.
1.Wheelbrace.
For removing the wheel trim and removing
the wheel bolts.
2. Jack with integral handle.
For raising the vehicle.
3."Bolt cover" tool.
For removing the bolt protectors
(covers)
on alloy wheels.4. Socket for the security bolts (located in the glove box).
For adapting the wheelbrace to the special
"security" bolts.
5. One wheel chock for immobilising the
vehicle.
6.Towing eye.
See "Towing the vehicle".