2013 PEUGEOT 5008 head up
[x] Cancel search: head upPage 94 of 364
VIS
92
In fog or snow, the sunshine
sensor may detect suffi cient
light. In this case, the lighting
will not come on automatically.
Do not cover the sunshine sensor,
coupled with the rain sensor and lo-
cated in the centre of the windscreen
behind the rear view mirror; the as-
sociated functions would no longer
be controlled.
Automatic "guide-me-home" lightingAutomatic illumination of headlamps
When a low level of ambient light is de-
tected by a sunshine sensor, the num-
ber plate lamps, sidelamps and dipped
beam headlamps are switched on auto-
matically, without any action on the part of
the driver. They can also come on if rain is
detected, at the same time as automatic
operation of the windscreen wipers.
As soon as the brightness returns to a
suffi cient level or after the windscreen
wipers are switched off, the lamps are
switched off automatically.
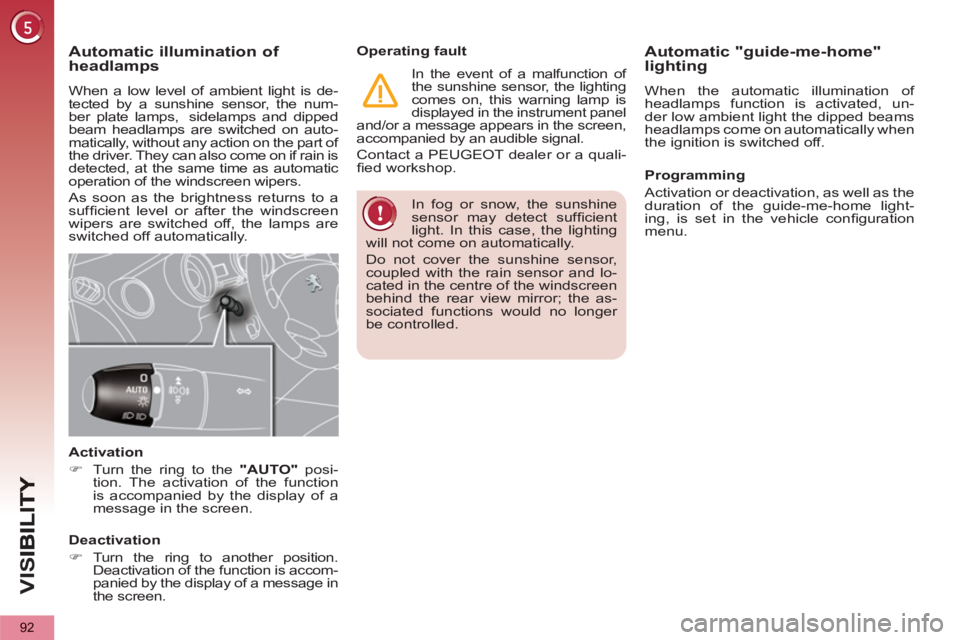
Activation
�)
Turn the ring to the "AUTO"
posi-
tion. The activation of the function
is accompanied by the display of a
message in the screen.
Deactivation
�)
Turn the ring to another position.
Deactivation of the function is accom-
panied by the display of a message in
the screen.
Operating fault
In the event of a malfunction of
the sunshine sensor, the lighting
comes on, this warning lamp is
displayed in the instrument panel
and/or a message appears in the screen,
accompanied by an audible signal.
Contact a PEUGEOT dealer or a quali-
fi ed workshop.
When the automatic illumination of
headlamps function is activated, un-
der low ambient light the dipped beams
headlamps come on automatically when
the ignition is switched off.
Programming
Activation or deactivation, as well as the
duration of the guide-me-home light-
ing, is set in the vehicle confi guration
menu.
Page 95 of 364
VIS
93
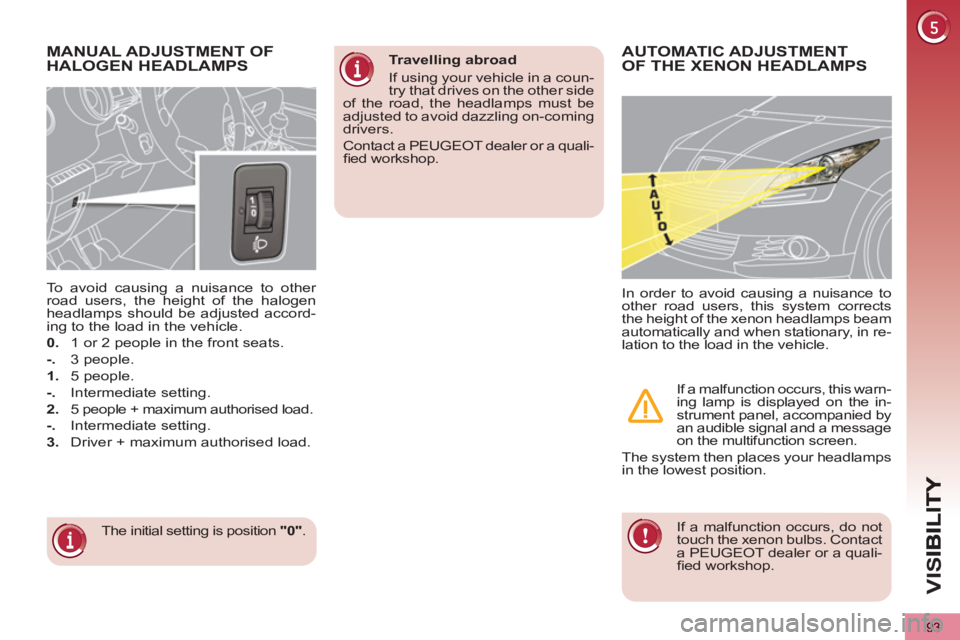
MANUAL ADJUSTMENT OF
HALOGEN HEADLAMPS
The initial setting is position "0"
.
To avoid causing a nuisance to other
road users, the height of the halogen
headlamps should be adjusted accord-
ing to the load in the vehicle.
0.
1 or 2 people in the front seats.
-.
3 people.
1.
5 people.
-.
Intermediate setting.
2.
5 people + maximum authorised load.
-.
Intermediate setting.
3.
Driver + maximum authorised load.
AUTOMATIC ADJUSTMENT
OF THE XENON HEADLAMPS
If a malfunction occurs, do not
touch the xenon bulbs. Contact
a PEUGEOT dealer or a quali-
fi ed workshop.
In order to avoid causing a nuisance to
other road users, this system corrects
the height of the xenon headlamps beam
automatically and when stationary, in re-
lation to the load in the vehicle.
If a malfunction occurs, this warn-
ing lamp is displayed on the in-
strument panel, accompanied by
an audible signal and a message
on the multifunction screen.
The system then places your headlamps
in the lowest position.
Travelling abroad
If using your vehicle in a coun-
try that drives on the other side
of the road, the headlamps must be
adjusted to avoid dazzling on-coming
drivers.
Contact a PEUGEOT dealer or a quali-
fi ed workshop.
Page 96 of 364
VIS
94
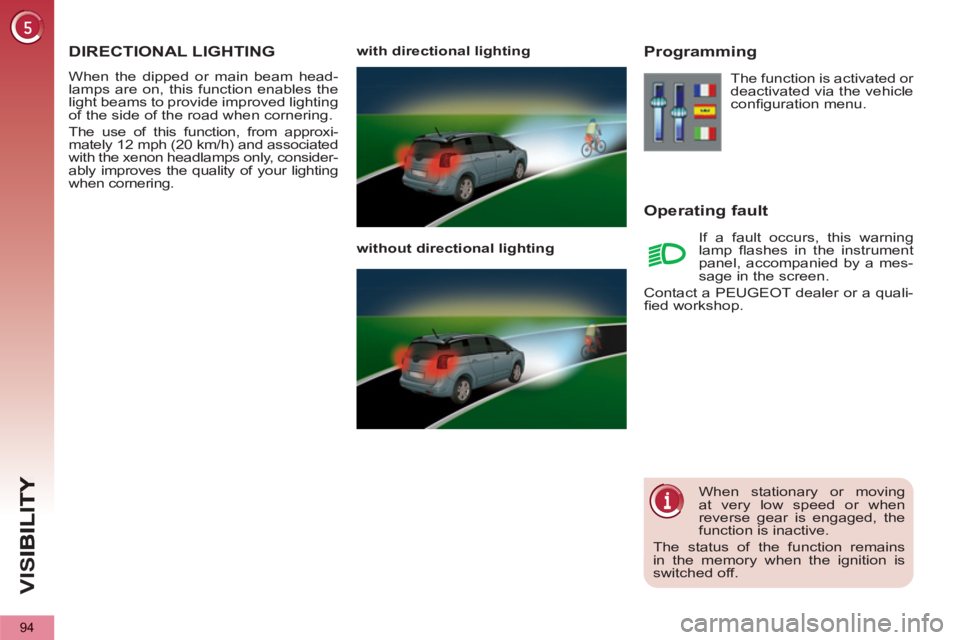
DIRECTIONAL LIGHTING
When the dipped or main beam head-
lamps are on, this function enables the
light beams to provide improved lighting
of the side of the road when cornering.
The use of this function, from approxi-
mately 12 mph (20 km/h) and associated
with the xenon headlamps only, consider-
ably improves the quality of your lighting
when cornering.
with directional lighting
without directional lighting
Programming
Operatin
g fault
The function is activated or
deactivated via the vehicle
confi guration menu.
If a fault occurs, this warning
lamp fl ashes in the instrument
panel, accompanied by a mes-
sage in the screen.
Contact a PEUGEOT dealer or a quali-
fi ed workshop.
When stationary or moving
at very low speed or when
reverse gear is engaged, the
function is inactive.
The status of the function remains
in the memory when the ignition is
switched off.
Page 98 of 364
VIS
96
Windscreen and headlamp
wash
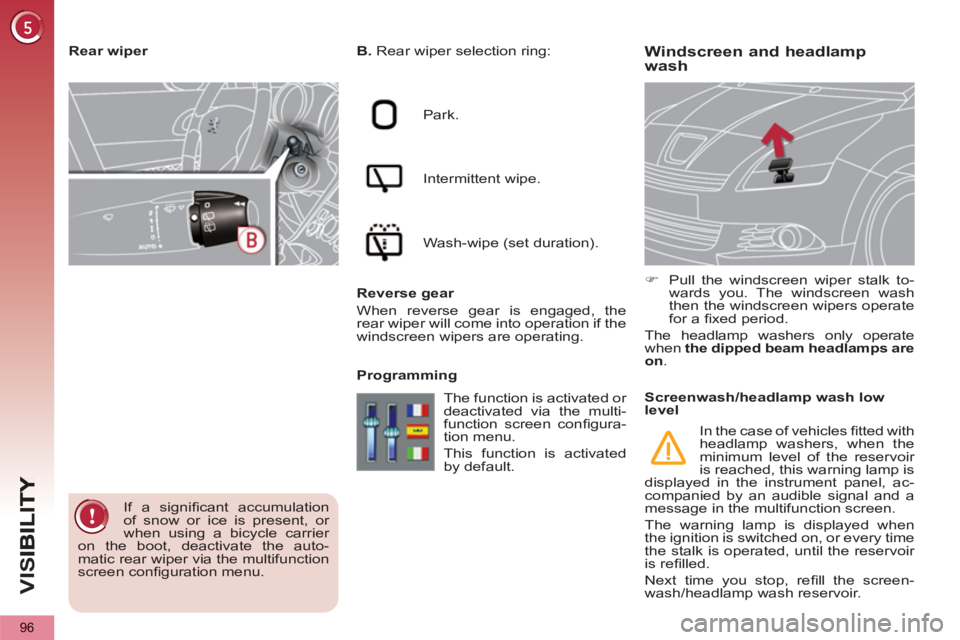
B.
Rear wiper selection ring:
Park.
Intermittent wipe.
Wash-wipe (set duration).
Reverse gear
When reverse gear is engaged, the
rear wiper will come into operation if the
windscreen wipers are operating.
Programming
�)
Pull the windscreen wiper stalk to-
wards you. The windscreen wash
then the windscreen wipers operate
for a fi xed period.
The headlamp washers only operate
when the dipped beam headlamps are
on
.
Rear wiper
If a signifi cant accumulation
of snow or ice is present, or
when using a bicycle carrier
on the boot, deactivate the auto-
matic rear wiper via the multifunction
screen confi guration menu. The function is activated or
deactivated via the multi-
function screen confi gura-
tion menu.
This function is activated
by default.
Screenwash/headlamp wash low
level
In the case of vehicles fi tted with
headlamp washers, when the
minimum level of the reservoir
is reached, this warning lamp is
displayed in the instrument panel, ac-
companied by an audible signal and a
message in the multifunction screen.
The warning lamp is displayed when
the ignition is switched on, or every time
the stalk is operated, until the reservoir
is refi lled.
Next time you stop, refi ll the screen-
wash/headlamp wash reservoir.
Page 101 of 364
VIS
99
INTERIOR MOOD LIGHTING INTERIOR WELCOME LIGHTING
The remote switching on of the passen-
ger compartment lighting makes your
approach to the vehicle easier in poor
light. It operates with the automatic il-
lumination of headlamps.
Switching on
�)
Press the open padlock on the re-
mote control.
The courtesy lamps come on; your ve-
hicle is also unlocked.
Switching off
The interior welcome lighting switches
off automatically after a set time or when
one of the doors is opened.
Programming
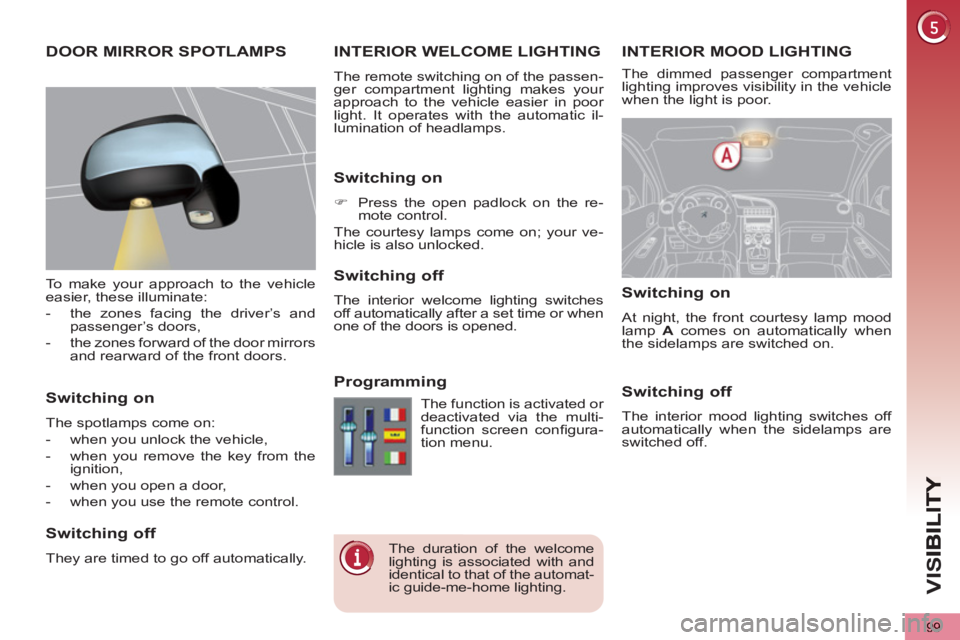
Switching on
At night, the front courtesy lamp mood
lamp A
comes on automatically when
the sidelamps are switched on.
Switching off
The interior mood lighting switches off
automatically when the sidelamps are
switched off.
The duration of the welcome
lighting is associated with and
identical to that of the automat-
ic guide-me-home lighting.
The function is activated or
deactivated via the multi-
function screen confi gura-
tion menu.
DOOR MIRROR SPOTLAMPS
To make your approach to the vehicle
easier, these illuminate:
- the zones facing the driver’s and
passenger’s doors,
- the zones forward of the door mirrors
and rearward of the front doors.
Switching on
The spotlamps come on:
- when you unlock the vehicle,
- when you remove the key from the
ignition,
- when you open a door,
- when you use the remote control.
Switching off
They are timed to go off automatically.
The dimmed passenger compartment
lighting improves visibility in the vehicle
when the light is poor.
Page 108 of 364
FITTINGS
106
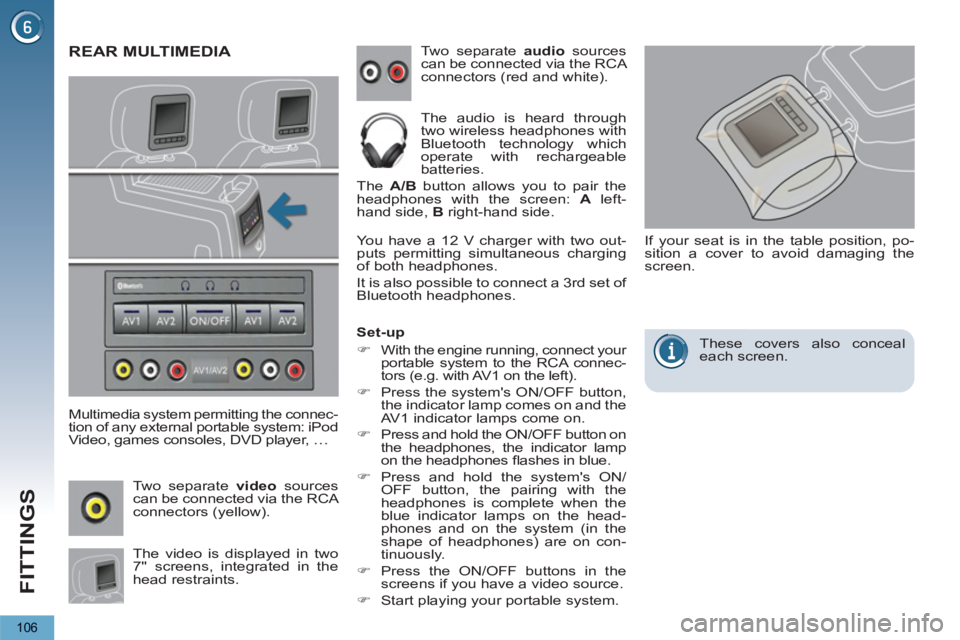
REAR MULTIMEDIA
Multimedia system permitting the connec-
tion of any external portable system: iPod
Video, games consoles, DVD player, … Two separate audio
sources
can be connected via the RCA
connectors (red and white).
The audio is heard through
two wireless headphones with
Bluetooth technology which
operate with rechargeable
batteries.
The A/B
button allows you to pair the
headphones with the screen: A
left-
hand side, B
right-hand side.
The video is displayed in two
7'' screens, integrated in the
head restraints. Two separate video
sources
can be connected via the RCA
connectors (yellow).
You have a 12 V charger with two out-
puts permitting simultaneous charging
of both headphones.
It is also possible to connect a 3rd set of
Bluetooth headphones.
Set-up
�)
With the engine running, connect your
portable system to the RCA connec-
tors (e.g. with AV1 on the left).
�)
Press the system's ON/OFF button,
the indicator lamp comes on and the
AV1 indicator lamps come on.
�)
Press and hold the ON/OFF button on
the headphones, the indicator lamp
on the headphones fl ashes in blue.
�)
Press and hold the system's ON/
OFF button, the pairing with the
headphones is complete when the
blue indicator lamps on the head-
phones and on the system (in the
shape of headphones) are on con-
tinuously.
�)
Press the ON/OFF buttons in the
screens if you have a video source.
�)
Start playing your portable system.
If your seat is in the table position, po-
sition a cover to avoid damaging the
screen.
These covers also conceal
each screen.
Page 125 of 364
CHILD SAFETY
123
ADVICE ON CHILDSEATS
The incorrect installation of a child
seat in a vehicle compromises the
child's protection in the event of an
accident.
Remember to fasten the seat belts or
the child seat harnesses keeping the
slack relative to the child's body to a
minimum, even for short journeys.
When installing a child seat using the
seat belt, ensure that the seat belt is
tightened correctly on the child seat
and that it secures the child seat fi rm-
ly on the seat of your vehicle. If your
passenger seat is adjustable, move it
forwards if necessary.
For optimum installation of the "for-
wards-facing" child seat, ensure that
the back of the child seat is in contact
with the back of the vehicle's seat
and that the head restraint does not
cause any discomfort.
If the head restraint has to be removed,
ensure that it is stored or attached se-
curely to prevent it from being thrown
around the vehicle in the event of
sharp braking.
Installing a booster seat
The chest part of the seat belt must
be positioned on the child's shoulder
without touching the neck.
Ensure that the lap part of the seat
belt passes correctly over the child's
thighs.
PEUGEOT recommends the use of
a booster seat which has a back, fi t-
ted with a seat belt guide at shoulder
level.
As a safety precaution, do not leave:
- a child or children alone and un-
supervised in a vehicle,
- a child or an animal in a vehicle
which is exposed to the sun, with
the windows closed,
- the keys within reach of children
inside the vehicle. To prevent accidental opening of
the doors and rear windows, use
the "Child lock".
Take care not to open the rear win-
dows by more than one third.
To protect young children from the
rays of the sun, fi t side blinds on the
rear windows.
Children under the age of 10 must
not travel in the "forwards-facing"
position on the front passenger seat,
unless the rear seats are already oc-
cupied by other children, cannot be
used or are absent.
Deactivate the passenger airbag
when a "rearwards-facing" child seat
is installed on the front seat.
Otherwise, the child would risk being
seriously injured or killed if the airbag
were to infl ate.
Page 126 of 364
CHILD SAFETY
124
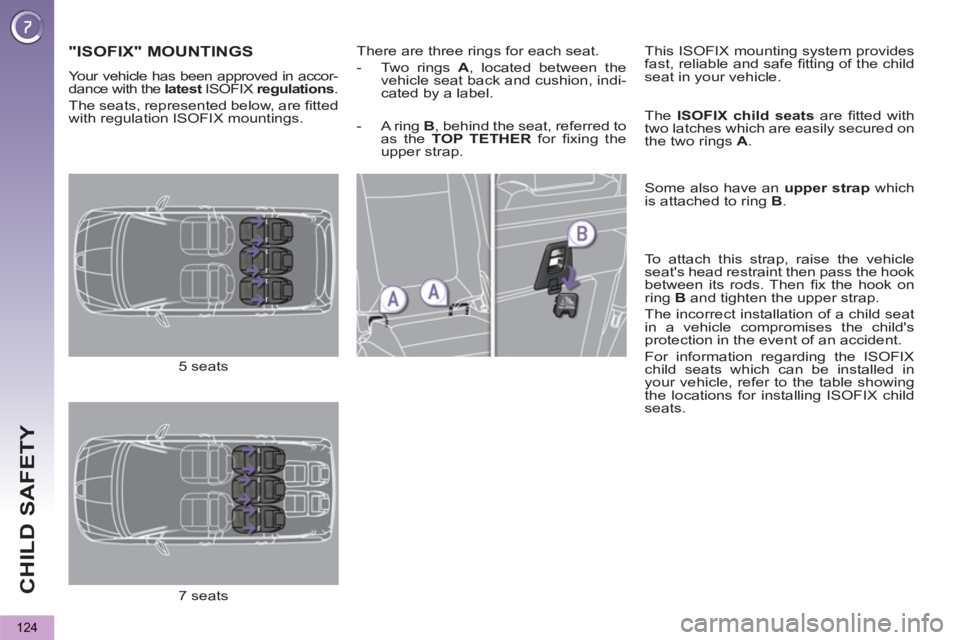
"ISOFIX" MOUNTINGS
There are three rings for each seat.
- Two rings A
, located between the
vehicle seat back and cushion, indi-
cated by a label.
This ISOFIX mounting system provides
fast, reliable and safe fi tting of the child
seat in your vehicle.
The ISOFIX child seats
are fi tted with
two latches which are easily secured on
the two rings A
.
Some also have an upper strap
which
is attached to ring B
.
To attach this strap, raise the vehicle
seat's head restraint then pass the hook
between its rods. Then fi x the hook on
ring B
and tighten the upper strap.
The incorrect installation of a child seat
in a vehicle compromises the child's
protection in the event of an accident.
For information regarding the ISOFIX
child seats which can be installed in
your vehicle, refer to the table showing
the locations for installing ISOFIX child
seats.
5 seats
7 seats
Your vehicle has been approved in accor-
dance with the latest
ISOFIX regulation
s
.
The seats, represented below, are fi tted
with regulation ISOFIX mountings.
- A ring B
, behind the seat, referred to
as the TOP TETHER
for fi xing the
upper strap.