Page 177 of 364
CHECKS
175
PETROL ENGINES
The various caps and covers allow access for checking the levels of the various fl uids and for replacing certain components.
1.
Power steering reservoir.
2.
Screenwash and headlamp wash
reservoir.
3.
Coolant reservoir.
4.
Brake fl uid reservoir.
5.
Battery/Fuses.
6.
Fusebox.
7.
Air fi lter.
8.
Engine oil dipstick.
9.
Engine oil fi ller cap.
Page 178 of 364
CHECKS
176
DIESEL ENGINES
The various caps and covers allow access for checking the levels of the various fl uids, for replacing certain components and
for priming the fuel system.
1.
Power steering reservoir.
2.
Screenwash and headlamp wash
reservoir.
3.
Coolant reservoir.
4.
Brake fl uid reservoir.
5.
Battery/Fuses.
6.
Fusebox.
7.
Air fi lter.
8.
Engine oil dipstick.
9.
Engine oil fi ller cap.
10.
Priming pump * .
11 .
Bleed screw * .
*
According to engine.
Page 179 of 364

CHECKS
177
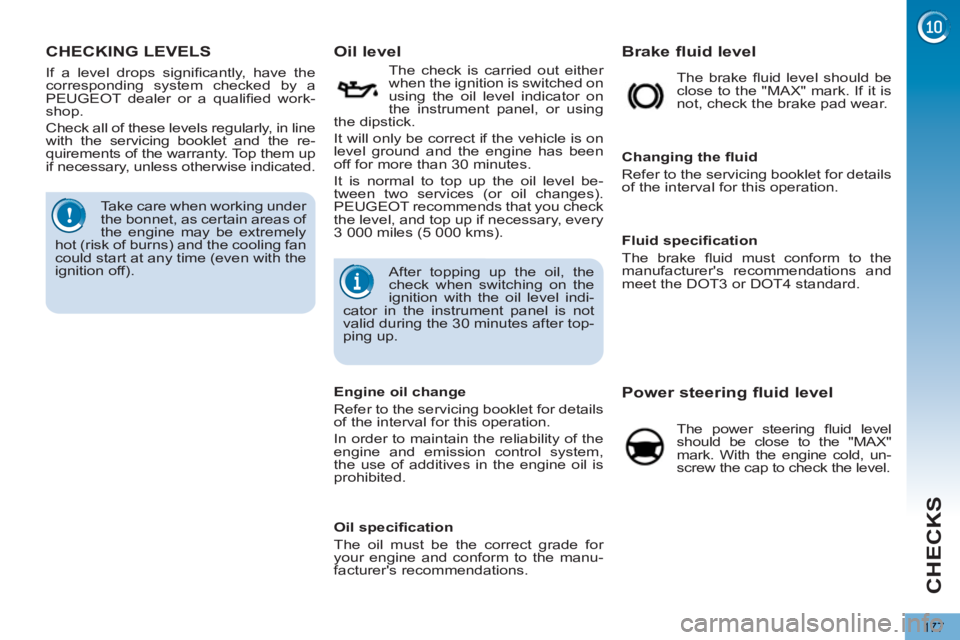
CHECKING LEVELS
Oil level
The check is carried out either
when the ignition is switched on
using the oil level indicator on
the instrument panel, or using
the dipstick.
It will only be correct if the vehicle is on
level ground and the engine has been
off for more than 30 minutes.
It is normal to top up the oil level be-
tween two services (or oil changes).
PEUGEOT recommends that you check
the level, and top up if necessary, every
3 000 miles (5 000 kms).
Take care when working under
the bonnet, as certain areas of
the engine may be extremely
hot (risk of burns) and the cooling fan
could start at any time (even with the
ignition off).
If a level drops signifi cantly, have the
corresponding system checked by a
PEUGEOT dealer or a qualifi ed work-
shop.
Check all of these levels regularly, in line
with the servicing booklet and the re-
quirements of the warranty. Top them up
if necessary, unless otherwise indicated.
Power steering fluid level
The power steering fl uid level
should be close to the "MAX"
mark. With the engine cold, un-
screw the cap to check the level.
Fluid specifi cation
The brake fl uid must conform to the
manufacturer's recommendations and
meet the DOT3 or DOT4 standard.
Changing the fl uid
Refer to the servicing booklet for details
of the interval for this operation.
Brake fluid level
The brake fl uid level should be
close to the "MAX" mark. If it is
not, check the brake pad wear.
Engine oil change
Refer to the servicing booklet for details
of the interval for this operation.
In order to maintain the reliability of the
engine and emission control system,
the use of additives in the engine oil is
prohibited. After topping up the oil, the
check when switching on the
ignition with the oil level indi-
cator in the instrument panel is not
valid during the 30 minutes after top-
ping up.
Oil specifi cation
The oil must be the correct grade for
your engine and conform to the manu-
facturer's recommendations.
Page 184 of 364
PRACTICAL INFORMATION
182
Description of the kit
A.
"Sealant" or "Air" position selector.
B.
On "I"
/ off "O"
switch.
C.
Defl ation button.
D.
Pressure gauge (in bar or p.s.i.).
E.
Compartment housing:
- a cable with adaptor for 12 V
socket,
- various infl ation adaptors for ac-
cessories, such as balls, bicycle
tyres...
F.
Sealant cartridge.
G.
White pipe with cap for repair.
H.
Black pipe for infl ation.
I.
Speed limit sticker.
The speed limit sticker I
must
be affi xed to the vehicle's
steering wheel to remind you
that a wheel is in temporary use.
Do not exceed a speed of 50 mph
(80 km/h) when driving with a tyre re-
paired using this type of kit.
Page 189 of 364

PRACTICAL INFORMATION
187
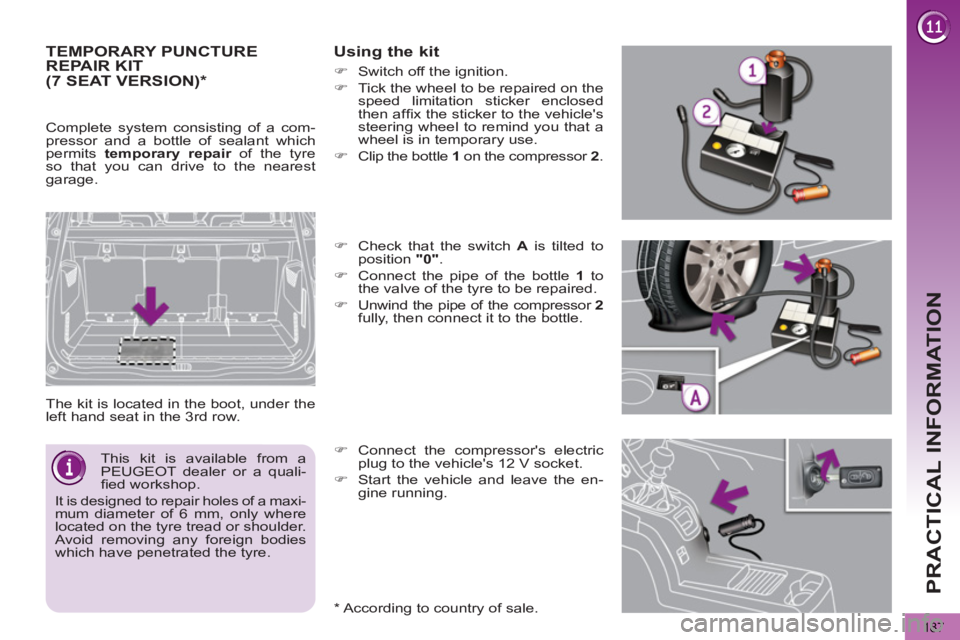
TEMPORARY PUNCTURE REPAIR KIT
The kit is located in the boot, under the
left hand seat in the 3 rd row.
Using the kit
*
According to country of sale.
�)
Connect the compressor's electric
plug to the vehicle's 12 V socket.
�)
Start the vehicle and leave the en-
gine running.
This kit is available from a
PEUGEOT dealer or a quali-
fi ed workshop.
It is designed to repair holes of a maxi-
mum diameter of 6 mm, only where
located on the tyre tread or shoulder.
Avoid removing any foreign bodies
which have penetrated the tyre.
(7 SEAT VERSION) *
Complete system consisting of a com-
pressor and a bottle of sealant which
permits temporary repair
of the tyre
so that you can drive to the nearest
garage.
�)
Check that the switch A
is tilted to
position "0"
.
�)
Connect the pipe of the bottle 1
to
the valve of the tyre to be repaired.
�)
Unwind the pipe of the compressor 2
fully, then connect it to the bottle.
�)
Switch off the ignition.
�)
Tick the wheel to be repaired on the
speed limitation sticker enclosed
then affi x the sticker to the vehicle's
steering wheel to remind you that a
wheel is in temporary use.
�)
Clip the bottle 1
on the compressor 2
.
Page 205 of 364
PRACTICAL INFORMATION
203
Access to the fuses
�)
Refer to the paragraph "Access to
the tools".
Fuse
N°
Rating
(A)
Functions
F8
20
Audio system, audio/telephone, CD changer,
multifunction screen, tyre under-infl ation detection,
alarm siren, alarm control unit, telematic unit.
F9
30
Front 12 V socket, cigarette lighter, rear 12 V socket.
F10
15
Steering mounted controls.
F11
15
Low current ignition switch.
F12
15
Trailer presence, rain / brightness sensor, supply
for fuses F32, F34, F35.
F13
5
Engine fusebox, airbag control unit.
F14
15
Instrument panel, instrument panel screen, supply
for fuse F33.
F15
30
Locking and deadlocking.
F17
40
Rear screen demist/defrost, supply for fuse F30.
SH
-
PARC shunt.
Page 207 of 364

PRACTICAL INFORMATION
205
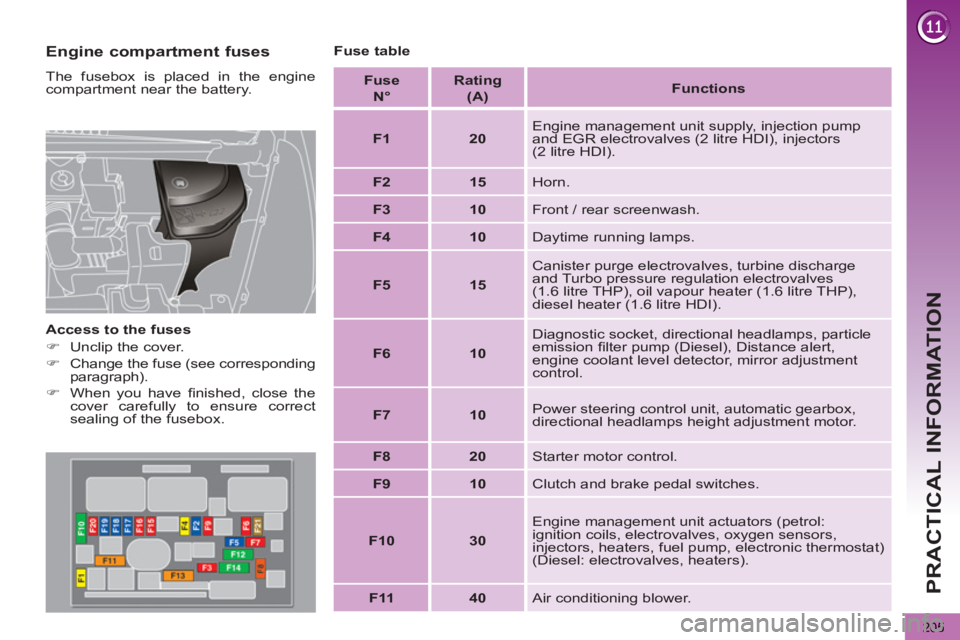
Engine compartment fuses
The fusebox is placed in the engine
compartment near the battery.
Access to the fuses
�)
Unclip the cover.
�)
Change the fuse (see corresponding
paragraph).
�)
When you have fi nished, close the
cover carefully to ensure correct
sealing of the fusebox.
Fuse table
Fuse
N°
Rating
(A)
Functions
F1
20
Engine management unit supply, injection pump
and EGR electrovalves (2 litre HDI), injectors
(2 litre HDI).
F2
15
Horn.
F3
10
Front / rear screenwash.
F4
10
Daytime running lamps.
F5
15
Canister purge electrovalves, turbine discharge
and Turbo pressure regulation electrovalves
(1.6 litre THP), oil vapour heater (1.6 litre THP),
diesel heater (1.6 litre HDI).
F6
10
Diagnostic socket, directional headlamps, particle
emission fi lter pump (Diesel), Distance alert,
engine coolant level detector, mirror adjustment
control.
F7
10
Power steering control unit, automatic gearbox,
directional headlamps height adjustment motor.
F8
20
Starter motor control.
F9
10
Clutch and brake pedal switches.
F10
30
Engine management unit actuators (petrol:
ignition coils, electrovalves, oxygen sensors,
injectors, heaters, fuel pump, electronic thermostat)
(Diesel: electrovalves, heaters).
F11
40
Air conditioning blower.
Page 209 of 364

PRACTICAL INFORMATION
207
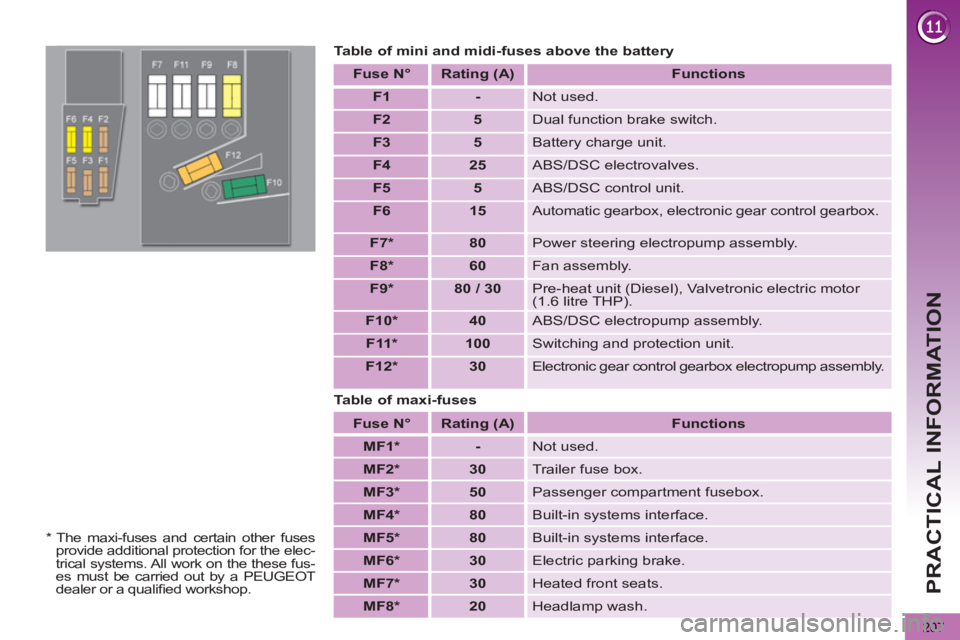
Table of mini and midi-fuses above the battery
Fuse N°
Rating
(A)
Functions
F1
-
Not used.
F2
5
Dual function brake switch.
F3
5
Battery charge unit.
F4
25
ABS/DSC electrovalves.
F5
5
ABS/DSC control unit.
F6
15
Automatic gearbox, electronic gear control gearbox.
F7 *
80
Power steering electropump assembly.
F8
*
60
Fan assembly.
F9 *
80 / 30
Pre-heat unit (Diesel), Valvetronic electric motor
(1.6 litre THP).
F10 *
40
ABS/DSC electropump assembly.
F11 *
100
Switching and protection unit.
F12 *
30
Electronic gear control gearbox electropump assembly.
Fuse N°
Rating (A)
Functions
MF1 *
-
Not used.
MF2 *
30
Trailer fuse box.
MF3 *
50
Passenger compartment fusebox.
MF4 *
80
Built-in systems interface.
MF5 *
80
Built-in systems interface.
MF6 *
30
Electric parking brake.
MF7 *
30
Heated front seats.
MF8 *
20
Headlamp wash.
Table of maxi-fuses
*
The maxi-fuses and certain other fuses
provide additional protection for the elec-
trical systems. All work on the these fus-
es must be carried out by a PEUGEOT
dealer or a qualifi ed workshop.