Page 4 of 382

2
CONTENTS
Instrument panels 25
Warning and indicator lamps 29
Indicators 39
Instrument panel buttons 43Ventilation 61
Heating 63
Manual air conditioning 63
Rear screen demist - defrost 65
Dual-zone digital air conditioning 66
Front seats 68
Rear seats 72
Seat modularity 78
Mirrors 80
Steering wheel adjustment 82
COMFORT 61 �Π82
Remote control key 83
Alarm 87
Electric windows 89
Doors 91
Boot 94
Panoramic sunroof 95
Fuel tank 96
Misfuel prevention (Diesel) 97
ACCESS 83 �Π98
Lighting controls 99
LED lamps 101
Daytime running lamps 101
Headlamp adjustment 103
Directional lighting 104
Wiper controls 105
Automatic rain sensitive wipers 107
Courtesy lamps 108
Interior mood lighting 109
Boot lamp 109
VISIBILITY 99 �Π109
Child seats 125
ISOFIX child seats 131
Child lock 136
CHILD
SAFETY 125 �Π136 FAMILIARISATION 4 �Π22
INSTRUMENTS and
CONTROLS 25 �Π44
Screens without audio equipment 45
Screens with audio equipment 47
Retractable colour screen
(Peugeot Connect Navigation (RT6)) 52Retractable colour screen (Peugeot Connect
Media Navigation (NG4 3D)) 54
Trip computer 57
MULTIFUNCTION
SCREENS 45 �Π60
Interior fi ttings 110
Front armrest 113
Boot fi ttings 116
FITTINGS 110 �Π124
7
5
4
3
26
ECO-DRIVING 23 �Π24
Page 6 of 382
4
FAMILIARISATION
EXTERIOR
Stop & Start system
This system puts the engine temporarily into
standby during stops in the traffi c (red lights,
traffi c jams, etc....). The engine restarts auto-
matically as soon as you want to move off.
The Stop & Start system reduces fuel con-
sumption, exhaust emissions and the noise
level when stationary.
��
160
Directional lighting
This lighting automatically provides
additional visibility when cornering.
��
104
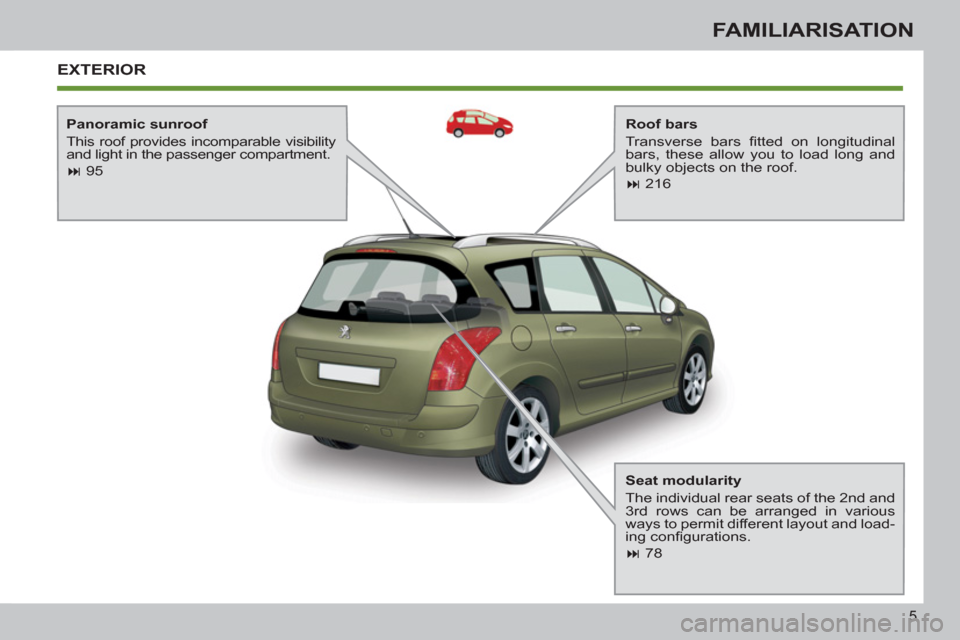
Panoramic sunroof
This roof provides incomparable vis-
ibility and light in the passenger com-
partment.
��
95
Temporary puncture repair kit
This kit is a complete system, con-
sisting of a compressor and a sealant
cartridge, for the temporary repair of
a tyre.
��
178
Page 7 of 382
5
FAMILIARISATION
EXTERIOR
Roof bars
Transverse bars fi tted on longitudinal
bars, these allow you to load long and
bulky objects on the roof.
��
216
Panoramic sunroof
This roof provides incomparable visibility
and light in the passenger compartment.
��
95
Seat modularity
The individual rear seats of the 2nd and
3rd rows can be arranged in various
ways to permit different layout and load-
ing confi gurations.
��
78
Page 9 of 382
7
FAMILIARISATION
ACCESS
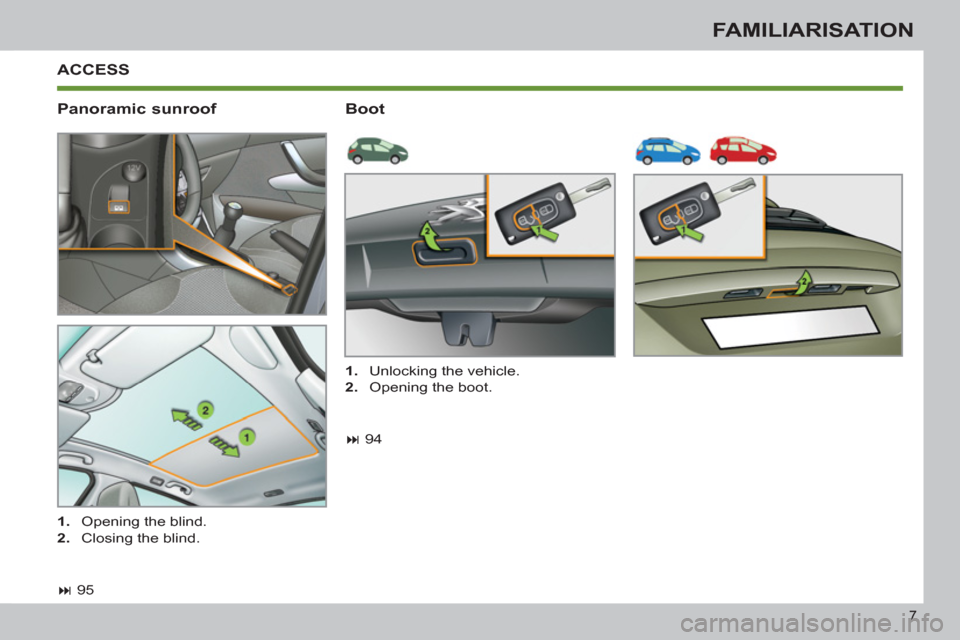
Panoramic sunroof
Boot
��
95
1.
Opening the blind.
2.
Closing the blind.
1.
Unlocking the vehicle.
2.
Opening the boot.
��
94
Page 11 of 382
9
FAMILIARISATION
INSTRUMENTS AND CONTROLS
1.
Cruise control / speed limiter
switches.
2.
Steering wheel adjustment control.
3.
Lighting and direction indicator
control stalk.
4.
Instrument panel.
5.
Driver's airbag.
Horn.
6.
Gear lever.
7.
Parking brake lever.
8.
Panoramic sunroof blind control.
9.
Heated seat control.
10.
Bonnet release.
11 .
Door mirror controls.
Electric window controls.
12.
Fusebox.
13.
Manual headlamp height
adjustment.
Stop & Start button.
14.
Front side window demisting vent.
15.
Speaker (tweeter).
16.
Windscreen demisting vent.
Page 97 of 382

4
95
ACCESS
PANORAMIC SUNROOF
Component which has a tinted glass
panoramic surface to increase the light
and visibility in the passenger compart-
ment.
Fitted with an electric blind in several
sections to improve temperature and
noise related comfort.
If the blind meets an obstacle dur-
ing operation, you must reverse the
movement of the blind. To do this,
press the control concerned.
When the driver operates the blind
control, he must ensure that no one
is preventing correct closing of the
blind.
The driver must ensure that pas-
sengers use the blind correctly.
Be aware of children when operat-
ing the blind.
- manual mode
�)
Pull or press control A
gently.
The blind stops when you release
the control.
- automatic mode
�)
Pull or press control A
fi rmly.
One press opens or closes the
blind completely.
Pressing the control again stops
the blind.
Safety anti-pinch
In automatic mode and at the end of
its travel, if the blind meets an obstacle
while closing it stops and moves back
slightly.
One-touch electric blind
There are two options for opening and
closing:
Reinitialisation:
if the blind's sup-
ply is cut off while it is moving, the
safety anti-pinch must be reinitial-
ised:
�)
press the control until the blind
is fully closed,
�)
continue to press for at least
3 seconds. A slight movement
of the blind will then be notice-
able, confi rming the reinitialisa-
tion.
If the blind re-opens during a clos-
ing manoeuvre, and immediately
after it stops:
�)
pull the control until the blind is
fully open,
�)
press the control until the blind
is fully closed.
The safety anti-pinch function is
not operational during these op-
erations.
Page 204 of 382
.
Access to the fuses
�)
refer to the paragraph \"Access")
11
202
PRACTICAL INFORMATION
Dashboard fuses
The fusebox is placed in the lower section
of the dashboard (left-hand side).
Access to the fuses
�)
refer to the paragraph "Access to
the tools".
Fuse tables
Fuse N°
Rating
Functions
F1
15 A
Rear wiper.
F2
30 A
Locking and deadlocking earth.
F3
5 A
Airbags and pretensioners control unit.
F4
10 A
Clutch pedal and dual-function brake switches,
electrochromatic rear view mirror, air conditioning,
steering wheel angle sensor, automatic gearbox,
switching and protection unit.
F5
30 A
Front one-touch electric windows, folding mirrors
supply, panoramic sunroof blind.
F6
30 A
Rear one-touch electric windows, trailer fusebox.
F7
5 A
Front and rear courtesy lamps, map reading lamps,
rear reading lamps, sun visor illumination, glove
box illumination, torch.
F8
20 A
Audio equipment, audio/telephone, multifunction
screen, tyre under-infl ation detection.
F9
30 A
Front 12 V socket.
F10
15 A
Steering mounted controls, alarm siren, alarm
control unit.
F11
15 A
Low current ignition switch.
Page 211 of 382

Disconnect the (+) terminal.
�)
Follow the instructions for use pro-
vided by the manufacturer of the
charger.
�)
Connect the ch")
11
209
PRACTICAL INFORMATION
Charging
�)
Disconnect the (+) terminal.
�)
Follow the instructions for use pro-
vided by the manufacturer of the
charger.
�)
Connect the charger's red cable to
the (+) terminal of the battery, then
the black cable to the (-) terminal.
�)
Once the battery is fully charged,
disconnect the charger cables in re-
verse order.
Charging should be carried out in
a well-ventilated area and away
from naked fl ames and sources of
sparks, so as to avoid any risk of
explosion and fi re.
Do not try to charge a frozen bat-
tery; fi rst thaw it out so as to avoid
the risk of explosion.
If the battery had frozen, before
charging, have it checked by a
PEUGEOT dealer or qualifi ed
workshop who will ensure that
the internal components have not
been damaged and that the casing
is not cracked, which would cause
a leak of toxic and corrosive acid.
Reinitialisation after
reconnection
After any reconnection of the battery,
switch on the ignition and wait at least one
minute before starting, to allow time for the
initialisation of the electronic systems.
By referring to the corresponding sections,
you should set or initialise the following
systems yourself:
- remote control,
- one-touch electric windows,
- panoramic sunroof blind,
- time and date,
- audio and navigation system settings.
Check that no alert message or
warning lamp comes on after
switching on the ignition.
However, if minor problems per-
sist after carrying out these opera-
tions, contact a PEUGEOT dealer
or a qualifi ed workshop.
The Stop & Start battery does not
have to be disconnected for charging.
Charging the battery using
a battery charger
Before disconnecting
�)
Go to the battery.
�)
Check that the doors and boot are
closed but not locked.
�)
Switch off the ignition and wait for at
least four minutes.
If the vehicle is to not going to be used for
more than a month, it is recommended
that the battery be disconnected.
When your vehicle's battery is dis-
charged or when the vehicle is to be
out of use for a prolonged period, you
can charge the battery using a battery
charger.
Contact a PEUGEOT dealer or a quali-
fi ed workshop for the specifi cation of
chargers compatible with your battery.
. The engine restarts")