Page 37 of 382
1INSTRUMENTS and CONTROLS
Operation indicator lamps
If one of the following indicator lamps comes on, this confi rms that the corresponding system has come into operation.
It may be accompanied by an audible signal.
Depending on your version of instrument panel, the illumination of the lamp is accompanied by:
Warning lamp
is on
Cause
Action / Observations
Left-hand
direction
indicato
r
fl ashing with
buzzer. The lighting stalk is pushed
down.
Right-hand
direction
indicator
fl ashing with
buzzer.
The lighting stalk is pushed up.
Hazard
warning
lamps
fl ashing with
audible signal. The hazard warning
lamps switch, located on
the dashboard, has been
operated. The left-hand and right-hand direction indicators
and their associated indicator lamps fl ash
simultaneously.
- a message in the multi-function
screen, or
- a pictogram in the central instrument
panel screen and a message in the
multifunction screen, or
- a pictogram and a message in the
central instrument panel screen.
Page 38 of 382

1
36
INSTRUMENTS and CONTROLS
Warning lamp
is on
Cause
Action / Observations
Front
foglamps
fi xed. The front foglamps are
switched on. Turn the ring on the stalk rearwards twice to
switch off the front foglamps.
Rear
foglamps
fi xed. The rear foglamps are
switched on. Turn the ring on the stalk rearwards to switch off
the rear foglamps.
Diesel engine
pre-heating
fi xed. The ignition switch is at the
2nd position (ignition on).
Wait until the warning lamp has switched off before starting.
The duration for which the warning lamp is on is
determined by the climatic conditions.
Parking brake
fi xed. The parking brake is applied
or not properly released. Release the parking brake to switch off the
warning lamp, keeping your foot on the brake
pedal.
Observe the safety recommendations.
For further information on the parking brake, refer
to the "Driving" section.
Dipped beam
headlamps
fi xed. The lighting stalk is in the
"Dipped beam headlamps"
position or in the "AUTO"
position in conditions of low
light.
Main beam
headlamps
fi xed. The lighting stalk is pulled
towards you. Pull the stalk again to return to dipped beam
headlamps.
Page 39 of 382

1
37
INSTRUMENTS and CONTROLS
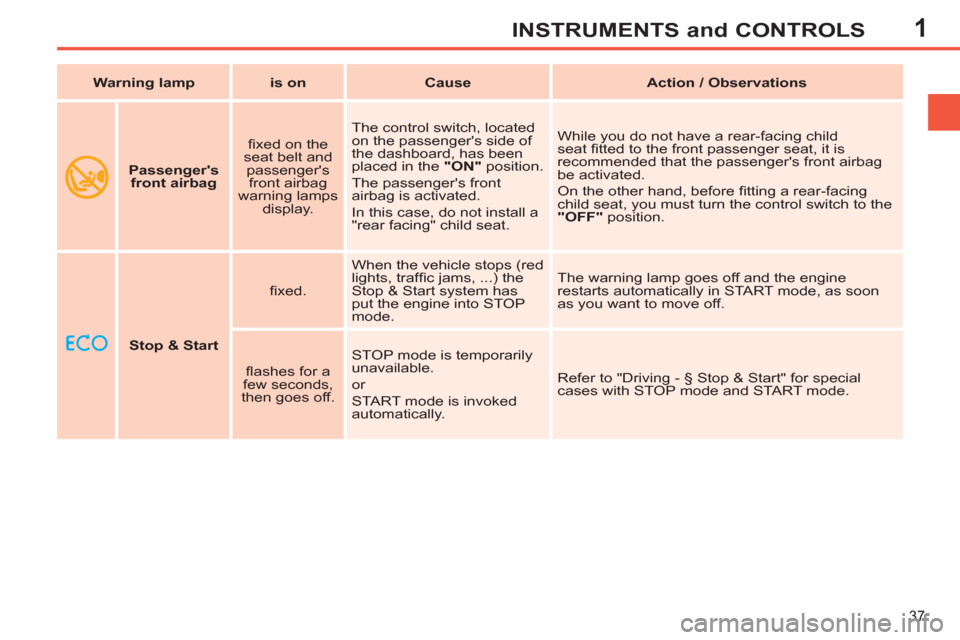
Stop & Start
fi xed. When the vehicle stops (red
lights, traffi c jams, ...) the
Stop & Start system has
put the engine into STOP
mode. The warning lamp goes off and the engine
restarts automatically in START mode, as soon
as you want to move off.
fl ashes for a
few seconds,
then goes off. STOP mode is temporarily
unavailable.
or
START mode is invoked
automatically. Refer to "Driving - § Stop & Start" for special
cases with STOP mode and START mode.
Warning lamp
is on
Cause
Action / Observations
Passenger's
front airbag
fi xed on the
seat belt and
passenger's
front airbag
warning lamps
display. The control switch, located
on the passenger's side of
the dashboard, has been
placed in the "ON"
position.
The passenger's front
airbag is activated.
In this case, do not install a
"rear facing" child seat. While you do not have a rear-facing child
seat fi tted to the front passenger seat, it is
recommended that the passenger's front airbag
be activated.
On the other hand, before fi tting a rear-facing
child seat, you must turn the control switch to the
"OFF"
position.
Page 40 of 382

1
38
INSTRUMENTS and CONTROLS
Warning lamp
is on
Cause
Action / Observations
Deactivation warning lamps
If one of the following warning lamps comes on, this confi rms that the corresponding system has been switched off intentionally.
This may be accompanied by an audible signal.
Depending on your version of instrument panel, illumination of the warning lamp is also accompanied by:
Passenger's
front airbag
fi xed in the
instrument
panel and/or
in the seat
belt and front
passenger's
airbag warning
lamps display. The control switch, located on the
passenger's end of the dashboard, is
set to the "OFF"
position.
The passenger's front airbag is
deactivated.
You can install a rear-facing child seat
on the front passenger seat. To activate the front passenger's
airbag, set the switch to the "ON"
position; in this case, it is not possible
to fi t a child seat in the rear-facing
position on this seat.
ESP/ASR
fi xed. The button, located in the middle of
the dashboard, is pressed. Its indicator
lamp is on.
The ESP/ASR is deactivated. The
following functions are deactivated:
- ESP (dynamic stability control),
- ASR (wheel anti-slip regulation).
Press the button again to manually reactivate
these functions. Its indicator lamp goes off.
From approximately 30 mph (50 km/h), these
systems are reactivated automatically (except
for the 1.6 litre THP 200 hp petrol engine).
These function are activated automatically
when the vehicle is started.
- a message in the multifunction
screen, or
- a pictogram in the central instrument
panel screen and a message in the
multifunction screen, or
- a pictogram and a message in the
central instrument panel screen.
Page 41 of 382
1
39
INSTRUMENTS and CONTROLS
Coolant temperature indicator
With the engine running, when the nee-
dle is:
- in zone A
, the temperature is
correct,
- in zone B
, the temperature is
too high; the max temperature
warning lamp 1
and the central
STOP
warning lamp come on,
accompanied by an audible signal
and a message in the screen.
You must stop as soon as it is safe
to do so.
Wait a few minutes before switching off
the engine.
Contact a PEUGEOT dealer or a quali-
fi ed workshop. After driving for a few minutes, the tem-
perature and pressure in the cooling
system increase.
To top up the level:
�)
wait for the engine to cool,
�)
unscrew the cap by two turns to
allow the pressure to drop,
�)
when the pressure has dropped,
remove the cap,
�)
top up the level to the "MAX" mark.
Page 44 of 382

1
42
INSTRUMENTS and CONTROLS
The level shown will only be correct
if the vehicle is on level ground and
the engine has been off for more
than 30 minutes.
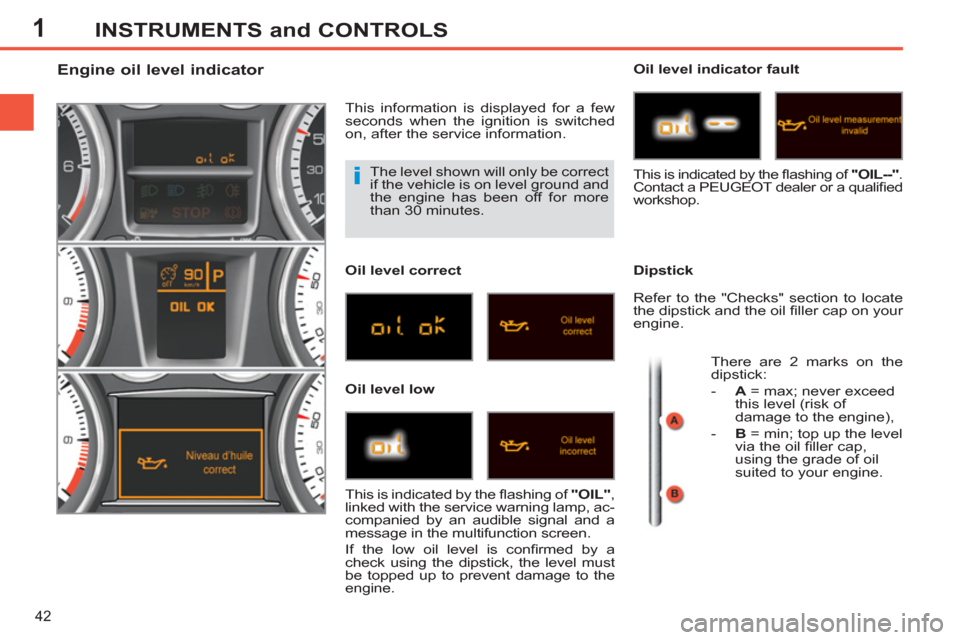
Engine oil level indicator
This information is displayed for a few
seconds when the ignition is switched
on, after the service information.
Oil level correct
Oil level low
Oil level indicator fault
Dipstick
This is indicated by the fl ashing of "OIL"
,
linked with the service warning lamp, ac-
companied by an audible signal and a
message in the multifunction screen.
If the low oil level is confi rmed by a
check using the dipstick, the level must
be topped up to prevent damage to the
engine. This is indicated by the fl ashing of "OIL--"
.
Contact a PEUGEOT dealer or a qualifi ed
workshop.
Refer to the "Checks" section to locate
the dipstick and the oil fi ller cap on your
engine.
There are 2 marks on the
dipstick:
- A
= max; never exceed
this level (risk of
damage to the engine),
- B
= min; top up the level
via the oil fi ller cap,
using the grade of oil
suited to your engine.
Page 45 of 382

1
43
INSTRUMENTS and CONTROLS
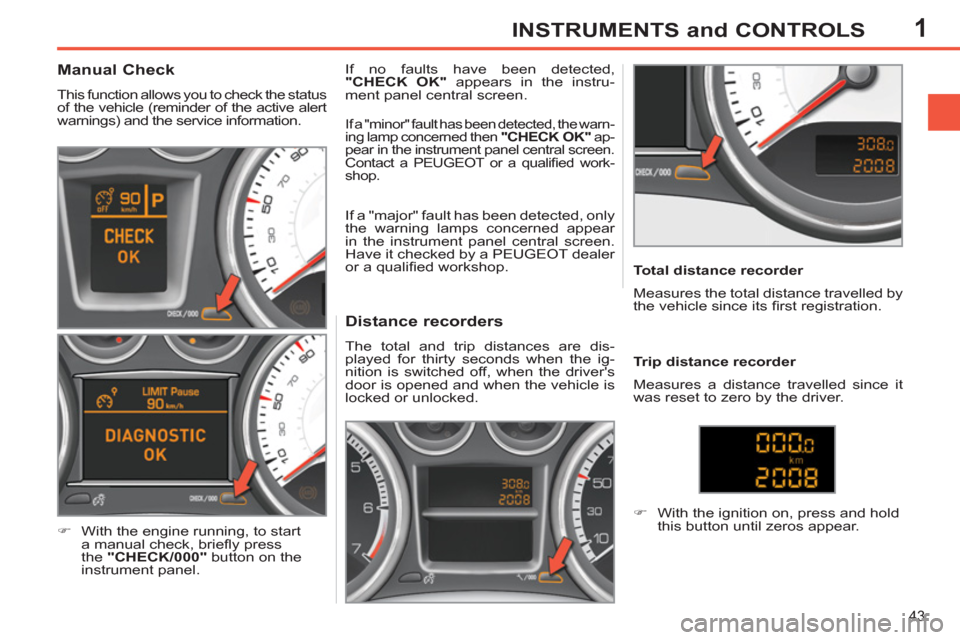
Distance recorders
The total and trip distances are dis-
played for thirty seconds when the ig-
nition is switched off, when the driver's
door is opened and when the vehicle is
locked or unlocked.
Total distance recorder
Trip distance recorder
�)
With the ignition on, press and hold
this button until zeros appear.
Manual Check
This function allows you to check the status
of the vehicle (reminder of the active alert
warnings) and the service information.
�)
With the engine running, to start
a manual check, briefl y press
the "CHECK/000"
button on the
instrument panel. If no faults have been detected,
"CHECK OK"
appears in the instru-
ment panel central screen.
If a "major" fault has been detected, only
the warning lamps concerned appear
in the instrument panel central screen.
Have it checked by a PEUGEOT dealer
or a qualifi ed workshop.
If a "minor" fault has been detected, the warn-
ing lamp concerned then "CHECK OK"
ap-
pear in the instrument panel central screen.
Contact a PEUGEOT or a qualifi ed work-
shop.
Measures a distance travelled since it
was reset to zero by the driver. Measures the total distance travelled by
the vehicle since its fi rst registration.
Page 52 of 382

2
50
MULTIFUNCTION SCREENS
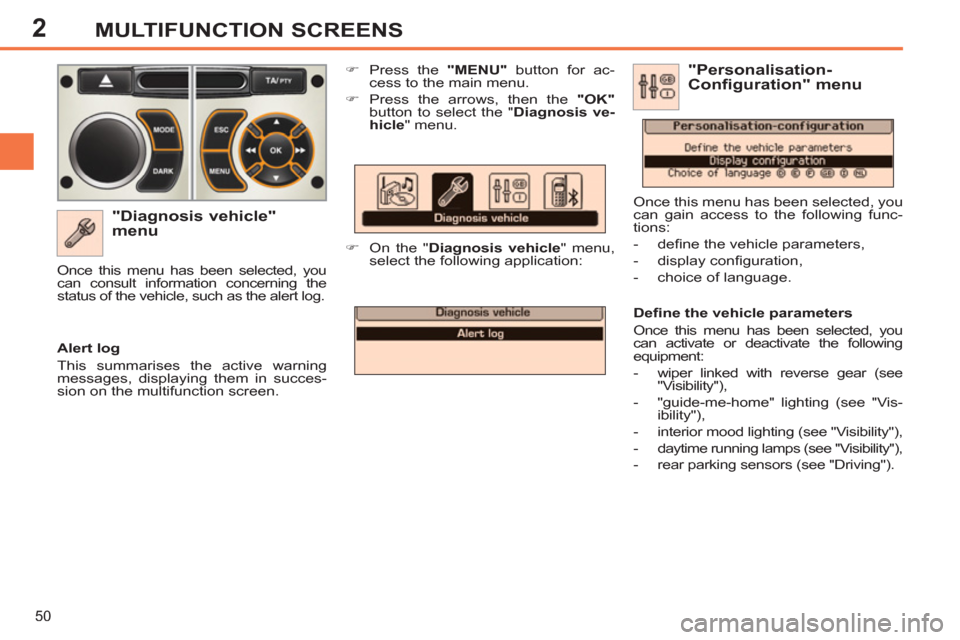
"Diagnosis vehicle"
menu
�)
Press the "MENU"
button for ac-
cess to the main menu.
�)
Press the arrows, then the "OK"
button to select the " Diagnosis ve-
hicle
" menu.
�)
On the " Diagnosis vehicle
" menu,
select the following application:
Alert log
This summarises the active warning
messages, displaying them in succes-
sion on the multifunction screen. Once this menu has been selected, you
can consult information concerning the
status of the vehicle, such as the alert log.
Defi ne the vehicle parameters
Once this menu has been selected, you
can activate or deactivate the following
equipment:
- wiper linked with reverse gear (see
"Visibility"),
- "guide-me-home" lighting (see "Vis-
ibility"),
- interior mood lighting (see "Visibility"),
- daytime running lamps (see "Visibility"),
- rear parking sensors (see "Driving").
"Personalisation-
Configuration" menu
Once this menu has been selected, you
can gain access to the following func-
tions:
- defi ne the vehicle parameters,
- display confi guration,
- choice of language.