Page 3 of 382

!
i
1
Thank you for choosing a 308, symbol
of confi dence, passion and inspiration.
Page reference:
this symbol invites you to refer to
the pages which provide details of
the function.
Key
Protection of the environment:
this symbol accompanies advice
relating to protection of the envi-
ronment.
Information:
this symbol draws your attention
to additional information for better
use of your vehicle.
Warning:
this symbol marks warnings which
it is essential to observe for your
own safety, for the safety of others
or to avoid any risk of damaging
your vehicle. Your vehicle is fi tted with only some of the
equipment described in this document,
depending on its trim level, version and
the specifi cation for the country in which
it was sold.
WELCOME
This handbook has been designed to
enable you to make the most of your
308 saloon or 308 SW.
On the fi rst few pages, you will fi nd a
detailed summary, followed by a quick
reference guide intended to make it
easier for you to become familiar with
your vehicle.
All of the details specifi c to your 308,
comfort, safety, driving, are then pre-
sented in this handbook, to increase
your appreciation of the vehicle and
make the most of it. 308 saloon
308 SW with bench rear
seat
308 SW with individual rear
seats At the end of the handbook, a visual
search enables you to identify the spe-
cial features in relation to the outline
illustration of your vehicle, saloon or SW.
Key
This key will enable you to distinguish
the special features of your vehicle:
Page 18 of 382

16
FAMILIARISATION
MONITORING
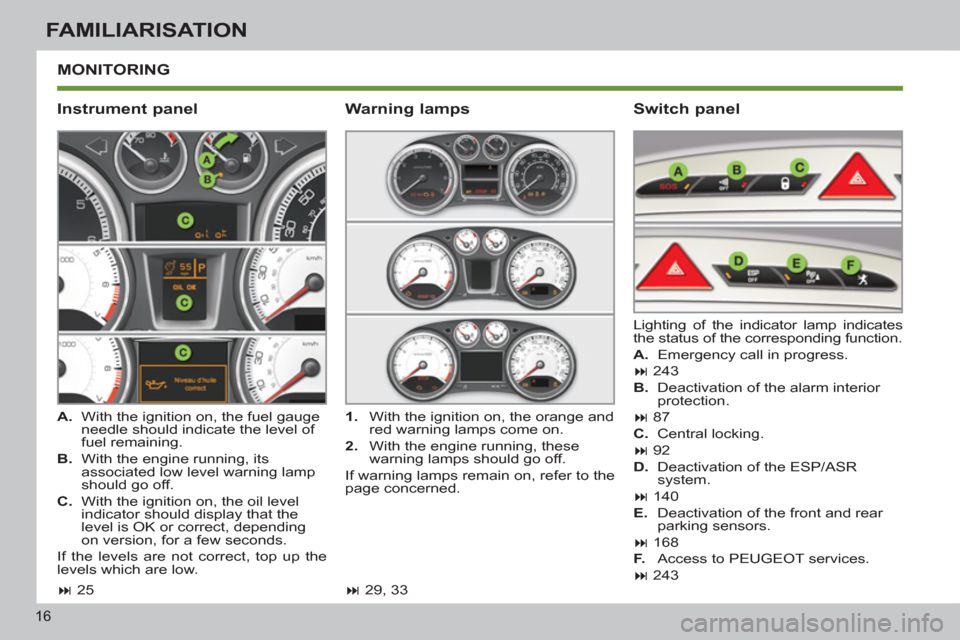
Instrument panel
Switch panel
A.
With the ignition on, the fuel gauge
needle should indicate the level of
fuel remaining.
B.
With the engine running, its
associated low level warning lamp
should go off.
C.
With the ignition on, the oil level
indicator should display that the
level is OK or correct, depending
on version, for a few seconds.
If the levels are not correct, top up the
levels which are low. Lighting of the indicator lamp indicates
the status of the corresponding function.
A.
Emergency call in progress.
��
243
B.
Deactivation of the alarm interior
protection.
��
87
C.
Central locking.
��
92
D.
Deactivation of the ESP/ASR
system.
��
140
E.
Deactivation of the front and rear
parking sensors.
��
168
F.
Access to PEUGEOT services.
��
243
1.
With the ignition on, the orange and
red warning lamps come on.
2.
With the engine running, these
warning lamps should go off.
If warning lamps remain on, refer to the
page concerned.
Warning lamps
��
25
��
29, 33
Page 82 of 382

3
80
COMFORT
The objects observed are, in real-
ity, closer than they appear.
Take this into account in order to
correctly judge the distance of ve-
hicles approaching from behind.
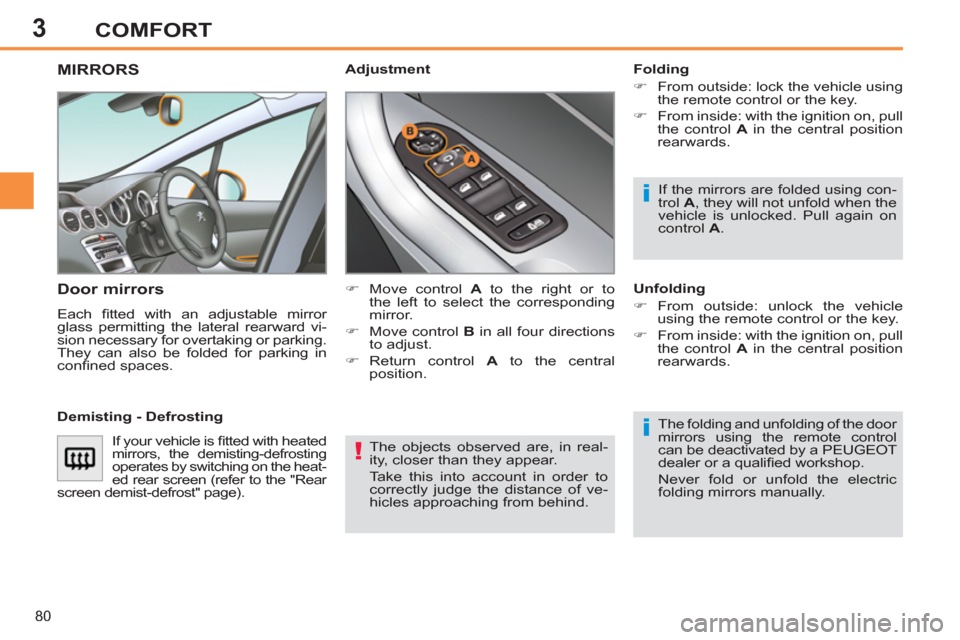
MIRRORS
Door mirrors
Each fi tted with an adjustable mirror
glass permitting the lateral rearward vi-
sion necessary for overtaking or parking.
They can also be folded for parking in
confi ned spaces.
Folding
�)
From outside: lock the vehicle using
the remote control or the key.
�)
From inside: with the ignition on, pull
the control A
in the central position
rearwards.
The folding and unfolding of the door
mirrors using the remote control
can be deactivated by a PEUGEOT
dealer or a qualifi ed workshop.
Never fold or unfold the electric
folding mirrors manually.
Adjustment
Unfolding
�)
From outside: unlock the vehicle
using the remote control or the key.
�)
From inside: with the ignition on, pull
the control A
in the central position
rearwards. If the mirrors are folded using con-
trol A
, they will not unfold when the
vehicle is unlocked. Pull again on
control A
.
�)
Move control A
to the right or to
the left to select the corresponding
mirror.
�)
Move control B
in all four directions
to adjust.
�)
Return control A
to the central
position.
Demisting - Defrosting
If your vehicle is fi tted with heated
mirrors, the demisting-defrosting
operates by switching on the heat-
ed rear screen (refer to the "Rear
screen demist-defrost" page).
Page 112 of 382
6
110
FITTINGS
INTERIOR FITTINGS
1.
Spectacles storage
2.
Sun visor
(see details on following page)
3.
Grab handle with coat hook
4.
Toll card/car park ticket windows
(see details on following page)
5.
Storage compartment
6. Oddments box
7.
Illuminated glove box
(see details on following page)
8.
Door pockets
9.
Illuminated ashtray
(see details on following page)
10.
Storage compartment with
non-slip mat
11 .
12 V accessories socket
(see details on following page)
12.
Cup holder
13.
Front armrest
(see details on following page)
14.
Storage box
Page 118 of 382
6
116
FITTINGS
BOOT FITTINGS
1.
Rear parcel shelf
(see details on following page)
2.
Hooks
(see details on following page)
3.
Stowing rings
4.
Luggage retaining strap
5.
Enclosed storage tray
6.
Open storage tray
7.
Storage box
(see details on following page)
Page 120 of 382
6
118
FITTINGS
BOOT FITTINGS
1.
Rear parcel shelf
(see details on following page)
2.
12 V accessories socket
(see details on following page)
3.
Hooks
(see details on following page)
4.
Stowing rings
5.
Storage tray
6.
High load retaining net
(see details on following page)
7.
Luggage retaining strap
Page 123 of 382
6
121
FITTINGS
BOOT FITTINGS
1.
Load space screen
(see details on following page)
2.
Storage box
3.
12 V accessory socket
(see details on following page)
4.
Hooks
(see details on following page)
5.
Stowing rings
6.
High load retaining net
(see details on following page)
7.
Rear armrests with cup holder
8.
Luggage retaining strap
9.
Location for torch or for Hi-Fi
amplifi er
(see details on following page)
10.
Temporary puncture repair kit
Page 173 of 382

10
171
CHECKS
RUNNING OUT OF FUEL (DIESEL)
1.6 litre HDi engine
�)
Fill the fuel tank with at least fi ve litres
of diesel.
�)
Open the bonnet.
�)
If necessary, unclip the styling cover
for access to the priming pump.
�)
Squeeze and release the priming
pump repeatedly until resistance is
felt (there may be resistance at the
fi rst press).
�)
Operate the starter until the engine
starts (if the engine does not start at the
fi rst attempt, wait around 15 seconds
before trying again).
�)
If the engine does not start after a
few attempts, operate the priming
pump again then start the engine.
�)
Clip the styling cover back in place.
�)
Close the bonnet.
2 litre HDi engine
�)
Fill the fuel tank with at least fi ve litres
of Diesel.
�)
Open the bonnet.
�)
If necessary, unclip the style cover
for access to the priming pump.
�)
Squeeze and release the priming
pump repeatedly until fuel appears
in the transparent pipe.
�)
Operate the starter until the engine
starts (if the engine fails to start at the
fi rst attempt, wait around 15 seconds
before trying again).
�)
If the engine fails to start after a few
attempts, operate the priming pump
again, then the starter.
�)
Put the style cover back in position
and clip it in place, ensuring that it
has clipped correctly.
�)
Close the bonnet.
If the engine does not start fi rst
time, don't keep trying. Start the
procedure again from the begin-
ning.
On vehicle fi tted with HDi engines, the
fuel system must be primed if you run
out of fuel; refer to the engine compart-
ment view on the "Diesel engine" page.
If the tank on your vehicle is fi tted with
a misfuel prevention device, refer to the
section "Access - § Misfuel prevention
(Diesel)".