2013 NISSAN XTERRA reset
[x] Cancel search: resetPage 183 of 394
●Do not connect a USB device if a connector,
cable or USB port is wet. Allow the connec-
tor, cable, and USB port to dry completely
before connecting the USB device. (Wait for
24 hours or more until it is dry.) If the con-
nector and USB port are exposed to fluids
other than water, evaporative residue may
cause a short circuit between the connector
pins and USB port. In this case, replace the
cable and USB port. Otherwise damage to
the USB device and a loss of function may
occur.
● If the cable is damaged (insulation cut, con-
nectors cracked, contamination such as liq-
uids, dust, dirt, etc. in the connectors) , do
not use the cable. Replace the cable with a
new one.
● Do not put a USB device in a location where
static electricity occurs, electrical noise is
generated or hot air from the air conditioner
blows directly on it. Doing so may cause the
data stored on the USB device to be cor-
rupted. Notes for iPod® use:
iPod® is a trademark of Apple Inc., registered in
the U.S. and other countries.
● Improperly plugging in the iPod may cause a
checkmark to be displayed on and off (flick-
ering) . Always make sure that the iPod is
connected properly.
● An iPod® nano (1st Generation) may remain
in fast forward or rewind mode if it is con-
nected during a seek operation. In this case,
please manually reset the iPod.
● An iPod® nano (2nd Generation) will con-
tinue to fast-forward or rewind if it is discon-
nected during a seek operation.
● An incorrect song title may appear when the
Play Mode is changed while using an iPod®
nano (2nd Generation) .
● Audiobooks may not play in the same order
as they appear on an iPod®.
● Large video files cause slow responses in an
iPod®. The vehicle center display may mo-
mentarily black out, but will soon recover.
● If an iPod® automatically selects large video
files while in the shuffle mode, the vehicle
center display may momentarily black out,
but will soon recover.Bluetooth® streaming audio (if so
equipped)
●Some Bluetooth® audio devices may not be
recognized by the in-vehicle audio system.
● It is necessary to set up the wireless con-
nection between a compatible Bluetooth®
audio device and the in-vehicle Bluetooth®
module before using the Bluetooth® audio.
● Operating procedure of the Bluetooth® au-
dio will vary depending on the devices. Make
sure how to operate your audio device be-
fore using it with this system.
● The Bluetooth® audio may be stopped un-
der the following conditions:
● Receiving a call on the Hands-Free
Phone System.
● Checking the connection to the hands-
free phone.
● Do not place the Bluetooth® audio device in
an area surrounded by metal or far away from
the in-vehicle Bluetooth® module to prevent
tone quality degradation and wireless con-
nection disruption.
4-38Monitor, climate, audio, phone and voice recognition systems
Page 184 of 394
●While an audio device is connected through
the Bluetooth® wireless connection, the
battery power of the device may discharge
quicker than usual.
● This system supports the Bluetooth® Audio
Distribution Profile (A2DP, AVRCP) .
BLUETOOTH® is a
trademark owned by
Bluetooth SIG, Inc.
and licensed to
Visteon and Bosch.
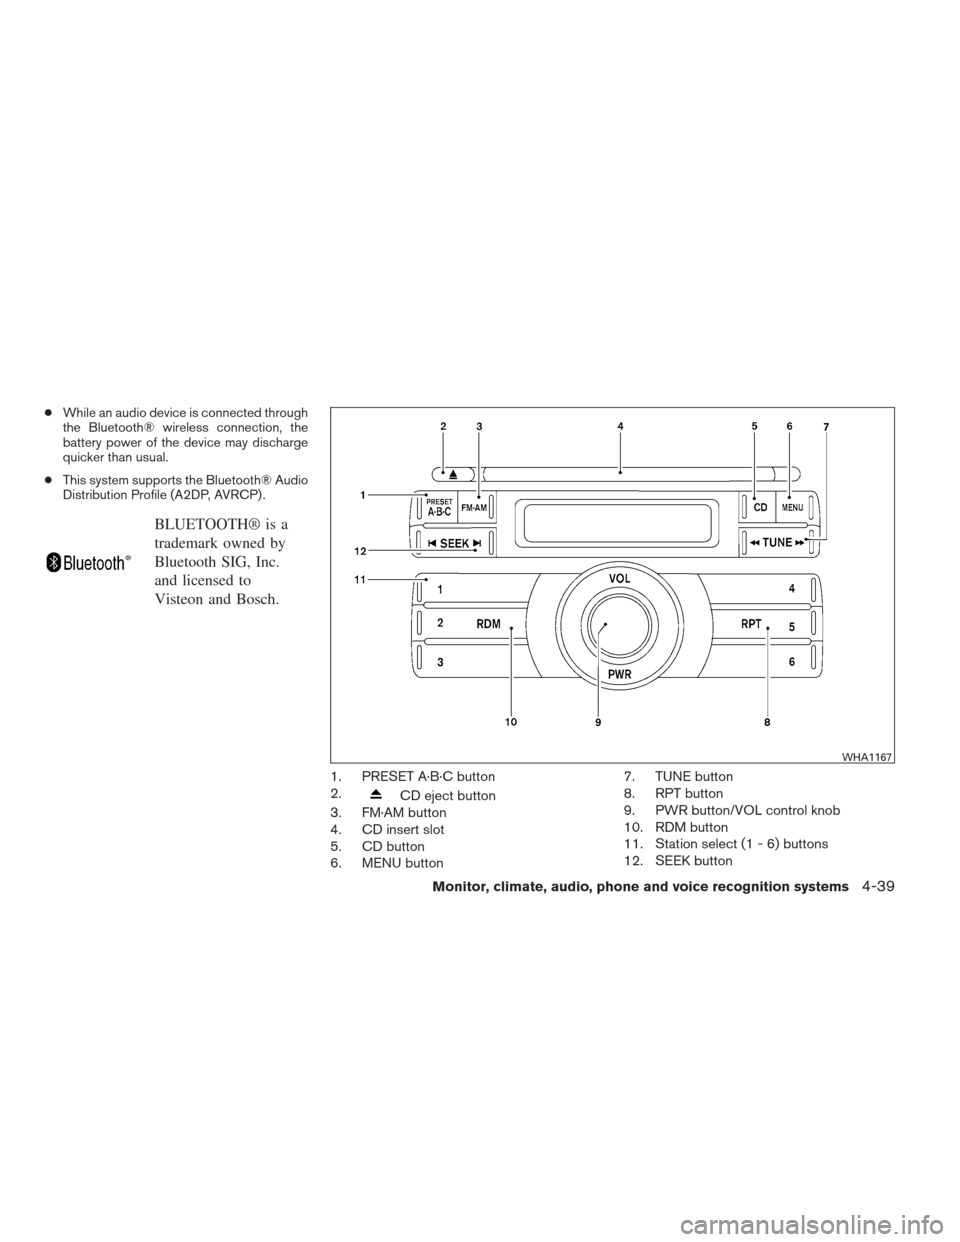
1. PRESET A·B·C button
2.
CD eject button
3. FM·AM button
4. CD insert slot
5. CD button
6. MENU button 7. TUNE button
8. RPT button
9. PWR button/VOL control knob
10. RDM button
11. Station select (1 - 6) buttons
12. SEEK button
WHA1167
Monitor, climate, audio, phone and voice recognition systems4-39
Page 186 of 394
Resetting the time
Hold the MENU button down and then press the
TUNE or SEEK button; the time will reset as
follows:● If the displayed minutes before the reset are
in the range of :00 - :29, the hour displayed
before the reset will stay the same and the
minutes will be reset to :00.
● If the displayed minutes before the reset are
in the range of :30 - :59, the hour displayed
before the reset will advance by one hour
and the minutes will be reset to :00.
For example, if the MENU button and the TUNE or
SEEK button are pressed while the time dis-
played is between 8:00 and 8:29, the display will
be reset to 8:00. If the buttons were pressed
while the time was between 8:30 and 8:59, the
display will be reset to 9:00. At the same time the
display will return to the audio.
FM/AM radio operation
FM·AM button:
Press the FM·AM button to change from AM ←→
FM reception.
The FM stereo indicator, ST, illuminates during
FM stereo reception. When the stereo broadcast
signal is weak, the radio automatically changes
from stereo to monaural reception.
TUNE buttons:
Manual tuning
Press the TUNE
orbutton for less
than 0.5 seconds for manual tuning.
To move quickly through the channels, press and
hold either TUNE
orbutton down
for more than 1.5 seconds.
SEEK buttons:
SEEK tuning
Press the SEEK
orbutton to seek
through the frequencies. Seek tuning begins
from low to high frequencies, or high to low
frequencies, depending on which button is
pressed, and stops at the next broadcasting sta-
tion. Once the highest broadcasting station is
reached, the radio continues in the seek mode at
the lowest broadcasting station.
Station memory operations:
18 stations can be set for the FM and AM radio to
the A, B and C preset button in any combination
of AM or FM stations. 1. Press the PRESET A·B·C button to change
between storage banks. The radio displays
the icon A, B or C to indicate which set of
presets are active.
2. Tune to the desired station using manual TUNE or SEEK tuning. Press and hold any of
the desired station memory buttons (1 – 6)
until a beep sound is heard. (The radio mutes
when the select button is pressed.)
3. The channel indicator will then come on and the sound will resume. Programming is now
complete.
4. Other buttons can be set in the same man- ner.
If the battery cable is disconnected, or if the fuse
opens, the radio memory will be canceled. In that
case, reset the desired stations.
Compact disc (CD) player operation
If the radio is already operating, it automatically
turns off and the compact disc begins to play.
CD button:
When the CD button is pressed with a compact
disc loaded and the radio playing, the radio turns
off and the last used compact disc starts to play.
Monitor, climate, audio, phone and voice recognition systems4-41
Page 191 of 394
When the XM button is pressed while the ignition
switch is in the ACC or ON position, the radio will
come on at the station last played.
The last station played will also come on when
the VOL/ON·OFF control knob is pressed ON.
*When the XM button is pressed, the satellite
radio reception will not be available unless an
optional satellite receiver and antenna are in-
stalled and a SiriusXM Satellite Radio service
subscription is active. Satellite radio is not avail-
able in Alaska, Hawaii and Guam.
If a compact disc is playing when the XM button
is pressed, the compact disc will automatically be
turned off and the last radio station played will
come on.
TUNE/SCROLL knob (Tuning):
Turn the TUNE/SCROLL knob to the left or right
for manual tuning.
SEEK tuning:
Press the SEEK button
orto
tune from low to high or high to low frequencies
and to stop at the next broadcasting station.
SCAN tuning:
Press the SCAN button to stop at each broad-
casting station for 5 seconds. SCAN will appear
on the screen while the radio is scan tuning. Pressing the button again during this 5 second
period will stop SCAN tuning and the radio will
remain tuned to that station. If the SCAN button is
not pressed within 5 seconds, SCAN tuning
moves to the next station.
1 to 6 Station memory operations:
Six stations can be set for the AM band. Twelve
stations can be set for the FM band (6 for FM1, 6
for FM2) . Eighteen channels can be set for the
satellite radio (6 for XM1, 6 for XM2, 6 for XM3) .
1. Choose the radio band AM, FM1 or FM2 using the FM·AM select button, or choose
the satellite band XM1, XM2 or XM3 using
the XM button.
2. Tune to the desired station using manual, SEEK or SCAN tuning. Press and hold any
of the desired station memory buttons (1 –
6) until the preset number is updated on the
display and the sound is briefly muted.
3. The channel indicator will then come on and the sound will resume. Programming is now
complete.
4. Other buttons can be set in the same man- ner.
If the battery cable is disconnected, or if the fuse
opens, the radio memory will be canceled. In that
case, reset the desired stations.
Compact disc (CD) player operation
If the radio is already operating, it automatically
turns off and the compact disc begins to play.
CD·AUX button:
With a CD loaded, press the CD·AUX button until
the CD mode is displayed on the screen.
CD/MP3 display mode:
While listening to an MP3/WMA CD, certain text
may be displayed on the screen if the CD has
been encoded with text information. Depending
on how the MP3/WMA CD is encoded, informa-
tion such as Artist, Song and Folder will be dis-
played.
The track number and the total number of tracks
in the current folder or on the current disc are
displayed on the screen as well.
SEEK/CAT (Reverse or Fast Forward) button:
Press and hold the SEEK/CAT button
orfor 1.5 seconds while the compact disc
is playing to reverse or fast forward the track
being played. The compact disc plays at an in-
creased speed while reversing or fast forwarding.
When the button is released, the compact disc
returns to normal play speed.
4-46Monitor, climate, audio, phone and voice recognition systems
Page 197 of 394
Tuning with the TUNE knob:
The radio can also be manually tuned using the
TUNE knob. When in FM or AM mode, turn the
TUNE knob to the left for lower frequencies or to
the right for higher frequencies. When in XM
mode, turn the TUNE knob to change the chan-
nel.
SEEK tuning:
When in FM or AM mode, press the seek
buttons
orto tune from low to high
or high to low frequencies and to stop at the next
broadcasting station.
When in XM mode, press the seek buttons
orto change the category. 1 to 6 Station memory operations:
Twelve stations can be set for the FM band (6 for
FM1, 6 for FM2) and six stations can be set for
the AM band. Eighteen stations can be set for the
XM band (6 for XM1, 6 for XM2, 6 for XM3) .
1. Choose the radio band AM, FM1 or FM2 using the FM·AM select button or choose
the radio band XM1, XM2 or XM3 using the
XM button.
2. Tune to the desired station using manual or seek tuning. Press and hold any of the de-
sired station memory buttons (1 – 6) until a
beep sound is heard. 3. The channel indicator will then come on and
the sound will resume. Programming is now
complete.
4. Other buttons can be set in the same man- ner.
If the battery cable is disconnected or if the fuse
opens, the radio memory will be canceled. In that
case, reset the desired stations.
Presets can also be selected by touching the
desired preset number on the screen.
Compact disc (CD) player operation
If the radio is already operating, it automatically
turns off and the compact disc begins to play.
CD button:
When the CD button is pressed with the system
off and the compact disc loaded, the system will
turn on and the compact disc will start to play.
When the CD button is pressed with a compact
disc loaded and the radio playing, the radio will
automatically be turned off and the compact disc
will start to play.LHA2263
4-52Monitor, climate, audio, phone and voice recognition systems
Page 210 of 394
3. Select the “Add Telephone or Device” key.This same screen can be accessed to re-
move, replace or select a different
Bluetooth® device.
4. The system acknowledges the command and asks you to initiate connecting from the
phone handset. The connecting procedure
of the cellular phone varies according to
each cellular phone model. See the cellular
phone Owner’s Manual for details. You can
also visit www.nissanusa.com/bluetooth for
instructions on connecting NISSAN recom-
mended cellular phones.Audio main operation
To switch to the Bluetooth® audio mode, press
the CD button repeatedly until the
Bluetooth® audio mode is displayed on the
screen.
The controls for the Bluetooth® audio are dis-
played on the screen. Use the Preset 3 button for
play and the Preset 4 button for pause.
BLUETOOTH® STREAMING AUDIO
WITH NAVIGATION SYSTEM (if so
equipped)
If you have a compatible Bluetooth® audio de-
vice that is capable of playing audio files, the
device can be connected to the vehicle’s audio
system so that the audio files on the device play
through the vehicle’s speakers.
LHA2274LHA2292
Monitor, climate, audio, phone and voice recognition systems4-65
Page 212 of 394
The controls for the Bluetooth® audio are dis-
played on the screen.
PANDORA® AUDIO (United States
only) (if so equipped)
The vehicle’s audio system is capable of playing
audio streaming through a compatible, USB-
connected audio device using the Pandora® mu-
sic service.
Connecting a device for use with
Pandora® audio
Devices capable of streaming Pandora® audio
can be connected to the vehicle’s audio system
via the USB input jack. The USB input jack is
located on the center console beneath the heater
and air conditioner controls.
Launch the Pandora® application on the phone
and then connect with the USB jack. Once con-
nected, the Pandora® controls will be displayed
on the control panel display screen.
Compatibility
The following iPhone® models are compatible
with the system:● iPhone® 3GS
● iPhone® 4
● iPhone® 4S The latest Pandora® application should be in-
stalled on the phone.
Audio main operation
Models without Navigation System:
To switch to the Pandora® audio mode, press
the CD-AUX button repeatedly until the Pan-
dora® audio mode is displayed on the screen.
The controls for the Pandora® audio are dis-
played on the screen. Press the audio preset 3
button to pause or play the music.
Press the audio preset 5 button to select “
”
(thumbs up) . Press the audio preset 4 button to
select “
” (thumbs down) .
Models without Navigation System
LHA2283
Monitor, climate, audio, phone and voice recognition systems4-67
Page 214 of 394
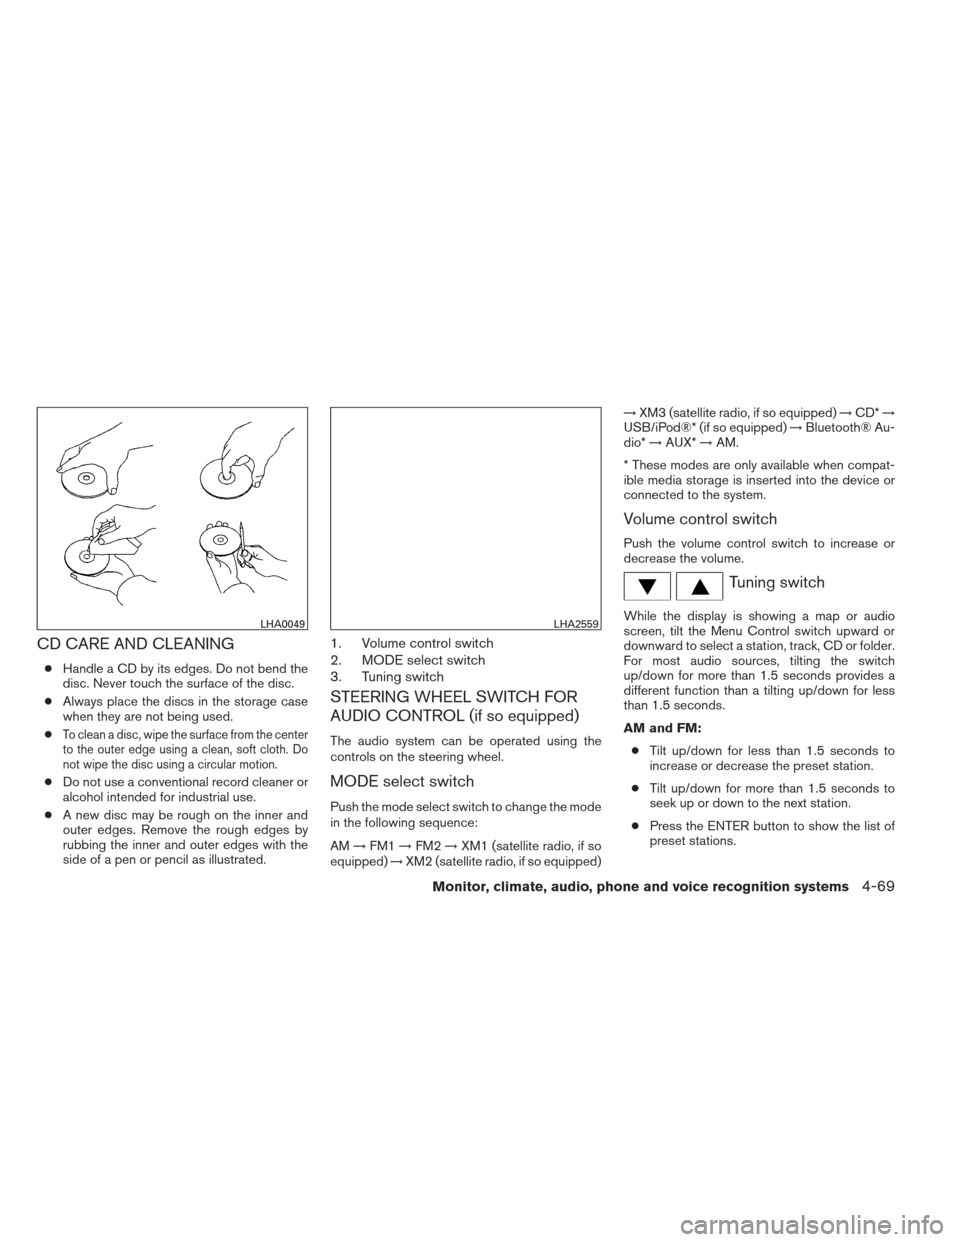
CD CARE AND CLEANING
●Handle a CD by its edges. Do not bend the
disc. Never touch the surface of the disc.
● Always place the discs in the storage case
when they are not being used.
●
To clean a disc, wipe the surface from the center
to the outer edge using a clean, soft cloth. Do
not wipe the disc using a circular motion.
● Do not use a conventional record cleaner or
alcohol intended for industrial use.
● A new disc may be rough on the inner and
outer edges. Remove the rough edges by
rubbing the inner and outer edges with the
side of a pen or pencil as illustrated.
1. Volume control switch
2. MODE select switch
3. Tuning switch
STEERING WHEEL SWITCH FOR
AUDIO CONTROL (if so equipped)
The audio system can be operated using the
controls on the steering wheel.
MODE select switch
Push the mode select switch to change the mode
in the following sequence:
AM →FM1 →FM2 →XM1 (satellite radio, if so
equipped) →XM2 (satellite radio, if so equipped) →
XM3 (satellite radio, if so equipped) →CD* →
USB/iPod®* (if so equipped) →Bluetooth® Au-
dio* →AUX* →AM.
* These modes are only available when compat-
ible media storage is inserted into the device or
connected to the system.
Volume control switch
Push the volume control switch to increase or
decrease the volume.
Tuning switch
While the display is showing a map or audio
screen, tilt the Menu Control switch upward or
downward to select a station, track, CD or folder.
For most audio sources, tilting the switch
up/down for more than 1.5 seconds provides a
different function than a tilting up/down for less
than 1.5 seconds.
AM and FM: ● Tilt up/down for less than 1.5 seconds to
increase or decrease the preset station.
● Tilt up/down for more than 1.5 seconds to
seek up or down to the next station.
● Press the ENTER button to show the list of
preset stations.LHA0049LHA2559
Monitor, climate, audio, phone and voice recognition systems4-69