2013 NISSAN QUEST key
[x] Cancel search: keyPage 9 of 36
01
03
04
05
06
02
NISSaN INTeLLIGeNT K eY® SYST eM
The ni SSAn intelligent k ey® System allows you to lock or
unlock your vehicle, open your liftgate and start the engine.
n OTe: it is important to make sure the intelligent k ey is
with you (that is, in your pocket or purse).
The operating range of the intelligent k ey is within
31.5 in (80 cm) from each request switch.
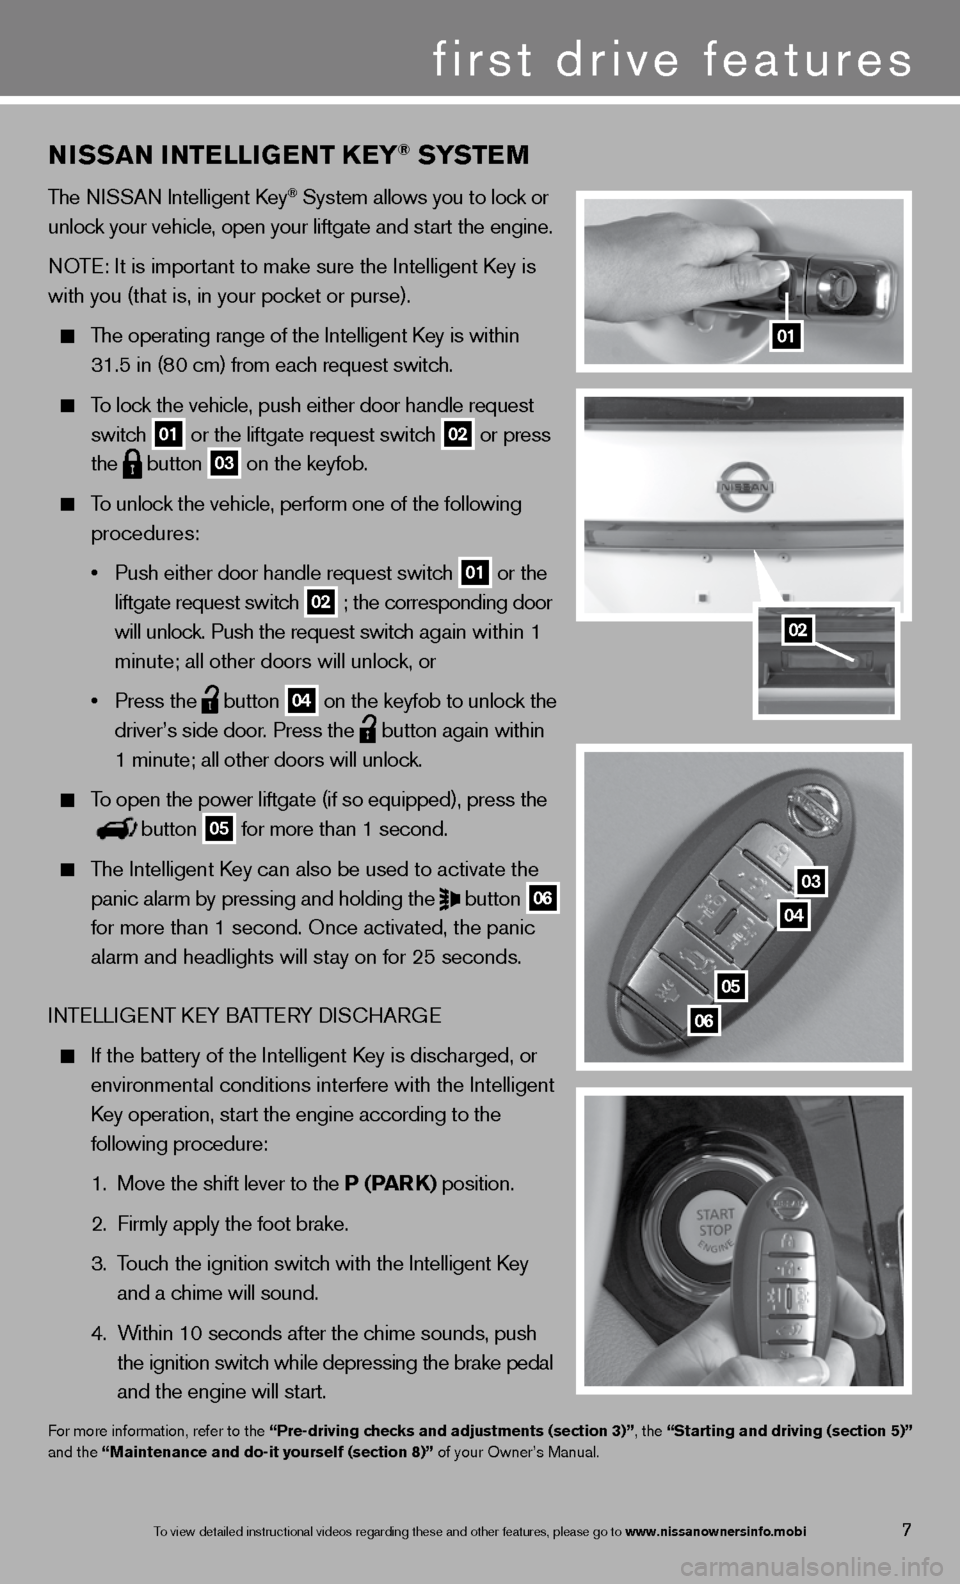
To lock the vehicle, push either door handle request
switch
01 or the liftgate request switch 02 or press
the
button 03 on the keyfob.
To unlock the vehicle, perform one of the following
procedures:
• Push either door handle request switch
01 or the
liftgate request switch 02 ; the corresponding door
will unlock. Push the request switch again within 1
minute; all other doors will unlock, or
• Press the
button 04 on the keyfob to unlock the
driver’s side door. Press the
button again within
1 minute; all other doors will unlock.
To open the power liftgate (if so equipped), press the
button 05 for more than 1 second.
The intelligent k ey can also be used to activate the
panic alarm by pressing and holding the
button 06
for more than 1 second. Once activated, the panic
alarm and headlights will stay on for 25 seconds.
inTe LLiGenT keY BATTe RY diSc HARG e
if the battery of the intelligent k ey is discharged, or
environmental conditions interfere with the intelligent
k ey operation, start the engine according to the
following procedure:
1. Move the shift lever to the P (Par K) position.
2. firmly apply the foot brake.
3. Touch the ignition switch with the intelligent k ey
and a chime will sound.
4. Within 10 seconds after the chime sounds, push
the ignition switch while depressing the brake pedal
and the engine will start.
for more information, refer to the “Pre-driving checks and adjustments (section 3)”, the “Starting and driving (section 5)”
and the “Maintenance and do-it yourself (section 8)” of your Owner’s Manual.
first drive features
7To view detailed in\fstructional videos\f regarding these a\fnd other features\f \fplease go to www.nissanownersin\Ifo.mobi
Page 11 of 36
FrONT PO wer SeaT aDJ uSTM eNTS (if so equipped)
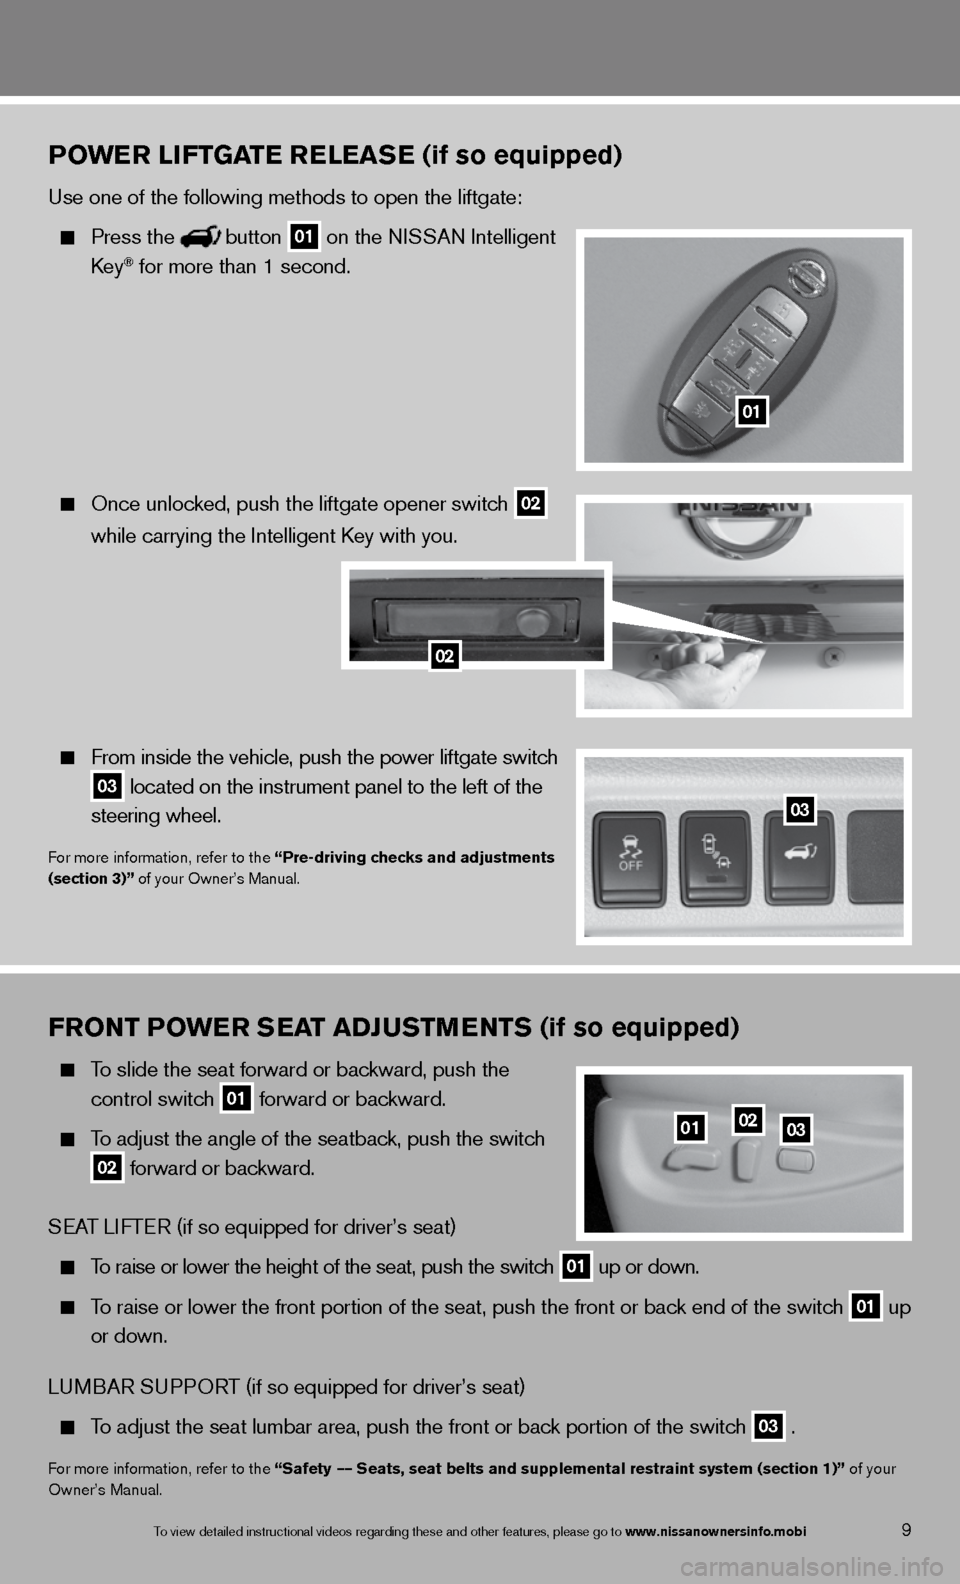
To slide the seat forward or backward, push the
control switch
01 forward or backward.
To adjust the angle of the seatback, push the switch
02 forward or backward.
SeAT LifTe R (if so equipped for driver’s seat)
To raise or lower the height of the seat, push the switch 01 up or down.
To raise or lower the front portion of the seat, push the front or back end of the switch 01 up
or down.
Lu MBAR Su PPORT (if so equipped for driver’s seat)
To adjust the seat lumbar area, push the front or back portion of the switch 03 .
f or more information, refer to the “Safety –– Seats, seat belts and supplemental restraint system (section 1)” of your
Owner’s Manual.
010203
PO wer LIFTGa Te reLeaSe (if so equipped)
use one of the following methods to open the liftgate:
Press thebutton 01 on the ni
SSAn intelligent
key® for more than 1 second.
Once unlocked, push the liftgate opener switch 02
while
carrying the intelligent k ey with you.
from inside the vehicle, push the power liftgate switch
03 located on the instrument panel to the left of the
steering wheel.
for more information, refer to the “Pre-driving checks and adjustments
(section 3)” of your Owner’s Manual.
01
03
02
9To view detailed in\fstructional videos\f regarding these a\fnd other features\f \fplease go to www.nissanownersin\Ifo.mobi
Page 13 of 36
3rD r Ow S eaT aDJ uSTM eNTS
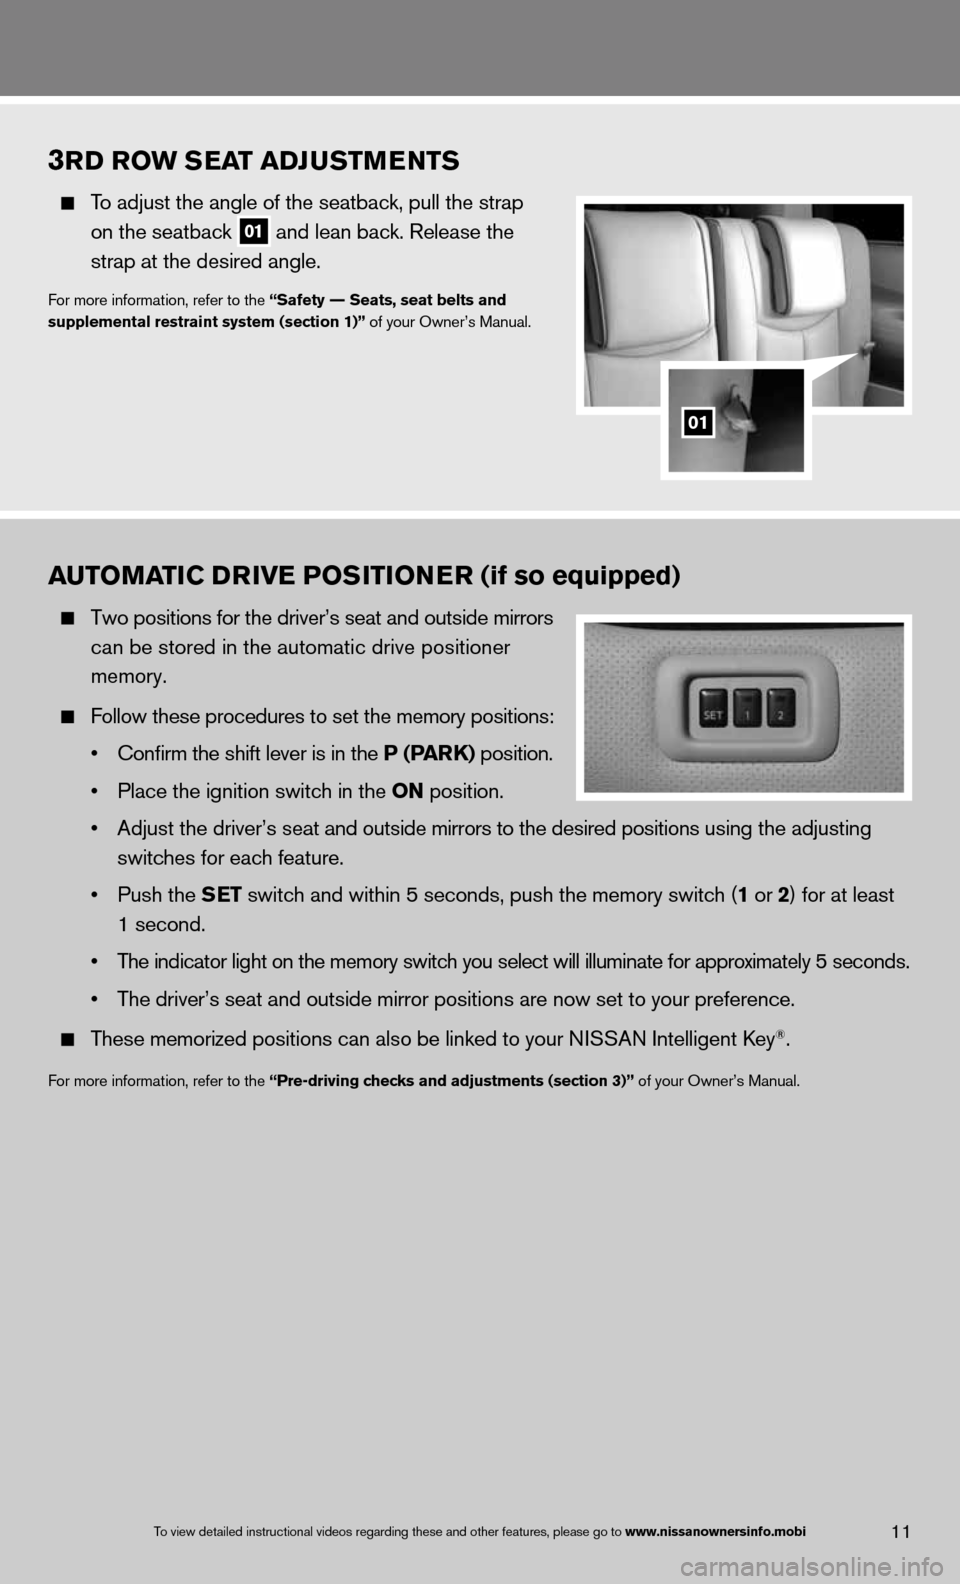
To adjust the angle of the seatback, pull the strap
on the seatback
01 and lean back. Release the
strap at the desired angle.
for more information, refer to the “Safety –– Seats, seat belts and
supplemental restraint system (section 1)” of your Owner’s Manual.
01
11To view detailed in\fstructional videos\f regarding these a\fnd other features\f \fplease go to www.nissanownersin\Ifo.mobi
auTOMa TIC DrIVe POSITION er (if so equipped)
Two positions for the driver’s seat and outside mirrors
can be stored in the automatic drive positioner
memory.
follow these procedures to set the memory positions:
• Confirm the shift lever is in the P (P arK) position.
• Place the ignition switch in the ON position.
• Adjust the driver’s seat and outside mirrors to the desired positions using the adjusting
switches for each feature.
• Push the S eT switch and within 5 seconds, push the memory switch (1 or 2) for at least
1 second.
• The indicator light on the memory switch you select will illuminate for approximately 5 seconds.
• The driver’s seat and outside mirror positions are now set to your preference.
These memorized positions can also be linked to your ni SSAn intelligent key®.
for more information, refer to the “Pre-driving checks and adjustments (section 3)” of your Owner’s Manual.
Page 14 of 36
OuTSIDe MIrrOr CONTr OL SwITCH
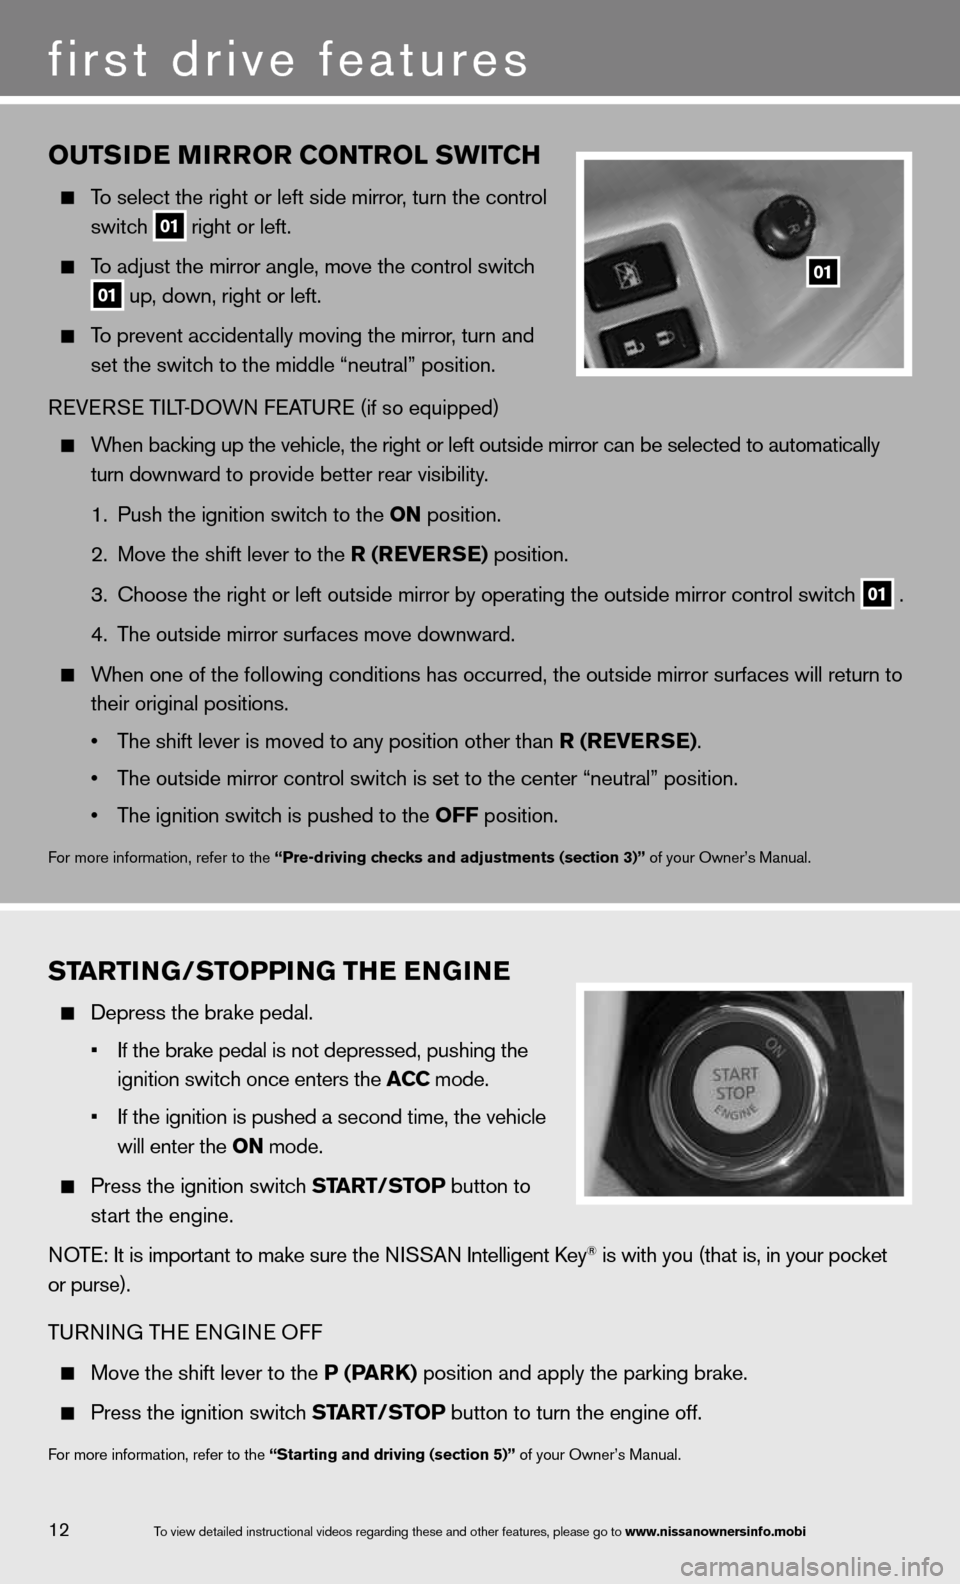
To select the right or left side mirror , turn the control
switch
01 right or left.
To adjust the mirror angle, move the control switch
01 up, down, right or left.
To prevent accidentally moving the mirror, turn and
set the switch to the middle “neutral” position.
R eVe RSe Ti LT-d OWn feATu Re (if so equipped)
When backing up the vehicle, the right or left outside mirror can be selected to\
automatically
turn downward to provide better rear visibility.
1. Push the ignition switch to the ON position.
2. Move the shift lever to the r (reVer Se) position.
3. choose the right or left outside mirror by operating the outside mirror c\
ontrol switch
01 .
4. The outside mirror surfaces move downward.
When one of the following conditions has occurred, the outside mirror sur\
faces will return to
their original positions.
• The shift lever is moved to any position other than r (reVer Se).
• The outside mirror control switch is set to the center “neutral” position.
• The ignition switch is pushed to the OFF position.
for more information, refer to the “Pre-driving checks and adjustments (section 3)” of your Owner’s Manual.
01
ST arTING/STOPPING TH e eNGIN e
depress the brake pedal.
• If the \brake pedal i\fs not depressed\f pu\fshing the
ignition switch on\fce enters the ACC mode.
• If the ignition is \fpushed a second ti\fme\f the vehicle
will enter the ON mode.
Press the ignition switch ST arT/STOP button to
start the engine.
n OTe: it is important to make sure the ni SSAn intelligent key
® is with you (that is, in your pocket
or purse).
T uRnin G THe enGine Off
Move the shift lever to the P (P arK) position and apply the parking brake.
Press the ignition switch ST arT/STOP button to turn the engine off.
for more information, refer to the “Starting and driving (section 5)” of your Owner’s Manual.
12
first drive features
To view detailed in\fstructional videos\f regarding these a\fnd other features\f \fplease go to www.nissanownersin\Ifo.mobi
Page 18 of 36
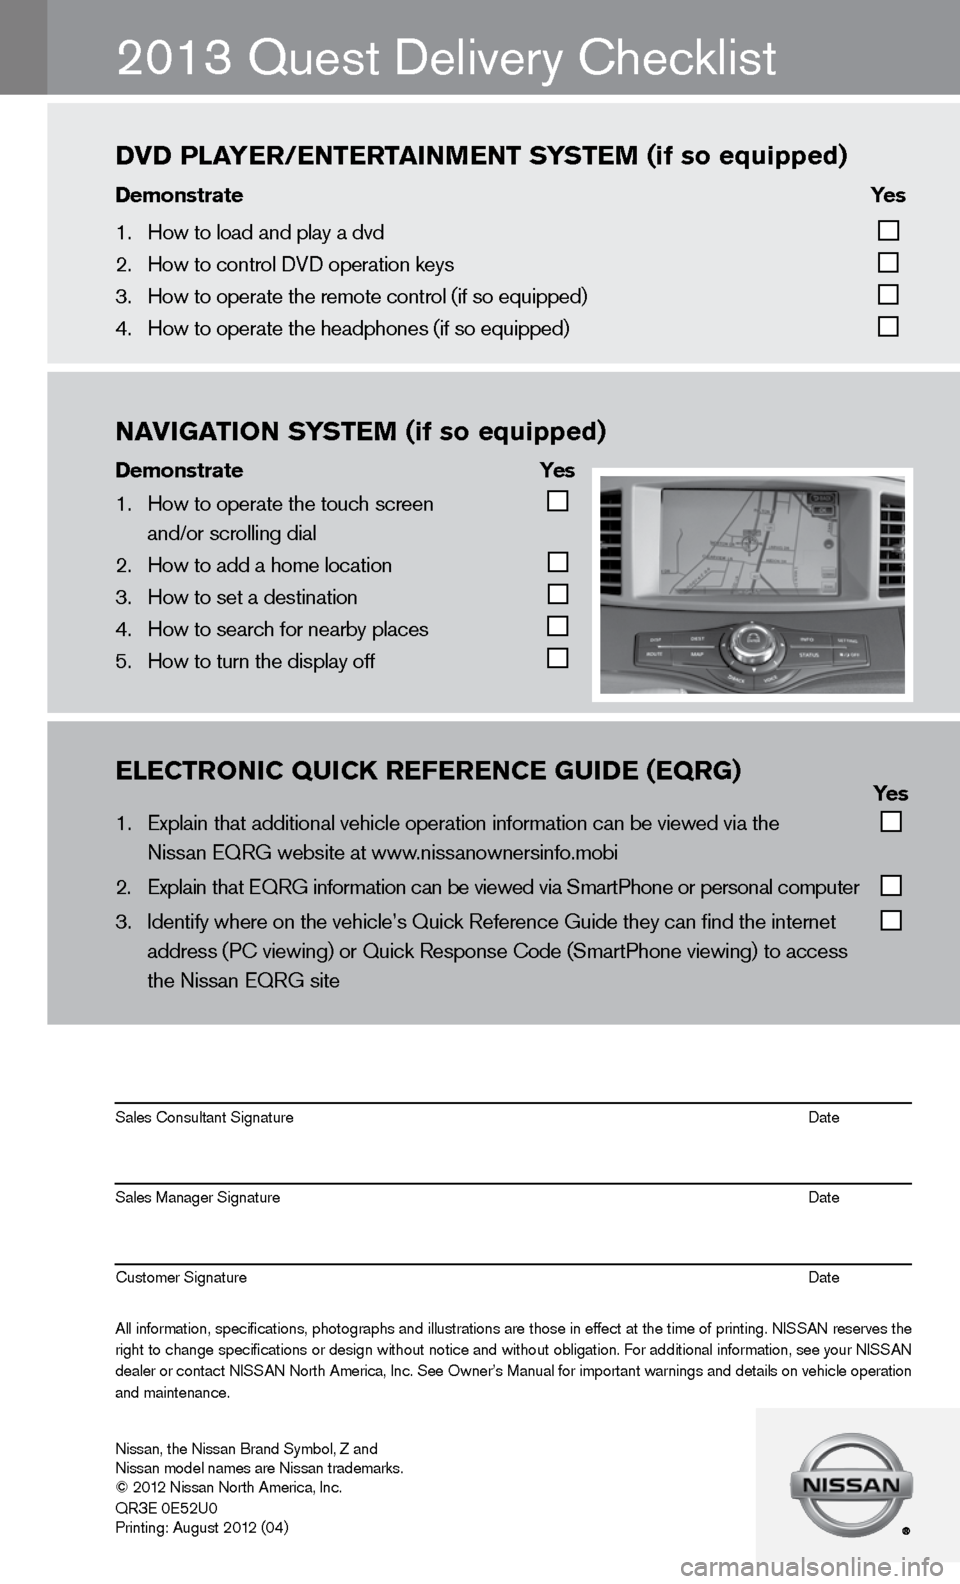
\bl\bCTrONIC\fQUICK\fr\bf\br\bNC\b\fgUID\b\f(\bQrg)\f\f\f\f\f\f \f \f\f \f\f Yes
1. Explain that addit\fional vehicle oper\fation information c\fan \be viewed via th\fe
Nissan EQRG we\bsite\f at www.nissanownersinfo.m\fo\bi
2. Explain that EQRG \finformation can \be \fviewed via SmartPh\fone or personal co\fmputer
3. Identify where on t\fhe vehicle’s Quick\f Reference Guide th\fey can find the int\fernet
address (PC viewing\f) or Quick Respons\fe Code (SmartPhone \fviewing) to access\f
the Nissan EQRG si\fte
All information\f specifications\f photographs and illustrations are those in effect at the time of printing. NISSAN reserves the
right to change specifications or design without notice and without o\bligation. For additional information\f see your NISSAN
dealer or contact NISSAN North America\f Inc. See Owner’s Manual for important warnings and details on vehicle operation
and maintenance. Sales Consultant S\fignature Date
Sales Manager Sign\fature Date
Customer Signature\f Date
Nissan\f the Nissan \fBrand Sym\bol\f Z and\f
Nissan model names\f are Nissan tradem\farks.
© 2012 Nissan North Ame\frica\f Inc.
QR
3E 0E52U0
Printing: August 2\f012 (04)
2013 Quest delivery checklist
NAVIgATION\fS YST\bM\f(if\fso\fequipped)
Demonstrate\f \f \f Yes
1. How to operate the\f touch screen
and/or scrolling d\fial
2. How to add a home \flocation
3. How to set a desti\fnation
4. How to search for n\fear\by places
5. How to turn the di\fsplay off
DVD\fPlAY\br/\bNT\brTAINM\bNT\fS YST\bM\f(if\fso\fequipped)
Demonstrate\f \f \f\f\f Yes\f
1. How to load and pl\fay a dvd
2. How to control DVD\f operation keys
3. How to operate the\f remote control (if \fso equipped)
4. How to operate the\f headphones (if so e\fquipped)
Page 27 of 36
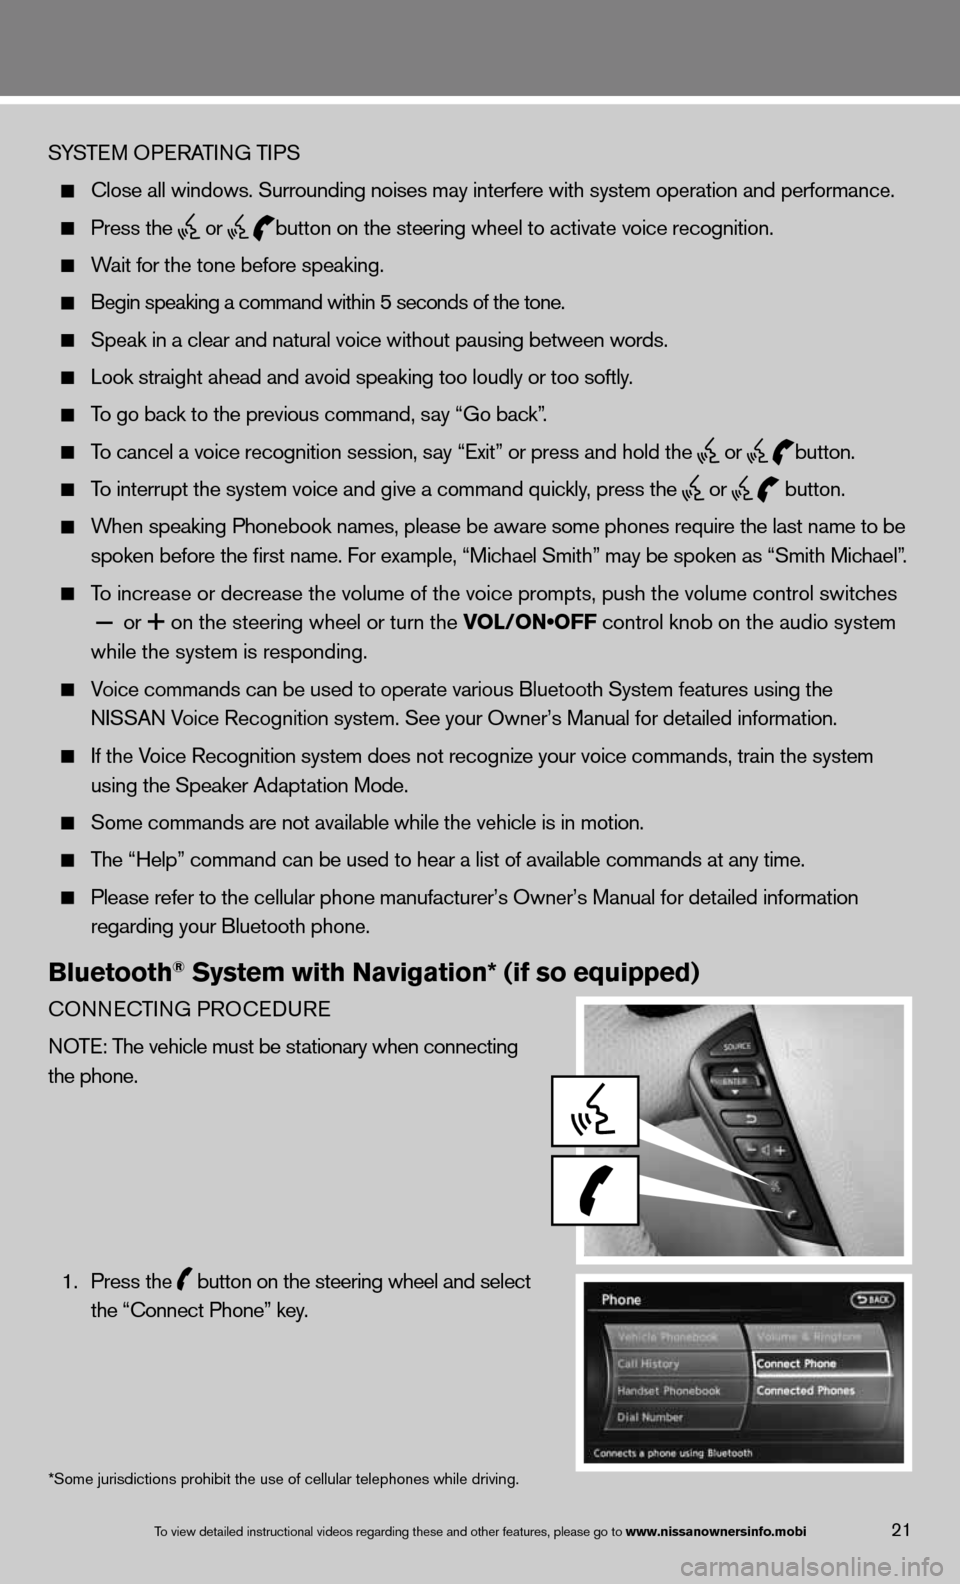
SYSTeM OPeRATin G TiPS
close all windows. Surrounding noises may interfere with system operation\
and performance.
Press the
or
button on the steering wheel to activate voice recognition.
Wait for the tone before speaking.
Begin speaking a command within 5 seconds of the tone.
Speak in a clear and natural voice without pausing between words.
Look straight ahead and avoid speaking too loudly or too softly.
To go back to the previous command, say “Go back”.
To cancel a voice recognition session, say “exit” or press and hold the
or
button.
To interrupt the system voice and give a command quickly, press the
or
button.
When speaking Phonebook names, please be aware some phones require the la\
st name to be
spoken before the first name. f or example, “Michael Smith” may be spoken as “Smith Michael”.
To increase or decrease the volume of the voice prompts, push the volume \
control switches
or
on the steering wheel or turn the VOL/ON•OFF control knob on the audio system
while the system is responding.
Voice commands can \f\be used to operate \fvarious Bluetooth \fSystem features usi\fng the
NISSAN Voice Recognition s\fystem. See your Owner’s Manual for detailed information.
if the Voice Recognition system does not recognize your voice commands, train th\
e system
using the Speaker Adaptation Mode.
Some commands are not available while the vehicle is in motion.
The “Help” command can be used to hear a list of available commands\
at any time.
Please refer to the cellular phone manufacturer’s Owner’s Manual f\
or detailed information
regarding your Bluetooth phone.
Bluetooth® System with Navigation* (if so equipped)
cOnnec TinG PROcedu Re
n OTe: The vehicle must be stationary when connecting
the phone.
1. Press the
button on the steering wheel and select
the “connect Phone” key.
*Some jurisdictions prohibit the use of cellular telephones while drivin\
g.
To view detailed in\fstructional videos\f regarding these a\fnd other features\f \fplease go to www.nissanownersin\Ifo.mobi21
Page 28 of 36
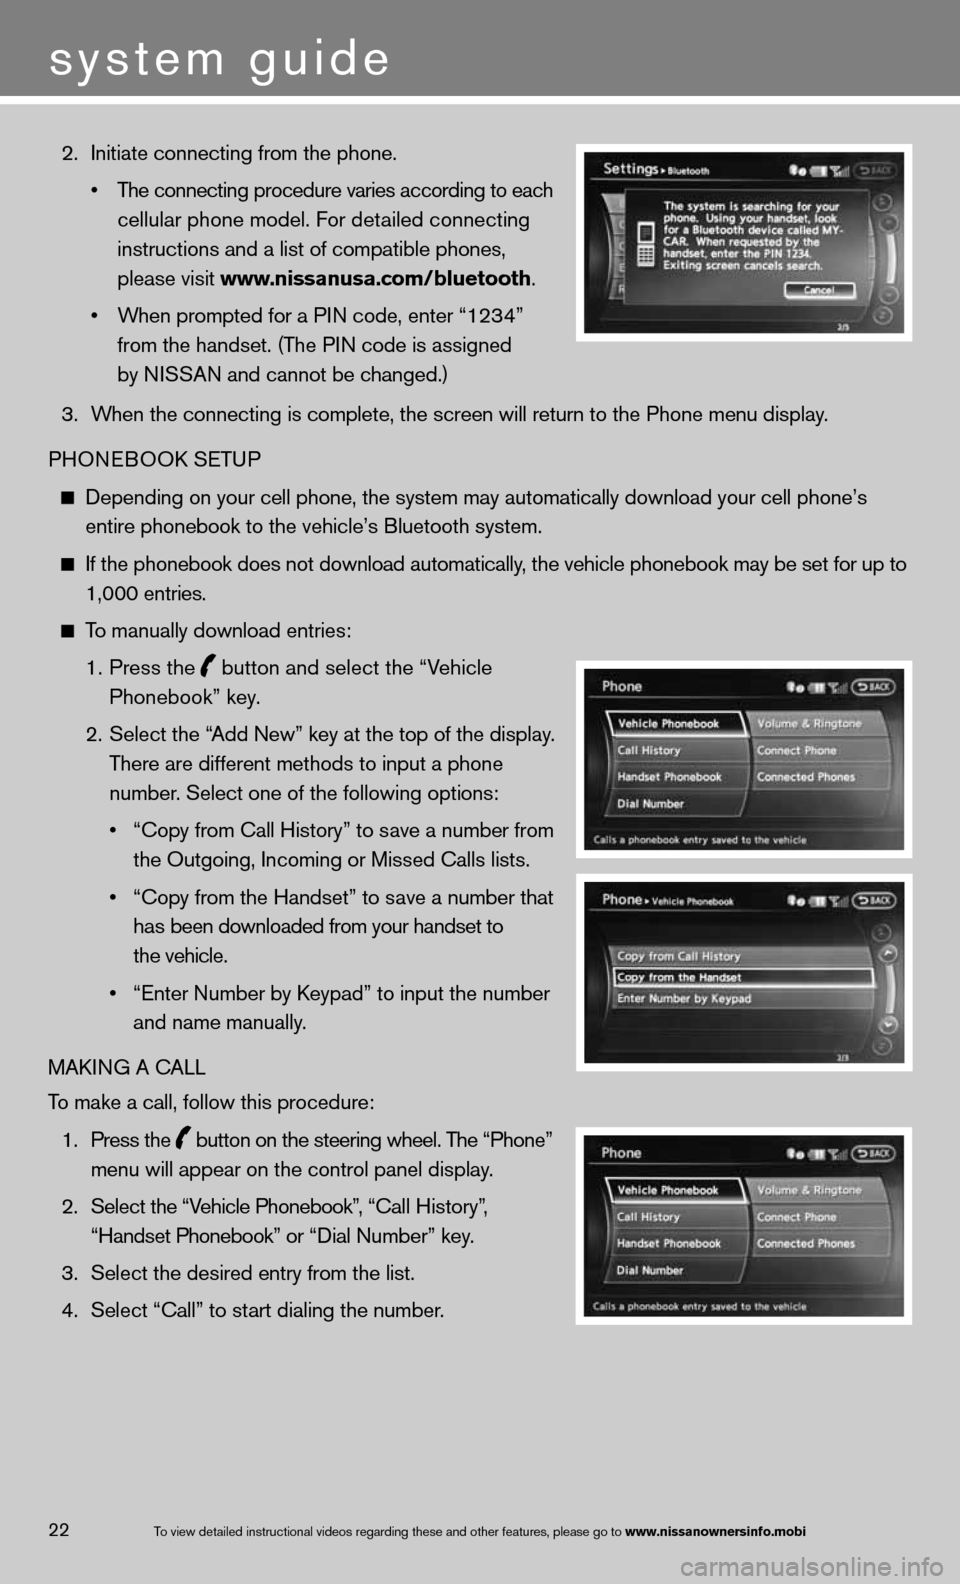
2. initiate connecting from the phone.
• The connecting procedure varies according to each
cellular phone model. f or detailed connecting
instructions and a list of compatible phones,
please visit www.nissanusa.com/bluetooth.
• When prompted for a PIN code, enter “1234”
from the handset. (The P in code is assigned
by niSSAn and cannot be changed.)
3. When the connecting is complete, the screen will return to the Phone menu display.
PHOne BOOk SeTu P
depending on your cell phone, the system may automatically download your \
cell phone’s
entire phonebook to the vehicle’s Bluetooth system.
if the phonebook does not download automatically, the vehicle phonebook may be set for up to 1,000 entries.
To manually download entries:
1. Press the
button and select the “Vehicle
Phonebook” key.
2. Select the “Add new” key at the top of the display.
There are different methods to input a phone
number. Select one of the following options:
• “Copy from Call History” to save a number from
the Outgoing, incoming or Missed calls lists.
• “Copy from the Handset” to save a number that
has been downloaded from your handset to
the vehicle.
• “Enter Number by Keypad” to input the number
and name manually.
MAkin G A cALL
To make a call, follow this procedure:
1. Press the
button on the steering wheel. The “Phone”
menu will appear on the control panel display.
2. Select the “Vehicle Phonebook”, “ call History”,
“Handset Phonebook” or “ dial n umber” key.
3. Select the desired entry from the list.
4. Select “call” to start dialing the number.
To view detailed in\fstructional videos\f regarding these a\fnd other features\f \fplease go to www.nissanownersin\Ifo.mobi22
system guide
Page 29 of 36
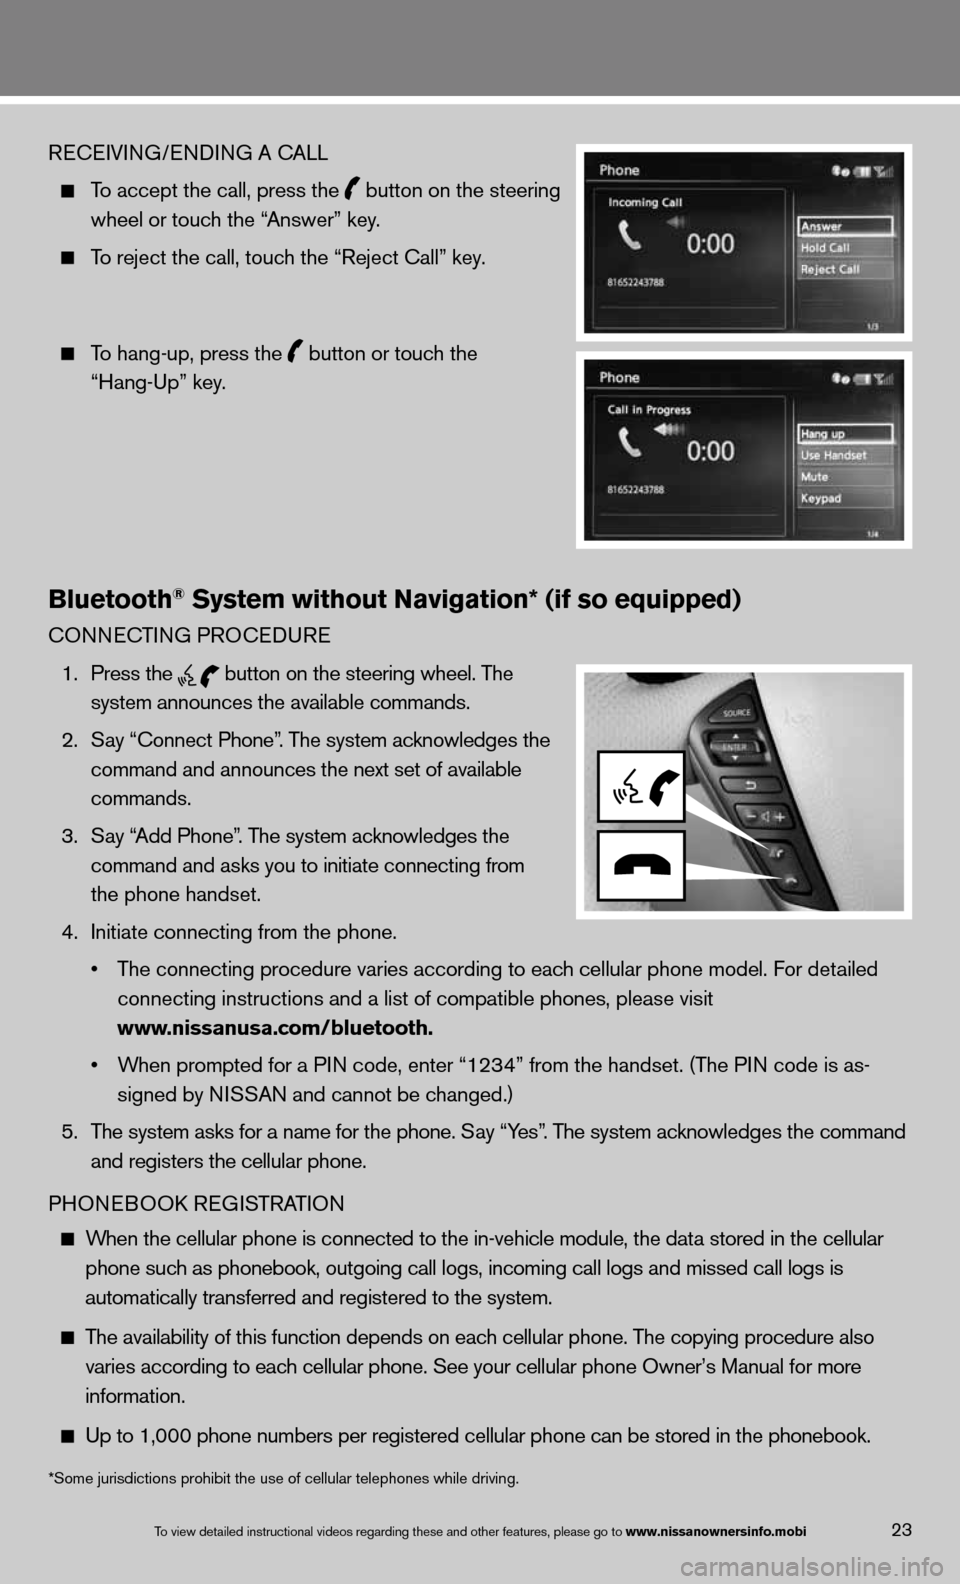
ReceiVin G/endin G A cALL
To accept the call, press the
button on the steering
wheel or touch the “Answer” key.
To reject the call, touch the “Reject call” key.
To hang-up, press the
button or touch the
“Hang-up” key.
Bluetooth® System without Navigation* (if so equipped)
cOnnec TinG PROcedu Re
1. Press the
button on the steering wheel. The
system announces the available commands.
2. Say “connect Phone”. The system acknowledges the
command and announces the next set of available
commands.
3. Say “Add Phone”. The system acknowledges the
command and asks you to initiate connecting from
the phone handset.
4. initiate connecting from the phone.
• The connecting procedure varies according to each cellular phone model. f or detailed
connecting instructions and a list of compatible phones, please visit
www.nissanusa.com/bluetooth.
• When prompted for a PIN code, enter “1234” from the handset. (The P in code is as-
signed by ni SSAn and cannot be changed.)
5. The system asks for a name for the phone. Say “Yes”. The system acknowledges the command
and registers the cellular phone.
PHOne BOOk ReG iSTRAT iOn
When the cellular phone is connected to the in-vehicle module, the data stored in the cellular
phone such as phonebook, outgoing call logs, incoming call logs and missed call l\
ogs is
automatically transferred and registered to the system.
The availability of this function depends on each cellular phone. The copying procedure also
varies according to each cellular phone. See your cellular phone Owner’s Manual for more
information.
up to 1,000 phone numbers per registered cellular phone can be stored in \
the phonebook.
To view detailed in\fstructional videos\f regarding these a\fnd other features\f \fplease go to www.nissanownersin\Ifo.mobi23
*Some jurisdictions prohibit the use of cellular telephones while drivin\
g.