Page 82 of 402
CHARGING STATUS INDICATOR
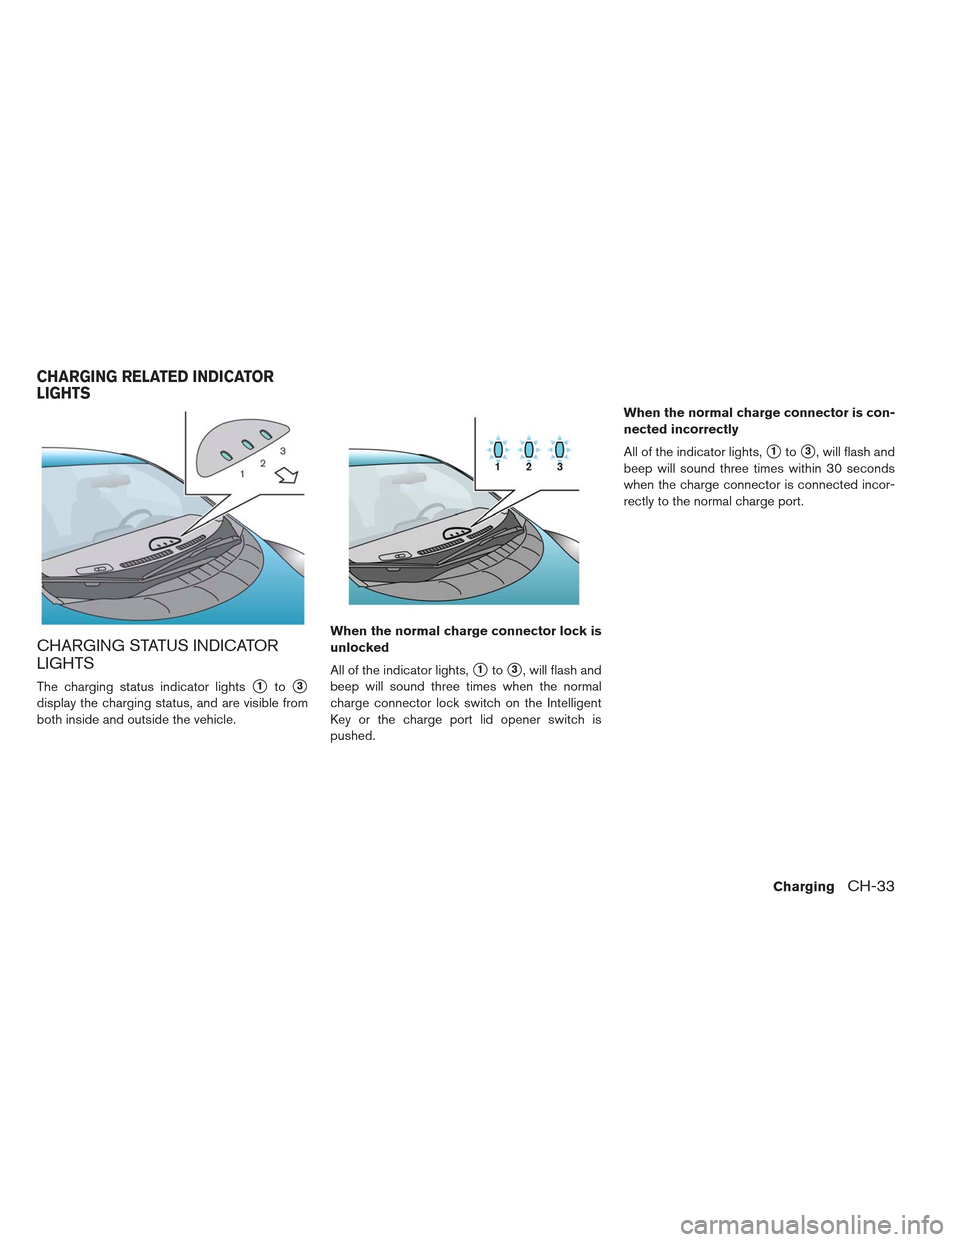
LIGHTS
The charging status indicator lights�1to�3
display the charging status, and are visible from
both inside and outside the vehicle.When the normal charge connector lock is
unlocked
All of the indicator lights,
�1to�3, will flash and
beep will sound three times when the normal
charge connector lock switch on the Intelligent
Key or the charge port lid opener switch is
pushed. When the normal charge connector is con-
nected incorrectly
All of the indicator lights,
�1to�3, will flash and
beep will sound three times within 30 seconds
when the charge connector is connected incor-
rectly to the normal charge port.
CHARGING RELATED INDICATOR
LIGHTS
ChargingCH-33
Page 88 of 402

SymptomPossible cause Possible solution
Charging timer cannot be
performed. The charge cable is not connected. Connect the charge cable.
The time on the clock is wrong. The charging timer function does not start charging based on the clock located on the upper dis-
play. Confirm that the date and time shown on the charging timer screen are the same as the GPS
time and date. If the 12-volt battery is discharged or if the Li-ion battery is disconnected, the time
setting must be updated. There must be a GPS signal to adjust the timer setting clock.
The immediate charge switch has been pushed. Charging timer does not operate when immediate charge is selected.
Charging timer has not been set. Set the charging timer schedule. See
�Charging timer
�.
Charging does not start because the charging
timer start time and end time are set and the cur-
rent time is before the set start time.
Confirm when the charging timer time is set to start charging. Change the charging timer setting to the
desired charge time or press the immediate charge button. See �Charging timer
�.
Charging does not start because only the charg-
ing timer start time is set and the current time is
after the set start time.
Charging does not start because only the charg-
ing timer end time is set and the current time is
after the set end time.
Charging does not start because the charge
amount has been set to 80% and the Li-ion bat-
tery is already charged to more than 80%. When the charge percentage in the charging timer is set to 80%, the Li-ion battery cannot be
charged more than 80%. Confirm the charge percentage set in the charging timer. Change the
charging percentage to the desired charge setting.
Remote charge cannot be performed. The charge cable is not connected.
Connect the charge cable beforehand.
Communication with the vehicle cannot be
established. Confirm that there is a cellular signal in your location. Remote charge cannot be started unless the
web enabled smart phone can connect to the internet.
Confirm that there is a cellular signal at the vehicle location.
If the power switch is in the OFF position for more than 2 weeks, the remote charge function can no
longer be used until power switch is in ON position.
ChargingCH-39
Page 89 of 402

SymptomPossible cause Possible solution
Normal charge stops in the
middle of charging. There is no power coming from the outlet. There may have been a electrical power failure, or the breaker may have failed. Charging will resume
when the power source is reset.
The charge cable has been disconnected. Check that the charge cable has not been disconnected.
The release switch has been pressed. If the charge connector button is pressed for a long period of time, charging will be stopped.
Both the normal charge connector and the quick
charge connector were connected at the same
time. If the normal charge connector and the quick charge connector are connected at the same time,
charging will be stopped.
Charging timer end time has been reached. When charging timer is set and the charge end time is reached, charging will be stopped, even if the Li-ion battery is not fully charged.
The temperature of the Li-ion battery is too hot
or too cold to charge. Confirm the Li-ion battery temperature by checking the Li-ion battery temperature gauge. If the
gauge indicates the Li-ion battery is too hot (red zone) or too cold (blue zone) , charging is not pos-
sible. Allow the Li-ion battery to cool or warm up before charging. See
�Li-ion battery temperature
gauge� in the�2 Instruments and controls
�section.
Quick charge cannot be performed. Incorrect charge connector connection, not fully
inserted or may not be locked.
Check that the charge connector is connected correctly and that it is locked.
The self-diagnostic function of the quick charge
device returns a negative result. There is a possibility that the vehicle has a malfunction. Stop charging and contact a NISSAN certified
LEAF dealer.
Charging does not start because the charge
amount has been set to 80% and the Li-ion battery
is already charged to more than 80%. When the charge percentage in the long life mode is set to 80%, the Li-ion battery cannot be charged
more than 80%. Confirm the charge percentage set in the long life mode. Change the charging
percentage the desired charge setting.
The power switch of the quick charger is off. Check the power switch of the quick charger.
Quick charge stops in the middle of charging Charging is stopped by the quick charge timer. Charging will stop depending on the timer function setting of the quick charge device. If you need to
charge the Li-ion battery more, start the charging procedure again.
The maximum time for quick charge is 30–60 minutes. If you need to charge the Li-ion battery for longer
than this, start the charging procedure again.
The power supply for the quick charger is off. Check whether the power supply for the quick charger is off.
CH-40Charging
Page 91 of 402

WARNING
Do not ride in a moving vehicle when the seatback is reclined. This can be
dangerous. The shoulder belt will not
be against your body. In an accident,
you could be thrown into it and receive
neck or other serious injuries. You
could also slide under the lap belt and
receive serious internal injuries. For the most effective protection when
the vehicle is in motion, the seat
should be upright. Always sit well back
in the seat with both feet on the floor
and adjust the seat properly. See �Pre-
cautions on seat belt usage� later in
this section.
After adjustment, gently rock in the seat to make sure it is securely locked.
Do not leave children unattended in- side the vehicle. They could unknow-
ingly activate switches or controls. Un-
attended children could become
involved in serious accidents. The seatback should not be reclined
any more than needed for comfort.
Seat belts are most effective when the
passenger sits well back and straight
up in the seat. If the seatback is re-
clined, the risk of sliding under the lap
belt and being injured is increased.
CAUTION
When adjusting the seat positions, be
sure not to contact any moving parts to
avoid possible injuries and/or damage.
SEATS
1-2Safety–Seats, seat belts and supplemental restraint system
Page 92 of 402
FRONT SEATS
Front manual seat adjustment
Forward and backward:
Pull the bar up and hold it while sliding the seat
forward or backward to the preferred position.
Release the bar to lock the seat in position.Reclining:
To recline the seatback, pull the lever up and lean
back. To bring the seatback forward, pull the lever
up and lean your body forward. Release the lever
to lock the seatback in position.
The reclining feature allows adjustment of the
seatback for occupants of different sizes for
added comfort and to help obtain proper seat
belt fit. See
�Precautions on seat belt usage�.
Also, the seatback can be reclined to allow oc-
cupants to rest when the vehicle is stopped and
the vehicle is in the P (Park) position or N (Neu-
tral) position with the parking brake applied. Seat lifter (for driver’s seat):
Pull up or push down the adjusting lever to adjust
the seat height to the preferred position.
Safety–Seats, seat belts and supplemental restraint system1-3
Page 94 of 402
head restraint before an occupant uses
the seating position. Failure to follow
these instructions can reduce the effec-
tiveness of the head restraints. This may
increase the risk of serious injury or
death in a collision.The illustration shows the seating positions
equipped with head restraints. The front seats
are adjustable and removable. The rear seat is
only removable.
Indicates the seating position is equipped
with a head restraint.
Components
1. Head restraint
2. Adjustment notches
3. Lock knob
4. Stalks
Safety–Seats, seat belts and supplemental restraint system1-5
Page 95 of 402
Adjustment
Adjust the head restraint so the center is level
with the center of your ears.To raise the head restraint, pull it up.
To lower, push and hold the lock knob and push
the head restraint down.
1-6Safety–Seats, seat belts and supplemental restraint system
Page 96 of 402

Removal
Use the following procedure to remove the ad-
justable head restraints.
1. Pull the head restraint up to the highestposition.
2. Push and hold the lock knob.
3. Remove the head restraint from the seat.
4. Store the head restraint properly in a secure place so it is not loose in the vehicle.
5. Reinstall and properly adjust the head re- straint before an occupant uses the seating
position.
Install
1. Align the head restraint stalks with the holes inthe seat. Make sure that the head restraint is
facing the correct direction. The stalk with the
adjustment notches
�1must be installed in
the hole with the lock knob
�2.
2. Push and hold the lock knob and push the head restraint down.
3. Properly adjust the head restraint before an occupant uses the seating position.
PRECAUTIONS ON SEAT BELT
USAGE
If you are wearing your seat belt properly ad-
justed, and you are sitting upright and well back
in your seat with both feet on the floor, your
chances of being injured or killed in an accident
and/or the severity of injury may be greatly re-
duced. NISSAN strongly encourages you and all
of your passengers to buckle up every time you
drive, even if your seating position includes a
supplemental air bag.
Most U.S. states and Canadian provinces
or territories specify that seat belts be worn
at all times when a vehicle is being driven.
SEAT BELTS
Safety–Seats, seat belts and supplemental restraint system1-7