2013 NISSAN LEAF start stop button
[x] Cancel search: start stop buttonPage 46 of 275
![NISSAN LEAF 2013 1.G Navigation Manual 2-8Unique EV functions
around the destination is updated.
.[Near Home]:Charging station information for the area
around your home is updated. Registra-
tion of your home in the Address Book is
necessa NISSAN LEAF 2013 1.G Navigation Manual 2-8Unique EV functions
around the destination is updated.
.[Near Home]:Charging station information for the area
around your home is updated. Registra-
tion of your home in the Address Book is
necessa](/manual-img/5/324/w960_324-45.png)
2-8Unique EV functions
around the destination is updated.
.[Near Home]:Charging station information for the area
around your home is updated. Registra-
tion of your home in the Address Book is
necessary before using this item.
“Storing home location”
(page 1-12)
.[Near a location on the Map]:Charging station information for the area
where the cross pointer is placed by
moving the map is updated.
3. When [Stop] is touched while updating information, connection to the NISSAN
CARWINGS Data Center is disconnected.
INFO:
If communication with the NISSAN CARW-
INGS Data Center is disconnected due to
poor signal reception, a message will be
displayed. Touch [Yes] to restart the down-
load.
4. When the update is completed, a message is displayed.Energy economy and energy usage information
are displayed.
VIEWING ENERGY ECONOMY IN-
FORMATION
Estimated driving range, average energy econ-
omy and instant energy economy are displayed.
1. Push the
(Zero Emission menu) button.
2. Touch [Energy Info].
3. Touch [Energy Economy].
*1Driving Range:
The possible driving distance based on the
current charging status is displayed.
*2Average:
The average energy economy from the previous
to the next resets is displayed.
*3Instant:
The system shows the distance that the vehicle
can travel using 1kWh.
ENERGY INFORMATION DISPLAY
Page 48 of 275
2-10Unique EV functions
This function enables the batteries to be
charged and the climate control to be turned
on automatically at a regular time and day of the
week.
SETTING TIMER CHARGE
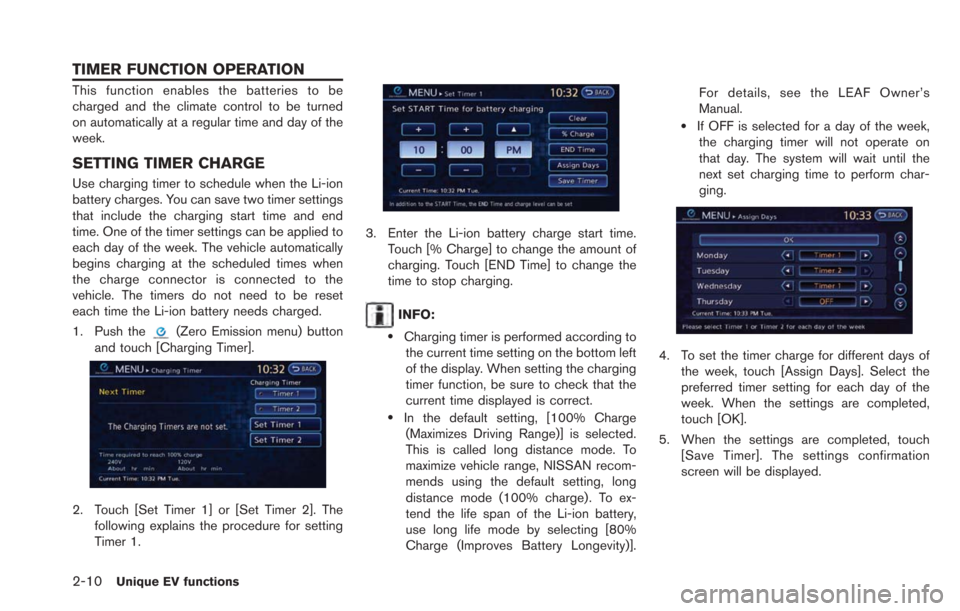
Use charging timer to schedule when the Li-ion
battery charges. You can save two timer settings
that include the charging start time and end
time. One of the timer settings can be applied to
each day of the week. The vehicle automatically
begins charging at the scheduled times when
the charge connector is connected to the
vehicle. The timers do not need to be reset
each time the Li-ion battery needs charged.
1. Push the
(Zero Emission menu) button
and touch [Charging Timer].
2. Touch [Set Timer 1] or [Set Timer 2]. The following explains the procedure for setting
Timer 1.
3. Enter the Li-ion battery charge start time.Touch [% Charge] to change the amount of
charging. Touch [END Time] to change the
time to stop charging.
INFO:
.Charging timer is performed according tothe current time setting on the bottom left
of the display. When setting the charging
timer function, be sure to check that the
current time displayed is correct.
.In the default setting, [100% Charge
(Maximizes Driving Range)] is selected.
This is called long distance mode. To
maximize vehicle range, NISSAN recom-
mends using the default setting, long
distance mode (100% charge). To ex-
tend the life span of the Li-ion battery,
use long life mode by selecting [80%
Charge (Improves Battery Longevity)]. For details, see the LEAF Owner’s
Manual.
.If OFF is selected for a day of the week,
the charging timer will not operate on
that day. The system will wait until the
next set charging time to perform char-
ging.
4. To set the timer charge for different days of
the week, touch [Assign Days]. Select the
preferred timer setting for each day of the
week. When the settings are completed,
touch [OK].
5. When the settings are completed, touch [Save Timer]. The settings confirmation
screen will be displayed.
TIMER FUNCTION OPERATION
Page 50 of 275
2-12Unique EV functions
.When the climate control is set as the first
priority, the Climate Ctrl. Timer will not
operate until the remaining Li-ion battery
power displayed in the meter is 2 segments
(15%) or higher.
. The Li-ion battery will not charge when the
charge connector is connected to the
vehicle until the next scheduled charge start
time when the charge timer is active. If
necessary, use immediate charge or remote
charge to charge the Li-ion battery.
. Some charging stations used to perform
normal charge are equipped with timer
functions. If the charger timer function and
the vehicle timer are both set, and the two
timers are not set to operate at the same
time, it is possible that the charger will not
start or the battery will not be charged to the
level expected.
. The Li-ion battery may not charge to the
expected level when the Li-ion battery
warmer operates while charging using the
Charging Timer.
. Set only the Charging Timer End time when
charging in cold weather. The vehicle
automatically determines when to start
charging to fully charge the Li-ion battery,
even if the Li-ion battery warmer operates.
Charging ends before the set End time if the Li-ion battery is fully charged.
SETTING CLIMATE CTRL. TIMER
While the charger is connected to vehicle, this
function pre-heats or pre-cools the passenger
compartment of the vehicle to the set tempera-
ture before driving. This helps reduce power
consumption from the Li-ion battery.
“Temperature settings” (page 2-14)
The Climate Ctrl. Timer operates the air condi-
tioner using power from the charger. Electric
power from the Li-ion battery is not used.
The Climate Ctrl. Timer function allows two
different timer settings. Each timer charge
function can be set to activate on a different
day of the week.
Once the Climate Ctrl. Timer is set, it will
complete air conditioning by the time that is set.
It is not necessary to set the Climate Ctrl. Timer
everyday.
WARNING
Even if the Climate Ctrl. Timer is set, the
temperature in the passenger compart-
ment may become high if the system
automatically stops. Do not leave chil-
dren or adults who would normally
require the support of others alone in your vehicle. Pets should not be left
alone either. On hot, sunny days, tem-
peratures in a closed vehicle could
quickly become high enough to cause
severe or possibly fatal injuries to
people or animals.
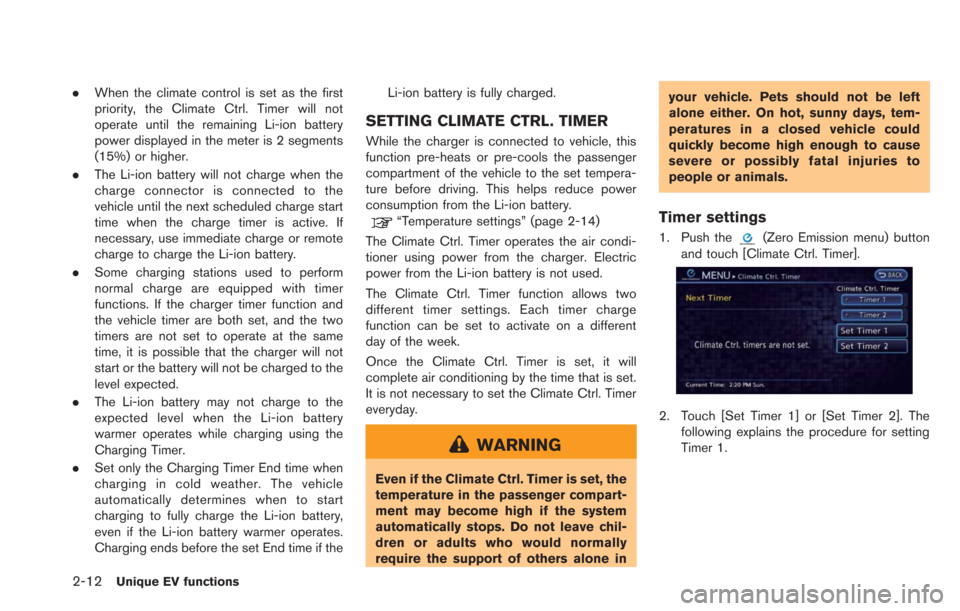
Timer settings
1. Push the(Zero Emission menu) button
and touch [Climate Ctrl. Timer].
2. Touch [Set Timer 1] or [Set Timer 2]. The following explains the procedure for setting
Timer 1.
Page 52 of 275
2-14Unique EV functions
.If the Climate Ctrl. Timer starts operating
while the vehicle is being charged, the time
required for charging will be longer.
. Operating the Climate Ctrl. Timer or remote
climate control in an environment where the
temperature is low may decrease the rate of
battery charge.
. Timer setting can also be changed while
Climate Ctrl. timer is operated. When the
power position is switched to OFF, the air
conditioner starts or enters waiting mode
depending on the new timer settings.
. When charging is set as the first priority, the
Climate Ctrl. Timer does not start until 10
segments (80%) of the Li-ion battery avail-
able charge gauge are illuminated.
. When the difference in temperature be-
tween the air conditioner setting tempera-
ture and the temperature outside the vehicle
is large, the temperature inside the vehicle
may not be maintained at the setting
temperature.
. The charging status indicator lights illumi-
nate in a specific pattern when the Li-ion
battery warmer operates. The charging
status indicator lights use the same pattern
to indicate 12-volt battery charging, Climate
Ctrl. Timer operation or Remote Climate
Control operation. The charging status indicator lights do not change if the Li-ion
battery warmer operates at the same time as
the above features. See LEAF Owner’s
Manual for details of the charging status
indicator lights.
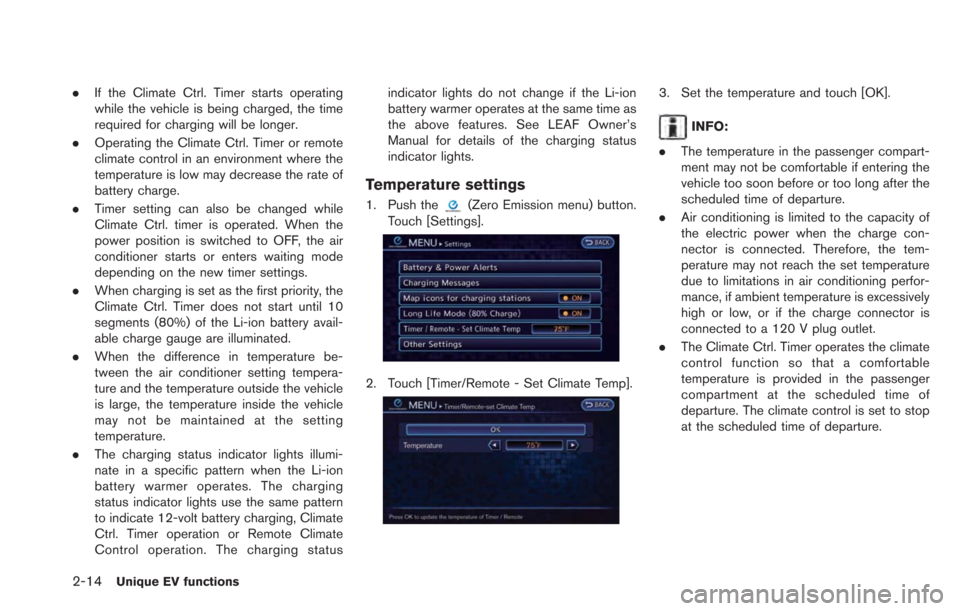
Temperature settings
1. Push the(Zero Emission menu) button.
Touch [Settings].
2. Touch [Timer/Remote - Set Climate Temp].
3. Set the temperature and touch [OK].
INFO:
. The temperature in the passenger compart-
ment may not be comfortable if entering the
vehicle too soon before or too long after the
scheduled time of departure.
. Air conditioning is limited to the capacity of
the electric power when the charge con-
nector is connected. Therefore, the tem-
perature may not reach the set temperature
due to limitations in air conditioning perfor-
mance, if ambient temperature is excessively
high or low, or if the charge connector is
connected to a 120 V plug outlet.
. The Climate Ctrl. Timer operates the climate
control function so that a comfortable
temperature is provided in the passenger
compartment at the scheduled time of
departure. The climate control is set to stop
at the scheduled time of departure.
Page 109 of 275
2. Touch the preferred key.
: Pauses the simulation.
: Resumes the simulation.
: Ends the simulation.
3. Push theMAPbutton to return to the
current location map screen.
INFO:
During simulation, the map scale can be
changed by touching [ZOOM IN] or [ZOOM
OUT]. While the map scale is being changed,
the simulation is temporarily stopped.
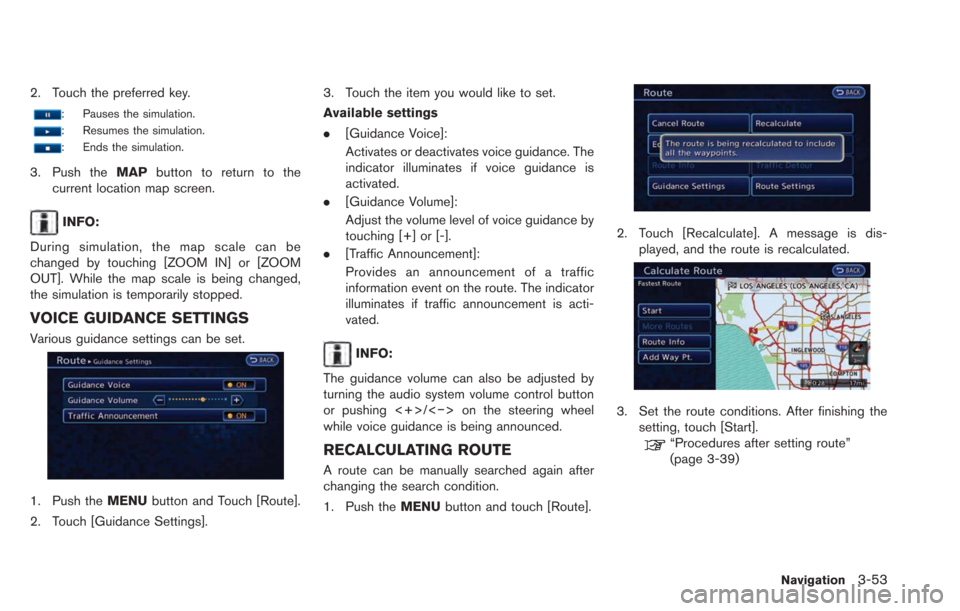
VOICE GUIDANCE SETTINGS
Various guidance settings can be set.
1. Push the MENUbutton and Touch [Route].
2. Touch [Guidance Settings]. 3. Touch the item you would like to set.
Available settings
.
[Guidance Voice]:
Activates or deactivates voice guidance. The
indicator illuminates if voice guidance is
activated.
. [Guidance Volume]:
Adjust the volume level of voice guidance by
touching [+] or [-].
. [Traffic Announcement]:
Provides an announcement of a traffic
information event on the route. The indicator
illuminates if traffic announcement is acti-
vated.
INFO:
The guidance volume can also be adjusted by
turning the audio system volume control button
or pushing <+>/<−> on the steering wheel
while voice guidance is being announced.
RECALCULATING ROUTE
A route can be manually searched again after
changing the search condition.
1. Push the MENUbutton and touch [Route].
2. Touch [Recalculate]. A message is dis-
played, and the route is recalculated.
3. Set the route conditions. After finishing thesetting, touch [Start].
“Procedures after setting route”
(page 3-39)
Navigation3-53
Page 208 of 275
8-2Voice recognition
USING VOICE RECOGNITION SYS-
TEM
Initialization
When the power switch is pushed to the "ON"
position, Voice Recognition is initialized, which
takes a few seconds. When completed, the
system is ready to accept voice commands. If
the
button on the steering wheel is pushed
before the initialization completes, the display
will show the message: "Loading Voice Recog-
nition system. Please wait...".
BEFORE STARTING
To get the best recognition performance from
Voice Recognition, observe the following items.
. The interior of the vehicle should be as quiet
as possible. Close the windows to eliminate
the surrounding noises (traffic noise and
vibration sounds, etc.), which may prevent
the system from correctly recognizing the
voice commands.
. Wait until the tone sounds before speaking a
command.
. Speak in a natural conversational voice
without pausing between words.
GIVING VOICE COMMANDS
1. Push thebutton located on the steering
wheel.
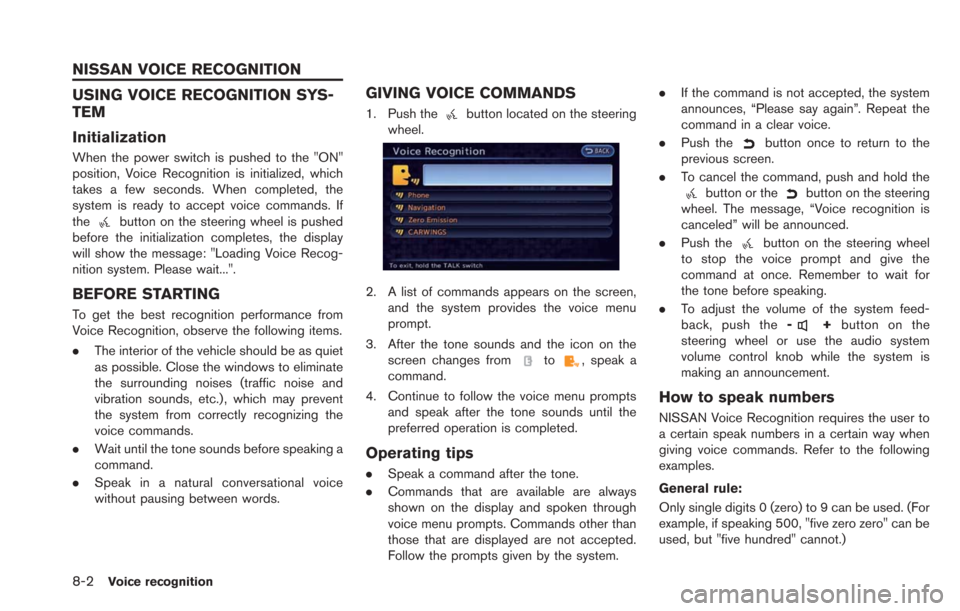
2. A list of commands appears on the screen,
and the system provides the voice menu
prompt.
3. After the tone sounds and the icon on the screen changes from
to, speak a
command.
4. Continue to follow the voice menu prompts and speak after the tone sounds until the
preferred operation is completed.
Operating tips
.Speak a command after the tone.
. Commands that are available are always
shown on the display and spoken through
voice menu prompts. Commands other than
those that are displayed are not accepted.
Follow the prompts given by the system. .
If the command is not accepted, the system
announces, “Please say again”. Repeat the
command in a clear voice.
. Push the
button once to return to the
previous screen.
. To cancel the command, push and hold the
button or thebutton on the steering
wheel. The message, “Voice recognition is
canceled” will be announced.
. Push the
button on the steering wheel
to stop the voice prompt and give the
command at once. Remember to wait for
the tone before speaking.
. To adjust the volume of the system feed-
back, push the -
+button on the
steering wheel or use the audio system
volume control knob while the system is
making an announcement.
How to speak numbers
NISSAN Voice Recognition requires the user to
a certain speak numbers in a certain way when
giving voice commands. Refer to the following
examples.
General rule:
Only single digits 0 (zero) to 9 can be used. (For
example, if speaking 500, "five zero zero" can be
used, but "five hundred" cannot.)
NISSAN VOICE RECOGNITION