2013 NISSAN GT-R ECU
[x] Cancel search: ECUPage 183 of 346
3-22Pre-driving checks and adjustments
.Do not leave the key inside the
trunk.
NOTE:
. To prevent the Intelligent Key from
being accidentally locked in the trunk,
lockout protection is equipped with the
Intelligent Key system. When the trunk
lid is closed with the Intelligent Key
inside the trunk, the outside buzzer will
sound and the trunk will open.
. The trunk of this vehicle is slightly
more difficult to close than an ordinary
vehicle (particularly when the vehicle is
new) . This is because the trunk rigidity
has been increased to handle the high
load on the rear spoiler during vehicle
operation. This does not indicate that
there is a malfunction. Check that the
trunk is securely locked.
EMERGENCY TRUNK LID RELEASE
WARNING
Closely supervise children when they
are around cars to prevent them from
playing and becoming locked in the
trunk where they could be seriously
injured. Keep the car locked, with the
trunk lid securely latched, when not in
use, and prevent children’s access to
Intelligent Keys.
The emergency trunk lid release mechanism allows opening of the trunk lid in the event that
people become locked inside the trunk or in the
event of the loss of electrical power such as a
discharged battery.
Inside the trunk
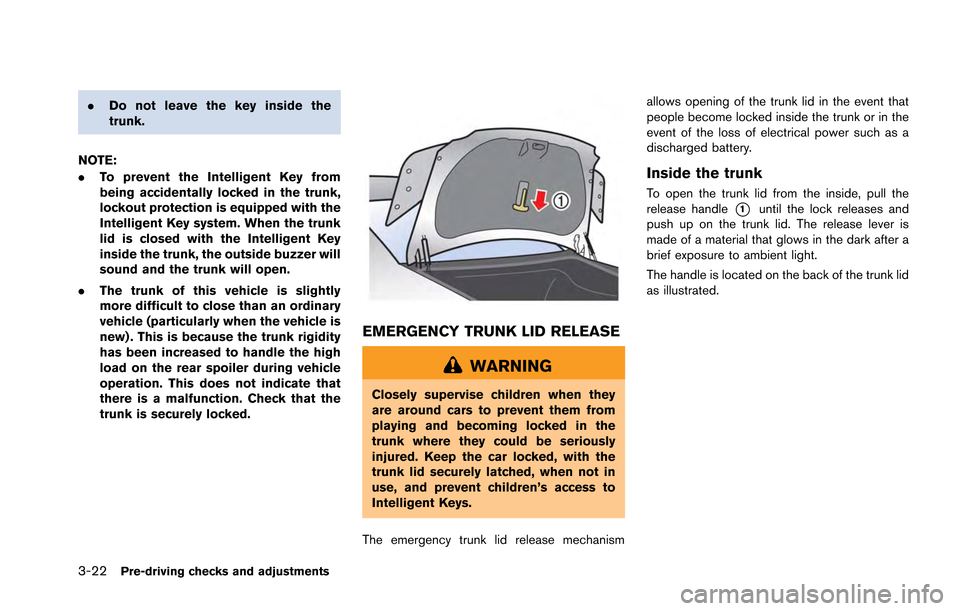
To open the trunk lid from the inside, pull the
release handle
*1until the lock releases and
push up on the trunk lid. The release lever is
made of a material that glows in the dark after a
brief exposure to ambient light.
The handle is located on the back of the trunk lid
as illustrated.
Page 196 of 346
WARNING
.Do not leave children or adults who
would normally require the support
of others alone in your vehicle. Pets
should not be left alone either. They
could accidentally injure themselves
or others through inadvertent op-
eration of the vehicle. Also, on hot,
sunny days, temperatures in a
closed vehicle could quickly become
high enough to cause severe or
possibly fatal injuries to people or
animals.
. Closely supervise children when
they are around cars to prevent
them from playing and becoming
locked in the trunk where they could
be seriously injured. Keep the car
locked, with the rear seatback and
trunk lid securely latched when not
in use, and prevent children’s access
to car keys.
EXHAUST GAS (carbon monoxide)
WARNING
.Do not breathe exhaust gases; they
contain colorless and odorless car-
bon monoxide. Carbon monoxide is
dangerous. It can cause uncon-
sciousness or death.
. If you suspect that exhaust fumes
are entering the vehicle, drive with
all windows fully open, and have the
vehicle inspected immediately.
. Do not run the engine in closed
spaces such as a garage.
. Do not park the vehicle with the
engine running for any extended
length of time.
. Keep the trunk lid closed while
driving, otherwise exhaust gases
could be drawn into the passenger
compartment. If you must drive with
the trunk lid open, follow these
precautions:
a. Open all the windows.
b. Set the
air recirculation to
off and the fan control to high to circulate the air.
. The exhaust system and body
should be inspected by a qualified
mechanic whenever:
— The vehicle is raised for service.
— You suspect that exhaust fumes
are entering into the passenger
compartment.
— You notice a change in the sound of the exhaust system.
— You have had an accident invol- ving damage to the exhaust
system, underbody, or rear of
the vehicle.
THREE-WAY CATALYST
The three-way catalyst is an emission control
device installed in the exhaust system. Exhaust
gases in the three-way catalyst are burned at
high temperatures to help reduce pollutants.
Starting and driving5-3
PRECAUTIONS WHEN STARTING
AND DRIVING
Page 202 of 346
Remember, drinking and driving don’t mix! And
that is true for drugs, too (over-the-counter,
prescription, and illegal drugs) . Don’t drive if
your ability to operate your vehicle is impaired by
alcohol, drugs, or some other physical condition.
ALL-WHEEL DRIVE (AWD) DRIVING
SAFETY PRECAUTIONS
WARNING
.Do not drive beyond the perfor-
mance capability of the tires, even
with AWD engaged. Accelerating
quickly, sharp steering maneuvers
or sudden braking may cause loss
of control.
. Always use the specified tires on all
four wheels. Install tire chains on
the rear wheels when driving on
slippery roads and drive carefully.
. This vehicle is not designed for
offroad (rough road) use. Do not
drive on sandy or muddy roads that
tires may get stuck in.
. Do not attempt to raise two wheels
off the ground and shift the trans-
mission to any
&A↔&Mor&Rposition
with the engine running. Doing so may result in drivetrain damage or
unexpected vehicle movement
which could result in serious vehicle
damage or personal injury.
. Do not attempt to test an AWD
equipped vehicle on a 2-wheel dy-
namometer, (such as the dynam-
ometers used by some states for
emissions testing) , or similar equip-
ment even if the other two wheels
are raised off the ground. Make sure
you inform test facility personnel
that your vehicle is equipped with
AWD before it is placed on a
dynamometer. Using the wrong test
equipment may result in drivetrain
damage or unexpected vehicle
movement which could result in
serious vehicle damage or personal
injury.
. When a wheel is off the ground due
to an unlevel surface, do not spin
the wheel excessively.
WARNING
Do not operate the push-button ignition
switch while driving the vehicle except
in an emergency. (The engine will stop
when the ignition switch is pushed
three consecutive times or the ignition
switch is pushed and held for more than
2 seconds.) If the engine stops while
the vehicle is being driven, this could
lead to a crash and serious injury.
Before operating the push-button ignition
switch, be sure to move the shift lever to the
&Pposition.
Starting and driving5-9
PUSH-BUTTON IGNITION SWITCH
Page 204 of 346
NOTE:
.If the steering lock release malfunction
indicator appears on the vehicle infor-
mation display when the ignition
switch is pressed, press the ignition
switch again while gently turning the
steering wheel left and right.
(
“Steering lock release malfunc-
tion indicator” page 2-42)
. If the shift
&Pwarning appears on the
vehicle information display when the
ignition switch is pushed, the shift lever
is in any position except the
&Pposi-
tion. Move the shift lever to the&Pposition. (“Shift “P” warning”
page 2-42)
. If the Intelligent Key battery discharge
indicator appears on the vehicle infor-
mation display, the Intelligent Key
battery is discharged and the ignition
switch will not operate. Insert the
Intelligent Key into the key port to
operate the ignition switch.
(
“Intelligent Key battery discharge
indicator” page 2-43)
. When all of the following conditions
are met for 60 minutes, the battery
saver system will cut off the power
supply to prevent battery discharge. —
The ignition switch is in the ACC
position, and
— All doors are closed, and
— The shift lever is in the
&Pposition.
. Do not leave the vehicle with the
ignition switch in the ACC or ON
position when the engine is not run-
ning for an extended period of time.
This can discharge the battery.
EMERGENCY ENGINE SHUT OFF
To shut off the engine in an emergency situation
while driving, perform the following procedure:
.Rapidly push the push-button ignition switch
3 consecutive times in less than 1.5
seconds, or
. Push and hold the push button ignition
switch for more than 2 seconds.
INTELLIGENT KEY BATTERY DIS-
CHARGE
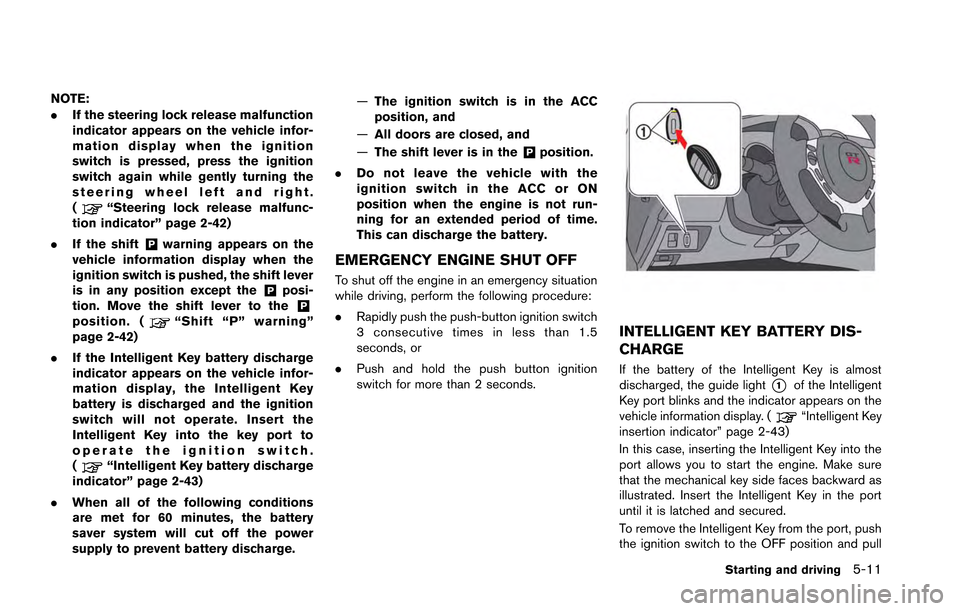
If the battery of the Intelligent Key is almost
discharged, the guide light
*1of the Intelligent
Key port blinks and the indicator appears on the
vehicle information display. (
“Intelligent Key
insertion indicator” page 2-43)
In this case, inserting the Intelligent Key into the
port allows you to start the engine. Make sure
that the mechanical key side faces backward as
illustrated. Insert the Intelligent Key in the port
until it is latched and secured.
To remove the Intelligent Key from the port, push
the ignition switch to the OFF position and pull
Starting and driving5-11
Page 225 of 346
5-32Starting and driving
conditions, and oil consumption by
itself does not necessarily indicate
any malfunction. If your rate of oil
consumption increases suddenly or
without explanation, NISSAN recom-
mends that you have your vehicle
inspected by a GT-R certified NISSAN
dealer.This function enables the driver to start accel-
eration from a stop by selecting R mode with the
VDC and transmission setup switch. The engine
output will be maintained at approximately 4,000
rpm. When using the R mode or the R mode
start function, always use proper seating posi-
tion and follow the safety instructions in Section
1 of this manual.
WARNING
.Failure to follow the warnings and
instruction for the use of this fea-
ture may cause a loss of vehicle
control or a collision which may lead
to serious personal injury or death:
. Make sure to drive carefully within
legal limits.
. Only use this function when you can
guarantee that it is safe to do so,
based on the surrounding traffic
conditions.
. Do not use this function on slippery
or wet roads. This may cause loss of
vehicle control and could result in
an accident.
. The R mode start function has been
developed not only for controlling the engine, transmission and VDC
system, but also the settings of the
suspension and tires. Therefore, any
modification of the vehicle may
disrupt the vehicle’s balance. This
will not only reduce the optimum
performance of the vehicle but may
also cause damage to powertrain
components, including the trans-
mission.
NOTICE
.
When the temperature of the engine
coolant and transmission oil is high
or low, the function cannot be used.
The temperature range in which the
R mode start function can be used:
— Engine coolant: 1408F - 2128F
(608C - 1008C)
— Transmission oil: 1408F - 2668F (608C - 1308C)
. If the R mode start function is used
4 times consecutively, the function
may be disabled and cannot be
turned on to protect the vehicle
system. While the function is dis-
R MODE START FUNCTION
Page 249 of 346
6-2In case of emergency
In the event of a roadside emergency, Roadside
Assistance Service is available to you. Please
refer to your Warranty Information Booklet (U.S.)
or Warranty & Roadside Assistance Information
Booklet (Canada) for details.To shut off the engine in an emergency situation
while driving, perform the following procedure:
.Rapidly push the push-button ignition switch
3 consecutive times in less than 1.5
seconds, or
. Push and hold the push-button ignition
switch for more than 2 seconds.TIRE PRESSURE MONITORING
SYSTEM (TPMS)
This vehicle is equipped with the Tire Pressure
Monitoring System (TPMS) . It monitors tire
pressure of all tires. When the low tire pressure
warning light is lit, one or more of your tires is
significantly under-inflated. If the vehicle is being
driven with low tire pressure, the TPMS will
activate and warn you of it by the low tire
pressure warning light (in the instrument panel)
or the LOW PRESSURE information screen (on
the display) . This system will activate only when
the vehicle is driven at speeds above 16 MPH
(25 km/h). (
“Low tire pressure warning
light” page 2-26) (“Tire Pressure Monitor-
ing System (TPMS)” page 5-4)
WARNING
. If the low tire pressure warning light
illuminates or LOW PRESSURE in-
formation is displayed on the moni-
tor screen while driving, avoid
sudden steering maneuvers or
abrupt braking, reduce vehicle
speed, pull off the road to a safe
location and stop the vehicle as
soon as possible. Driving with un-
der-inflated tires may permanently
ROADSIDE ASSISTANCE
PROGRAM EMERGENCY ENGINE SHUT OFF FLAT TIRE
Page 257 of 346
6-10In case of emergency
FrontRear
VEHICLE RECOVERY (freeing a
stuck vehicle)
WARNING
.Stand clear of a stuck vehicle.
. Do not spin your tires at high speed.
This could cause them to explode
and result in serious injury. Parts of
your vehicle could also overheat
and be damaged.
Pulling a stuck vehicle
If your vehicle is stuck in sand, snow, mud, etc.,
use a tow strap or other device designed
specifically for vehicle recovery. Always follow
the manufacturer’s instructions for the recovery
device.
Front:
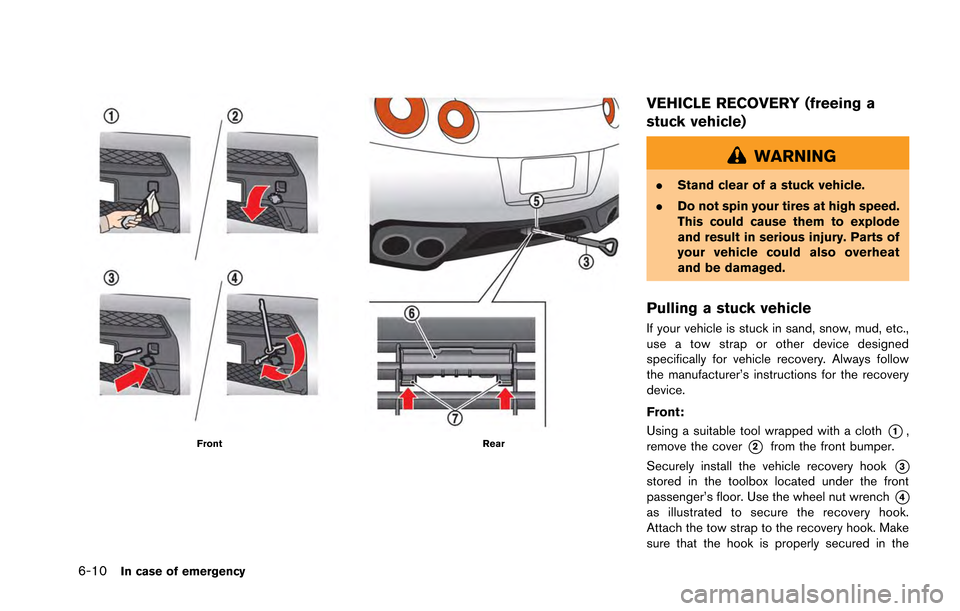
Using a suitable tool wrapped with a cloth
*1,
remove the cover
*2from the front bumper.
Securely install the vehicle recovery hook
*3stored in the toolbox located under the front
passenger’s floor. Use the wheel nut wrench
*4as illustrated to secure the recovery hook.
Attach the tow strap to the recovery hook. Make
sure that the hook is properly secured in the
Page 258 of 346
original place after use.
Rear:
The rear hook
*5is designed as the recovery
hook.
To remove the cover
*6from the rear bumper,
first push in the tabs
*7until they unlatch and
then pull the cover.
Securely install the recovery hook
*3to the
attaching mount located on the rear bumper.
Make sure that the recovery hook is properly
secured in its storage location after use.
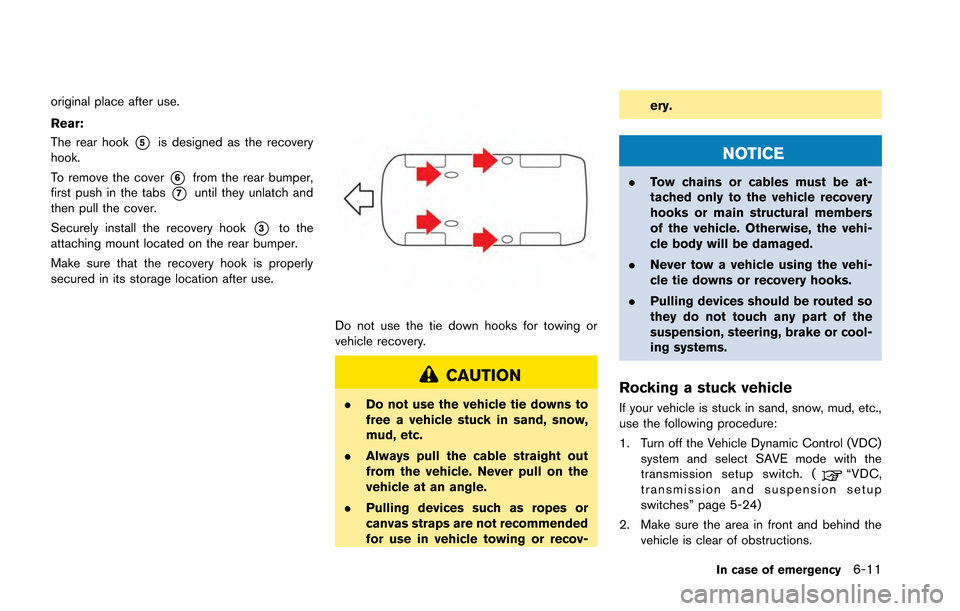
Do not use the tie down hooks for towing or
vehicle recovery.
CAUTION
. Do not use the vehicle tie downs to
free a vehicle stuck in sand, snow,
mud, etc.
. Always pull the cable straight out
from the vehicle. Never pull on the
vehicle at an angle.
. Pulling devices such as ropes or
canvas straps are not recommended
for use in vehicle towing or recov- ery.
NOTICE
.
Tow chains or cables must be at-
tached only to the vehicle recovery
hooks or main structural members
of the vehicle. Otherwise, the vehi-
cle body will be damaged.
. Never tow a vehicle using the vehi-
cle tie downs or recovery hooks.
. Pulling devices should be routed so
they do not touch any part of the
suspension, steering, brake or cool-
ing systems.
Rocking a stuck vehicle
If your vehicle is stuck in sand, snow, mud, etc.,
use the following procedure:
1. Turn off the Vehicle Dynamic Control (VDC)
system and select SAVE mode with the
transmission setup switch. (
“VDC,
transmission and suspension setup
switches” page 5-24)
2. Make sure the area in front and behind the vehicle is clear of obstructions.
In case of emergency6-11