2013 NISSAN GT-R ECU
[x] Cancel search: ECUPage 75 of 346
1-26Safety — Seats, seat belts and supplemental restraint system
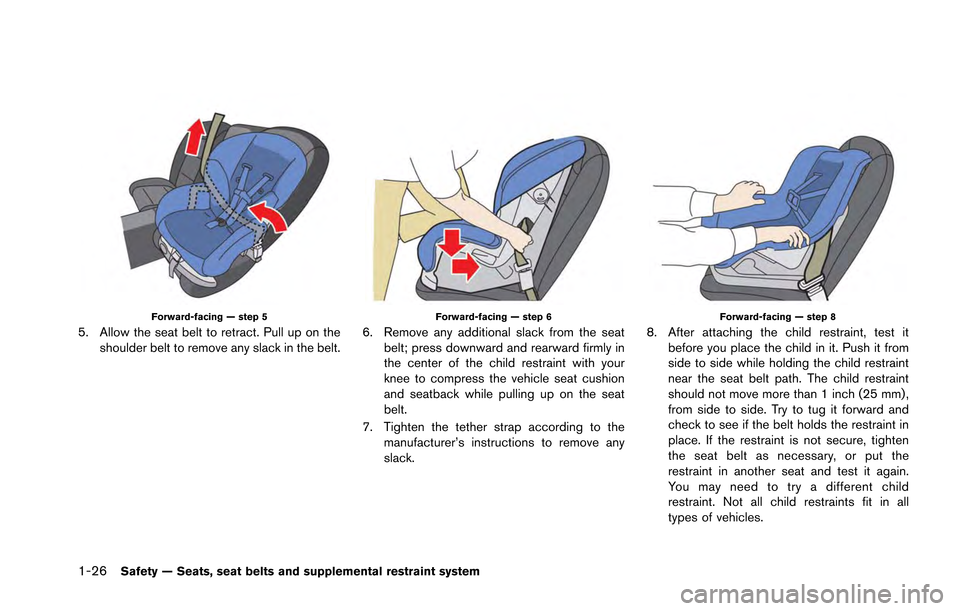
Forward-facing — step 5
5. Allow the seat belt to retract. Pull up on theshoulder belt to remove any slack in the belt.
Forward-facing — step 6
6. Remove any additional slack from the seatbelt; press downward and rearward firmly in
the center of the child restraint with your
knee to compress the vehicle seat cushion
and seatback while pulling up on the seat
belt.
7. Tighten the tether strap according to the manufacturer’s instructions to remove any
slack.
Forward-facing — step 8
8. After attaching the child restraint, test itbefore you place the child in it. Push it from
side to side while holding the child restraint
near the seat belt path. The child restraint
should not move more than 1 inch (25 mm) ,
from side to side. Try to tug it forward and
check to see if the belt holds the restraint in
place. If the restraint is not secure, tighten
the seat belt as necessary, or put the
restraint in another seat and test it again.
You may need to try a different child
restraint. Not all child restraints fit in all
types of vehicles.
Page 76 of 346
9. Check to make sure the child restraint isproperly secured prior to each use. If the
seat belt is not locked, repeat steps 2
through 8.
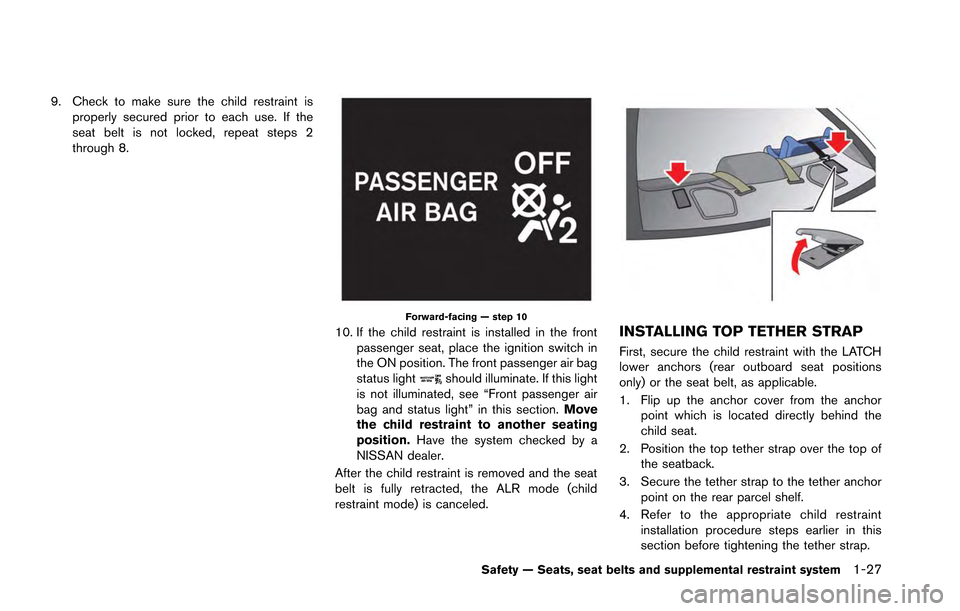
Forward-facing — step 10
10. If the child restraint is installed in the frontpassenger seat, place the ignition switch in
the ON position. The front passenger air bag
status light
should illuminate. If this light
is not illuminated, see “Front passenger air
bag and status light” in this section. Move
the child restraint to another seating
position. Have the system checked by a
NISSAN dealer.
After the child restraint is removed and the seat
belt is fully retracted, the ALR mode (child
restraint mode) is canceled.
INSTALLING TOP TETHER STRAP
First, secure the child restraint with the LATCH
lower anchors (rear outboard seat positions
only) or the seat belt, as applicable.
1. Flip up the anchor cover from the anchor point which is located directly behind the
child seat.
2. Position the top tether strap over the top of the seatback.
3. Secure the tether strap to the tether anchor point on the rear parcel shelf.
4. Refer to the appropriate child restraint installation procedure steps earlier in this
section before tightening the tether strap.
Safety — Seats, seat belts and supplemental restraint system1-27
Page 88 of 346
however, if the occupant does not sit in the seat
properly (for example, by not sitting upright, by
sitting on an edge of the seat, or by otherwise
being out of position) , this could cause the
sensor to turn the air bag OFF. Always be sure
to be seated and wearing the seat belt properly
for the most effective protection by the seat belt
and supplemental air bag.
NISSAN recommends that pre-teens and chil-
dren be properly restrained in a rear seat.
NISSAN also recommends that appropriate
child restraints and booster seats be properly
installed in a rear seat. If this is not possible, the
occupant classification sensor is designed to
operate as described above to turn the front
passenger air bag OFF for specified child
restraints. Failing to properly secure child
restraints and to use the Automatic Locking
Retractor (ALR) mode (child restraint mode)
may allow the restraint to tip or move in an
accident or sudden stop. This can also result in
the passenger air bag inflating in a crash instead
of being OFF. (
“Child restraints” page 1-
14)
If the front passenger seat is not occupied, the
passenger air bag is designed not to inflate in a
crash. However, heavy objects placed on the
seat could result in air bag inflation, because of
the object being detected by the occupant classification sensor. Other conditions could
also result in air bag inflation, such as if a child is
standing on the seat, or if two children are on the
seat, contrary to the instructions in this manual.
Always be sure that you and all vehicle
occupants are seated and restrained properly.
Using the passenger air bag status light, you can
monitor when the front passenger air bag is
automatically turned OFF with the seat occu-
pied. The light will not illuminate when the front
passenger seat is unoccupied.
If an adult occupant is in the seat but the
passenger air bag status light is illuminated
(indicating that the air bag is OFF) , it could be
that the person is a small adult, or is not sitting
on the seat properly.
If a child restraint must be used in the front seat,
the passenger air bag status light may or may
not be illuminated, depending on the size of the
child and the type of child restraint being used. If
the passenger air bag status light is not
illuminated (indicating that the air bag might
inflate in a crash), it could be that the child
restraint or seat belt is not being used properly.
Make sure that the child restraint is installed
properly, the seat belt is used properly and the
occupant is positioned properly. If the passen-
ger air bag status light is still not illuminated,
reposition the occupant or child restraint in arear seat.
If the passenger air bag status light will not
illuminate even though you believe that the child
restraint, the seat belts and the occupant are
properly positioned, the system may be sensing
an unoccupied seat (in which case the air bag is
OFF). Your GT-R certified NISSAN dealer can
check that the system is OFF by using a special
tool. However, until you have confirmed with
your dealer that your air bag is working properly,
reposition the occupant or child restraint in a
rear seat.
The NISSAN Advanced Air Bag System and
passenger air bag status light will take a few
seconds to register a change in the passenger
seat status. However, if the seat becomes
unoccupied, the air bag status light will remain
off.
If a malfunction occurs in the front passenger air
bag system, the supplemental air bag warning
light
, located in the meter and gauges area
will blink. Have the system checked by a GT-R
certified NISSAN dealer.
Safety — Seats, seat belts and supplemental restraint system1-39
Page 97 of 346
Cruise control system warning .................................... 2-39
Low fuel warning ............................................................. 2-39
Door/trunk open warning .............................................. 2-40
Low washer fluid warning ............................................. 2-40
No key warning ................................................................ 2-40
Operation displays ................................................................ 2-41 Engine start operation indicator .................................. 2-41
Shift “P” warning ............................................................. 2-42
“PUSH” warning .............................................................. 2-42
Steering lock release malfunction indicator ............. 2-42
Intelligent Key insertion indicator ................................ 2-43
Intelligent Key removal indicator .................................. 2-43
Intelligent Key battery discharge indicator ................ 2-43
Security systems ................................................................... 2-44
Vehicle security system ................................................. 2-44
NISSAN Vehicle Immobilizer System ......................... 2-45
Windshield wiper and washer switch .............................. 2-46 Using the wipers ............................................................. 2-47
Using the washer ............................................................ 2-48
Rear window defroster switch ........................................... 2-48
Headlight and turn signal switch ...................................... 2-49
Xenon headlights ............................................................. 2-49
Headlight switch .............................................................. 2-49
Hazard warning flasher switch .......................................... 2-52
Horn ........................................................................\
.................. 2-53 Heated seats (if so equipped) .......................................... 2-53
Turning on the heaters ................................................. 2-53
Turning off the heaters ................................................. 2-53
Power outlets ........................................................................\
2-54
Storage ........................................................................\
........... 2-55 Cup holders .................................................................... 2-55
Sunglasses holder ........................................................ 2-56
Door pocket .................................................................... 2-57
Glove box ........................................................................\
2-57Console box ................................................................... 2-58
Coat hooks ..................................................................... 2-58
Windows ........................................................................\
........ 2-59 Power windows ............................................................. 2-59
Interior lights ........................................................................\
.. 2-61
Map lights ....................................................................... 2-61
Interior light control switch ......................................... 2-62
Vanity mirror lights ................................................................ 2-63
HomeLink
®Universal Transceiver .................................... 2-63
Programming HomeLink®............................................ 2-64
Programming HomeLink®for
Canadian customers .................................................... 2-65
Operating the HomeLink
®universal transceiver ... 2-65
Programming trouble-diagnosis ................................ 2-65
Clearing the programmed information ..................... 2-66
Reprogramming a single HomeLink
®button ......... 2-66
If your vehicle is stolen ................................................ 2-66
Page 123 of 346
2-28Instruments and controls
.Although you can continue driving
with a punctured run-flat tire, re-
member that vehicle handling sta-
bility is reduced, which could lead to
an accident and personal injury.
Also, driving a long distance at high
speeds may damage the tires.
. Do not drive at speeds above 50
MPH (80 km/h) and do not drive
more than 50 miles (80 km) with a
punctured run-flat tire. The actual
distance the vehicle can be driven
on a flat tire depends on outside
temperature, vehicle load, road con-
ditions and other factors.
. When a wheel is replaced, the TPMS
will not function and the low tire
pressure warning light will flash for
approximately 1 minute. The light
will remain on after the 1 minute.
Contact a GT-R certified NISSAN
dealer as soon as possible for tire
replacement and/or system reset-
ting.
. Replacing tires with those not ori-
ginally specified by NISSAN could
affect the proper operation of the
TPMS.CAUTION
.The TPMS is not a substitute for the
regular tire pressure check. Be sure
to check the tire pressure regularly.
. Be sure to install the specified size
of tires on the four wheels.
NOTE:
. If the vehicle is being driven at speeds
of less than 16 MPH (25 km/h) , the
TPMS may not operate correctly.
. The tires of this vehicle are filled with
nitrogen gas. When the tire pressure is
low, fill the tires with nitrogen gas.
Contact a GT-R certified NISSAN dealer
for information on filling the tires with
nitrogen gas.
Master warning light
When the ignition switch is in the ON position,
the master warning light illuminates if any of the
warning displays appear on the vehicle informa-
tion display. (
“Warning display” page 2-
32)
Seat belt warning light and
chime
The light and chime remind you to fasten seat
belts. The light illuminates whenever the ignition
switch is pushed to the ON position, and will
remain illuminated until the driver’s seat belt is
fastened. At the same time, the chime will sound
for about 6 seconds unless the driver’s seat belt
is securely fastened.
The seat belt warning light for the front
passenger will illuminate if the seat belt is not
fastened when the front passenger’s seat is
occupied. For approximately 5 seconds after the
ignition switch is in the ON position, the system
does not activate the warning light for the front
passenger. (
“Seat belts” page 1-6)
Supplemental air bag warning
light
After pushing the ignition switch to the ON
position, the supplemental air bag warning light
will illuminate for about 7 seconds and then turn
off. This means the system is operational.
If any of the following conditions occur, the front
air bag, side air bag, curtain air bag and
pretensioner systems need servicing and your
vehicle must be taken to a GT-R certified
NISSAN dealer.
Page 135 of 346
2-40Instruments and controls
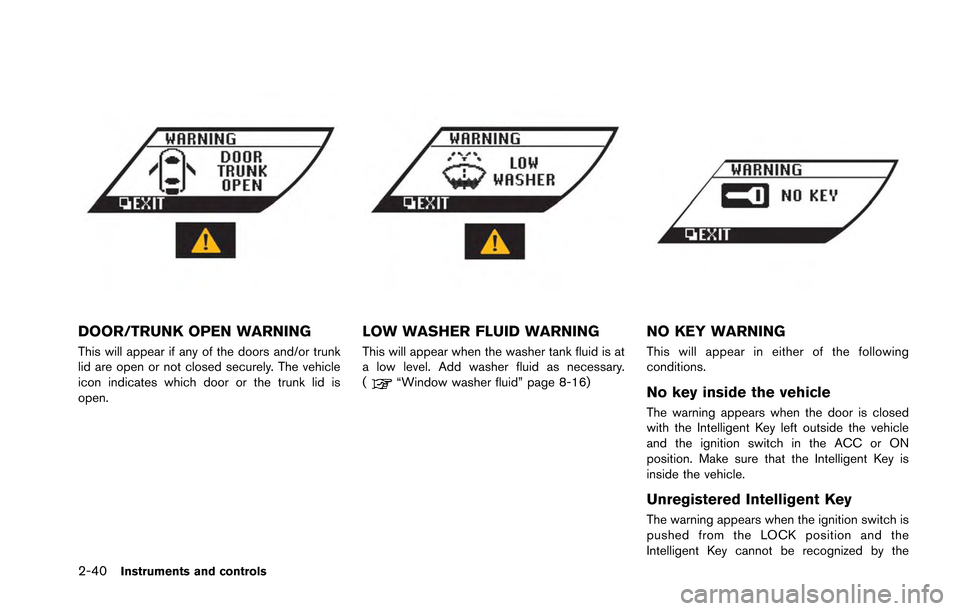
DOOR/TRUNK OPEN WARNING
This will appear if any of the doors and/or trunk
lid are open or not closed securely. The vehicle
icon indicates which door or the trunk lid is
open.
LOW WASHER FLUID WARNING
This will appear when the washer tank fluid is at
a low level. Add washer fluid as necessary.
(
“Window washer fluid” page 8-16)
NO KEY WARNING
This will appear in either of the following
conditions.
No key inside the vehicle
The warning appears when the door is closed
with the Intelligent Key left outside the vehicle
and the ignition switch in the ACC or ON
position. Make sure that the Intelligent Key is
inside the vehicle.
Unregistered Intelligent Key
The warning appears when the ignition switch is
pushed from the LOCK position and the
Intelligent Key cannot be recognized by the
Page 139 of 346
2-44Instruments and controls
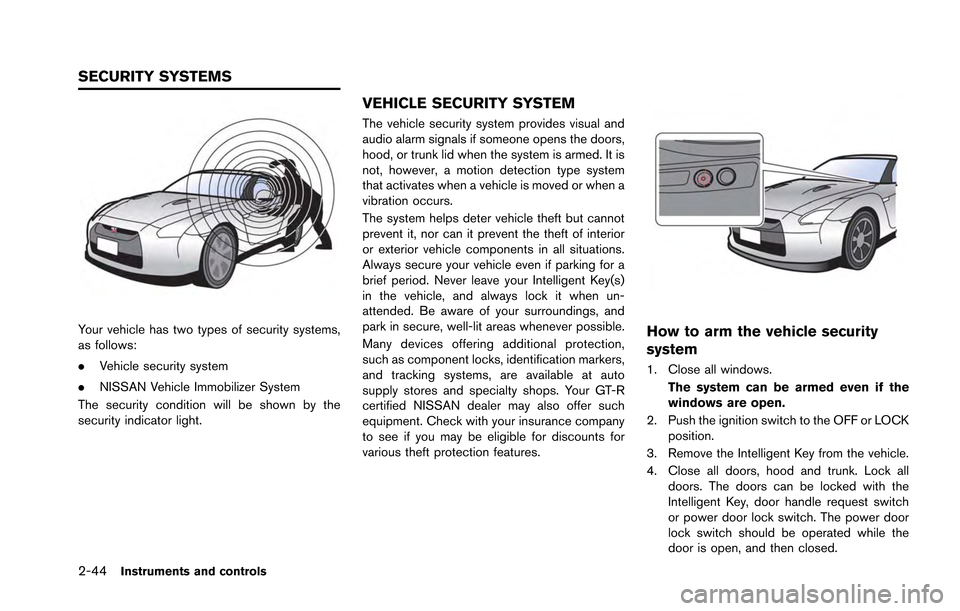
Your vehicle has two types of security systems,
as follows:
.Vehicle security system
. NISSAN Vehicle Immobilizer System
The security condition will be shown by the
security indicator light.
VEHICLE SECURITY SYSTEM
The vehicle security system provides visual and
audio alarm signals if someone opens the doors,
hood, or trunk lid when the system is armed. It is
not, however, a motion detection type system
that activates when a vehicle is moved or when a
vibration occurs.
The system helps deter vehicle theft but cannot
prevent it, nor can it prevent the theft of interior
or exterior vehicle components in all situations.
Always secure your vehicle even if parking for a
brief period. Never leave your Intelligent Key(s)
in the vehicle, and always lock it when un-
attended. Be aware of your surroundings, and
park in secure, well-lit areas whenever possible.
Many devices offering additional protection,
such as component locks, identification markers,
and tracking systems, are available at auto
supply stores and specialty shops. Your GT-R
certified NISSAN dealer may also offer such
equipment. Check with your insurance company
to see if you may be eligible for discounts for
various theft protection features.
How to arm the vehicle security
system
1. Close all windows. The system can be armed even if the
windows are open.
2. Push the ignition switch to the OFF or LOCK position.
3. Remove the Intelligent Key from the vehicle.
4. Close all doors, hood and trunk. Lock all doors. The doors can be locked with the
Intelligent Key, door handle request switch
or power door lock switch. The power door
lock switch should be operated while the
door is open, and then closed.
SECURITY SYSTEMS
Page 140 of 346
5. Confirm that the security indicator lightcomes on. The security indicator light stays
on for about 30 seconds. The vehicle
security system is now pre-armed. After
about 30 seconds the vehicle security
system automatically shifts into the armed
phase. The security light begins to flash
once every approximately 3 seconds. If,
during this 30-second pre-arm time period,
the door is unlocked, or the ignition switch is
pushed to ACC or ON, the system will not
arm.
Even when the driver and/or passengers
are in the vehicle, the system will activate
with all doors, hood, and trunk lid locked
with the ignition switch in the LOCK
position. When pushing the ignition switch
to the ACC or ON position, the system will
be released.
Vehicle security system activation
The vehicle security system will give the follow-
ing alarm:
. The headlights blink and the horn sounds
intermittently.
. The alarm automatically turns off after
approximately 1 minute. However, the alarm
reactivates if the vehicle is tampered with
again. The alarm is activated by:
.
Opening the door or the trunk lid without
using the button on the Intelligent Key, the
door handle request switch or the mechan-
ical key. (Even if the door is opened by
releasing the door inside lock knob, the
alarm will activate.)
. Opening the hood.
How to stop an activated alarm
The alarm will stop by:
.Unlocking a door by pushing the UNLOCK
button on the Intelligent Key.
. Unlocking a door by pushing the door
handle request switch.
. Pushing the ignition switch to the ACC or
ON position.
If the system does not operate as de-
scribed above, have it checked by a GT-R
certified NISSAN dealer.
NISSAN VEHICLE IMMOBILIZER
SYSTEM
The NISSAN Vehicle Immobilizer System will not
allow the engine to start without the use of the
registered Intelligent Key. Never leave these
keys in the vehicle. FCC Notice:
For USA:
This device complies with Part 15 of the
FCC Rules. Operation is subject to the
following two conditions: (1) This device
may not cause harmful interference, and
(2) this device must accept any interfer-
ence received, including interference that
may cause undesired operation.
Note: Changes or modifications not ex-
pressly approved by the party responsible
for compliance could void the user’s
authority to operate the equipment.
For Canada:
This device complies with RSS-210 of
Industry Canada. Operation is subject to
the following two conditions: (1) this
device may not cause interference, and
(2) this device must accept any interfer-
ence, including interference that may
cause undesired operation of the device.
Instruments and controls2-45