2013 NISSAN GT-R check engine
[x] Cancel search: check enginePage 126 of 346
and then blinks for 10 seconds when the engine
is not running, it indicates that the vehicle is not
ready for an emission control system inspection/
maintenance test. (
“Readiness for Inspec-
tion/Maintenance (I/M) test (US only)” page 9-
20)
Operation:
The malfunction indicator light will come on in
one of two ways:
. Malfunction indicator light on steady — An
emission control system malfunction has
been detected. Check the fuel-filler cap. If
the fuel-filler cap is loose or missing, tighten
or install the cap and continue to drive the
vehicle. The
light should turn off after a
few driving trips. If thelight does not
turn off after a few driving trips, have the
vehicle inspected by a GT-R certified
NISSAN dealer. You do not need to have
your vehicle towed to the dealer.
. Malfunction indicator light blinking — An
engine misfire has been detected which may
damage the emission control system.
To reduce or avoid emission control system
damage:
a. Do not drive at speeds above 45 MPH
(72 km/h). b. Avoid hard acceleration or deceleration.
c. Avoid steep uphill grades.
d. If possible, reduce the amount of cargo
being hauled or towed.
The malfunction indicator light may stop
blinking and remain on.
Have the vehicle inspected by a GT-R
certified NISSAN dealer. You do not need
to have your vehicle towed to the dealer.
NOTICE
Continued vehicle operation without
having the emission control system
checked and repaired as necessary
could lead to poor driveability, reduced
fuel economy, and possible damage to
the emission control system.
Turn signal/hazard indicator
lights
The light flashes when the turn signal switch
lever or hazard switch is turned on.
Vehicle Dynamic Control (VDC)
off indicator light
The light comes on when the Vehicle Dynamic
Control (VDC) set up switch is pushed to OFF for more than 1 second. (
“VDC, transmis-
sion and suspension setup switches” page 5-
24)
This indicates that the vehicle dynamic control
system and traction control system are not
operating. (
“Vehicle Dynamic Control
(VDC) system” page 5-49)
AUDIBLE REMINDERS
Key reminder chime
A chime will sound if the driver side door is
opened while the ignition switch is pushed to
the ACC position or pushed to the OFF or
LOCK position with the Intelligent Key left in the
Intelligent Key port. Make sure the ignition
switch is pushed to the OFF position, and take
the Intelligent Key with you when leaving the
vehicle.
Light reminder chime
A chime will sound when the driver side door is
opened with the light switch in theorposition and the ignition switch in the ACC, OFF
or LOCK position.
Turn the light switch off when you leave the
vehicle.
Instruments and controls2-31
Page 140 of 346
5. Confirm that the security indicator lightcomes on. The security indicator light stays
on for about 30 seconds. The vehicle
security system is now pre-armed. After
about 30 seconds the vehicle security
system automatically shifts into the armed
phase. The security light begins to flash
once every approximately 3 seconds. If,
during this 30-second pre-arm time period,
the door is unlocked, or the ignition switch is
pushed to ACC or ON, the system will not
arm.
Even when the driver and/or passengers
are in the vehicle, the system will activate
with all doors, hood, and trunk lid locked
with the ignition switch in the LOCK
position. When pushing the ignition switch
to the ACC or ON position, the system will
be released.
Vehicle security system activation
The vehicle security system will give the follow-
ing alarm:
. The headlights blink and the horn sounds
intermittently.
. The alarm automatically turns off after
approximately 1 minute. However, the alarm
reactivates if the vehicle is tampered with
again. The alarm is activated by:
.
Opening the door or the trunk lid without
using the button on the Intelligent Key, the
door handle request switch or the mechan-
ical key. (Even if the door is opened by
releasing the door inside lock knob, the
alarm will activate.)
. Opening the hood.
How to stop an activated alarm
The alarm will stop by:
.Unlocking a door by pushing the UNLOCK
button on the Intelligent Key.
. Unlocking a door by pushing the door
handle request switch.
. Pushing the ignition switch to the ACC or
ON position.
If the system does not operate as de-
scribed above, have it checked by a GT-R
certified NISSAN dealer.
NISSAN VEHICLE IMMOBILIZER
SYSTEM
The NISSAN Vehicle Immobilizer System will not
allow the engine to start without the use of the
registered Intelligent Key. Never leave these
keys in the vehicle. FCC Notice:
For USA:
This device complies with Part 15 of the
FCC Rules. Operation is subject to the
following two conditions: (1) This device
may not cause harmful interference, and
(2) this device must accept any interfer-
ence received, including interference that
may cause undesired operation.
Note: Changes or modifications not ex-
pressly approved by the party responsible
for compliance could void the user’s
authority to operate the equipment.
For Canada:
This device complies with RSS-210 of
Industry Canada. Operation is subject to
the following two conditions: (1) this
device may not cause interference, and
(2) this device must accept any interfer-
ence, including interference that may
cause undesired operation of the device.
Instruments and controls2-45
Page 149 of 346
2-54Instruments and controls
with a dry cloth.
. If any malfunctions are found or the
heated seat does not operate, turn
the switch off and have the system
checked by a GT-R certified NISSAN
dealer.
NOTICE
.The battery could run down if the
seat heater is operated while the
engine is not running.
. Do not use the seat heater for
extended periods or when no one
is using the seat.
. When cleaning the seat, never use
gasoline, thinner, or any similar
materials.
CAUTION
.The outlet and plug may be hot
during or immediately after use.
. Do not use with accessories that
exceed a 12 volt, 120W (10A) power
draw. Do not use double adapters or
more than one electrical accessory.
. This power outlet is not designed
for use with a cigarette lighter unit.
. Before inserting or disconnecting a
plug, be sure the electrical acces-
sory being used is turned OFF.
. When not in use, be sure to close
the cap. Do not allow water to
contact the outlet.
NOTICE
.Use power outlet with the engine
running to avoid discharging the
vehicle battery.
. Avoid using power outlet when the
air conditioner, headlights or rear
window defroster is on. .
Push the plug in as far as it will go.
If good contact is not made, the plug
may overheat or the internal tem-
perature fuse may open.
POWER OUTLETS
Page 165 of 346
3-4Pre-driving checks and adjustments
WARNING
.Always have the doors locked while
driving. Along with the use of seat
belts, this provides greater safety in
the event of an accident by helping
to prevent persons from being
thrown from the vehicle. This also
helps keep children and others from
unintentionally opening the doors,
and will help keep out intruders.
. Before opening any door, always
look for and avoid oncoming traffic.
. Do not leave children unattended
inside the vehicle. They could un-
knowingly activate switches or con-
trols. Unattended children could
become involved in serious acci-
dents.
CAUTION
To prevent theft or accidents, be sure to
stop the engine and lock the doors
before stepping away from the vehicle.
NOTICE
When the battery cable is removed from
the battery terminal, do not close either
of the front doors. The automatic win-
dow adjusting function will not work,
and the side roof panel may be da-
maged. (
“Automatic adjusting
function” page 2-60)
NOTE:
. The doors of this vehicle are somewhat
harder to close than those of an
ordinary vehicle (especially when the
vehicle is new) . This is because the
stiffness of the rubber has been in-
creased to improve the airtightness of
the vehicle interior during situations
such as higher speed driving. This does
not indicate that there is a malfunction.
. When the driver’s door is locked or
unlocked, the fuel-filler door is auto-
matically locked or unlocked at the
same time.
When the door is being opened, the window is
automatically lowered slightly to avoid contact
between the window and the side roof panel.
When the door is closed, the window is automatically raised slightly. (
“Automatic
adjusting function” page 2-60)
DOORS
Page 178 of 346
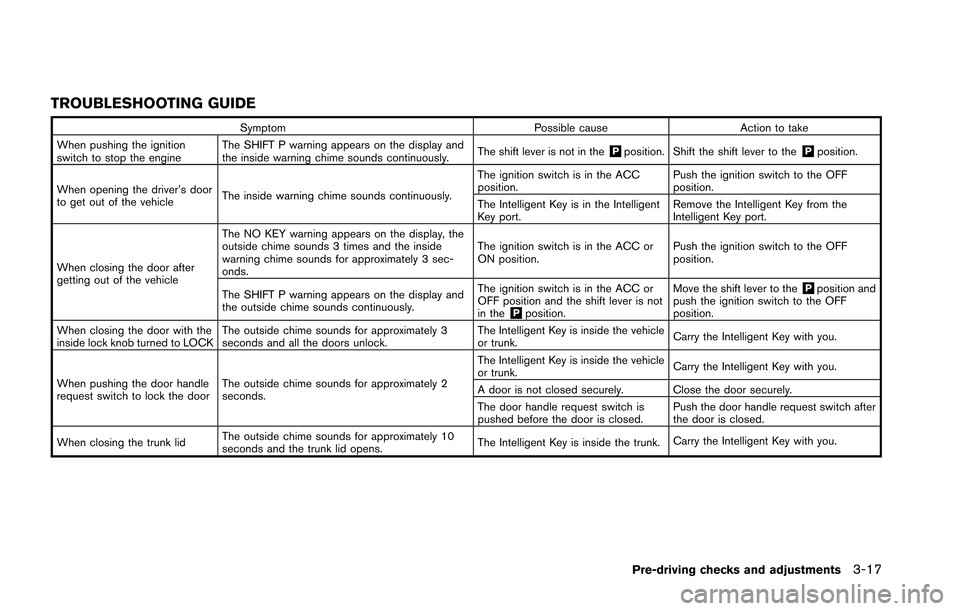
TROUBLESHOOTING GUIDE
SymptomPossible causeAction to take
When pushing the ignition
switch to stop the engine The SHIFT P warning appears on the display and
the inside warning chime sounds continuously.
The shift lever is not in the
&Pposition. Shift the shift lever to the&Pposition.
When opening the driver’s door
to get out of the vehicle The inside warning chime sounds continuously. The ignition switch is in the ACC
position.
Push the ignition switch to the OFF
position.
The Intelligent Key is in the Intelligent
Key port. Remove the Intelligent Key from the
Intelligent Key port.
When closing the door after
getting out of the vehicle The NO KEY warning appears on the display, the
outside chime sounds 3 times and the inside
warning chime sounds for approximately 3 sec-
onds.
The ignition switch is in the ACC or
ON position.
Push the ignition switch to the OFF
position.
The SHIFT P warning appears on the display and
the outside chime sounds continuously. The ignition switch is in the ACC or
OFF position and the shift lever is not
in the
&Pposition.Move the shift lever to the
&Pposition and
push the ignition switch to the OFF
position.
When closing the door with the
inside lock knob turned to LOCK The outside chime sounds for approximately 3
seconds and all the doors unlock. The Intelligent Key is inside the vehicle
or trunk.
Carry the Intelligent Key with you.
When pushing the door handle
request switch to lock the door The outside chime sounds for approximately 2
seconds. The Intelligent Key is inside the vehicle
or trunk.
Carry the Intelligent Key with you.
A door is not closed securely. Close the door securely.
The door handle request switch is
pushed before the door is closed. Push the door handle request switch after
the door is closed.
When closing the trunk lid The outside chime sounds for approximately 10
seconds and the trunk lid opens.
The Intelligent Key is inside the trunk.
Carry the Intelligent Key with you.
Pre-driving checks and adjustments3-17
Page 179 of 346
3-18Pre-driving checks and adjustments
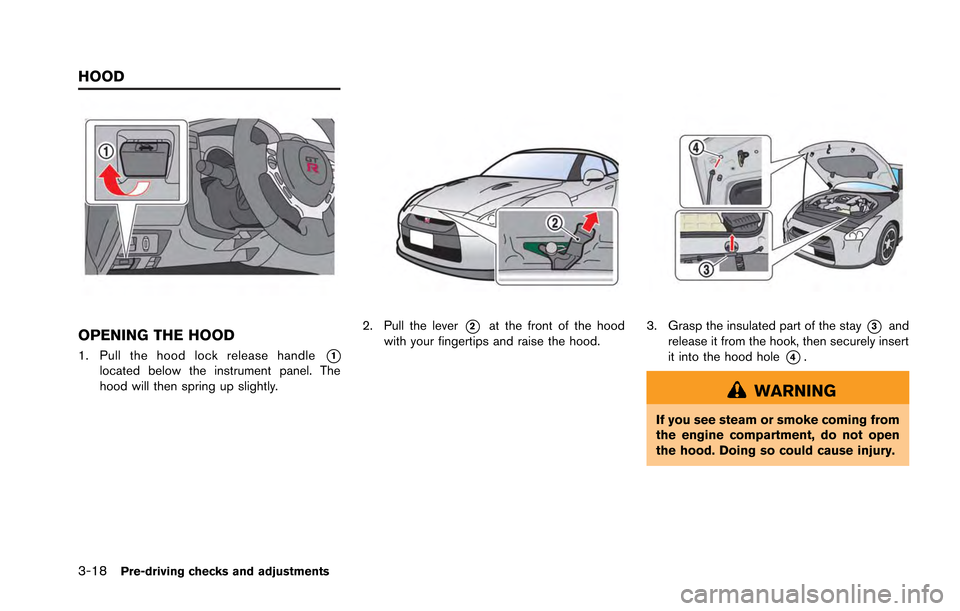
OPENING THE HOOD
1. Pull the hood lock release handle*1located below the instrument panel. The
hood will then spring up slightly.
2. Pull the lever*2at the front of the hood
with your fingertips and raise the hood.3. Grasp the insulated part of the stay*3and
release it from the hook, then securely insert
it into the hood hole
*4.
WARNING
If you see steam or smoke coming from
the engine compartment, do not open
the hood. Doing so could cause injury.
HOOD
Page 180 of 346
CAUTION
.Do not insert hands, clothing, tools
or other items into the engine
compartment while the engine is
running.
. Do not touch the exhaust system
parts, radiator or other hot parts
until the engine and the parts have
cooled.
NOTICE
Do not open the hood while the wiper
arms are lifted away from the wind-
shield. The hood and wipers will be
damaged.CLOSING THE HOOD
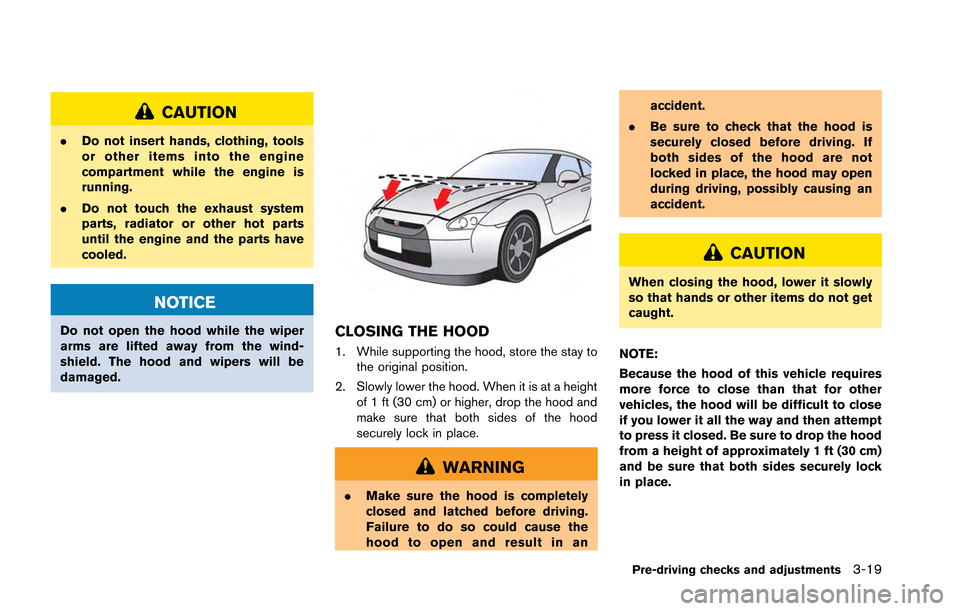
1. While supporting the hood, store the stay to
the original position.
2. Slowly lower the hood. When it is at a height of 1 ft (30 cm) or higher, drop the hood and
make sure that both sides of the hood
securely lock in place.
WARNING
.Make sure the hood is completely
closed and latched before driving.
Failure to do so could cause the
hood to open and result in an accident.
. Be sure to check that the hood is
securely closed before driving. If
both sides of the hood are not
locked in place, the hood may open
during driving, possibly causing an
accident.
CAUTION
When closing the hood, lower it slowly
so that hands or other items do not get
caught.
NOTE:
Because the hood of this vehicle requires
more force to close than that for other
vehicles, the hood will be difficult to close
if you lower it all the way and then attempt
to press it closed. Be sure to drop the hood
from a height of approximately 1 ft (30 cm)
and be sure that both sides securely lock
in place.
Pre-driving checks and adjustments3-19
Page 184 of 346
From the passenger compartment
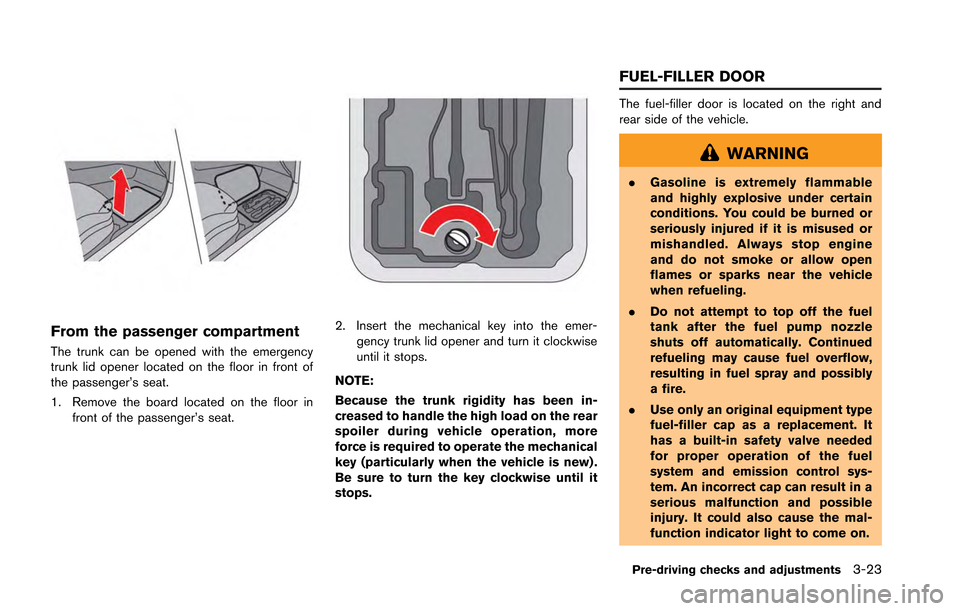
The trunk can be opened with the emergency
trunk lid opener located on the floor in front of
the passenger’s seat.
1. Remove the board located on the floor infront of the passenger’s seat.
2. Insert the mechanical key into the emer-gency trunk lid opener and turn it clockwise
until it stops.
NOTE:
Because the trunk rigidity has been in-
creased to handle the high load on the rear
spoiler during vehicle operation, more
force is required to operate the mechanical
key (particularly when the vehicle is new) .
Be sure to turn the key clockwise until it
stops.
The fuel-filler door is located on the right and
rear side of the vehicle.
WARNING
. Gasoline is extremely flammable
and highly explosive under certain
conditions. You could be burned or
seriously injured if it is misused or
mishandled. Always stop engine
and do not smoke or allow open
flames or sparks near the vehicle
when refueling.
. Do not attempt to top off the fuel
tank after the fuel pump nozzle
shuts off automatically. Continued
refueling may cause fuel overflow,
resulting in fuel spray and possibly
a fire.
. Use only an original equipment type
fuel-filler cap as a replacement. It
has a built-in safety valve needed
for proper operation of the fuel
system and emission control sys-
tem. An incorrect cap can result in a
serious malfunction and possible
injury. It could also cause the mal-
function indicator light to come on.
Pre-driving checks and adjustments3-23
FUEL-FILLER DOOR