2013 NISSAN GT-R low oil pressure
[x] Cancel search: low oil pressurePage 96 of 346
2 Instruments and controls
Cockpit ........................................................................\
............... 2-3
Instrument panel ....................................................................... 2-4
Meters and gauges .................................................................. 2-5Speedometer ....................................................................... 2-6
Odometer/twin trip odometer ......................................... 2-6
Tachometer ........................................................................\
.. 2-7
Engine coolant temperature gauge ............................... 2-7
Fuel gauge ........................................................................\
... 2-8
Transmission position indicator ...................................... 2-8
Upshift indicator ................................................................. 2-9
Instrument brightness control ...................................... 2-11
Vehicle information display ................................................. 2-11 Engine oil level display ................................................... 2-12
Transmission system check display ............................ 2-13
Drive computer ...................................................................... 2-14 Current fuel consumption ............................................. 2-15
Vehicle speed ................................................................... 2-15
Cruise control ................................................................... 2-15
Average fuel consumption and speed ....................... 2-16
Elapsed time and trip odometer .................................. 2-16
Distance to empty ........................................................... 2-17
Outside air temperature ................................................ 2-17
Setting (drive computer) ............................................... 2-18
Warning (drive computer) ............................................. 2-23 Warning/indicator lights and audible reminders .......... 2-24
Checking bulbs ............................................................. 2-24
Warning lights ................................................................ 2-24
Indicator lights ............................................................... 2-61
Audible reminders ......................................................... 2-31
Warning display .................................................................... 2-32
Engine oil low pressure warning ............................... 2-33
Engine system warning ............................................... 2-33
Shift lever position warning ........................................ 2-34
Transmission system warning .................................... 2-34
Transmission oil high temperature warning ............ 2-34
Transmission clutch high temperature warning ..... 2-35Parking brake release warning .................................. 2-35
Low brake fluid warning .............................................. 2-35
Anti-lock Braking System (ABS) warning .............. 2-36
Vehicle Dynamic Control (VDC)
system warning .............................................................. 2-36
AWD clutch high temperature warning ................... 2-36
Front/rear tire size discrepancy warning ................. 2-37
AWD system warning .................................................. 2-37
Low tire pressure warning .......................................... 2-38
Run-flat tire warning ..................................................... 2-38Tire Pressure Monitoring System
(TPMS) warning ............................................................ 2-38
Page 119 of 346
2-24Instruments and controls
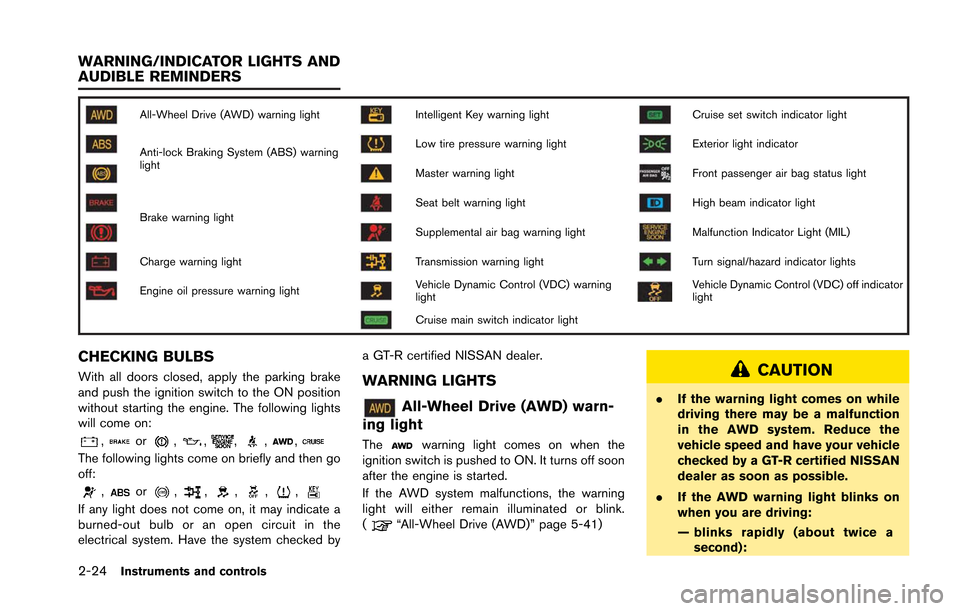
All-Wheel Drive (AWD) warning lightIntelligent Key warning lightCruise set switch indicator light
Anti-lock Braking System (ABS) warning
lightLow tire pressure warning lightExterior light indicator
Master warning lightFront passenger air bag status light
Brake warning lightSeat belt warning lightHigh beam indicator light
Supplemental air bag warning lightMalfunction Indicator Light (MIL)
Charge warning lightTransmission warning lightTurn signal/hazard indicator lights
Engine oil pressure warning lightVehicle Dynamic Control (VDC) warning
lightVehicle Dynamic Control (VDC) off indicator
light
Cruise main switch indicator light
CHECKING BULBS
With all doors closed, apply the parking brake
and push the ignition switch to the ON position
without starting the engine. The following lights
will come on:
,or,,,,,
The following lights come on briefly and then go
off:
,or,,,,,
If any light does not come on, it may indicate a
burned-out bulb or an open circuit in the
electrical system. Have the system checked bya GT-R certified NISSAN dealer.
WARNING LIGHTS
All-Wheel Drive (AWD) warn-
ing light
Thewarning light comes on when the
ignition switch is pushed to ON. It turns off soon
after the engine is started.
If the AWD system malfunctions, the warning
light will either remain illuminated or blink.
(
“All-Wheel Drive (AWD)” page 5-41)
CAUTION
. If the warning light comes on while
driving there may be a malfunction
in the AWD system. Reduce the
vehicle speed and have your vehicle
checked by a GT-R certified NISSAN
dealer as soon as possible.
. If the AWD warning light blinks on
when you are driving:
— blinks rapidly (about twice a
second):
WARNING/INDICATOR LIGHTS AND
AUDIBLE REMINDERS
Page 121 of 346
2-26Instruments and controls
WARNING
.Your brake system may not be
working properly if the warning light
is on. Driving could be dangerous. If
you judge it to be safe, drive care-
fully to the nearest service station
for repairs. Otherwise, have your
vehicle towed because driving it
could be dangerous.
. Pressing the brake pedal with the
engine stopped and/or low brake
fluid level may increase your stop-
ping distance and braking will re-
quire greater pedal effort as well as
pedal travel.
. If the brake fluid level is below the
minimum or MIN mark on the brake
fluid reservoir, do not drive until the
brake system has been checked at a
GT-R certified NISSAN dealer.
Charge warning light
If the light comes on while the engine is running,
it may indicate the charging system is not
functioning properly. Turn the engine off and
check the alternator belt. If the belt is loose, broken, missing or if the light remains on, see a
GT-R certified NISSAN dealer immediately.
NOTICE
Do not continue driving if the alternator
belt is loose, broken or missing.
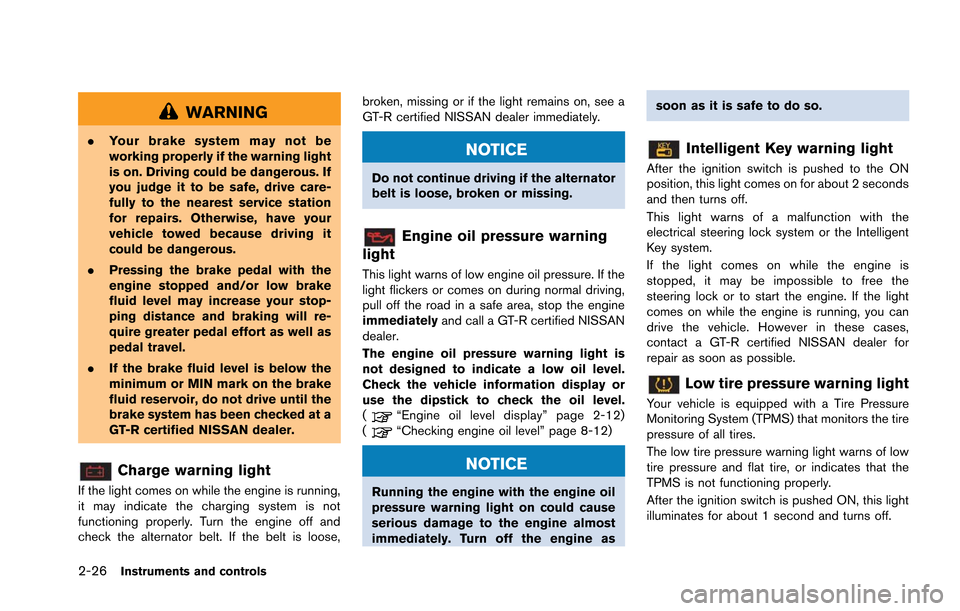
Engine oil pressure warning
light
This light warns of low engine oil pressure. If the
light flickers or comes on during normal driving,
pull off the road in a safe area, stop the engine
immediately and call a GT-R certified NISSAN
dealer.
The engine oil pressure warning light is
not designed to indicate a low oil level.
Check the vehicle information display or
use the dipstick to check the oil level.
(
“Engine oil level display” page 2-12)
(“Checking engine oil level” page 8-12)
NOTICE
Running the engine with the engine oil
pressure warning light on could cause
serious damage to the engine almost
immediately. Turn off the engine as soon as it is safe to do so.
Intelligent Key warning light
After the ignition switch is pushed to the ON
position, this light comes on for about 2 seconds
and then turns off.
This light warns of a malfunction with the
electrical steering lock system or the Intelligent
Key system.
If the light comes on while the engine is
stopped, it may be impossible to free the
steering lock or to start the engine. If the light
comes on while the engine is running, you can
drive the vehicle. However in these cases,
contact a GT-R certified NISSAN dealer for
repair as soon as possible.
Low tire pressure warning light
Your vehicle is equipped with a Tire Pressure
Monitoring System (TPMS) that monitors the tire
pressure of all tires.
The low tire pressure warning light warns of low
tire pressure and flat tire, or indicates that the
TPMS is not functioning properly.
After the ignition switch is pushed ON, this light
illuminates for about 1 second and turns off.
Page 128 of 346
If there are multiple warnings, the warning lights
remain lit or continue to blink and the warnings
displayed in the vehicle information display are
switched at regular intervals. The warnings
displayed in the vehicle information display can
be switched voluntarily by pushing the ENTER
switch
.
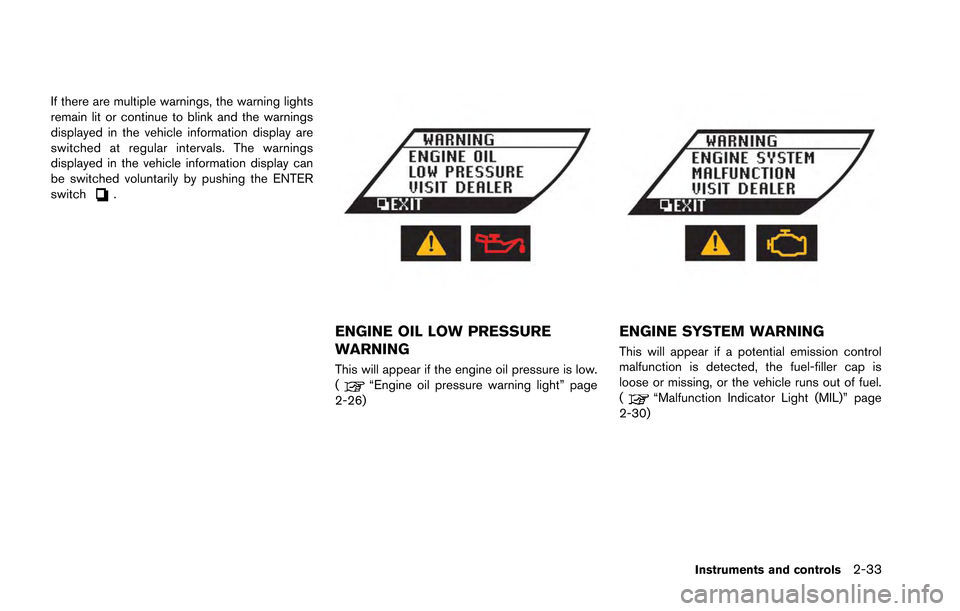
ENGINE OIL LOW PRESSURE
WARNING
This will appear if the engine oil pressure is low.
(“Engine oil pressure warning light” page
2-26)
ENGINE SYSTEM WARNING
This will appear if a potential emission control
malfunction is detected, the fuel-filler cap is
loose or missing, or the vehicle runs out of fuel.
(
“Malfunction Indicator Light (MIL)” page
2-30)
Instruments and controls2-33
Page 233 of 346
5-40Starting and driving
certified NISSAN dealer in accordance with
specifications for city driving to high perfor-
mance driving.
The tires on the GT-R may have different wear
rates and wear patterns in comparison to
conventional passenger vehicles. Contact a
GT-R certified NISSAN dealer to confirm that
the alignment is within specifications..Accelerate slowly and smoothly. Maintain
cruising speeds with a constant accelerator
position.
. Drive at moderate speeds on the highway.
Driving at high speed lowers fuel economy.
. Avoid unnecessary stopping and braking.
Keep a safe distance behind other vehicles.
. Select a gear range suitable to road condi-
tions.
. Avoid unnecessary engine idling.
. Keep your engine tuned up.
. Follow the recommended periodic mainte-
nance schedule.
. Keep the tires inflated to the correct
pressure. Low tire pressure increases tire
wear and lowers fuel economy.
. Keep the wheels in correct alignment.
Improper alignment increases tire wear and
lowers fuel economy.
. Air conditioner operation lowers fuel econ-
omy. Use the air conditioner only when
necessary.
. When cruising at highway speeds, it is more
economical to use the air conditioner and
leave the windows closed to reduce drag. .
Use the recommended viscosity engine oil.
(“Oil viscosity” page 9-6)
INCREASING FUEL ECONOMY
Page 262 of 346
WAXING
Regular waxing protects the paint surface and
helps retain new vehicle appearance. Polishing
is recommended to remove built-up wax residue
and to avoid a weathered appearance before
reapplying wax.
A GT-R certified NISSAN dealer can assist you
in choosing the proper product.
.Wax your vehicle only after a thorough
washing. Follow the instructions supplied
with the wax.
. Do not use a wax containing any abrasives,
cutting compounds or cleaners that may
damage the vehicle finish.
Machine compound or aggressive polishing on a
base coat/clear coat paint finish may dull the
finish or leave swirl marks.
WARNING
Do not use wax on the glass, rubber or
plastic parts around the glass or door.
This may prevent the window operation
or cause poor visibility and the wax
cannot be coated uniformly.
NOTICE
Never use wax on the carbon parts
(such as the rear diffuser or the op-
tional dry carbon fiber rear spoiler) .
This may cause deterioration or corro-
sion.
REMOVING SPOTS
Remove tar and oil spots, industrial dust,
insects, and tree sap as quickly as possible
from the paint surface to avoid lasting damage
or staining. Special cleaning products are
available at a GT-R certified NISSAN dealer or
any automotive accessory stores.
UNDERBODY
In areas where road salt is used in winter, the
underbody must be cleaned regularly. This will
prevent dirt and salt from building up and
causing the acceleration of corrosion on the
underbody and suspension. Before the winter
period and again in the spring, the underseal
must be checked and, if necessary, re-treated.
GLASS
Use glass cleaner to remove smoke and dust
film from the glass surfaces. It is normal for glass
to become coated with a film after the vehicle is
parked in the hot sun. Glass cleaner and a soft
cloth will easily remove this film.
NOTICE
When cleaning the inside of the win-
dows, do not use sharp-edged tools,
abrasive cleaners or chlorine-based
disinfectant cleaners. They could da-
mage the electrical conductors, radio
antenna elements or rear window
defroster elements.
WHEELS
Wash the wheels when washing the vehicle to
maintain their appearance.
. Clean the inner side of the wheels when the
wheel is changed or the underside of the
vehicle is washed.
. Inspect wheel rims regularly for dents or
corrosion. Such damage may cause loss of
pressure or poor seal at the tire bead.
. NISSAN recommends that the road wheels
Appearance and care7-3
Page 279 of 346
8-12Maintenance and do-it-yourself
CHANGING ENGINE COOLANT
If major cooling system repairs are required,
contact a GT-R certified NISSAN dealer. The
service procedures can be found in the appro-
priate NISSAN Service Manual.
Improper servicing can result in reduced
heater performance and engine overheat-
ing.
WARNING
.To avoid the danger of being
scalded, never change the coolant
when the engine is hot.
. Never remove the radiator filler cap
and the coolant reservoir cap when
the engine is hot. Serious burns
could be caused by high pressure
fluid escaping from the radiator and
reservoir.
. Avoid direct skin contact with used
coolant. If skin contact is made,
wash thoroughly with soap or hand
cleaner as soon as possible.
. Keep coolant out of reach of chil-
dren and pets. Engine coolant must be disposed of properly.
Check your local regulations.
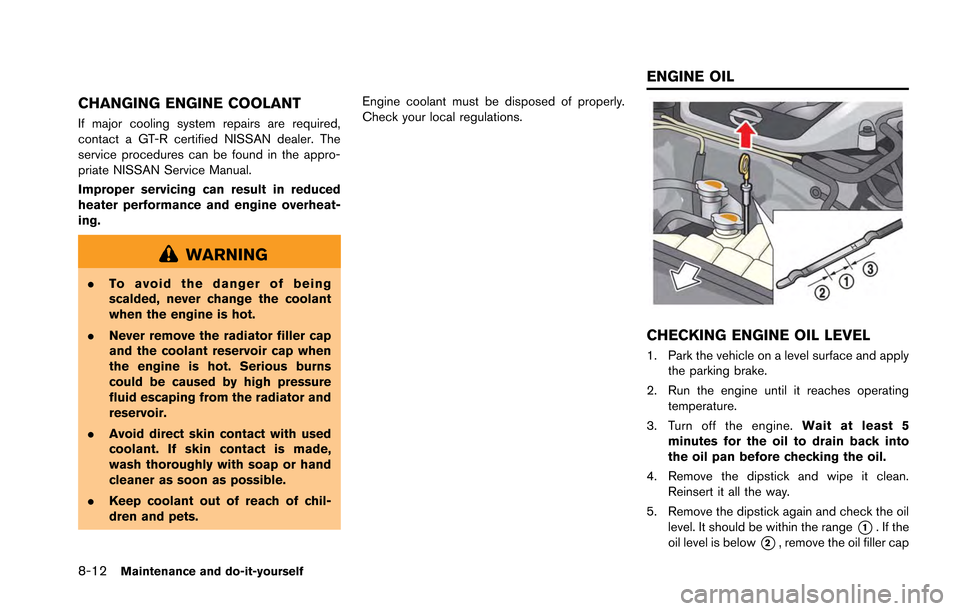
CHECKING ENGINE OIL LEVEL
1. Park the vehicle on a level surface and apply
the parking brake.
2. Run the engine until it reaches operating temperature.
3. Turn off the engine. Wait at least 5
minutes for the oil to drain back into
the oil pan before checking the oil.
4. Remove the dipstick and wipe it clean. Reinsert it all the way.
5. Remove the dipstick again and check the oil level. It should be within the range
*1. If the
oil level is below
*2, remove the oil filler cap
ENGINE OIL
Page 313 of 346
8-46Maintenance and do-it-yourself
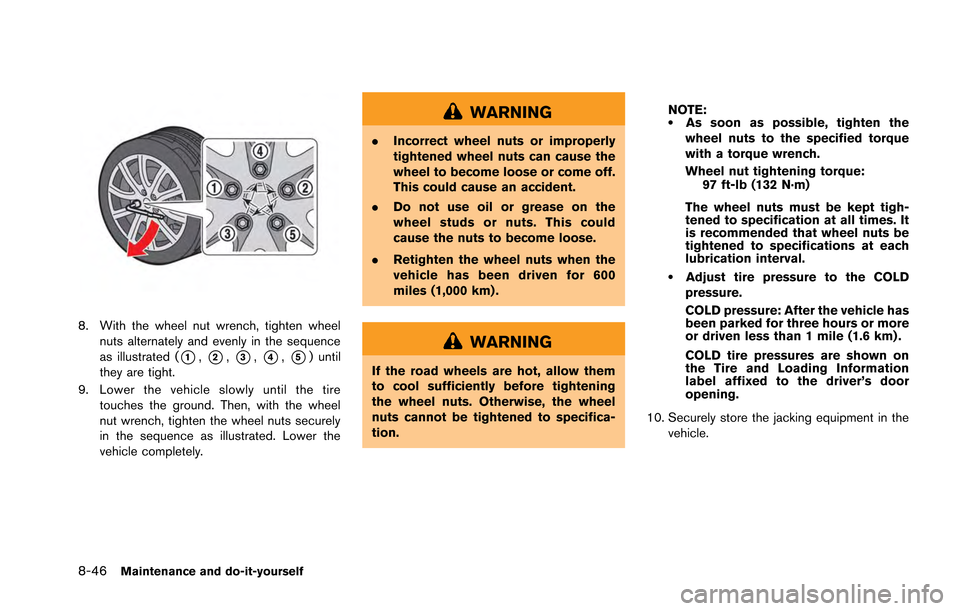
8. With the wheel nut wrench, tighten wheelnuts alternately and evenly in the sequence
as illustrated (
*1,*2,*3,*4,*5) until
they are tight.
9. Lower the vehicle slowly until the tire touches the ground. Then, with the wheel
nut wrench, tighten the wheel nuts securely
in the sequence as illustrated. Lower the
vehicle completely.
WARNING
.Incorrect wheel nuts or improperly
tightened wheel nuts can cause the
wheel to become loose or come off.
This could cause an accident.
. Do not use oil or grease on the
wheel studs or nuts. This could
cause the nuts to become loose.
. Retighten the wheel nuts when the
vehicle has been driven for 600
miles (1,000 km) .
WARNING
If the road wheels are hot, allow them
to cool sufficiently before tightening
the wheel nuts. Otherwise, the wheel
nuts cannot be tightened to specifica-
tion. NOTE:
.As soon as possible, tighten the
wheel nuts to the specified torque
with a torque wrench.
Wheel nut tightening torque: 97 ft-lb (132 N·m)
The wheel nuts must be kept tigh-
tened to specification at all times. It
is recommended that wheel nuts be
tightened to specifications at each
lubrication interval.
.Adjust tire pressure to the COLD
pressure.
COLD pressure: After the vehicle has
been parked for three hours or more
or driven less than 1 mile (1.6 km) .
COLD tire pressures are shown on
the Tire and Loading Information
label affixed to the driver’s door
opening.
10. Securely store the jacking equipment in the vehicle.