2013 NISSAN GT-R ESP
[x] Cancel search: ESPPage 140 of 346
5. Confirm that the security indicator lightcomes on. The security indicator light stays
on for about 30 seconds. The vehicle
security system is now pre-armed. After
about 30 seconds the vehicle security
system automatically shifts into the armed
phase. The security light begins to flash
once every approximately 3 seconds. If,
during this 30-second pre-arm time period,
the door is unlocked, or the ignition switch is
pushed to ACC or ON, the system will not
arm.
Even when the driver and/or passengers
are in the vehicle, the system will activate
with all doors, hood, and trunk lid locked
with the ignition switch in the LOCK
position. When pushing the ignition switch
to the ACC or ON position, the system will
be released.
Vehicle security system activation
The vehicle security system will give the follow-
ing alarm:
. The headlights blink and the horn sounds
intermittently.
. The alarm automatically turns off after
approximately 1 minute. However, the alarm
reactivates if the vehicle is tampered with
again. The alarm is activated by:
.
Opening the door or the trunk lid without
using the button on the Intelligent Key, the
door handle request switch or the mechan-
ical key. (Even if the door is opened by
releasing the door inside lock knob, the
alarm will activate.)
. Opening the hood.
How to stop an activated alarm
The alarm will stop by:
.Unlocking a door by pushing the UNLOCK
button on the Intelligent Key.
. Unlocking a door by pushing the door
handle request switch.
. Pushing the ignition switch to the ACC or
ON position.
If the system does not operate as de-
scribed above, have it checked by a GT-R
certified NISSAN dealer.
NISSAN VEHICLE IMMOBILIZER
SYSTEM
The NISSAN Vehicle Immobilizer System will not
allow the engine to start without the use of the
registered Intelligent Key. Never leave these
keys in the vehicle. FCC Notice:
For USA:
This device complies with Part 15 of the
FCC Rules. Operation is subject to the
following two conditions: (1) This device
may not cause harmful interference, and
(2) this device must accept any interfer-
ence received, including interference that
may cause undesired operation.
Note: Changes or modifications not ex-
pressly approved by the party responsible
for compliance could void the user’s
authority to operate the equipment.
For Canada:
This device complies with RSS-210 of
Industry Canada. Operation is subject to
the following two conditions: (1) this
device may not cause interference, and
(2) this device must accept any interfer-
ence, including interference that may
cause undesired operation of the device.
Instruments and controls2-45
Page 155 of 346
2-60Instruments and controls
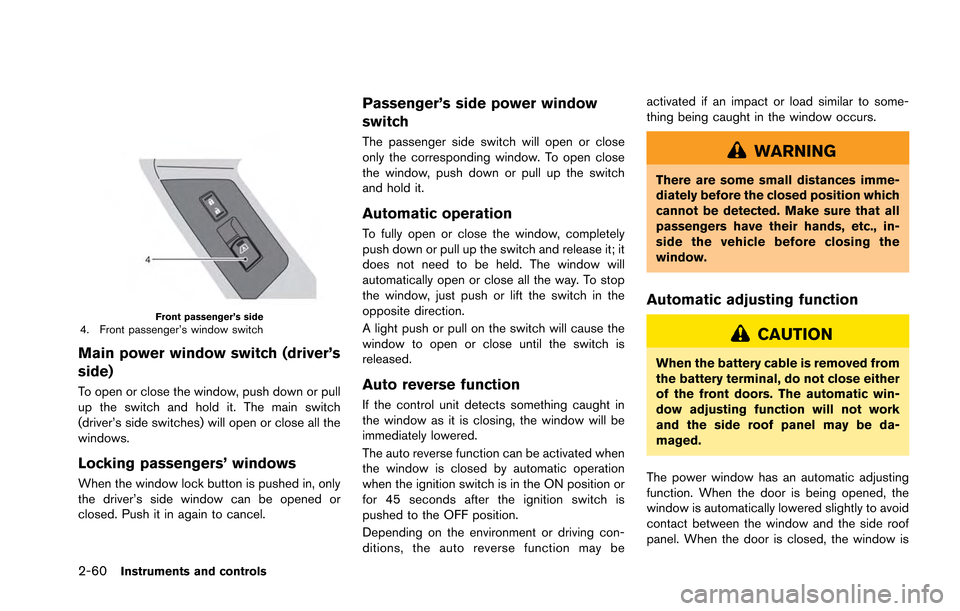
Front passenger’s side4. Front passenger’s window switch
Main power window switch (driver’s
side)
To open or close the window, push down or pull
up the switch and hold it. The main switch
(driver’s side switches) will open or close all the
windows.
Locking passengers’ windows
When the window lock button is pushed in, only
the driver’s side window can be opened or
closed. Push it in again to cancel.
Passenger’s side power window
switch
The passenger side switch will open or close
only the corresponding window. To open close
the window, push down or pull up the switch
and hold it.
Automatic operation
To fully open or close the window, completely
push down or pull up the switch and release it; it
does not need to be held. The window will
automatically open or close all the way. To stop
the window, just push or lift the switch in the
opposite direction.
A light push or pull on the switch will cause the
window to open or close until the switch is
released.
Auto reverse function
If the control unit detects something caught in
the window as it is closing, the window will be
immediately lowered.
The auto reverse function can be activated when
the window is closed by automatic operation
when the ignition switch is in the ON position or
for 45 seconds after the ignition switch is
pushed to the OFF position.
Depending on the environment or driving con-
ditions, the auto reverse function may beactivated if an impact or load similar to some-
thing being caught in the window occurs.
WARNING
There are some small distances imme-
diately before the closed position which
cannot be detected. Make sure that all
passengers have their hands, etc., in-
side the vehicle before closing the
window.
Automatic adjusting function
CAUTION
When the battery cable is removed from
the battery terminal, do not close either
of the front doors. The automatic win-
dow adjusting function will not work
and the side roof panel may be da-
maged.
The power window has an automatic adjusting
function. When the door is being opened, the
window is automatically lowered slightly to avoid
contact between the window and the side roof
panel. When the door is closed, the window is
Page 161 of 346
2-66Instruments and controls
.position the hand-held transmitter 2 to 5 in
(50 to 127 mm) away from the HomeLink®
surface. Hold the transmitter in that position
for up to 15 seconds. If HomeLink®is not
programmed within that time, try holding the
transmitter in another position - keeping the
indicator light in view at all times.
If you continue to have programming difficulties,
please contact the NISSAN Consumer Affairs
Department. The phone numbers are located in
the Foreword of this Owner’s Manual.
CLEARING THE PROGRAMMED IN-
FORMATION
Individual buttons cannot be cleared, however to
clear all programming, push and hold the two
outside buttons and release when the indicator
light begins to flash (in approximately 20
seconds) .
REPROGRAMMING A SINGLE
HomeLink®BUTTON
To reprogram a HomeLink®Universal Transcei-
ver button, complete the following.
1. Push and hold the desired HomeLink
®
button. Do not release the button until step
4 has been completed.
2. When the indicator light begins to flash slowly (after 20 seconds) , position the hand-held transmitter 2 to 5 in (50 to 127
mm) away from the HomeLink
®surface.
3. Push and hold the hand-held transmitter button.
4. The HomeLink
®indicator light will flash, first
slowly and then rapidly. When the indicator
light begins to flash rapidly, release both
buttons.
The HomeLink
®Universal Transceiver button
has now been reprogrammed. The new device
can be activated by pushing the HomeLink
®
button that was just programmed. This proce-
dure will not affect any other programmed
HomeLink
®buttons.
IF YOUR VEHICLE IS STOLEN
If your vehicle is stolen, you should change the
codes of any non-rolling code device that has
been programmed into HomeLink
®. Consult the
Owner’s Manual of each device or call the
manufacturer or dealer of those devices for
additional information.
When your vehicle is recovered, you will
need to reprogram the HomeLink
®Univer-
sal Transceiver with your new transmitter
information.
FCC Notice:
This device complies with FCC rules part
15. Operation is subject to the following two conditions: (1) This device may not
cause harmful interference and (2) This
device must accept any interference that
may be received, including interference
that may cause undesired operation.
The transmitter has been tested and
complies with FCC and DOC/MDC rules.
Changes or modifications not expressly
approved by the party responsible for
compliance could void the user’s authority
to operate the device.
DOC: ISTC 1763K1313
FCC I.D.: CB2V67690
Page 165 of 346
3-4Pre-driving checks and adjustments
WARNING
.Always have the doors locked while
driving. Along with the use of seat
belts, this provides greater safety in
the event of an accident by helping
to prevent persons from being
thrown from the vehicle. This also
helps keep children and others from
unintentionally opening the doors,
and will help keep out intruders.
. Before opening any door, always
look for and avoid oncoming traffic.
. Do not leave children unattended
inside the vehicle. They could un-
knowingly activate switches or con-
trols. Unattended children could
become involved in serious acci-
dents.
CAUTION
To prevent theft or accidents, be sure to
stop the engine and lock the doors
before stepping away from the vehicle.
NOTICE
When the battery cable is removed from
the battery terminal, do not close either
of the front doors. The automatic win-
dow adjusting function will not work,
and the side roof panel may be da-
maged. (
“Automatic adjusting
function” page 2-60)
NOTE:
. The doors of this vehicle are somewhat
harder to close than those of an
ordinary vehicle (especially when the
vehicle is new) . This is because the
stiffness of the rubber has been in-
creased to improve the airtightness of
the vehicle interior during situations
such as higher speed driving. This does
not indicate that there is a malfunction.
. When the driver’s door is locked or
unlocked, the fuel-filler door is auto-
matically locked or unlocked at the
same time.
When the door is being opened, the window is
automatically lowered slightly to avoid contact
between the window and the side roof panel.
When the door is closed, the window is automatically raised slightly. (
“Automatic
adjusting function” page 2-60)
DOORS
Page 172 of 346
horn mode” page 3-13)
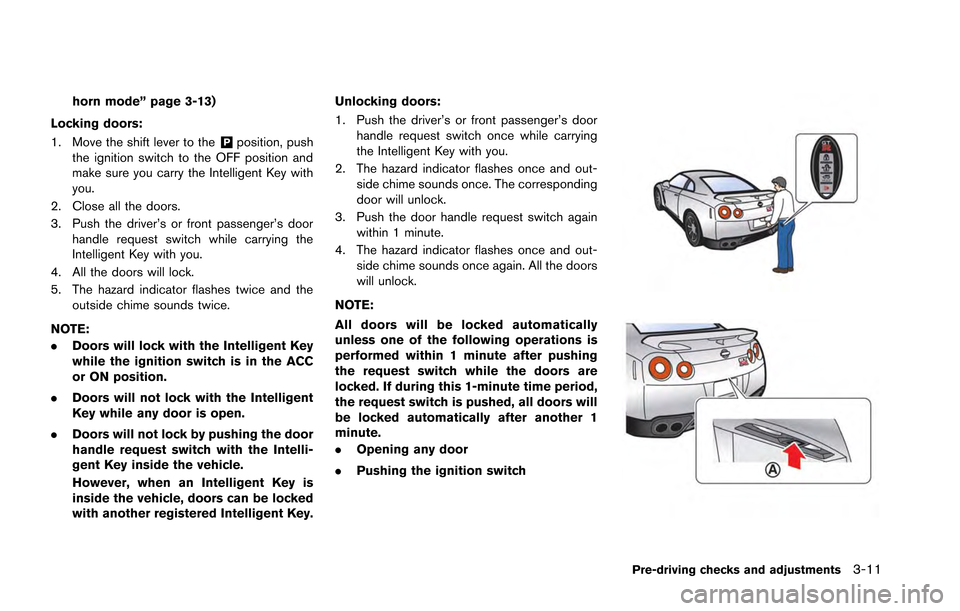
Locking doors:
1. Move the shift lever to the
&Pposition, push
the ignition switch to the OFF position and
make sure you carry the Intelligent Key with
you.
2. Close all the doors.
3. Push the driver’s or front passenger’s door handle request switch while carrying the
Intelligent Key with you.
4. All the doors will lock.
5. The hazard indicator flashes twice and the outside chime sounds twice.
NOTE:
. Doors will lock with the Intelligent Key
while the ignition switch is in the ACC
or ON position.
. Doors will not lock with the Intelligent
Key while any door is open.
. Doors will not lock by pushing the door
handle request switch with the Intelli-
gent Key inside the vehicle.
However, when an Intelligent Key is
inside the vehicle, doors can be locked
with another registered Intelligent Key. Unlocking doors:
1. Push the driver’s or front passenger’s door
handle request switch once while carrying
the Intelligent Key with you.
2. The hazard indicator flashes once and out- side chime sounds once. The corresponding
door will unlock.
3. Push the door handle request switch again within 1 minute.
4. The hazard indicator flashes once and out- side chime sounds once again. All the doors
will unlock.
NOTE:
All doors will be locked automatically
unless one of the following operations is
performed within 1 minute after pushing
the request switch while the doors are
locked. If during this 1-minute time period,
the request switch is pushed, all doors will
be locked automatically after another 1
minute.
. Opening any door
. Pushing the ignition switch
Pre-driving checks and adjustments3-11
Page 197 of 346
5-4Starting and driving
WARNING
.The exhaust gas and the exhaust
system are very hot. Keep people,
animals or flammable materials
away from the exhaust system com-
ponents.
. Do not stop or park the vehicle over
flammable materials such as dry
grass, waste paper or rags. They
may ignite and cause a fire.
NOTICE
.Do not use leaded gasoline. Depos-
its from leaded gasoline seriously
reduce the three-way catalyst’s abil-
ity to help reduce exhaust pollu-
tants.
. Keep your engine tuned up. Mal-
functions in the ignition, fuel injec-
tion, or electrical systems can cause
overrich fuel flow into the three-way
catalyst, causing it to overheat. Do
not keep driving if the engine mis-
fires, or if noticeable loss of perfor-
mance or other unusual operating conditions are detected. Have the
vehicle inspected promptly by a
GT-R certified NISSAN dealer.
. Avoid driving with an extremely low
fuel level. Running out of fuel could
cause the engine to misfire, dama-
ging the three-way catalyst.
. Do not race the engine while warm-
ing it up.
. Do not push or tow your vehicle to
start the engine.
TIRE PRESSURE MONITORING
SYSTEM (TPMS)
Each tire should be checked monthly when cold
and inflated to the inflation pressure recom-
mended by the vehicle manufacturer on the
vehicle placard or tire inflation pressure label. (If
your vehicle has tires of a different size than the
size indicated on the vehicle placard or tire
inflation pressure label, you should determine
the proper tire inflation pressure for those tires.)
As an added safety feature, your vehicle has
been equipped with a Tire Pressure Monitoring
System (TPMS) that illuminates a low tire
pressure telltale when one or more of your tires
is significantly under-inflated. Accordingly, when the low tire pressure telltale illuminates, you
should stop and check your tires as soon as
possible, and inflate them to the proper pres-
sure. Driving on a significantly under-inflated tire
causes the tire to overheat and can lead to tire
failure. Under-inflation also reduces fuel effi-
ciency and tire tread life, and may affect the
vehicle’s handling and stopping ability.
If the vehicle is being driven with one or more flat
tires, the run-flat tire warning light will illuminate
continuously and a chime will sound for 10
seconds. The chime will only sound at the first
indication of a flat tire, and the warning light will
illuminate continuously. When the Flat tire
warning is activated, have the system reset
and the tire checked and replaced if necessary
by a GT-R certified NISSAN dealer. Even if the
tire is inflated to the specified COLD tire
pressure, the warning light will continue to
illuminate until the system is reset by a GT-R
certified NISSAN dealer. Your vehicle can be
driven for a limited time on a flat tire. (
“Run-
flat tires” page 8-37)
Please note that the TPMS is not a substitute for
proper tire maintenance, and it is the driver’s
responsibility to maintain correct tire pressure,
even if under-inflation has not reached the level
to trigger illumination of the TPMS low tire
pressure telltale.
Page 200 of 346
radio frequencies are near the vehicle.
. If a transmitter set to similar frequencies is
being used in or near the vehicle.
. If a computer (or similar equipment) or a DC/
AC converter is being used in or near the
vehicle.
FCC Notice:
For USA:
This device complies with Part 15 of the
FCC Rules. Operation is subject to the
following two conditions: (1) This device
may not cause harmful interference, and
(2) this device must accept any interfer-
ence received, including interference that
may cause undesired operation.
Note: Changes or modifications not ex-
pressly approved by the party responsible
for compliance could void the user’s
authority to operate the equipment.
For Canada:
This device complies with RSS-210 of
Industry Canada. Operation is subject to
the following two conditions: (1) this
device may not cause interference, and
(2) this device must accept any interfer-
ence, including interference that may
cause undesired operation of the device.AVOIDING COLLISION AND ROLL-
OVER
WARNING
Failure to operate this vehicle in a safe
and prudent manner may result in loss
of control or an accident.
Be alert and drive defensively at all times. Obey
all traffic regulations. Avoid excessive speed,
high speed cornering, or sudden steering
maneuvers, because these driving practices
could cause you to lose control of your vehicle.
As with any vehicle, a loss of control could
result in a collision with other vehicles or
objects, or cause the vehicle to rollover,
particularly if the loss of control causes the
vehicle to slide sideways. Be attentive at all
times, and avoid driving when tired. Never drive
when under the influence of alcohol or drugs
(including prescription or over-the-counter
drugs which may cause drowsiness) . Always
wear your seat belt as outlined in this manual,
and also instruct your passengers to do so.
(
“Seat belts” page 1-6)
Seat belts help reduce the risk of injury in
collisions and rollovers. In a rollover crash, an
unbelted or improperly belted person is significantly more likely to be injured or
killed than a person properly wearing a
seat belt.
OFF-ROAD RECOVERY
While driving, the right side or left side wheels
may unintentionally leave the road surface. If this
occurs, maintain control of the vehicle by
following the procedure below. Please note that
this procedure is only a general guide. The
vehicle must be driven as appropriate based on
the conditions of the vehicle, road and traffic.
1. Remain calm and do not overreact.
2. Do not apply the brakes.
3. Maintain a firm grip on the steering wheel
with both hands and try to hold a straight
course.
4. When appropriate, slowly release the accel- erator pedal to gradually slow the vehicle.
5. If there is nothing in the way, steer the vehicle to follow the road while the vehicle
speed is reduced. Do not attempt to drive
the vehicle back onto the road surface until
vehicle speed is reduced.
6. When it is safe to do so, gradually turn the steering wheel until both tires return to the
road surface. When all tires are on the road
surface, steer the vehicle to stay in the
appropriate driving lane.
Starting and driving5-7
Page 201 of 346
5-8Starting and driving
.If you decide that it is not safe to return
the vehicle to the road surface based on
vehicle, road or traffic conditions, gradu-
ally slow the vehicle to a stop in a safe
place off the road.
RAPID AIR PRESSURE LOSS
Rapid air pressure loss or a “blow-out” can
occur if the tire is punctured or is damaged due
to hitting a curb or pothole. Rapid air pressure
loss can also be caused by driving on under-
inflated tires.
Rapid air pressure loss can affect the handling
and stability of the vehicle, especially at highway
speeds.
Help prevent rapid air pressure loss by main-
taining the correct air pressure and visually
inspect the tires for wear and damage.
(
“Wheels and tires” page 8-31)
If a tire rapidly loses air pressure or “blows-out”
while driving maintain control of the vehicle by
following the procedure below. Please note that
this procedure is only a general guide. The
vehicle must be driven as appropriate based on
the conditions of the vehicle, road and traffic.
WARNING
The following actions can increase the
chance of losing control of the vehicle if
there is a sudden loss of tire air
pressure. Losing control of the vehicle
may cause a collision and result in
personal injury.
. The vehicle generally moves or pulls
in the direction of the flat tire.
. Do not rapidly apply the brakes.
. Do not rapidly release the accelera-
tor pedal.
. Do not rapidly turn the steering
wheel.
1. Remain calm and do not overreact.
2. Maintain a firm grip on the steering wheel with both hands and try to hold a straight
course.
3. When appropriate, slowly release the accel- erator pedal to gradually slow the vehicle.
4. Gradually steer the vehicle to a safe location off the road and away from traffic if possible.
5. Lightly apply the brake pedal to gradually stop the vehicle. 6. Turn on the hazard warning flashers and
contact a roadside emergency service to
change the tire.
DRINKING ALCOHOL/DRUGS AND
DRIVING
WARNING
Never drive under the influence of
alcohol or drugs. Alcohol in the blood-
stream reduces coordination, delays
reaction time and impairs judgement.
Driving after drinking alcohol increases
the likelihood of being involved in an
accident injuring yourself and others.
Additionally, if you are injured in an
accident, alcohol can increase the se-
verity of the injury.
NISSAN is committed to safe driving. However,
you must choose not to drive under the influence
of alcohol. Every year thousands of people are
injured or killed in alcohol-related accidents.
Although the local laws vary on what is
considered to be legally intoxicated, the fact is
that alcohol affects all people differently and
most people underestimate the effects of
alcohol.