Page 17 of 28
CRUISE CONTROL (if so equipped)
The cruise control system enables you to set a constant
cruising speed once the vehicle has reac
hed 25 mph.
The system will automatically maintain the set speed
until you t
ap the brake pedal, accelerate, cancel or
turn the system off.
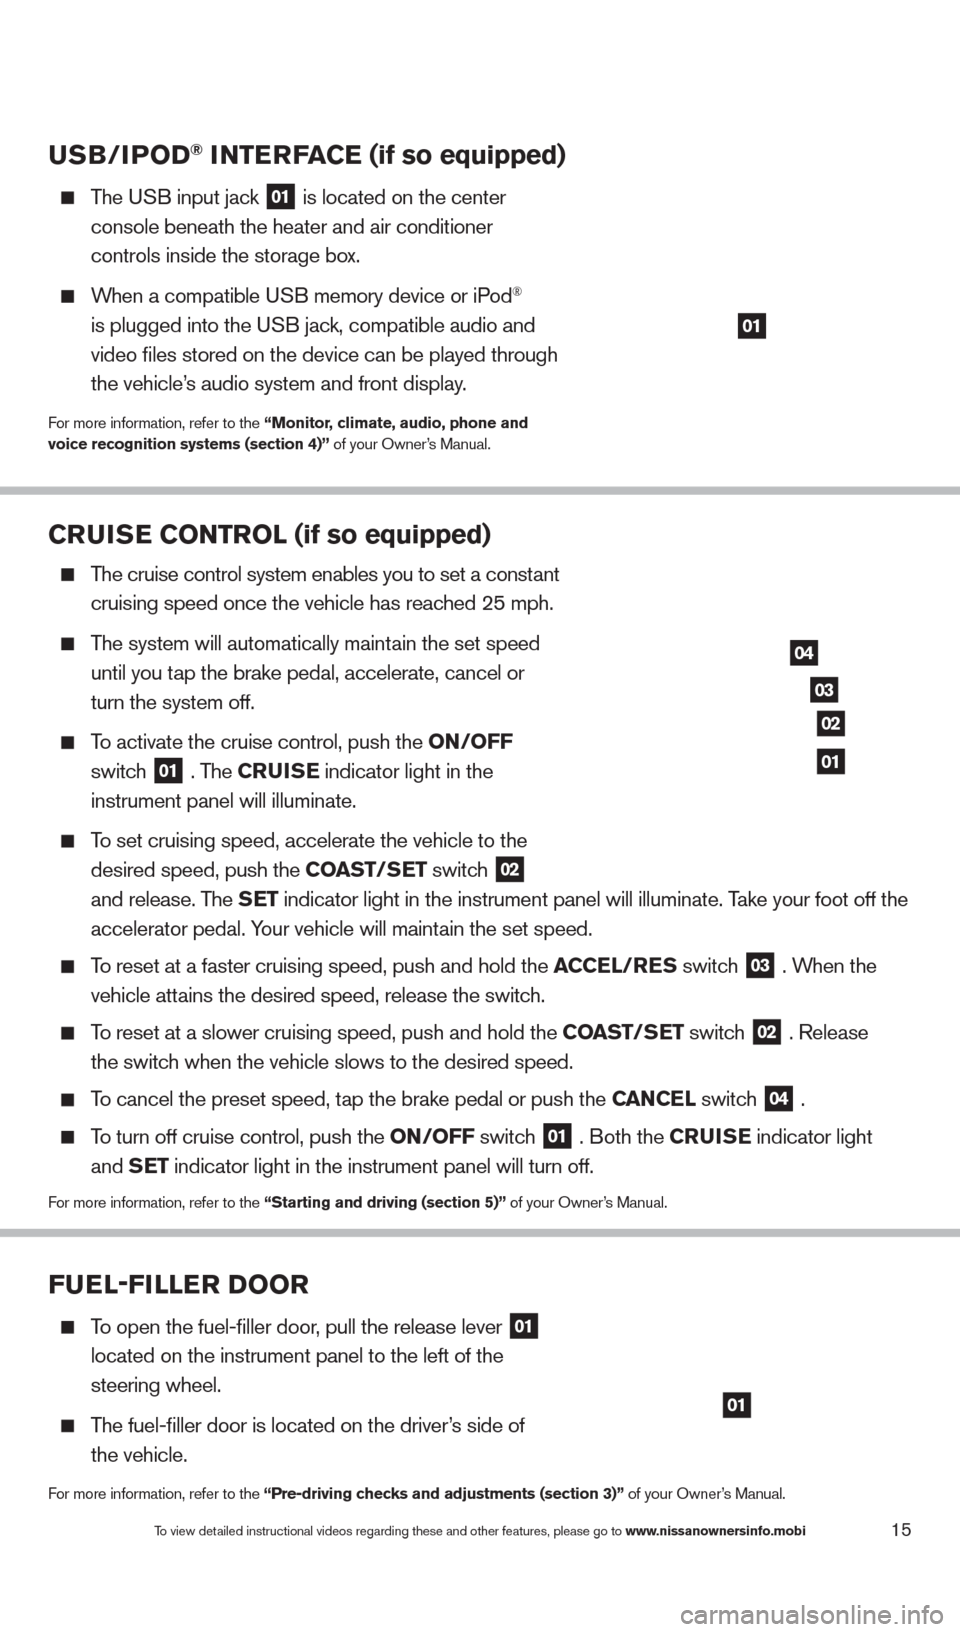
To activate the cruise control, push the ON/OFF
switc
h
01 . The CRUISE
indicator light in the
instrument panel will illuminate.
To set cruising speed, accelerate the vehicle to the
desired speed, push the
COAST/SET switch
02
and release. T
he SET indicator light in the instrument panel will illuminate. Take your foot off the
accelerator pedal. Y
our vehicle will maintain the set speed.
To reset at a faster cruising speed, push and hold the ACCEL/RES switch
03 . When the
vehicle att
ains the desired speed, release the switch.
To reset at a slower cruising speed, push and hold the COAST/SET switch 02 . Release
the switc
h when the vehicle slows to the desired speed.
To cancel the preset speed, tap the brake pedal or push the CANCEL switch 04 .
To turn off cruise control, push the ON/OFF switch 01 . Both the CRUISE
indicator light and S
ET indicator light in the instrument panel will turn off.
For more information, refer to the “Starting and driving (section 5)” of your Owner’s Manual.
03
02
04
01
USB/IP OD® INTERFACE (if so equipped)
The USB input jack
01 is located on the center
console beneath the heater and air conditioner
controls inside the storage bo
x.
When a compatible USB memory device or iPod®
is plugged into the U
SB jack, compatible audio and
video files stored on the device can be played through
the vehicle’
s audio system and front display.
For more information, refer to the “Monitor, climate, audio, phone and
voice recognition systems (section 4)” of your Owner’s Manual.
01
FUEL-FILLER DOOR
To open the fuel-filler door, pull the release lever 01
located on the instrument panel to the left of the
steering wheel.
The fuel-filler door is located on the driver’s side of
the vehicle.
For more information, refer to the “Pre-driving checks and adjustments (section 3)” of your Owner’s Manual.
01
To view detailed instructional videos regarding these and other features, please go\
to www.nissanownersinfo.mobi15
1482394_13d_AltimaSedan_QRG_030613.indd 153/6/13 1:17 PM
Page 18 of 28
16
VEHICLE INFORMATION DISPLAY
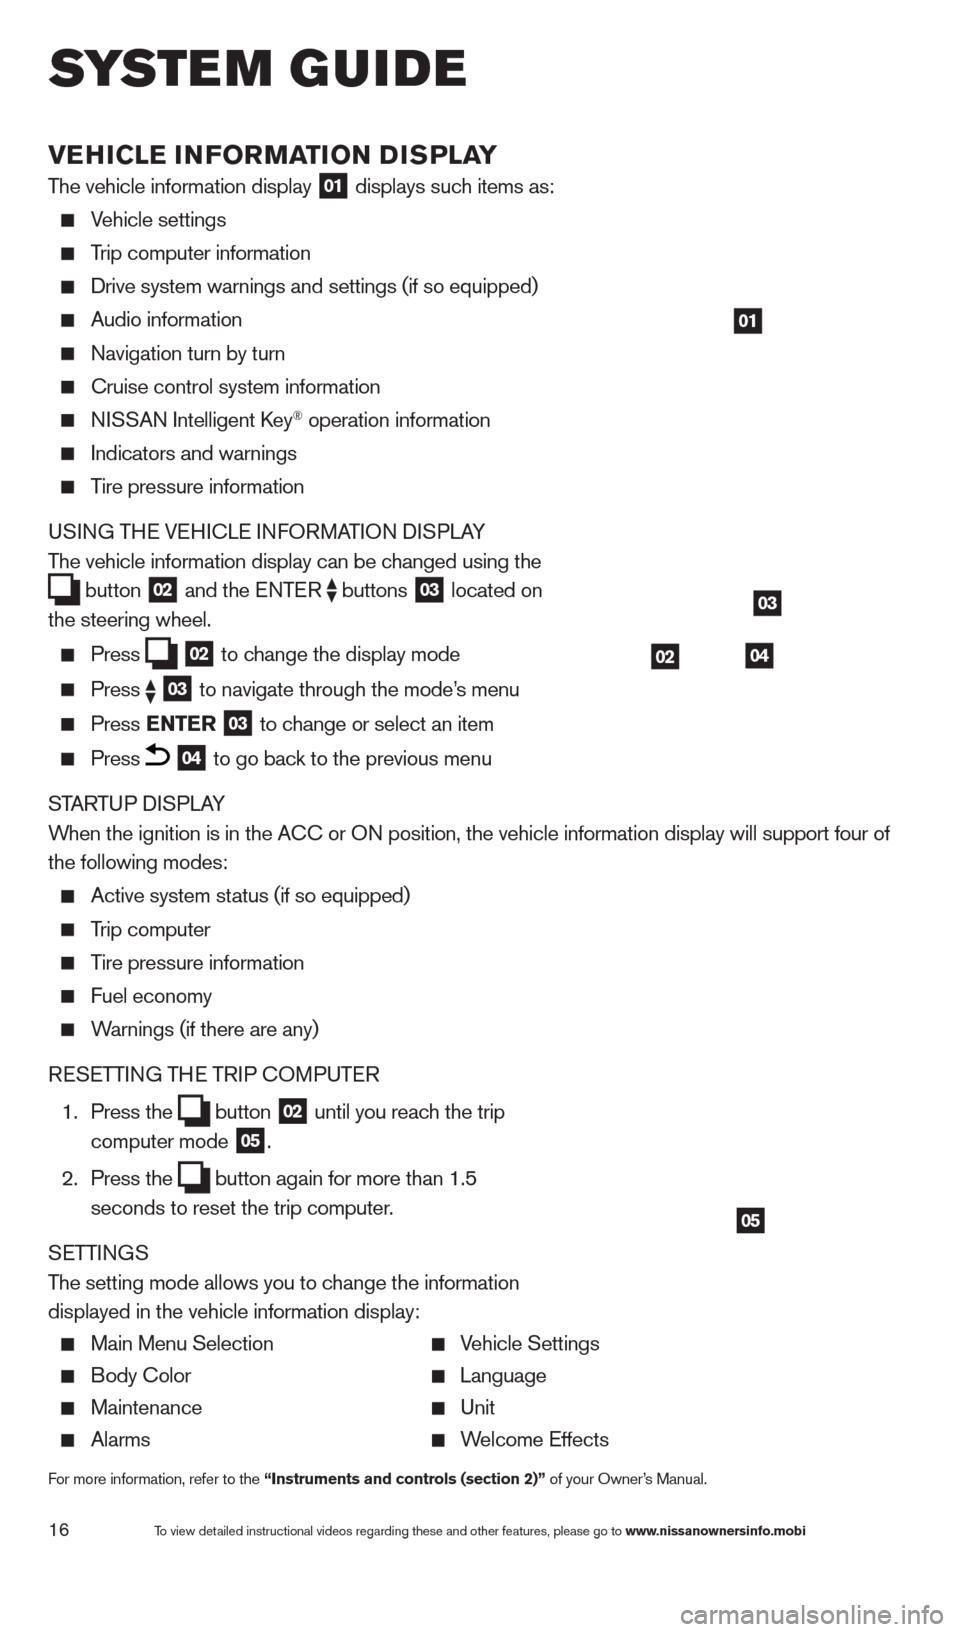
The vehicle information display 01 displays such items as:
Vehicle settings
Trip computer information
Drive system warnings and settings (if so equipped)
Audio information
Navigation turn by turn
cruise control system information
NISSAN Intelligent key® operation information
Indicators and warnings
Tire pressure information
USING THE VEHI c LE INFORMATION DISPLAY
The vehicle information display can be changed using the
button
02 and the ENTER
buttons
03 located on
the steering wheel.
Press 02 to change the display mode Press
03 to navigate through the mode’s menu Press ENTER
03 to change or select an item
Press 04 to go back to the previous menu
STARTUP DISPLAY
When the ignition is in the A
c
c or ON position, the vehicle information display will support four of
the following modes:
Active system status (if so equipped)
Trip computer
Tire pressure information
Fuel economy
Warnings (if there are any)
RESETTING THE TRIP c
O
MPUTER
1.
Press the button
02 until you reach the trip
computer mode 05.
2.
Press the button again for more than 1.5
seconds to reset the trip computer .
SETTINGS
The setting mode allows you to change the information
displayed in the vehicle information display:
Main Menu Selection Vehicle Settings
Body c olor Language
Maintenance Unit
Alarms Welcome Effects
For more information, refer to the “Instruments and controls (section 2)” of your Owner’s Manual.
01
03
0402
05
system guide
To view detailed instructional videos regarding these and other features, please go\
to www.nissanownersinfo.mobi
1482394_13d_AltimaSedan_QRG_030613.indd 163/6/13 1:17 PM
Page 19 of 28
17
BLUETOOTH® HANDS-FREE PHONE SYSTEM
A cellular telephone should not be used while driving
so full attention may be given to vehicle operation*.
SYSTEM OPERATING TIPS
The “Help” command can be used to hear a list of available commands at any time.
Reduce bac kround noise as much as possible by
closing windows and pointing HVA
c
vents away from
the ceiling.
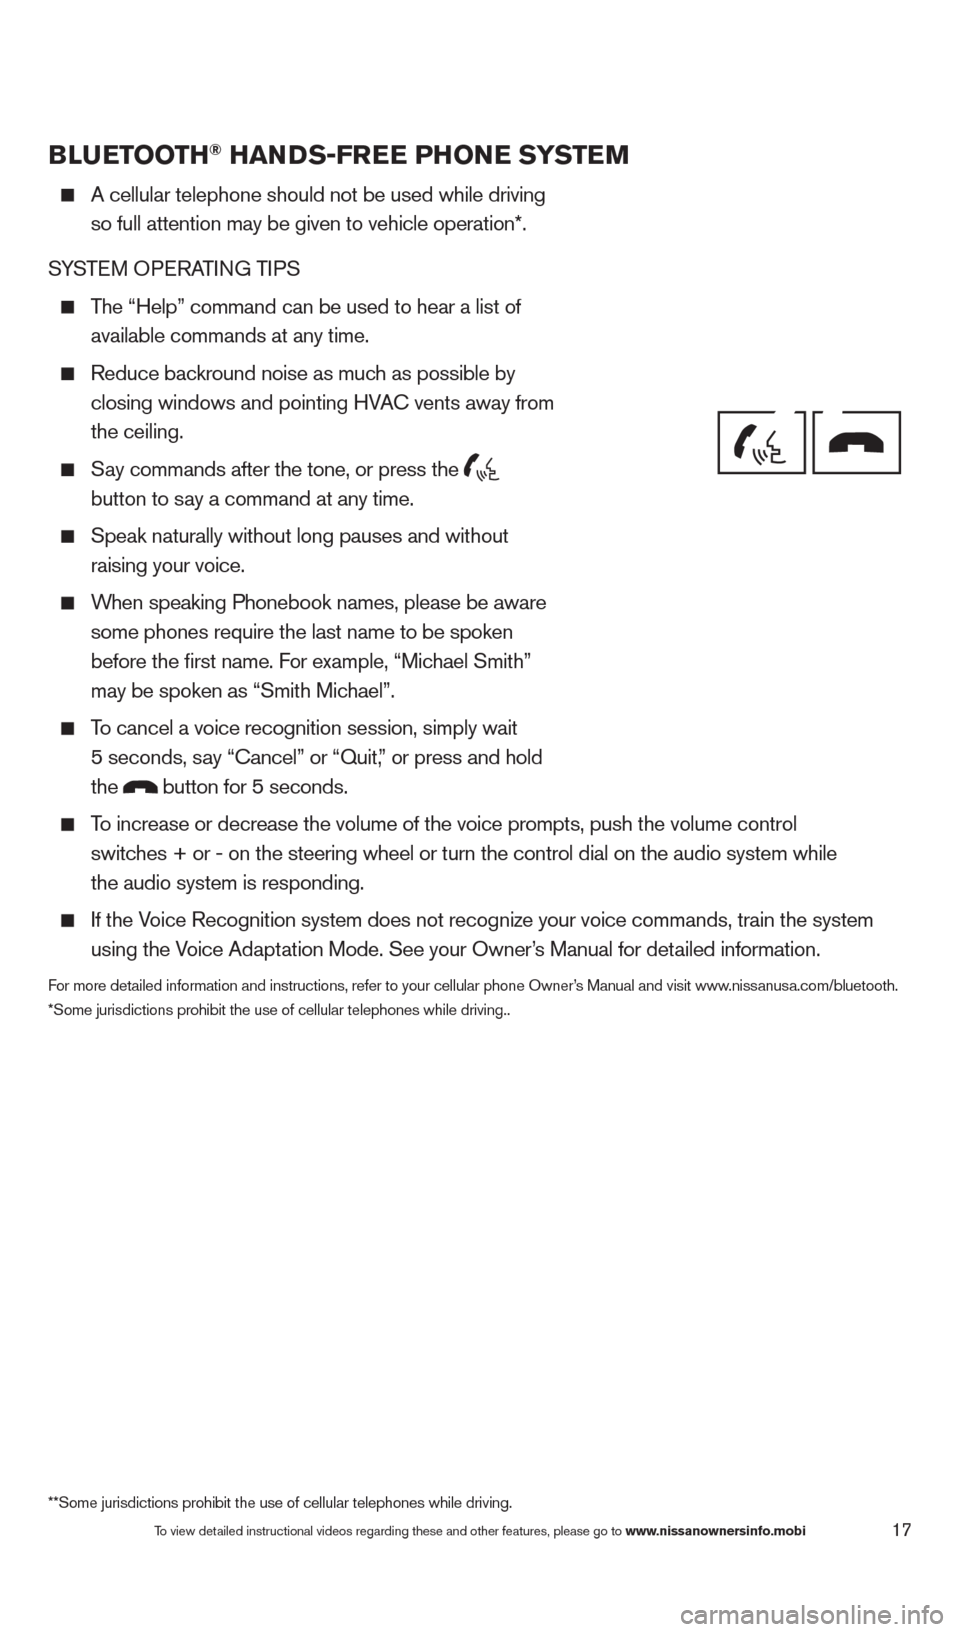
Say commands after the tone, or press the
button to say a command at any time.
Speak naturally without long pauses and without
raising your voice.
When speaking Phonebook names, please be aware some phones require the last name to be spoken
before the first name. For example, “Michael Smith”
may be spoken as “Smith Michael”.
To cancel a voice recognition session, simply wait
5 seconds, say “ c ancel” or “Quit,” or press and hold
the
button for 5 seconds.
To increase or decrease the volume of the voice prompts, push the volume \
control
switches + or - on the steering wheel or turn the control dial on the audio s\
ystem while
the audio system is responding.
If the Voice Recognition system does not recognize your voice commands, train th\
e system using the Voice Adaptation Mode. See your Owner’s Manual for detailed information.
For more detailed information and instructions, refer to your cellular phone Owner’s Manual and visit www.nissanusa.com/bluetooth.
*Some jurisdictions prohibit the use of cellular telephones while drivin\
g..
Bluetooth® Controls
Microphone
**Some jurisdictions prohibit the use of cellular telephones while drivi\
ng.
To view detailed instructional videos regarding these and other features, please go\
to www.nissanownersinfo.mobi
1482394_13d_AltimaSedan_QRG_030613.indd 173/6/13 1:17 PM
Page 20 of 28
18
cONNEcTING PROcE DURE WITHOUT NAVIGATION* (Type A) (if so equipped)
1. Press the
button on the steering wheel.
2. After the command, s
ay “Add Phone”.
3.
T
he system will confirm your command. After the tone, say “ c onnect Phone”, and then follow
the voice prompts to complete pairing from your handset.
•
T
he connecting procedure varies according to each phone. See the phone’s Owner’s
Manual for details and also visit www.nissanusa.com/bluetooth.
cO
NNE
cTI
NG PRO
cE
DURE WITHOUT NAVIGATION* (Type B) (if so equipped)
NOTE: The vehicle must be stationary when connecting the phone.
1.
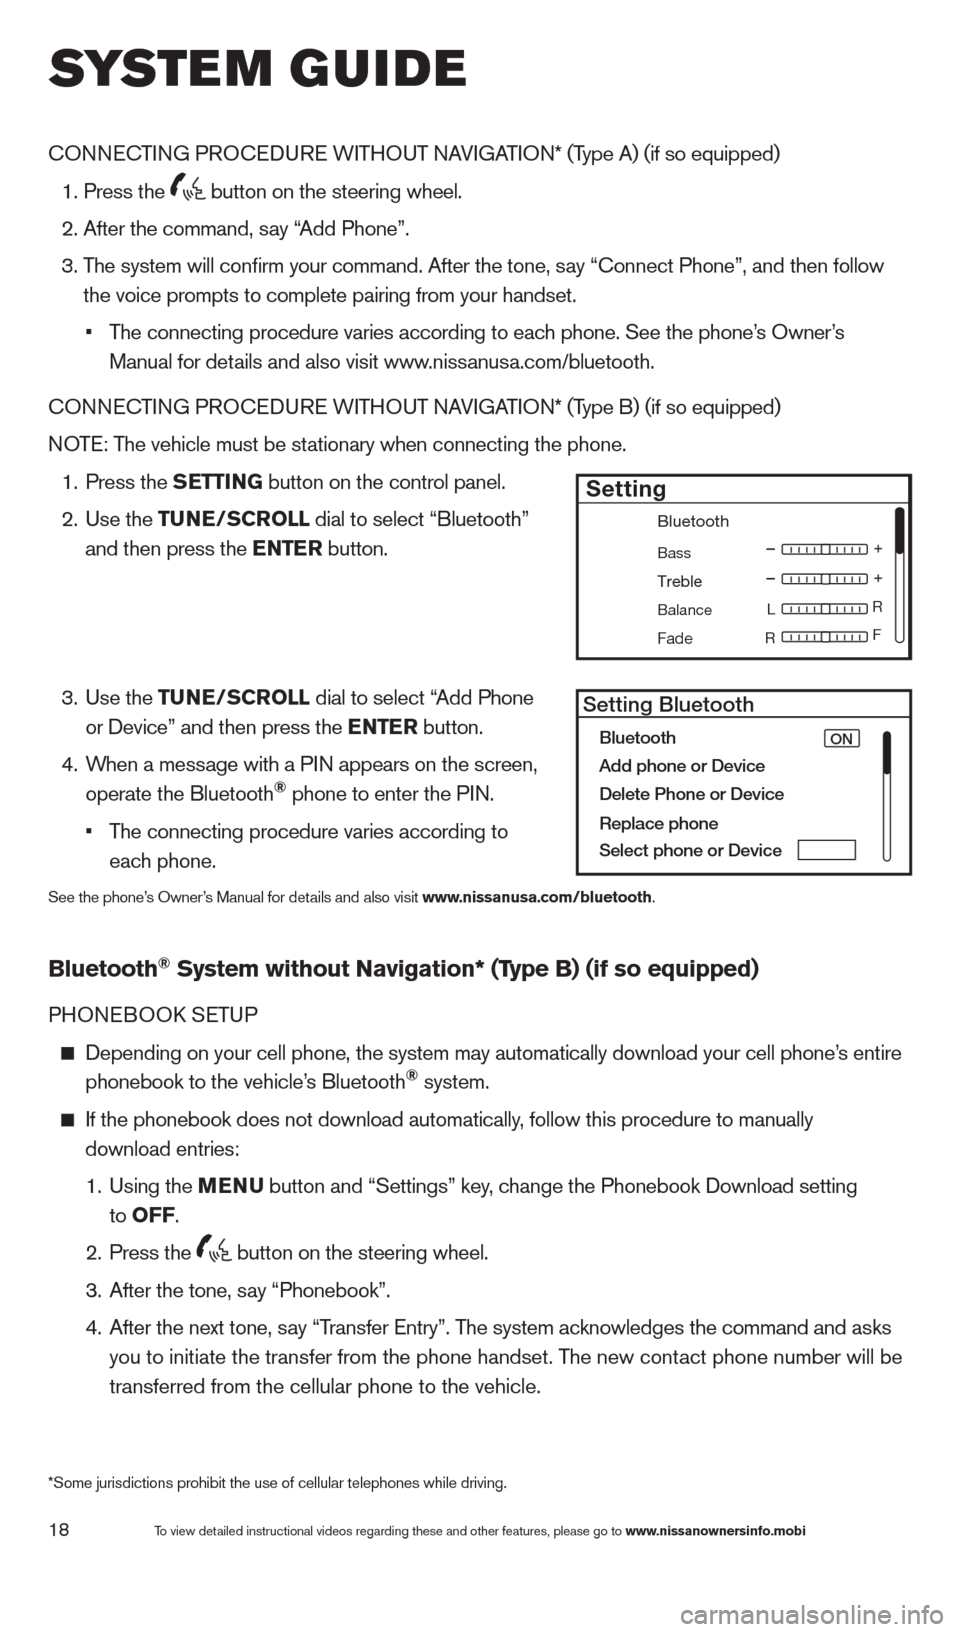
Press the
SETTING button on the control panel.
2.
Use the TUNE/SCROLL dial to select “Bluetooth”
and then press the ENTER button.
3.
Use the TUNE/SCROLL dial to select “Add Phone
or Device” and then press the ENTER button.
4.
W
hen a message with a PIN appears on the screen,
operate the Bluetooth
® phone to enter the PIN.
•
T
he connecting procedure varies according to
each phone.
See the phone’s Owner’s Manual for details and also visit www.nissanusa.com/bluetooth.
Bluetooth® System without Navigation* (Type B) (if so equipped)
PHONEBOOk SE TUP
Depending on your cell phone, the system may automatically download your\
cell phone’ s entire
phonebook to the vehicle’s Bluetooth® system.
If the phonebook does not download automatically , follow this procedure to manually
download entries:
1.
Using the M
ENU
button and “Settings” key
, change the Phonebook Download setting
to O
FF
.
2.
Press the button on the steering wheel.
3.
After the tone, s
ay “Phonebook”.
4.
After the next tone, s
ay “Transfer Entry”. The system acknowledges the command and asks
you to initiate the transfer from the phone handset. The new contact phone number will be
transferred from the cellular phone to the vehicle.
Bluetooth
Bass
Treble
Balance L
F
R R
Fade
Setting
LHA2257Setting Bluetooth
Bluetooth
Add phone or DeviceON
Delete Phone or Device
Replace phone
Select phone or Device
system guide
To view detailed instructional videos regarding these and other features, please go\
to www.nissanownersinfo.mobi
*Some jurisdictions prohibit the use of cellular telephones while drivin\
g.
1482394_13d_AltimaSedan_QRG_030613.indd 183/6/13 1:17 PM
Page 21 of 28
19
MAkING A cA LL FROM PHONEBOO k
1.
Press the button.
2.
After the tone, s
ay “ c all ” where is the name of a contact stored in
your phonebook.
3.
T
he system will confirm the name. If correct, say “Dial.” Otherwise, say “ c orrection.”
•
Please note that some phones require the name to be spoken in a
format.
MA
k
I
NG A
c
ALL B
Y PHONE NUMBER
1.
Press the button.
2.
After the tone, s
ay “ c all”.
3.
T
he system will confirm the command. After the tone say “Phone Number”.
4.
T
he system will prompt you to speak the phone number. Say the 10-digit phone number.
5.
T
he system will confirm the phone number. If correct, say “Dial.” Otherwise say “ c orrection”.
•
F
or vehicles without the 5” color display, you can simply say “Call ”
and jump to step 5.
RE
cEI
VING/ENDING A c
A
LL
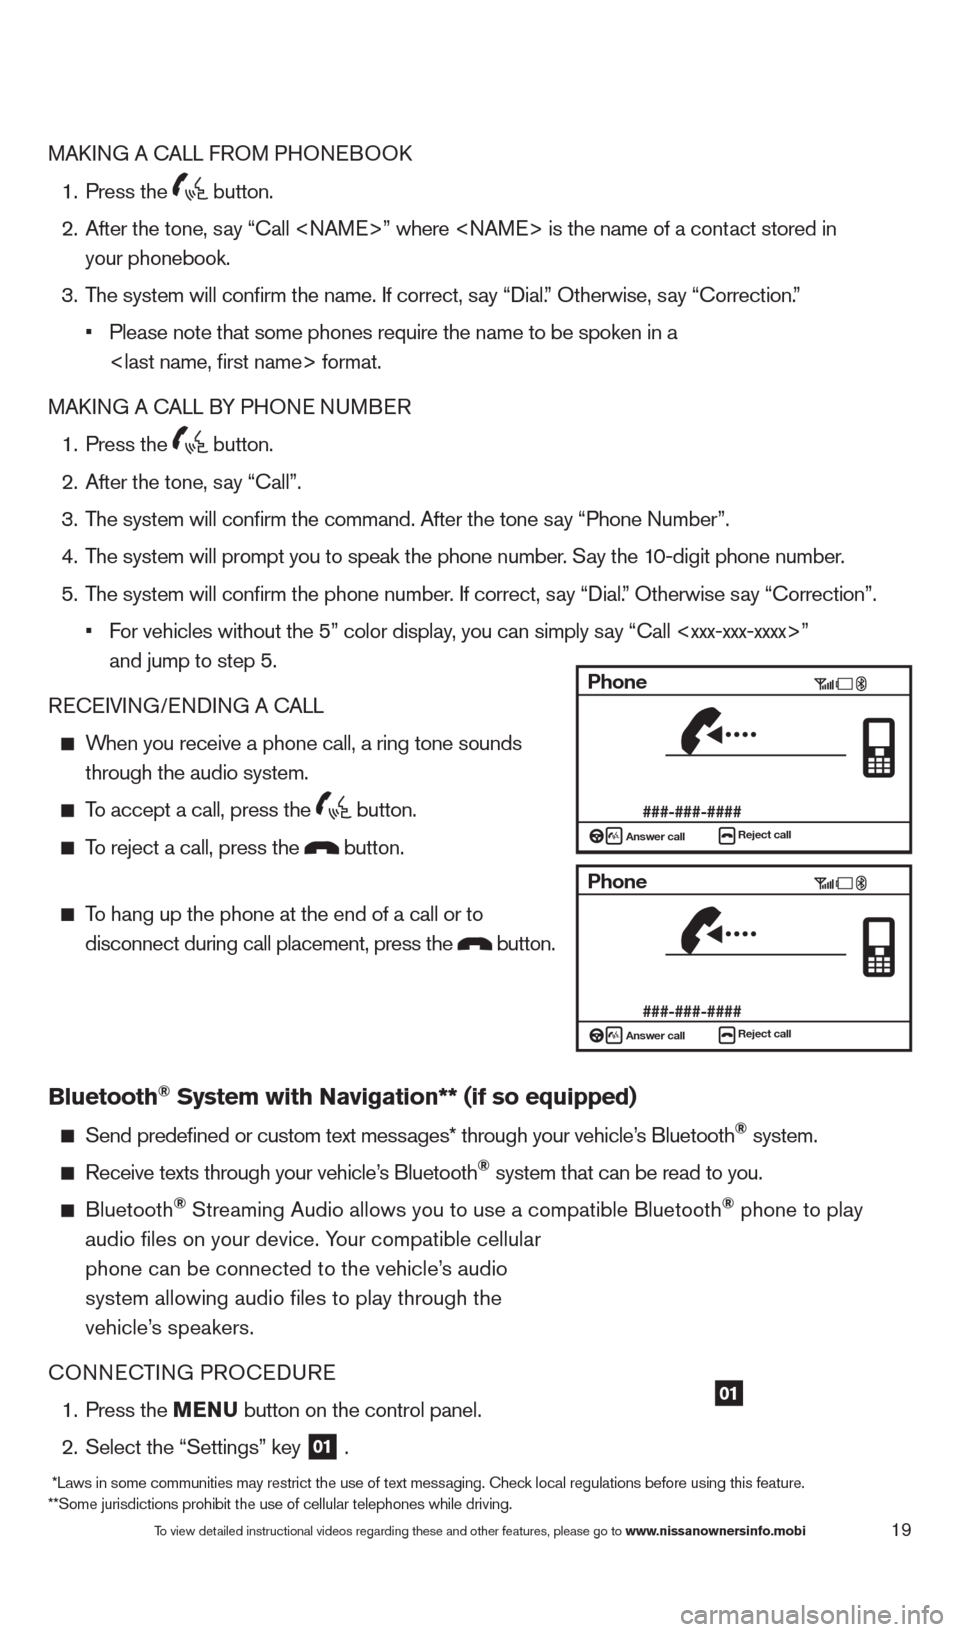
When you receive a phone call, a ring tone sounds through the audio system.
To accept a call, press the button.
To reject a call, press the button.
To hang up the phone at the end of a call or to
disconnect during call placement, press the
button.
Bluetooth® System with Navigation** (if so equipped)
Send predefined or custom text mess ages* through your vehicle’s Bluetooth® system.
Receive texts through your vehicle’s Bluetooth® system that can be read to you.
Bluetooth® Streaming Audio allows you to use a compatible Bluetooth® phone to play
audio files on your device. Your compatible cellular
phone can be connected to the vehicle’s audio
system allowing audio files to play through the
vehicle’s speakers.
c
ONNE
c
T
ING PRO
c
EDURE
1.
Press the
MENU button on the control panel.
2.
Select the “Settings” key 01 .
01
Phone
###-###-####Answer call
Reject call
Phone
###-###-####Answer callReject call
To view detailed instructional videos regarding these and other features, please go\
to www.nissanownersinfo.mobi
*Laws in some communities may restrict the use of text messaging. check local regulations before using this feature.
**Some jurisdictions prohibit the use of cellular telephones while drivi\
ng.
1482394_13d_AltimaSedan_QRG_030613.indd 193/6/13 1:17 PM
Page 22 of 28
20
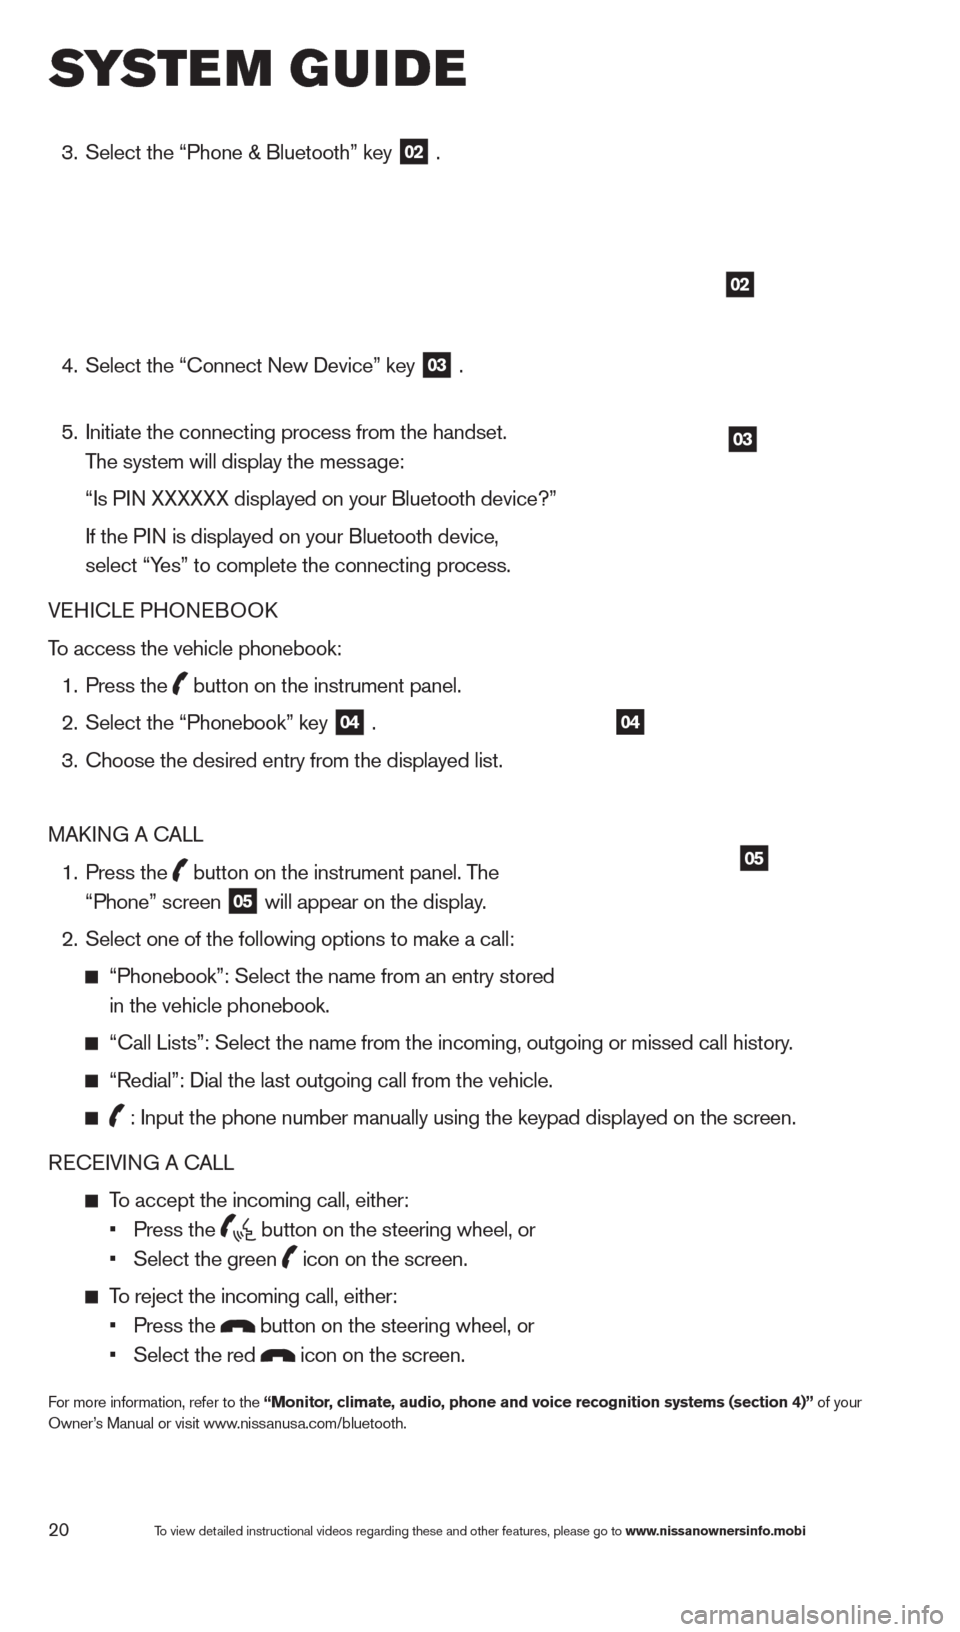
3. Select the “Phone & Bluetooth” key
02 .
4.
Select the “
c
onnect New Device” key
03 .
5.
Initiate the connecting process from the handset.
The system will display the message:
“Is P
IN XXXXXX displayed on your Bluetooth device?”
If the P
IN is displayed on your Bluetooth device,
select “Yes” to complete the connecting process.
VEHI
c
LE PHONEBOO
k
T
o access the vehicle phonebook:
1.
Press the button on the instrument panel.
2.
Select the “Phonebook” key 04 .
3.
c
hoose the desired entry from the displayed list.
MA
k
I
NG A
c
ALL
1.
Press the
button on the instrument panel. The
“Phone” screen 05 will appear on the display.
2.
Select one of the following options to make a call:
“Phonebook”: Select the name from an entry stored
in the vehicle phonebook.
“ c all Lists”: Select the name from the incoming, outgoing or missed cal\
l history.
“Redial”: Dial the last outgoing call from the vehicle.
: Input the phone number manually using the keypad displayed on the scre\
en.
RE
cE
IVING A c
ALL
To accept the incoming call, either:
•
Press the button on the steering wheel, or
•
Select the green icon on the screen.
To reject the incoming call, either:
•
Press the button on the steering wheel, or
•
Select the red icon on the screen.
For more information, refer to the “Monitor, climate, audio, phone and voice recognition systems (section 4)” of your
Owner’s Manual or visit www.nissanusa.com/bluetooth.
02
03
04
05
system guide
To view detailed instructional videos regarding these and other features, please go\
to www.nissanownersinfo.mobi
1482394_13d_AltimaSedan_QRG_030613.indd 203/6/13 1:17 PM
Page 23 of 28
21
NAVIGATION SYSTEM (if so equipped)
Your Navigation System can calculate a route from the current location to\
a preferred destination.
T
he real-time map display and turn-by-turn voice guidance will lead you a\
long the route.
The Navigation System will continually update your vehicle’s position. If you have deviated from
the original route, it will recalculate the route from your current loca\
tion.
Your Navigation System, along with POIs powered by Google™* (if so equipped), allows you to
enter a destination using Google searc
h results.
Using Google™ Send-to-car* (if so equipped) you can send a destination from Google Maps
to your vehicle’
s Navigation System.
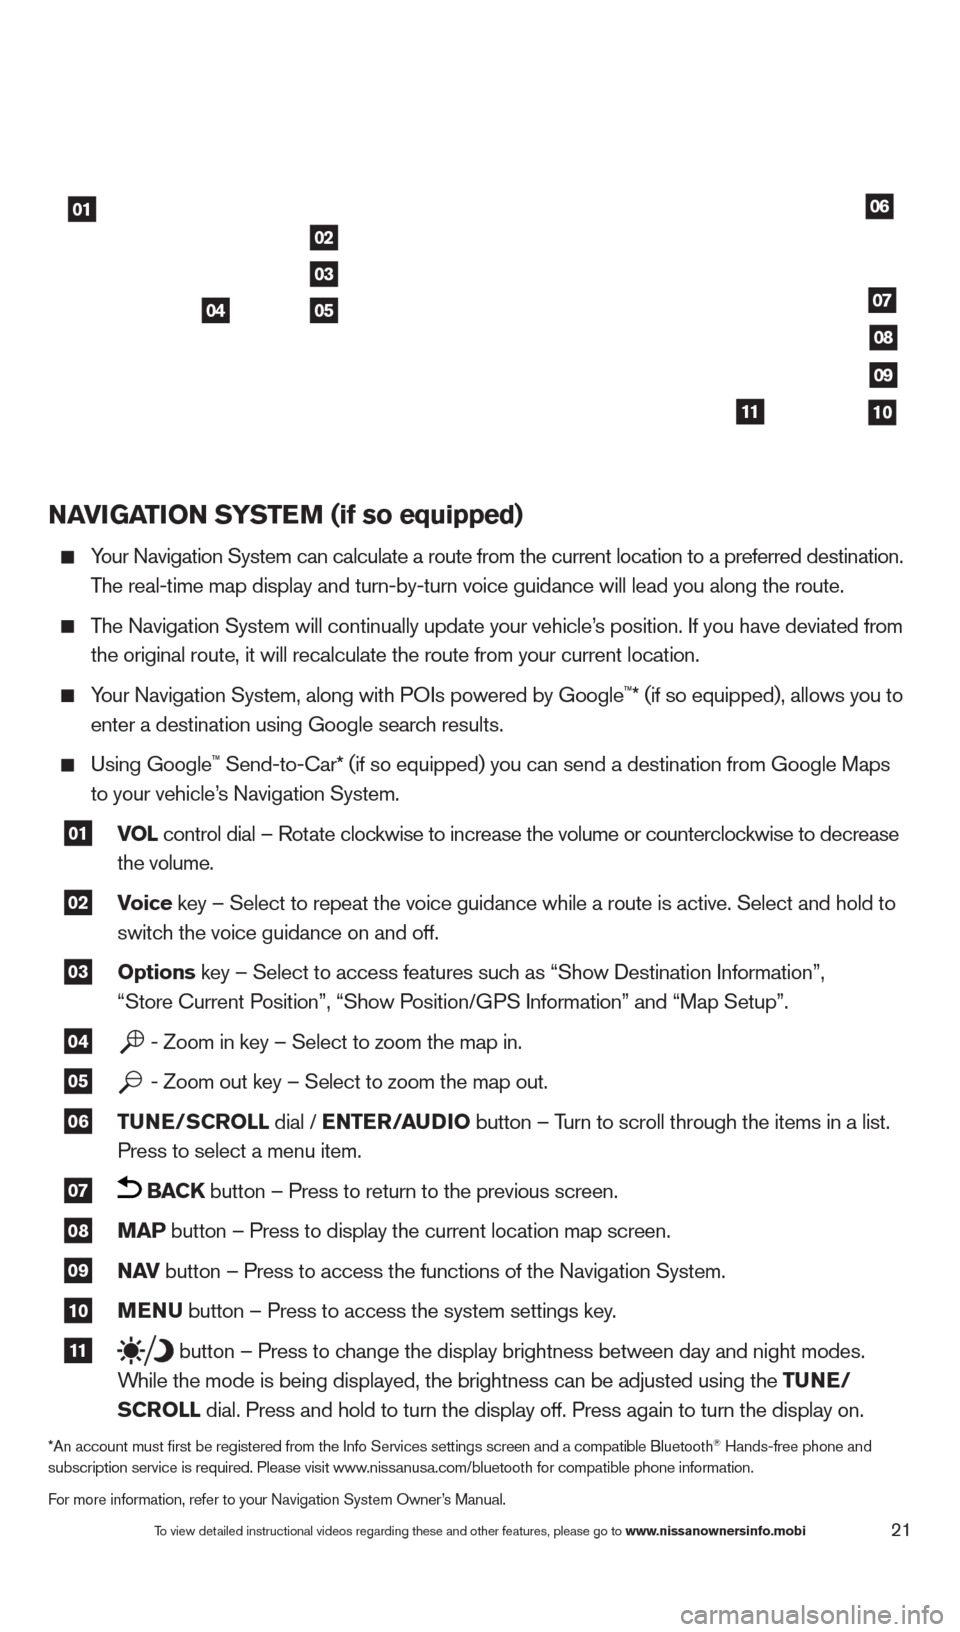
01 VOL
control dial – Rotate clockwise to increase the volume or counterclockwise to decrease
the volume.
02 Voice key – Select to repeat the voice guidance while a route is active. S\
elect and hold to
switc h the voice guidance on and off.
03 Options key – Select to access features such as “Show Destination Information”,
“Store c urrent Position”, “Show Position/GPS Information” and “Map Setup”.
04 - Zoom in key – Select to zoom the map in.
05 - Zoom out key – Select to zoom the map out.
06 TUNE/SCROLL dial / ENTER/AUDIO
button – Turn to scroll through the items in a list.
Press to select a menu item.
07 BACK button – Press to return to the previous screen.
08 MAP button – Press to display the current location map screen.
09 NAV
button – Press to access the functions of the Navigation System.
10 MENU button – Press to access the system settings key.
11 button – Press to change the display brightness between day and night modes.
W
hile the mode is being displayed, the brightness can be adjusted using t\
he TUNE/
S
CROLL dial. Press and hold to turn the display off. Press again to turn the d\
isplay on.
*An account must first be registered from the Info Services settings s\
creen and a compatible Bluetooth® Hands-free phone and
subscription service is required. Please visit www.nissanusa.com/bluetooth for compatible phone information.
For more information, refer to your Navigation System Owner’s Manual.
01
02
05
03
04
06
07
08
09
1011
To view detailed instructional videos regarding these and other features, please go\
to www.nissanownersinfo.mobi
1482394_13d_AltimaSedan_QRG_030613.indd 213/6/13 1:17 PM
Page 24 of 28
22
HOMELINK® UNIVERSAL TRANSCEIVER (if so equipped)
The HomeLink® system can learn and consolidate the functions of up to three different\
hand-held transmitters, operating items suc
h as garage doors, property gates, outdoor
and indoor lights or alarm systems.
For more information, refer to the “Instruments and controls (section 2)” of your Owner’s Manual, the HomeLink®
website at www.homelink.com or call 1-800-355-3515.
HOMELINK®
system guide
To view detailed instructional videos regarding these and other features, please go\
to www.nissanownersinfo.mobi
1482394_13d_AltimaSedan_QRG_030613.indd 223/6/13 1:17 PM