Page 433 of 602
5-64 Comfort controls
5
To listen to a CD
N00735501032
With CD player1. Press the PWR switch to turn the audio system ON andOFF. The system turns on in the last mode used.
2. Insert the disc with the label facing up. When a disc is inserted, the CD player will begin playing
even if the radio is being used. The CD player will also
begin playing when the CD button is pressed with a disc
set in the CD player or in the disc loading slot, even if the
radio is being used.NOTE� For information concerning the adjustment of volume and
tone, refer to “To adjust the volume” on page 5-48 and
“To adjust the tone” on page 5-49.
� For information concerning the handing of the compact
discs, refer to “Handling of compact discs” on page 5-100.With CD changerThe compact disc (CD) can be loaded or ejected by pressing
the LOAD button or the eject button even if the audio system
power is OFF.
1. Press the PWR switch to turn the audio system ON and OFF. The system turns on in the last mode used.
2. Press the CD button to enter CD mode. The CD changer will start playback if the CD is already in the CD changer.
3. To stop the CD, turn off the power by pressing the PWR switch or change over to radio mode by pressing the
RADIO button, or eject the disc by pressing the eject but-
ton.
NOTE� For information concerning the adjustment of volume and
tone, refer to “To adjust the volume” on page 5-48 and
“To adjust the tone” on page 5-49.
� As many as 6 CDs can be inserted into the CD changer.
� For information concerning the handing of the compact
discs, refer to “Handling of compact discs” on page 5-100.
To set a single disc 1. Press the LOAD button briefly.
2. The CD changer will show “WAIT” on the display and start making itself ready for disc loading.
3. When the CD changer is ready for disc loading, the LOAD indicator will illuminate and the display will show
“LOAD DISC No. (1-6)”.
4. When a disc is inserted into the CD slot, the disc will begin to play.NOTE� If there are multiple empty slots, you can select your
desired slot by pressing the DISC buttons.
� If you do not insert a disc for about 15 seconds after the
CD changer starts standing by for loading, the loading
standby mode will be canceled.
To set all the discs 1. Press the LOAD button for 2 seconds or longer (until you hear a beep).
2. The CD changer will select the lowest-numbered empty slot and switch to loading standby mode.
3. When the display shows “LOAD DISC No.(1-6)”, insert a disc. The CD changer will then automatically select the
next empty slot and enter loading standby mode.
BK0150700US.book 64 ページ 2012年3月22日 木曜日 午後6時46分
Page 444 of 602
Comfort controls5-75
5
5. To stop the playback, press the RADIO button or CD but-ton to switch to a different mode.NOTE� Buttons on the iPod are disabled while the iPod is con-
nected to the audio system.
� To adjust the volume and tone, refer to “To adjust the vol-
ume” on page 5-48 and “To adjust the tone” on page 5-49.To fast-forward/reverse the track
N00762500020
To fast-forward/reverse the current track, press the button
or button.
Fast-forward
To fast-forward the current track, press the button. While
the button is pressed, the track will be fast-forwarded.
Fast-reverse
To fast-reverse the current track, press the button. While the
button is pressed, the track will be fast-reversed.
To select a desired track
N00762600021
Press the TRACK button to select the desired track number.
If the side of the button is pressed once while a track is
playing, playback returns to the start of that track.NOTE�Every time the track selection button is pressed, the track
number in the display changes.Press : The track number increases by one.
Press : The track number decreases by one.
Press for a long
period (approx. 2
seconds or more) : The track number increases continu-
ously while the button is pressed.
Press for a long
period (approx. 2
seconds or more) : The track number decreases continu-
ously while the button is pressed.
BK0150700US.book 75 ページ 2012年3月22日 木曜日 午後6時46分
Page 461 of 602
5-92 Comfort controls
5
3. To deactivate the external audio input mode, press theRADIO button or the CD button to switch to another
mode.NOTE� The connected audio equipment cannot be operated with
the vehicle’s audio system.
� Depending on the connected audio equipment, it may pro-
duce noise from the speakers.
� For information on how to connect and operate the audio
equipment, refer to the owner’s manual for the equipment.
Steering wheel audio remote control switch
(if so equipped)
N00714800439
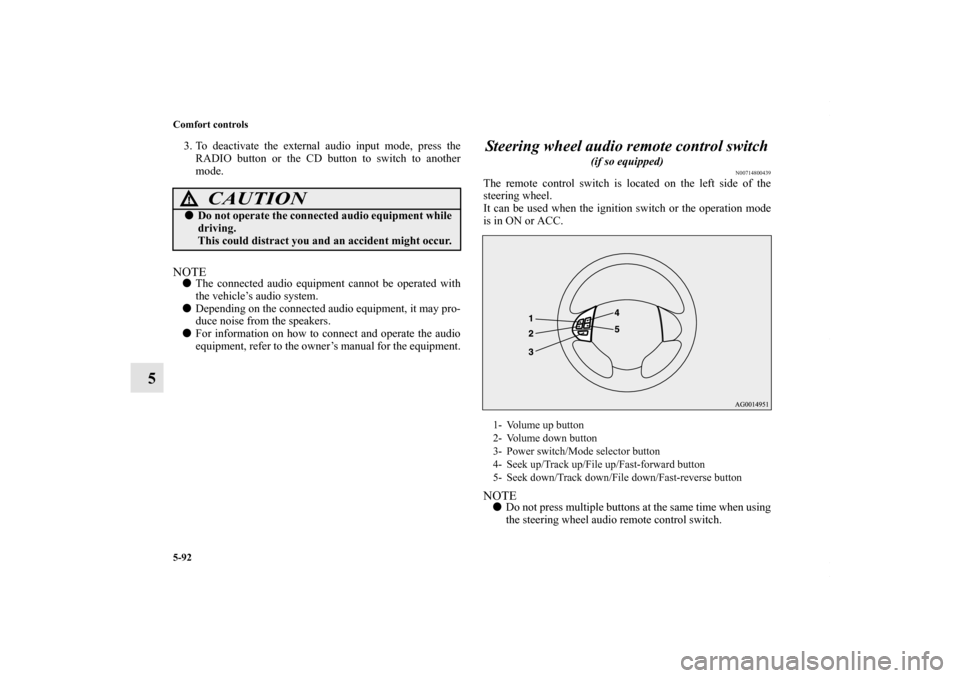
The remote control switch is located on the left side of the
steering wheel.
It can be used when the ignition switch or the operation mode
is in ON or ACC.NOTE� Do not press multiple buttons at the same time when using
the steering wheel audio remote control switch.
CAUTION
!�Do not operate the connected audio equipment while
driving.
This could distract you and an accident might occur.
1- Volume up button
2- Volume down button
3- Power switch/Mode selector button
4- Seek up/Track up/File up/Fast-forward button
5- Seek down/Track down/File down/Fast-reverse button
BK0150700US.book 92 ページ 2012年3月22日 木曜日 午後6時46分
Page 462 of 602
Comfort controls5-93
5
To turn on the powerPress the power switch to turn on the power. When the power is
turned on, the last mode used before turning off is displayed.
To turn off the power, press and hold down the power switch
for about 2 seconds until you hear a beep.Vo l u m e c o n t r o lVolume up buttonWhile the button is pressed, the volume will continue to
increase.Volume down buttonWhile the button is pressed, the volume will continue to
decrease.Mode selectionPress the mode selector button to select the desired mode.
The mode changes in the following order.
AM → FM1 → FM2 → (SAT1 → SAT2 → SAT3 → SAT4) →
CD → USB or iPod* → Bluetooth
®* → AM
*: If you connect these devices.
To listen to the radioPress the mode selector button and select AM or FM mode.Automatic tuningSeek up button / Seek down button
After pressing one of these buttons, a receivable station will be
automatically selected and reception of the station will begin.
Channel selection / Category selection (Vehicles with
satellite radio)Seek up button / Seek down button
Press the button to select the desired channel.
Pressing down the button for 2 seconds or longer will change
the system to category selection mode. While the button is
pressed, the category will change in order. When you reach the
desired category, release the button.To listen to a CDPress the mode selector button and select CD mode.To fast forward/reverse the disc (music CDs only)To fast forward or fast reverse the disc, press the fast-forward
button or the fast-reverse button.
Fast forward
You can fast forward the disc by holding down the fast-forward
button. While the button is kept pressed, the disc will be fast-
forwarded.
Fast reverse
You can fast reverse the disc by holding down the fast-reverse
button. While the button is kept pressed, the disc will be fast-
reversed.NOTE� With an MP3 CD, you can fast forward and fast reverse
tracks in the same folder.
BK0150700US.book 93 ページ 2012年3月22日 木曜日 午後6時46分
Page 472 of 602
Comfort controls5-103
5
Clock
(if so equipped)
N00755000111
The time is displayed when the ignition switch or the operation
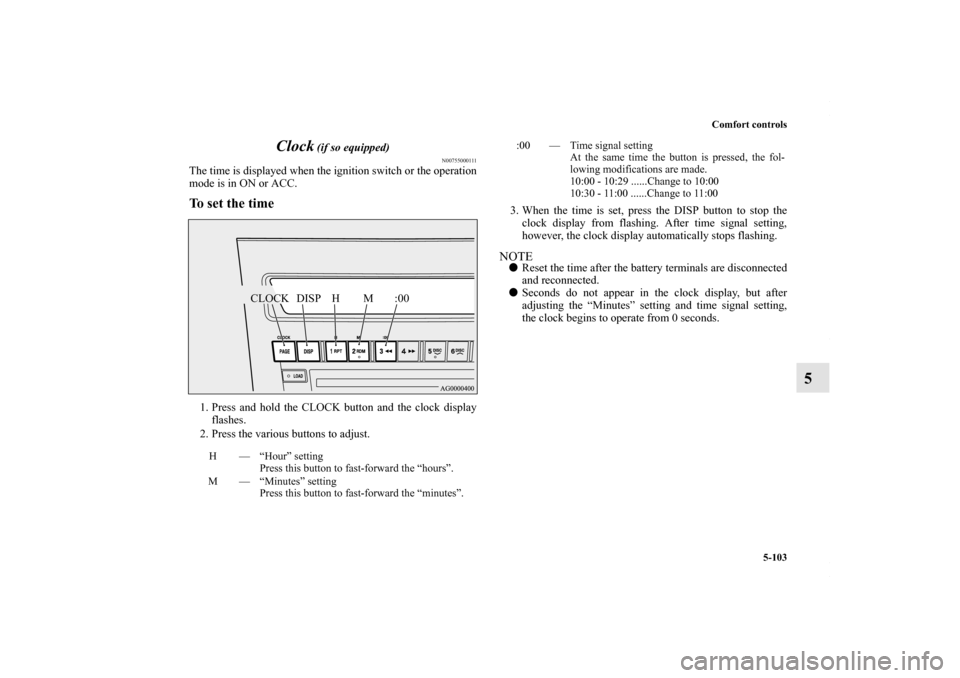
mode is in ON or ACC.To set the time1. Press and hold the CLOCK button and the clock display
flashes.
2. Press the various buttons to adjust. 3. When the time is set, press the DISP button to stop the
clock display from flashing. After time signal setting,
however, the clock display automatically stops flashing.
NOTE� Reset the time after the battery terminals are disconnected
and reconnected.
� Seconds do not appear in the clock display, but after
adjusting the “Minutes” setting and time signal setting,
the clock begins to operate from 0 seconds.
H — “Hour” setting
Press this button to fast-forward the “hours”.
M — “Minutes” setting Press this button to fast-forward the “minutes”.
CLOCK DISP H M :00
:00 — Time signal setting At the same time the button is pressed, the fol-
lowing modifications are made.
10:00 - 10:29 ......Change to 10:00
10:30 - 11:00 ......Change to 11:00
BK0150700US.book 103 ページ 2012年3月22日 木曜日 午後6時46分
Page:
< prev 1-8 9-16 17-24