Page 403 of 706

4-6 Driving safety
4Safe driving techniques
N00629200078
Even this vehicle’s safety equipment, and your safest driving,
cannot guarantee that you can avoid an accident or injury.
However, if you give extra attention to the following areas, you
can better protect yourself and your passengers:
�Drive defensively. Be aware of traffic, road and weather
conditions. Leave plenty of stopping distance between
your vehicle and the vehicle ahead.
�Before changing lanes, check your mirrors and use your
turn signal light.
�While driving, watch the behavior of other drivers, bicy-
clists, and pedestrians.
�Always obey applicable laws and regulations. Be a polite
and alert driver. Always leave room for unexpected
events, such as sudden braking.
�If you plan to drive in another country, obey their vehicle
registration laws and make sure you will be able to get the
right fuel.
Driving during cold weather
N00629400458
�Check the battery, including terminals and cables. During
extremely cold weather, the battery will not be as strong.
Also, the battery power level may drop because more
power is used for cold starting and driving.
Before driving the vehicle, check to see if the engine runs
at the proper speed and if the headlights are as bright as
normally. Charge or replace the battery if necessary. Dur-
ing extreme cold weather, it is possible that a very low
battery could freeze.
�Warm the engine sufficiently. After starting the engine,
allow a short warm-up time to distribute oil to all cylin-
ders and turbocharger. Then drive your vehicle slowly.
�Stay at low speeds at first so that the transaxle, transfer
case and rear axle oil have time to spread to all the lubri-
cation points.
�Manual transaxle can be harder to shift in cold weather
conditions. This is normal and shifting will get easier as
the transaxle warms up.
WA R N I N G
!�The battery gives off explosive hydrogen gas. Any
spark or flame can cause the battery to explode,
which could cause serious injury or death.
Always wear protective clothes and a face mask
when working with your battery, or let a skilled
mechanic do it.
BK0151000US.book 6 ページ 2012年3月29日 木曜日 午後6時8分
Page 565 of 706
 so that the jack contracts, then remove it
from the storage bracket (A).To s")
6-8 For emergencies
6
Jack
N00832700242
Before removing the jack, lift up the board.To r e m o v eTurn the shaft end (1) so that the jack contracts, then remove it
from the storage bracket (A).To s t o r eTurn the shaft end (2) by hand to expand the jack until it is held
firmly in position.
How to change a tire
N00836900718
Before changing a tire, first stop your vehicle in a safe, flat
location.
1. Park the vehicle on level and stable ground.
2. Set the parking brake firmly.
3. On vehicles equipped with manual transaxle, turn the
ignition switch to the “LOCK” position, and move the
gearshift lever to the “R” (Reverse) position.
On vehicles equipped with continuously variable trans-
mission (CVT) or Twin Clutch SST, move the selector
lever (CVT) or the gearshift lever (Twin Clutch SST) to
the “P” (PARK) position, and turn the ignition switch to
the “LOCK” position.
4. Turn on the hazard flashers and set up a warning triangle,
flashing signal light, etc., at an adequate distance from the
vehicle, and have all your passengers leave the vehicle.
WA R N I N G
!�The jack should not be used for any purpose other
than to change a tire. �Never get under the vehicle or put any portion of
your body under the vehicle while it is supported by
the jack.
BK0151000US.book 8 ページ 2012年3月29日 木曜日 午後6時8分
Page 638 of 706
![MITSUBISHI LANCER SPORTBACK 2013 8.G Owners Manual Vehicle care and maintenance
7-57
7
[For vehicles without high intensity discharge headlights] [For vehicles equipped with high intensity discharge head-
lights]
Description
Wattage
ANSI Trade
No. or](/manual-img/19/7504/w960_7504-637.png "MITSUBISHI LANCER SPORTBACK 2013 8.G Owners Manual Vehicle care and maintenance
7-57
7
[For vehicles without high intensity discharge headlights] [For vehicles equipped with high intensity discharge head-
lights]
Description
Wattage
ANSI Trade
No. or")
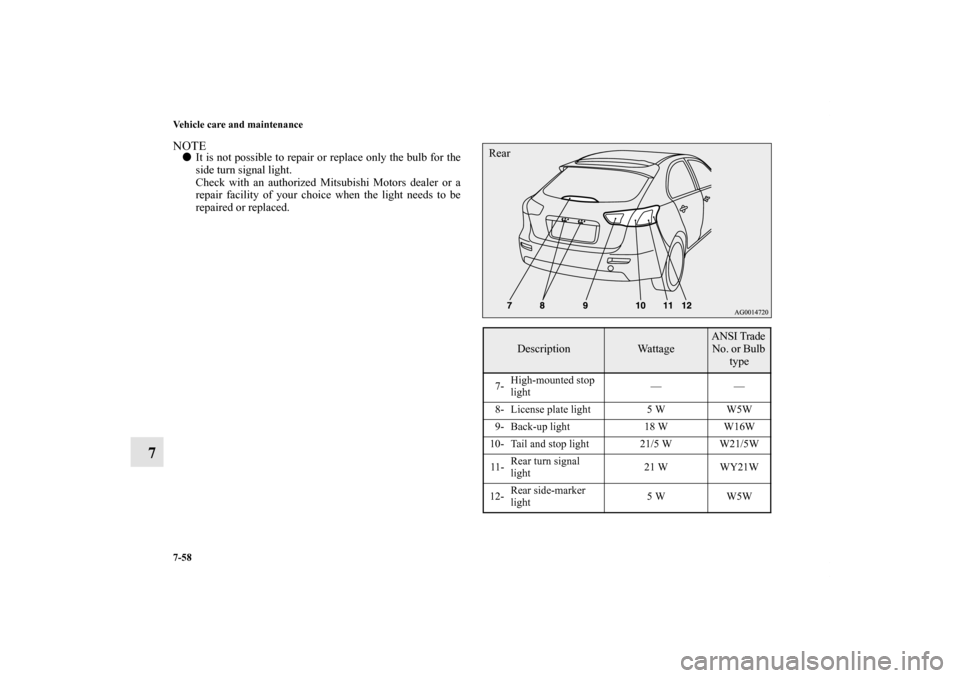
Vehicle care and maintenance
7-57
7
[For vehicles without high intensity discharge headlights] [For vehicles equipped with high intensity discharge head-
lights]
Description
Wattage
ANSI Trade
No. or Bulb
type
1-Front turn signal
light21 W WY21W
2- Headlight, high beam 60 W9005
HB3
3-Headlight, low beam
(Halogen bulb)51 W9006
HB4
4- Front fog light 55 W H11
5-Front side-marker
and parking light5 W WY5W
6- Side turn signal light 5 W —
Description
Wattage or Candle
power
ANSI Trade
No. or Bulb
type
1-Front turn signal
light21 W WY21W
2-Daytime running
light27 W
32 cp1156
3-Headlight, low/high
beam (Discharge
bulb)35 W —
4- Front fog light 55 W H11
5-Front side-marker
and parking light5 W WY5W
6- Side turn signal light 5 W —
WA R N I N G
!�Check with an authorized Mitsubishi Motors dealer
or a repair facility of your choice when it is neces-
sary to repair a discharge headlight or to replace the
bulb.
The power circuit, bulb and electrodes generate high
voltages that may cause a severe electrical shock.
BK0151000US.book 57 ページ 2012年3月29日 木曜日 午後6時8分
Page 639 of 706
7-58 Vehicle care and maintenance
7
NOTE�It is not possible to repair or replace only the bulb for the
side turn signal light.
Check with an authorized Mitsubishi Motors dealer or a
repair facility of your choice when the light needs to be
repaired or replaced.
Description
Wattage
ANSI Trade
No. or Bulb
type
7-High-mounted stop
light——
8- License plate light 5 W W5W
9- Back-up light 18 W W16W
10- Tail and stop light 21/5 W W21/5W
11-Rear turn signal
light21 W WY21W
12-Rear side-marker
light5 W W5WRear
BK0151000US.book 58 ページ 2012年3月29日 木曜日 午後6時8分
Page 652 of 706
Vehicle care and maintenance
7-71
7
5. To install the bulb, perform the removal steps in reverse.
Front turn signal lights
N00943400325
1. Remove the clips (A) and clips (B), then remove the duct
(C) and the upper cover (D).Except for vehicles with turbocharger
BK0151000US.book 71 ページ 2012年3月29日 木曜日 午後6時8分
Page 662 of 706
Vehicle care and maintenance
7-81
7
Rear combination lights
N00943700429
Tail and stop lights, rear turn signal lights and rear
side-marker lights1. Insert a screwdriver at the edge of the cover and pry gen-
tly to remove the cover. NOTE�Wrap a cloth around the tip of the screwdriver to keep
from scratching the cover.2. Remove the socket and bulb assemblies by turning them
counterclockwise.
A- Rear side-marker light
B- Rear turn signal light
C- Tail and stop light
BK0151000US.book 81 ページ 2012年3月29日 木曜日 午後6時8分
Page 663 of 706
7-82 Vehicle care and maintenance
7
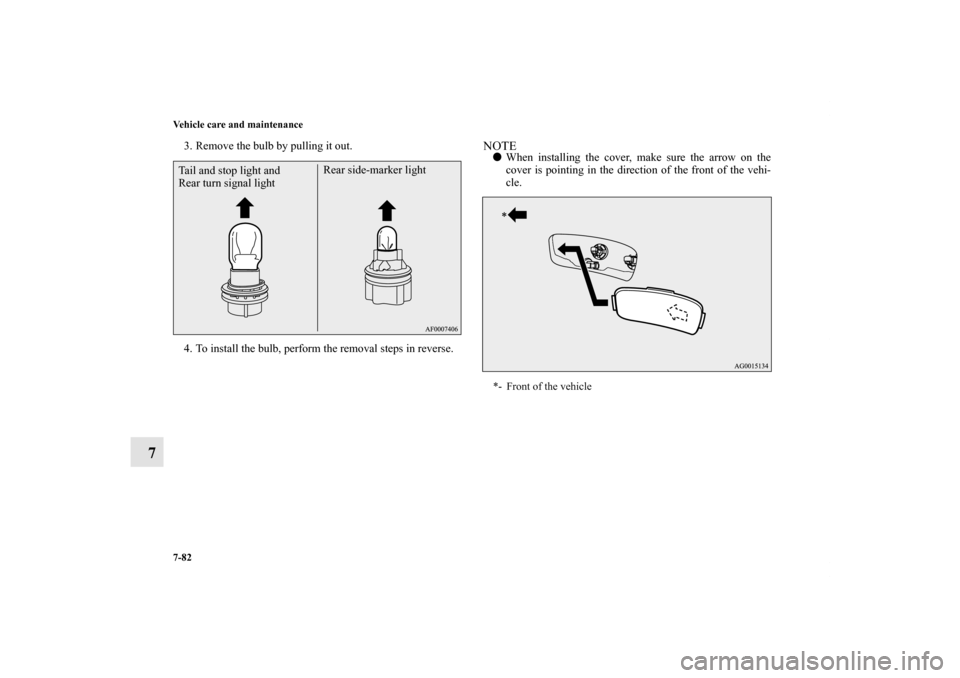
3. Remove the bulb by pulling it out.
4. To install the bulb, perform the removal steps in reverse.
NOTE�When installing the cover, make sure the arrow on the
cover is pointing in the direction of the front of the vehi-
cle.
Tail and stop light and
Rear turn signal lightRear side-marker light
*- Front of the vehicle
BK0151000US.book 82 ページ 2012年3月29日 木曜日 午後6時8分
Page 700 of 706
 3-4
,3-42
Emission-control system m")
Alphabetical index
3
Dual height adjustable cargo floor board 3-302
E
Electric rear window defogger switch 3-251
Electronic immobilizer (Anti-theft starting system) 3-4
,3-42
Emission-control system maintenance 7-41
Engine
Compartment 7-7
Coolant 7-11
,9-10
Hood 7-4
Oil and oil filter 7-8
,9-10
Overheating 6-5
Serial number 9-4
Specifications 9-8
Engine coolant temperature display 3-187
Exhaust system 7-44
External audio input connector 5-125
F
Filling the fuel tank 1-4
Floor console box 3-298
Floor mat 4-3
Fluid 9-10
AWC control fluid 7-19
,9-10
Brake fluid 7-21
,9-10
Clutch fluid 7-21,9-10
Continuously variable transmission (CVT) fluid 7-17
,9-10
Engine coolant 7-11
,9-10
Power steering fluid 7-22
,9-10Twin Clutch SST fluid 7-18
,9-10
Washer fluid 9-10
Fluid capacities and lubricants 9-10
Fog lights
Bulb capacity 7-56
Indicator 3-224
Replacement 7-73
,7-77
Switch 3-241
Free-hand advanced security transmitter (F.A.S.T.-key) 3-16
Front console boxes 3-297
Front console tray 3-296
Front seats 2-3
Front side-marker and parking light
Bulb capacity 7-56
Replacement 7-67,7-69
Front turn signal lights
Bulb capacity 7-56
Replacement 7-71
Fuel
Fuel economy 4-2
Fuel hoses 7-42
Modification/alterations to the electrical or fuel systems 1-9
Tank capacity 1-5,9-10
Fuel selection 1-2
Fuses 7-46
Fusible links 7-46
G
General maintenance 7-43
BK0151000US.book 3 ページ 2012年3月29日 木曜日 午後6時8分
 and clips (B), then remove the duct
(C)")