Page 263 of 706
3-170 Features and controls
3
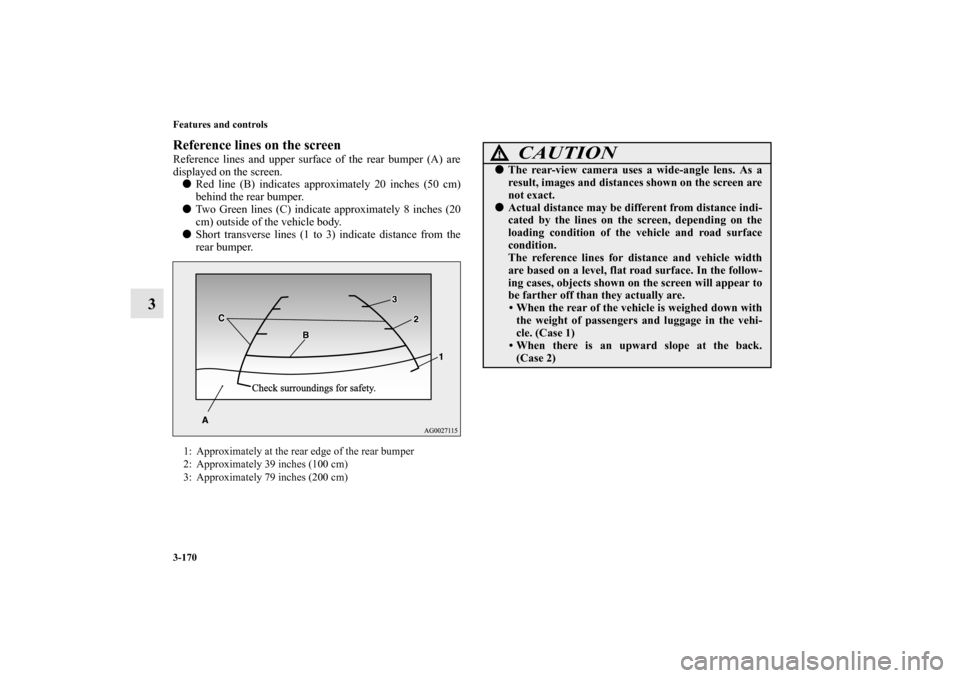
Reference lines on the screenReference lines and upper surface of the rear bumper (A) are
displayed on the screen.
�Red line (B) indicates approximately 20 inches (50 cm)
behind the rear bumper.
�Two Green lines (C) indicate approximately 8 inches (20
cm) outside of the vehicle body.
�Short transverse lines (1 to 3) indicate distance from the
rear bumper.1: Approximately at the rear edge of the rear bumper
2: Approximately 39 inches (100 cm)
3: Approximately 79 inches (200 cm)
CAUTION
!�The rear-view camera uses a wide-angle lens. As a
result, images and distances shown on the screen are
not exact.�Actual distance may be different from distance indi-
cated by the lines on the screen, depending on the
loading condition of the vehicle and road surface
condition.
The reference lines for distance and vehicle width
are based on a level, flat road surface. In the follow-
ing cases, objects shown on the screen will appear to
be farther off than they actually are.
• When the rear of the vehicle is weighed down with
the weight of passengers and luggage in the vehi-
cle. (Case 1)
• When there is an upward slope at the back.
(Case 2)
BK0151000US.book 170 ページ 2012年3月29日 木曜日 午後6時8分
Page 406 of 706

Driving safety
4-9
4 Loading information
N00629900323
It is very important to know how much weight your vehicle can
carry. This weight is called the vehicle capacity weight and
includes the weight of all occupants, cargo and non-factory-
installed options. The tire and loading information placard
located on the driver’s door sill of your vehicle will show how
much weight it may properly carry.
It is important to familiarize yourself with the following terms
before loading your vehicle:
�Vehicle maximum load on the tire: load on an individual
tire that is determined by distributing to each axle its share
of the maximum loaded vehicle weight and dividing by
two.
�Vehicle normal load on the tire: load on an individual tire
that is determined by distributing to each axle its share of
the curb weight, accessory weight, and normal occupant
weight and dividing by two.
�Maximum loaded vehicle weight: the sum of -
(a) Curb weight;
(b) Accessory weight;
(c) Vehicle capacity weight; and
(d) Production options weight.�Curb weight: the weight of a motor vehicle with standard
equipment including the maximum capacity of fuel, oil,
and coolant.
�Accessory weight: the combined weight (in excess of
those standard items which may be replaced) of automatic
transmission, power steering, power brakes, power win-
dows, power seats, radio, and heater, to the extent that
these items are available as factory- installed equipment
(whether installed or not).
�Vehicle capacity weight: the rated cargo and luggage load
plus 150 lbs (68 kg)* times the vehicle’s designated seat-
ing capacity.
�Production options weight: the combined weight of those
installed regular production options weighing over 5 lbs
(2.3 kg) in excess of those standard items which they
replace, not previously considered in curb weight or
accessory weight, including heavy duty brakes, ride level-
ers, roof rack, heavy duty battery, and special trim.
�Normal occupant weight: 150 lbs (68 kg)* times the num-
ber of specified occupants. (In your vehicle the number is
3)
�Occupant distribution: distribution of occupants in a vehi-
cle as specified. (In your vehicle the distribution is 2 in
front, 1 in second row seat)
WA R N I N G
!�Never overload your vehicle. Overloading can dam-
age your vehicle, adversely affect vehicle perfor-
mance, including handling and braking, cause tire
failure, and result in an accident.
*: 150 lbs (68 kg) is the weight of one person as defined by
U.S.A. and Canadian regulations.
BK0151000US.book 9 ページ 2012年3月29日 木曜日 午後6時8分
Page 407 of 706
4-10 Driving safety
4
Tire and loading information placard
N00630100341
The tire and loading information placard is located on the
driver’s door sill. This placard shows the maximum number of occupants permit-
ted to ride in your vehicle as well as “the combined weight of
occupants and cargo” (A), which is called the vehicle capacity
weight. The weight of roof road is included in the definition of
“cargo” when determining the vehicle capacity weight. This
placard also tells you the size and recommended inflation pres-
sure for the original equipment tires on your vehicle. For more
information, refer to “Tires” on page 7-29.
Ty p e 1
BK0151000US.book 10 ページ 2012年3月29日 木曜日 午後6時8分
Page 408 of 706
Driving safety
4-11
4
Ty p e 2
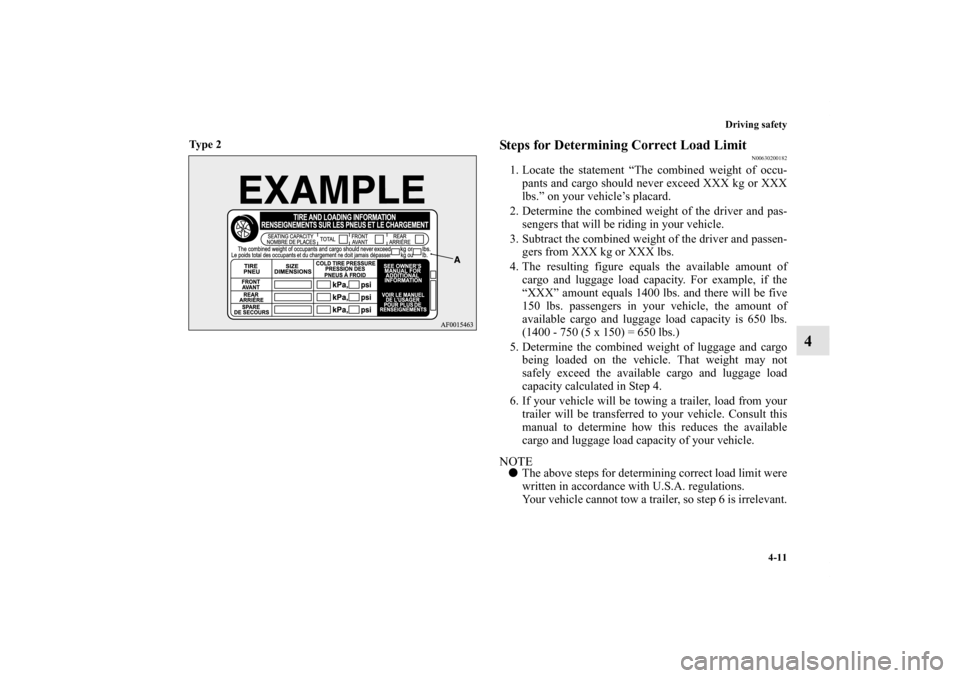
Steps for Determining Correct Load Limit
N00630200182
1. Locate the statement “The combined weight of occu-
pants and cargo should never exceed XXX kg or XXX
lbs.” on your vehicle’s placard.
2. Determine the combined weight of the driver and pas-
sengers that will be riding in your vehicle.
3. Subtract the combined weight of the driver and passen-
gers from XXX kg or XXX lbs.
4. The resulting figure equals the available amount of
cargo and luggage load capacity. For example, if the
“XXX” amount equals 1400 lbs. and there will be five
150 lbs. passengers in your vehicle, the amount of
available cargo and luggage load capacity is 650 lbs.
(1400 - 750 (5 x 150) = 650 lbs.)
5. Determine the combined weight of luggage and cargo
being loaded on the vehicle. That weight may not
safely exceed the available cargo and luggage load
capacity calculated in Step 4.
6. If your vehicle will be towing a trailer, load from your
trailer will be transferred to your vehicle. Consult this
manual to determine how this reduces the available
cargo and luggage load capacity of your vehicle.NOTE�The above steps for determining correct load limit were
written in accordance with U.S.A. regulations.
Your vehicle cannot tow a trailer, so step 6 is irrelevant.
BK0151000US.book 11 ページ 2012年3月29日 木曜日 午後6時8分
Page 409 of 706
4-12 Driving safety
4
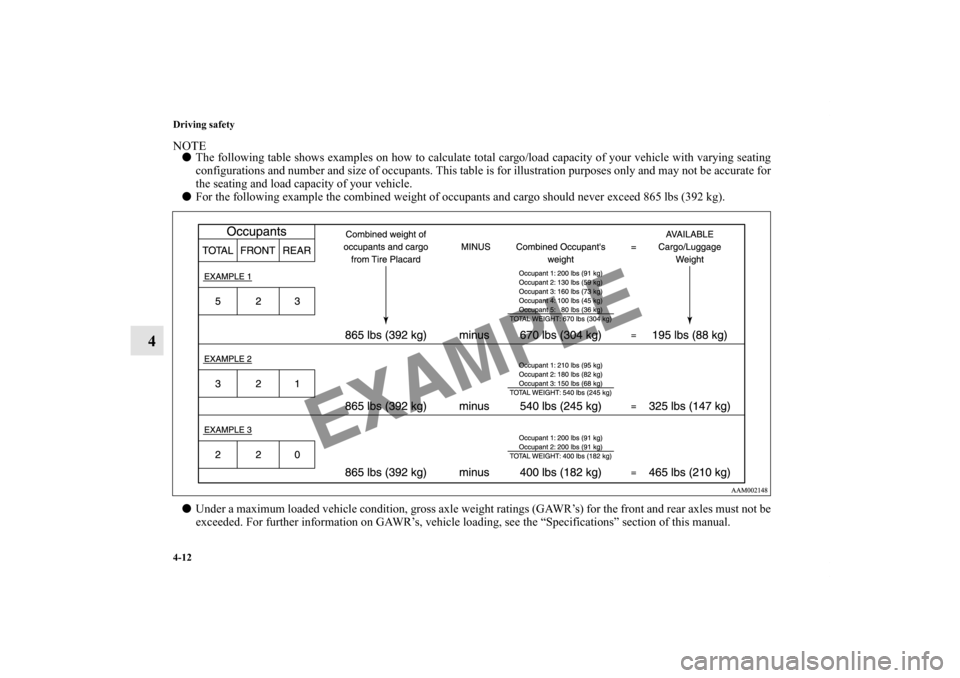
NOTE�The following table shows examples on how to calculate total cargo/load capacity of your vehicle with varying seating
configurations and number and size of occupants. This table is for illustration purposes only and may not be accurate for
the seating and load capacity of your vehicle.
�For the following example the combined weight of occupants and cargo should never exceed 865 lbs (392 kg).
�Under a maximum loaded vehicle condition, gross axle weight ratings (GAWR’s) for the front and rear axles must not be
exceeded. For further information on GAWR’s, vehicle loading, see the “Specifications” section of this manual.
BK0151000US.book 12 ページ 2012年3月29日 木曜日 午後6時8分
Page 410 of 706

Driving safety
4-13
4 Cargo loads
N00629700493
Cargo load precautionsTo determine the cargo load capacity for your vehicle, subtract
the weight of all vehicle occupants from the vehicle capacity
weight. For added information, if needed, refer to “Steps for
Determining Correct Load Limit” on page 4-11.
DO NOT USE the Gross Vehicle Weight Rating and Gross
Axle Weight Rating numbers listed on the safety certification
label (A) located on the inside sill of the driver’s door as the
guide for passengers and/or cargo weight.
WA R N I N G
!�To reduce the risk of serious injury or death, the
combined weights of the driver, passengers and
cargo and must never exceed the vehicle capacity
weight.�Exceeding the vehicle capacity weight will adversely
affect vehicle performance, including handling and
braking, and may cause an accident.�Do not load cargo or luggage higher than the top of
the seatback. Be sure that your cargo or luggage
cannot move when your vehicle is in motion.
Having either the rear view blocked, or your cargo
being thrown inside the cabin if you suddenly have
to brake can cause a serious accident or injury or
death.�Put cargo or luggage in the cargo area of your vehi-
cle. Try to spread the weight evenly.
BK0151000US.book 13 ページ 2012年3月29日 木曜日 午後6時8分
Page 411 of 706
4-14 Driving safety
4
Loading cargo on the roof
N00630400083
NOTE�To prevent wind noise or reduction in gas mileage,
remove the roof carrier when not in use.
�Before using an automatic car wash, check with the atten-
dant to determine if the roof carrier should be removed.
�Be sure that adequate clearance is maintained for raising
the sunroof and/or rear hatch when installing a roof car-
rier. (For vehicle with sunroof only)
WA R N I N G
!�Weight placed on the roof of the vehicle will raise the
vehicle’s center of gravity and adversely affect its
handling characteristics. As a result, driving errors
or emergency maneuvers could lead to a loss of con-
trol and result in an accident. Drive slowly and
avoid excessive maneuvers such as sudden braking
or quick turning.�Make sure that the weight of luggage and the roof
carrier do not exceed the maximum roof load, 110 lb
(50 kg). If the maximum roof load is exceeded, this
could cause damage to the vehicle or result in an
accident.�The total weight of all occupants and luggage,
including your roof load, must not exceed the vehicle
capacity weight. For more information, refer to
“Tire and loading information placard” on page 9-4.�Roof load is determined by adding the weight of the
roof carrier and the weight of the luggage placed on
the roof carrier.�For additional information, refer to “Maximum roof
load” on page 9-7.
CAUTION
!�Do not load luggage directly onto the roof. Use a roof
carrier that properly fits your vehicle.
For installation, refer to the instruction manual pro-
vided with the roof carrier.�Place the luggage on the carrier so that its weight is
distributed evenly with the heaviest items on the
bottom. Do not load items that are wider than the
roof carrier.�Before driving and after traveling a short distance,
always check the load to make sure it is securely fas-
tened to the roof carrier.
Stop the vehicle periodically and check that the load
remains secure. If the load is not secure, it could fall
from the vehicle and damage your vehicle, another
vehicle or create a road hazard.
BK0151000US.book 14 ページ 2012年3月29日 木曜日 午後6時8分
Page 566 of 706
For emergencies
6-9
6
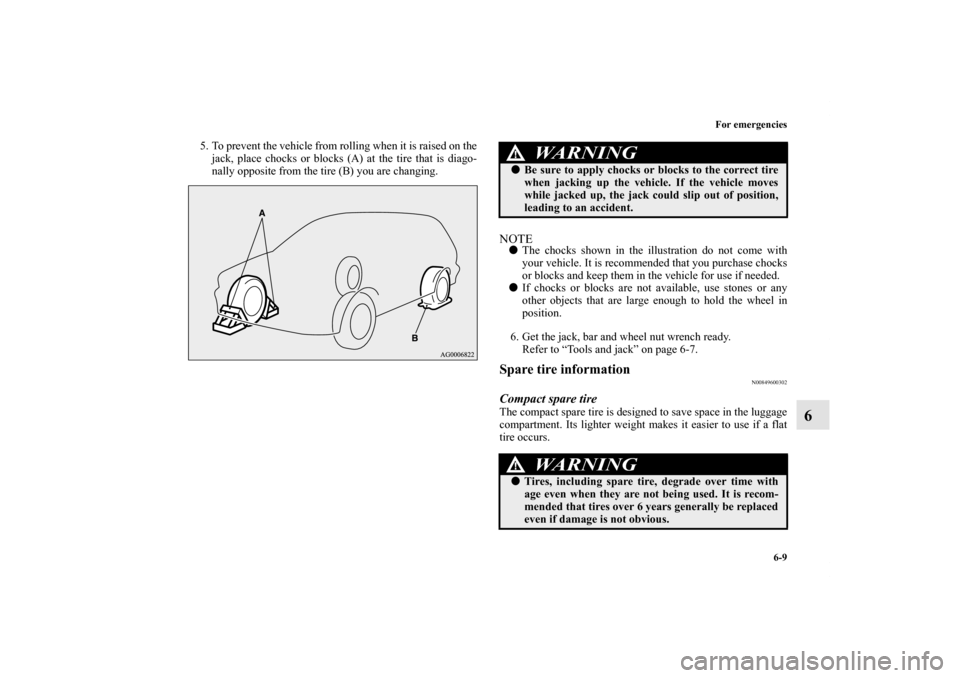
5. To prevent the vehicle from rolling when it is raised on the
jack, place chocks or blocks (A) at the tire that is diago-
nally opposite from the tire (B) you are changing.
NOTE�The chocks shown in the illustration do not come with
your vehicle. It is recommended that you purchase chocks
or blocks and keep them in the vehicle for use if needed.
�If chocks or blocks are not available, use stones or any
other objects that are large enough to hold the wheel in
position.
6. Get the jack, bar and wheel nut wrench ready.
Refer to “Tools and jack” on page 6-7.Spare tire information
N00849600302
Compact spare tireThe compact spare tire is designed to save space in the luggage
compartment. Its lighter weight makes it easier to use if a flat
tire occurs.
WA R N I N G
!�Be sure to apply chocks or blocks to the correct tire
when jacking up the vehicle. If the vehicle moves
while jacked up, the jack could slip out of position,
leading to an accident.
WA R N I N G
!�Tires, including spare tire, degrade over time with
age even when they are not being used. It is recom-
mended that tires over 6 years generally be replaced
even if damage is not obvious.
BK0151000US.book 9 ページ 2012年3月29日 木曜日 午後6時8分