Page 298 of 626

N00542800038
The direction of the headlight beam (the direction which the
light shines in) alters according to the number of")
Features and controls
3-211
3
Headlights leveling switch
(if so equipped)
N00542800038
The direction of the headlight beam (the direction which the
light shines in) alters according to the number of people and
the load in the vehicle. Lower the headlight angle if it is too
high due to the number of people and/or the load in the vehicle
so that the headlights’ glare does not distract the drivers of
approaching vehicles. First set the light switch to the “ ”
position, then turn the headlight leveling switch knob to lower
the beam. The greater the number on the headlight leveling
switch knob, the lower the beam will point.
Set the switch to the appropriate position so that the headlight
beam is level with the road.
NOTE�Start adjusting when the knob is at the “0” position (when
the beam is at its highest).
�Keep the knob in the “0” position except when using the
knob to lower the headlight beam angle.
�Always return the knob to the “0” position when the load
is removed and the people have left the vehicle.
WA R N I N G
!�To avoid distraction while driving, always perform
headlight adjustments before vehicle operation.
BK0150900US.book 211 ページ 2012年5月7日 月曜日 午後12時9分
Page 299 of 626
. It will return to the neu-
tral posi")
3-212 Features and controls
3Turn signal lever
N00522600476
When changing lanes, or to making a gradual turn, hold the
lever in the “lane change” position (1). It will return to the neu-
tral position when you let go. Use the full position (2) when
making a normal turn. The lever will return to the neutral posi-
tion when the turn is complete. There may be times when the
lever does not return to the neutral position. This usually hap-
pens when the steering wheel is turned only slightly. You can
easily return the lever by hand.
Also, when you move the lever to (1) slightly then release it,
the turn signal lights and the indicator light in the instrument
cluster will flash three times.
NOTE�A light in the instrument panel flashes to show when the
front and rear turn signal lights are working properly.
If this light flashes faster than usual, check for a burned
out turn signal light bulb or malfunctioning connection in
the signal.
If the panel light does not come on when the lever is
moved, check for a blown fuse or a burned out bulb in the
panel.
Have the system inspected by your authorized Mitsubishi
Motors dealer or a repair facility of your choice.
�It is possible to modify functions as follows:
• Deactivate the turn signal light 3-flash function for lane
changes.
• Adjust the time required to operate the lever for the 3-
flash function.
For further information, please contact your authorized
Mitsubishi Motors dealer.
On vehicles equipped with Mitsubishi Multi-Communica-
tion System, screen operations can be used to make the
adjustment.
Refer to the separate owner’s manual for details.
BK0150900US.book 212 ページ 2012年5月7日 月曜日 午後12時9分
Page 300 of 626

Features and controls
3-213
3 Hazard warning flasher switch
N00522700288
If you press the flasher switch, the front and rear turn signals
will flash intermittently, and so will the hazard warning lights.
This is an emergency warning system and should not be used
when the vehicle is in motion, except for emergencies.
If you need to leave your vehicle, the flashers will keep work-
ing after the ignition switch is turned off.NOTE�If the flashers are used for several hours, the battery will
run down. This could make it difficult or impossible to
restart your vehicle.
Front fog light switch
N00522800351
The front fog lights illuminate only when the headlights are on
low beam.
Turning the knob in the direction of the “ON” position turns on
the front fog lights as well as the indicator in the instrument
cluster. To turn them off, turn the knob in the direction of the
“OFF” position.
The knob will return to the neutral position when it is released.NOTE�If the headlights are switched to high beam, the front fog
lights will go out; they will illuminate again when the
headlights are switched back to low beam.
BK0150900US.book 213 ページ 2012年5月7日 月曜日 午後12時9分
Page 301 of 626

3-214 Features and controls
3
�If the light switch is rotated to the “OFF” or “ ” posi-
tion while the front fog lights are illuminated, they will
automatically turn off. They can be turned back on again
by rotating the combination headlights and dimmer switch
back to “ ” position, and turning the knob in the direc-
tion of the “ON” position.
�Do not use fog lights except in conditions of fog, other-
wise excessive light glare may temporarily blind oncom-
ing vehicle drivers.
Wiper and washer switch
N00523000581
Windshield wipersExcept for vehicles equipped with rain sensorThe windshield wiper and washer can be operated with the
ignition switch in the “ON” or “ACC” position.
If the blades are frozen to the windshield, do not operate the
wipers until the ice has melted and the blades are freed, other-
wise the wiper motor may be damaged.
CAUTION
!�If the washer is used in cold weather, the washer
fluid sprayed against the glass may freeze, which
may hinder visibility. Warm the glass with the
defroster before using the washer.
BK0150900US.book 214 ページ 2012年5月7日 月曜日 午後12時9分
Page 305 of 626

3-218 Features and controls
3
NOTE�To protect the rubber parts of the wipers, this operation of
the wipers does not take place when the vehicle is station-
ary and the ambient temperature is about 32 °F (0 °C) or
lower.
�Do not cover the sensor by affixing a sticker or label to the
windshield. Also, do not put any water-repellent coating
on the windshield. The rain sensor would not be able to
detect the extent of rain, and the wipers might stop work-
ing normally.
�In the following cases, the rain sensor may be malfunc-
tioning. Have the vehicle checked at an authorized
Mitsubishi Motors dealer or a repair facility of your
choice
• When the wipers operate at a constant interval despite
changes in the extent of rain.
• When the wipers do not operate even though it is rain-
ing.
�The wipers may automatically operate when things such
as insects or foreign objects are affixed to the windshield
on top of the rain sensor or when the windshield is frozen.
Objects affixed to the windshield will stop the wipers
when the wipers cannot remove them. To operate the wip-
ers again, move the lever to the “LO” or “HI” position.
Also, the wipers may operate automatically due to strong
direct sunlight or electromagnetic wave. To stop the wip-
ers, move the lever to the “OFF” position.
�Contact an authorized Mitsubishi Motors dealer or a
repair facility of your choice when replacing the wind-
shield glass.To adjust the sensitivity of the rain sensor
With the lever in the “AUTO” (rain sensor) position, it is possi-
ble to adjust the sensitivity of the rain sensor by turning the
knob (C).
“+”- Higher sensitivity to rain
“-”- Lower sensitivity to rain
C
BK0150900US.book 218 ページ 2012年5月7日 月曜日 午後12時9分
Page 309 of 626
3-222 Features and controls
3
�Replace the wiper blades when they are worn. Use the
proper size replacement blades. For further information,
please contact your authorized Mitsubishi Motors dealer.
Electric rear window defogger switch
N00523700360
The rear window defogger can be used when the engine is run-
ning.
The indicator light (A) will come on when you press the elec-
tric rear window defogger switch. Electric current will flow
through the heating wires on the rear window to help clear
away moisture or frost.
After about 20 minutes of operation, the system will shut off
automatically.
To switch the defogger OFF before 20 minutes have passed,
press the switch again. The indicator light will go out and the
defogger will turn off.
If you need the defogger for more than 20 minutes, press the
switch again. This will add 20 more minutes.
BK0150900US.book 222 ページ 2012年5月7日 月曜日 午後12時9分
Page 310 of 626
Features and controls
3-223
3
NOTE�If your vehicle is equipped with heated mirrors, mist can
also be removed from the outside rearview mirrors when
the rear window defogger switch is pressed. (Refer to
“Heated mirror” on page 3-83.)
Horn switch
N00523800130
To honk the horn, press the “ ” mark on the steering wheel.
CAUTION
!�The rear window defogger is not designed to melt
snow. Remove any snow manually before using the
rear window defogger.�Use the rear window defogger only after the engine
has started and is running. Be sure to turn the
defogger switch off immediately after the window is
clear to save on battery power.�Do not place stickers, tape, or other items that are
attached with adhesive over the grid wires on the
rear window.�When cleaning the inside rear window, use a soft
cloth and wipe lightly over the grid wires.
BK0150900US.book 223 ページ 2012年5月7日 月曜日 午後12時9分
Page 346 of 626
Features and controls
3-259
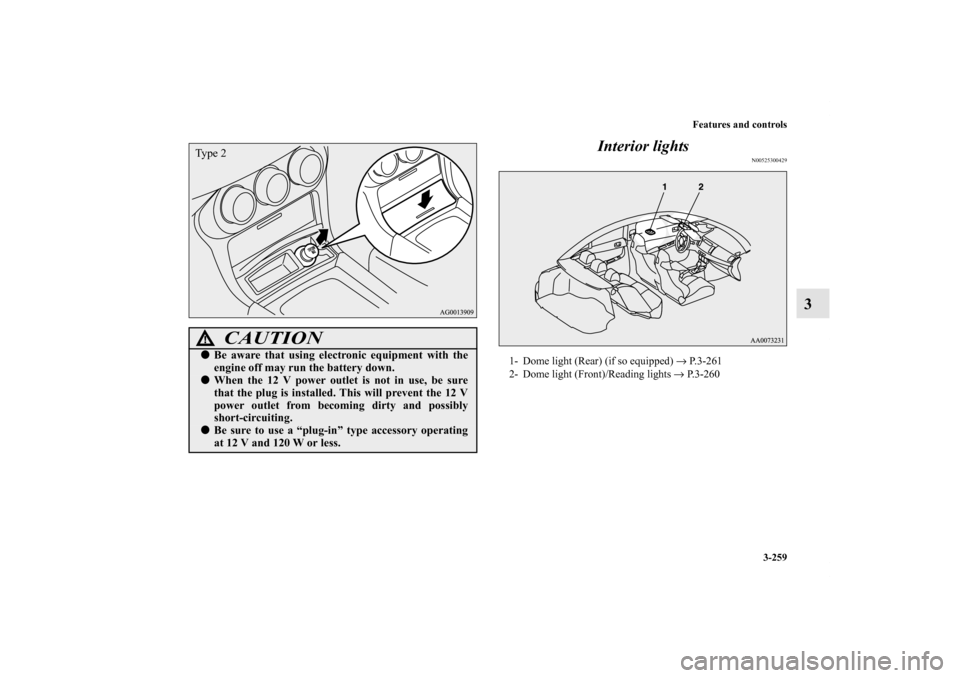
3 Interior lights
N00525300429
CAUTION
!�Be aware that using electronic equipment with the
engine off may run the battery down.�When the 12 V power outlet is not in use, be sure
that the plug is installed. This will prevent the 12 V
power outlet from becoming dirty and possibly
short-circuiting.�Be sure to use a “plug-in” type accessory operating
at 12 V and 120 W or less.Ty p e 2
1- Dome light (Rear) (if so equipped) → P.3-261
2- Dome light (Front)/Reading lights → P. 3 - 2 6 0
BK0150900US.book 259 ページ 2012年5月7日 月曜日 午後12時9分